

TrueNAS Mini R Basic Rack
Entwodiksyon
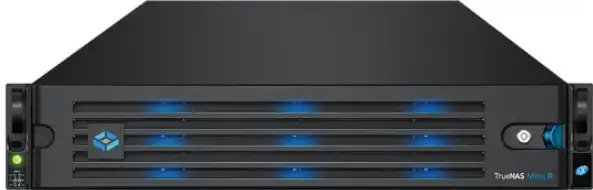
- TrueNAS Mini R a se yon etalaj depo 2U ki gen douz (12) baie kondwi 3.5” cho-chanjable ak opsyon pou chwazi ant etajè oswa aliye Desktop.
- Sistèm ou a vini ak sistèm operasyon TrueNAS la prechaje.
- Review konsiderasyon sekirite yo ak kondisyon anvan ou manyen Mini R la oswa enstale li nan yon etajè.
Sekirite
- AVÈTISMAN: The TrueNAS Mini products use a Closed Cap style CMOS battery, which is a non-consumer replaceable part due to regulatory requirements.
- Replacement should be performed by a qualified individual in a child-free environment. Contact our support services via support@truenas.com si ranplasman nesesè.
- Retire epi resikle imedyatman oswa jete pil yo itilize dapre règleman lokal yo epi kenbe yo lwen timoun yo. PA jete pil nan fatra kay oswa boule yo.
- Menm pil yo itilize ka lakòz blesi grav oswa lanmò.
- Rele yon sant kontwòl pwazon lokal pou enfòmasyon sou tretman.
- Kalite batri konpatib (CR2032).
- Nominal Voltage nan 3V.
- Pil ki pa rechargeable yo pa dwe rechaje.
- Do not force recharge, disassemble, heat above (Manufacturer’s specified temperature rating) or incinerate. Doing so may result in injury due to venting, leaking or explosion resulting in chemical burns.
- Nou rekòmande pou omwen de moun leve yon sistèm TrueNAS.
- Avètisman: Never attempt to lift a TrueNAS system loaded with drives! Install the system in a rack before adding drives. Remove drives before unracking the system.
- Kenbe sistèm nan sou kote yo oswa anba chak fwa sa posib. Toujou fè atansyon ak kabl oswa konektè ki lach epi evite pense oswa frape eleman sa yo chak fwa sa posib.
- Dokiman sa a sèvi ak "gòch" ak "dwat" selon pèspektiv ou lè w ap fè fas a devan yon sistèm oswa yon etajè.
Kondisyon
- We recommend these tools when installing a Mini R system in a rack.
- # 2 Philips tournevis tèt
- Nivo
System Specifications and Compliance
| Mini R Specifications | |
| Dimansyon (H x W x L) | 3.43 in x 17.2 in x 25.5 in (87 mm x 438 mm x 647.7 mm) |
| Pwa nèt (konplètman chaje) | 50 lbs (23 kg) |
| Tanperati Fonksyònman | 41°F – 95°F (5°C – 35°C) |
| Tanperati ki pa fonksyone | -40°F – 158°F (-40°C – 70°C) |
| Operasyon Imidite (ki pa kondansasyon) | 8% - 90% |
| Pwovizyon pou Voltage | 100-240VAC, 10-5A 50-60 Hz |
The TrueNAS Mini R is a network storage servers intended for use in home, home‑lab, and small office environments.
The apparatus is designed to be operated:
- In indoor residential or office environments, within the specified ranges for temperature, humidity, and supply voltage
- In properly grounded electrical installations, in accordance with local electrical codes
- On a stable, well‑ventilated surface or shelf, with unobstructed airflow around the chassis
- In accordance with the TrueNAS software documentation, including configuration, operation, and maintenance instructions
This product is not designed or intended for:
- Use in professional or industrial environments with demanding environmental conditions (e.g., heavy vibration, conductive dust, or exposure to chemicals)
- Use in situations requiring specialized environmental controls (e.g., clean rooms, high-temperature, or high-humidity installations)
- Any application outside the conditions and purposes described in this manual and the TrueNAS software documentation
- For detailed configuration and operational guidance, refer to the TrueNAS software documentation provided with the product and available from TrueNAS.
The Mini R is FCC/CE-marked and complies with:
- FCC 47 CFR Part 15, Class A – Radiated and conducted emissions limits for commercial IT equipment (EMI/EMC)
- Low Voltage Directive (LVD) 2014/35/EU – Electrical safety
- Electromagnetic Compatibility (EMC) Directive 2014/30/EU – Electromagnetic interference and immunity
- RoHS Directive 2011/65/EU, as amended by (EU) 2015/863 – Restriction of hazardous substances
- WEEE Directive 2012/19/EU – Waste electrical and electronic equipment
- For regulatory or compliance-related queries, contact compliance@truenas.com.
- EU Authorized Representative: Obelis S.A. – Boulevard Général Wahis 53, B-1030 Brussels, BELGIUM
Important – Battery Information
- This product contains a lithium coin cell (CMOS battery) used to maintain system settings. Do not dispose of the battery with household waste.
- Used batteries must be collected and disposed of separately in accordance with local regulations and the EU Battery Directive 2006/66/EC.
- The crossed-out wheeled bin symbol indicates that the battery must be taken to an appropriate collection facility for recycling.
Konpozan sistèm
- Inite TrueNAS yo ak anpil atansyon chaje ak anbake ak transpòtè ou fè konfyans yo rive nan yon kondisyon pafè.
- If there is any shipping damage or missing parts, please take photos and contact TrueNAS Support immediately at support@truenas.com, 1-855-GREP4-iX (1-855-473-7449), or 14089434100.
- Tanpri lokalize epi anrejistre nimewo seri pyès ki nan konpitè sou do chak chasi pou referans rapid.
Ak anpil atansyon depale bwat anbake yo epi lokalize eleman sa yo:
- Mini R Depo etalaj

- Mini R Montour

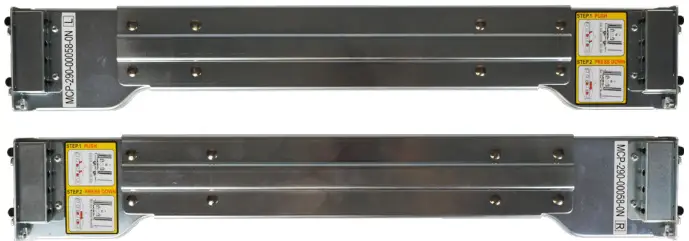
- Set of standard rack mount rails with hardware.
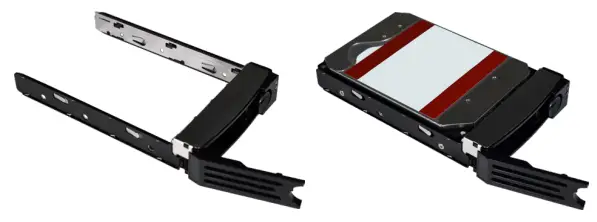
- Douz (12) plato 3.5” ak jiska douz (12) kondui, tou depann de konbyen ou te achte.
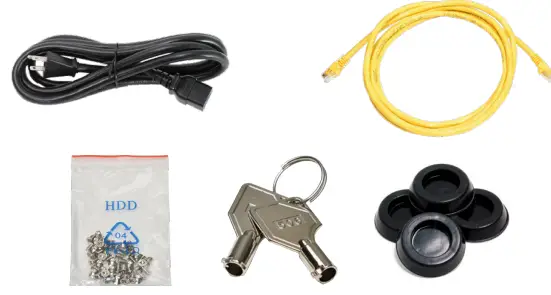
Twous akseswar:
- Yon (1) C13 a 5-15P kòd pouvwa
- De (2) câbles Ethernet
- Yon (1) sak vis HDD
- De (2) kle montour
- Kat (4) pye kawotchou.
- Yon (1) sak vis twous tren
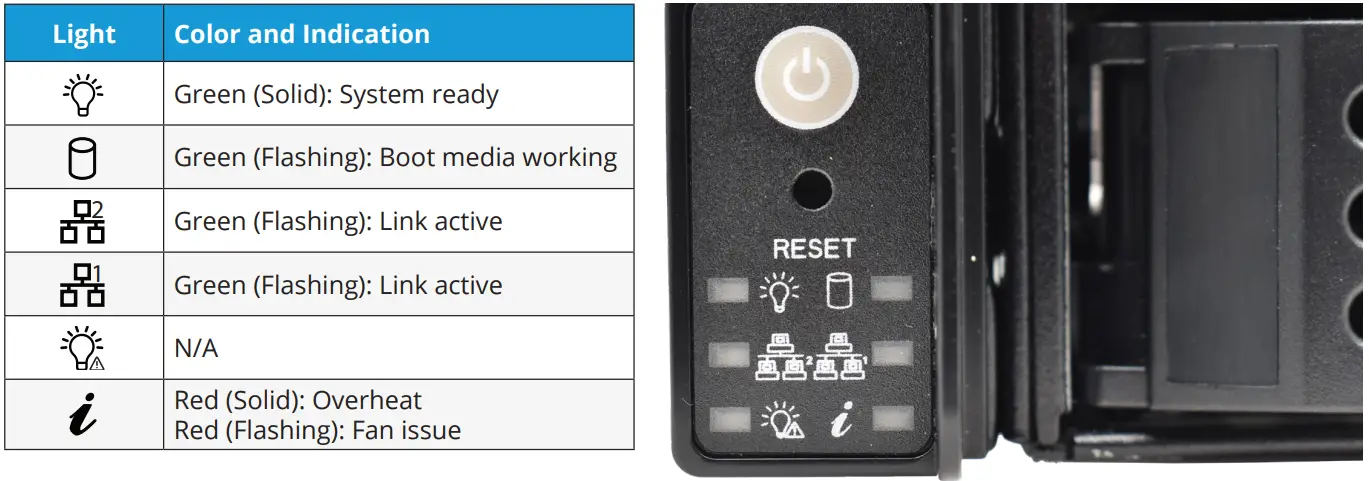
Endikatè devan yo
- Mini R la gen bouton panèl devan pou pouvwa ak reset sistèm. Li gen tou limyè endikatè pou pouvwa, aktivite medya bòt, aktivite koòdone rezo, ak enfòmasyon sistèm.
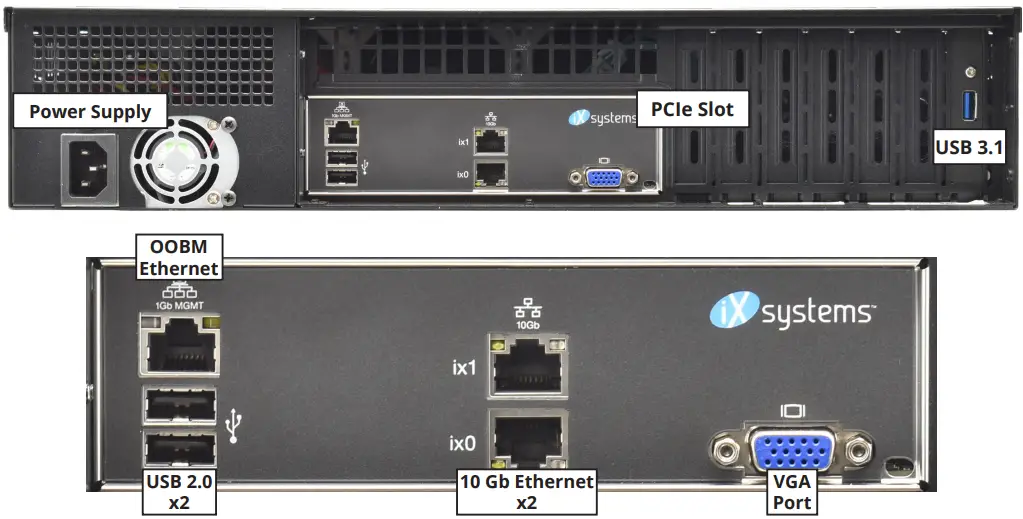
Eleman dèyè ak pò
- Mini R la gen yon sèl ekipman pou pouvwa, yon sèl plas PCIe, ak divès rezo ak pò koneksyon.
- If you are mounting the Mini R on a desktop instead of in a rack, skip to “4 Install Rubber Feet.
Rack Mini R la
- The Mini R requires an EIA-310 compliant rack and comes with a standard or extended rail kit based on your order.
- The standard rails support racks 19.2” – 26.6” (48.8 cm – 67.6 cm) deep.
- The extended rails support racks 26.6” – 36.5” (67.7 cm – 92.7 cm) deep.
Tache ray chasi yo
- Ou dwe retire ray chasi a nan tren etajè a anvan ou monte li sou sistèm nan. Glise tren chasi a deyò jiskaske trape metal la sispann li. Pouse trape-lage a epi glise tren chasi a soti nan ray etajè a jiskaske li gratis.

- Align the chassis rail on the side of the system designated by the stickers and ensure they are right-side-up.
- Place the rail slots over the chassis tabs, then slide the rail toward the front of the system until it clicks into place. Secure the rail to the system using one of the low profile #6 vis ray. Repete pwosesis sa a pou lòt tren an.
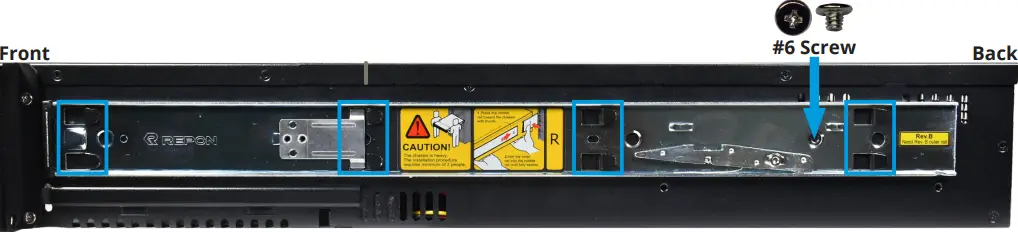
Enstale Rail yo etajè
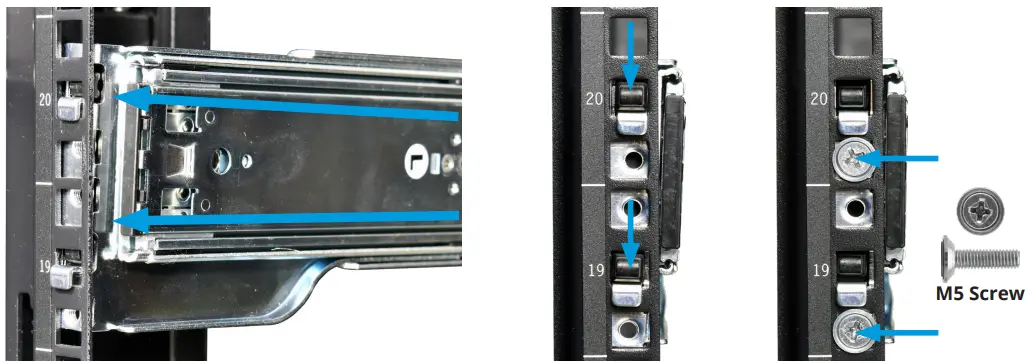
- Align a rack rail with the yellow sticker toward the front of the rack. The flat side must face outside the rack, and the empty inner rail must face inside the rack.
- Place the front tabs and black retaining buttons just above the center holes of each U you are mounting the rail in. Push the tabs into them until the black buttons fully depress, then slide the tabs down.
- Place two M5 machine screws with flush washers in the top and bottom threaded holes.
- Avèk devan tren an enstale, pwolonje dèyè ray etajè a nan direksyon pwen yo tache ekivalan sou pòs etajè dèyè a. Asire w ke tren an rete nivo depi devan dèyè. Swiv pwosesis sa a pou enstale lòt tren etajè a.
Enstale Mini R nan etajè a
- Avètisman – Pinch Point
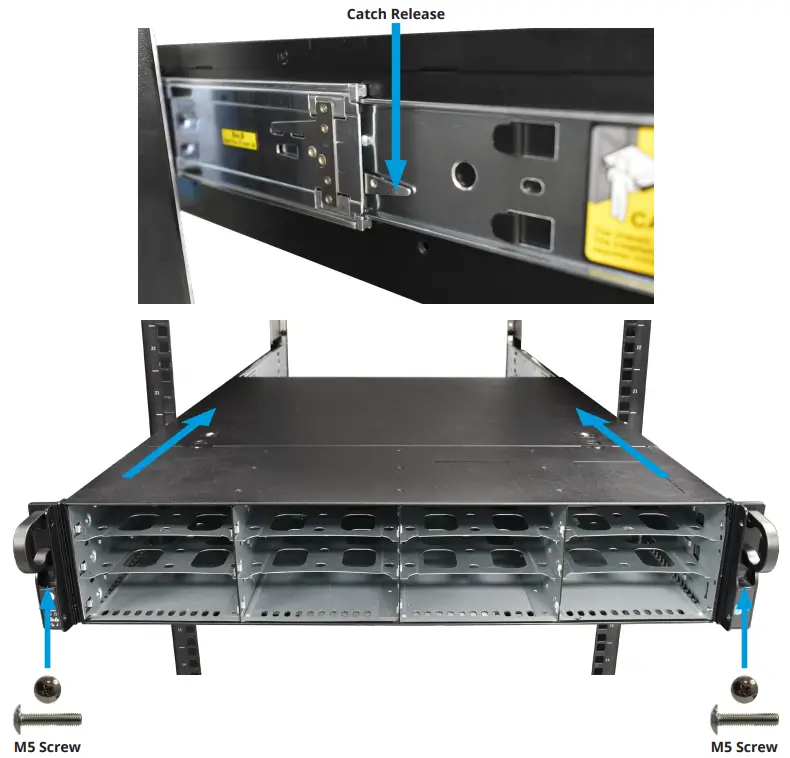
- The Mini R can pinch or crush fingers when sliding the rail sleeves onto the rack rails.
- Team-lift the system and align the chassis rails with the rack rails. Slide the ends of the chassis rails into the rack rails and push the Mini R forward until the safety catches lock.
- Press the catch releases down and keep sliding the system forward until it is flush with the front of the rack.
M5 vis
- Mete yon vis long M5 nan twou yo sou chak zòrèy pou an sekirite Mini R nan etajè a.
Enstale Pye kawotchou
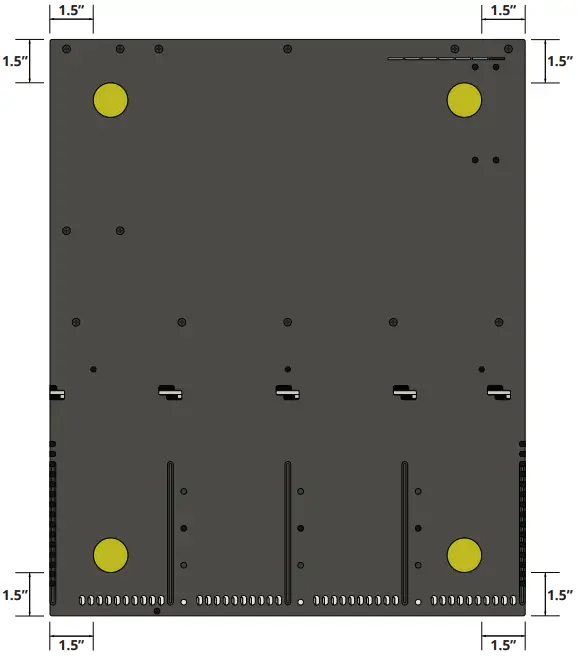
- Mini R la vini ak 1¼" pye kawotchou adezif pou aliye sistèm lan sou yon Desktop olye pou yo nan yon etajè.
- Dyagram ki anba la a montre pozisyon pi bon pye sou anba Mini R la.
Enstale Disk dis
- The Mini R supports TrueNAS‑qualified hard drives up to 18 TB. The Mini R also requires hard drives designed for Network Attached Storage (NAS). These drives run cooler and quieter than desktop drives.
- Please see the Drive Compatibility List available at https://www.truenas.com/truenas-mini1.
- Lè yo bay lòd san yo pa kondui dis, plato kondwi yo voye ak foure filler pwoteksyon. Si ou pa ranpli tout baies ak disques di, kenbe file yo nan plato vid yo pou pwoteje yo.
Retire plato Drive yo
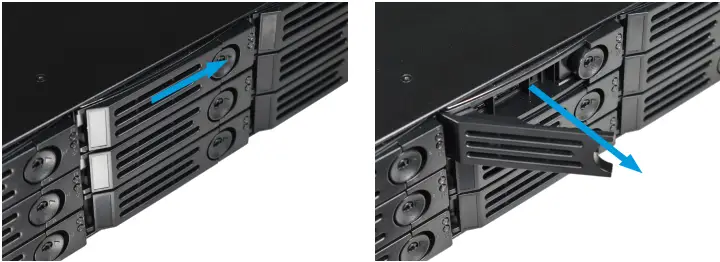
- Lage bra a bloke pa pouse gwo bouton sikilè a sou bò dwat la. Konplètman louvri bra bloke a, Lè sa a, dousman kenbe tèt la ak anba nan plato a epi retire li.
Retire File Files Drive
- Retire de vis dèyè ki kenbe filler la. Dousman gaye tou de bò plato a lwen filler la jiskaske broch yo lage, Lè sa a, retire filler la.
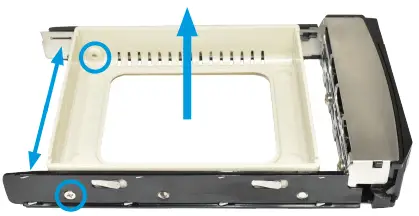
Mete Drive nan plato
- Mete kondwi a difisil nan plato a epi an sekirite li ak kat vis.

3.5 "a 2.5" SSD adaptè
- Itilizatè yo ka konvèti plato HDD Mini R 3.5" nan plato SSD 2.5" ak adaptè.
- Attach an SSD to the adapter using two of the SSD screws that came with the adapter. Ensure the SSD connector faces outside the adapter. Place the adapter in a drive tray and use the last SSD screw to secure the SSD to the tray.
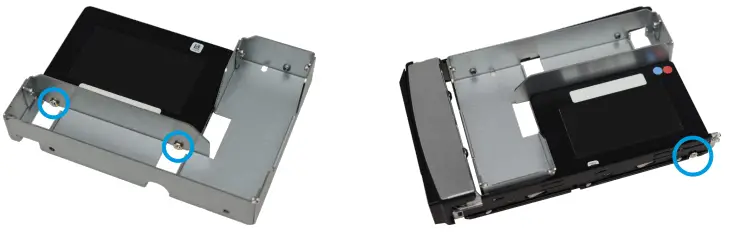
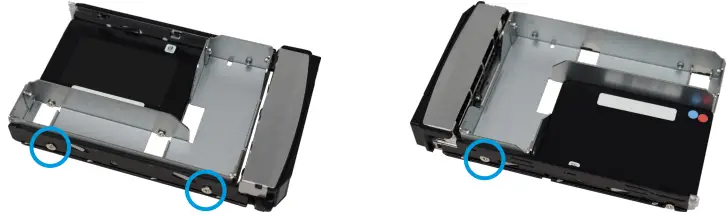
- Sèvi ak twa vis HDD pou tache adaptè a ak SSD nan plato kondwi a.
- Pou enstale plato a nan sistèm nan, swiv enstriksyon yo nan "5.5 Enstale plato Drive" nan paj 10. Asire w ou tache SSD a nan adaptè a ak konektè a fè fas a nan direksyon sistèm nan.
Enstale plato Drive
- Dousman mete yon plato nan yon bay kondwi jiskaske li sispann. Fèmen bra a fèmen jiskaske li fèmen. Repete pou tout disk di, apresa chaje plato ak filler nan rès baie vid yo.
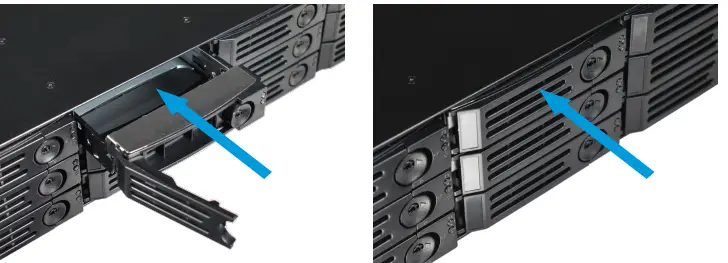
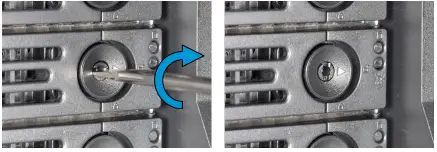
- For extra security, you can lock the drive tray into the system. The tray button is unlocked when the inner slot is horizontal and locked when the slot is vertical.
- To lock a tray, insert a flat‑head screwdriver into the center button slot and gently turn it ninety degrees clockwise until the slot is vertical.
Tache lunèt la
(Si ou vle)
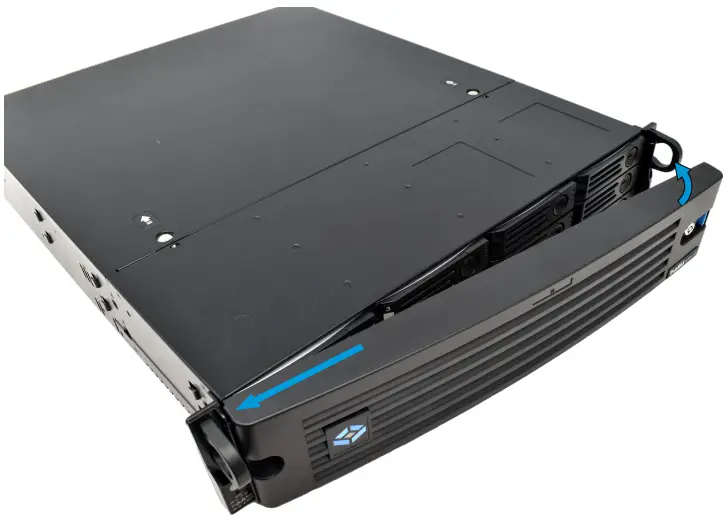
- Glise bò gòch montour la nan pwen atachman ki sou zòrèy gòch la, epi pouse bò dwat montour la nan seri zòrèy dwat la jiskaske li bloke.
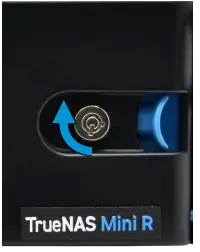
- Ou ka fèmen Montour la pou plis sekirite. Pou fè sa, mete yon kle nan seri a epi vire l katrevendis degre nan direksyon goch.
Konekte rezo ak kab pouvwa
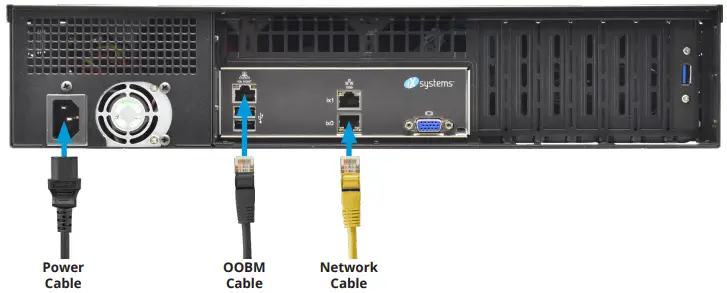
- Konekte câbles rezo ki soti nan routeur la oswa chanje nan pò rezo gigabit la ak pò Ethernet OOBM la.
- Ploge kab pouvwa a nan Mini R a, Lè sa a, yon priz kouran.
Limen TrueNAS Mini a
- The Power and Reset buttons control the power state of the TrueNAS Mini. These buttons behave in the same manner as standard PC power and reset buttons. When the system is off, pressing the power button turns the system on.
- Pressing and holding the power button while the system is running performs a hard power off. The reset button reboots the system.
- Pa default, Mini a limen le pli vit ke ou ploge kab la nan yon sous kouran ki vivan. Nan evènman an nan pèt pouvwa, Mini R la tou pouvwa sou le pli vit ke pouvwa retabli.
Warning – Grounded Connection
- Always connect power cords to properly grounded connections.
Avi: High Draw USB Aparèy
- The current draw on the Mini power supply +5Vsb line can exceed specifications if you leave high‑draw USB devices attached to the rear USB ports when the Mini R is powered off.
- Unplug high‑draw devices (such as bus‑powered USB hard drives) before powering off your Mini R.
Enstalasyon konsole
- You can connect a VGA monitor and USB keyboard for console access, but they are not required. If a monitor and keyboard are attached, you can see the Console Setup Menu.
- For more details about the Console options, see https://www.truenas.com/docs/scale/gettingstarted/install/consolesetupmenuscale/2.
- Si ou vle jesyon aleka soti nan gwoup (OOBM) atravè IPMI, konekte yon kab rezo nan pò IPMI a. Gade seksyon "2.2 Konpozan dèyè ak pò" nan paj 4 pou jwenn pò Mini IPMI ou.
Avètisman - BIOS ak IPMI Firmware
- Sistèm ou a ekipe ak pi bon BIOS ak firmwèr IPMI soti nan bwat la.
- PA AMEPLORE BIOS ak IPMI firmwèr sistèm ou an.
- Nou rekòmande pou IPMI sou yon rezo separe epi an sekirite san aksè entènèt. Tanpri kontakte sipò si ou bezwen ajou BIOS oswa firmwèr IPMI sistèm ou an.
TrueNAS Web Entèfas
- TrueNAS sèvi ak sèvis Multicast DNS, ke yo rele tou Bonjour oswa mDNS, pou fè sistèm lan aksesib sou pifò rezo san konfigirasyon adisyonèl.
- Louvri a web navigatè sou yon lòt òdinatè sou menm rezo a. Louvri TrueNAS la web koòdone pa navige nan truenas.local (oswa adrès IP Mini R ou).
Connect to the TrueNAS Interface
- TrueNAS la web interface uses default credentials for first‑time logins.
- Non itilizatè: admin
- Modpas: abcd1234
- Apre ou fin konekte, chanje modpas kont admin nan Kredansyèl > Itilizatè lokal yo pou ogmante sekirite sistèm lan.
- Si ou gen plis pase yon aparèy TrueNAS ki konekte nan rezo a, mDNS ka fè eksperyans konfli non.
- Pou chanje non host la nan web UI, ale nan Rezo epi klike sou Anviwònman nan Widget Konfigirasyon Global la.
Jesyon andeyò gwoup la
- Koneksyon andeyò gwoup yo gen kalifikasyon separe ak TrueNAS la web koòdone. Kalifikasyon yo owaza epi yo tache nan do chasi TrueNAS Mini R la. Pou plis detay, gade https://www.truenas.com/docs/sb-3273.
- For more on Mini R Out-of-band Management, see: https://www.truenas.com/docs/files/MiniX+OOBM25011.pdf4.
Chanje vèsyon TrueNAS yo
- If you want to upgrade or run a different version of TrueNAS, you can find new and legacy versions at https://www.truenas.com/download-truenas-community-edition5 (ECHÈL).
- After downloading your desired version, you must use image utility like balenaEtcher or Rufus to flash the ISO file nan yon kondwi USB.
- Plug the flashed USB drive into a USB port on your Mini and select it from the boot menu during system startup. Follow the install instructions on our Documentation Hub.

Lòt Resous
- TrueNAS Dokimantasyon Hub la gen konfigirasyon lojisyèl konplè ak enstriksyon itilizasyon. Klike sou Gid nan TrueNAS la web koòdone oswa ale dirèkteman nan: https://www.truenas.com/docs
- Lòt gid pyès ki nan konpitè ak atik yo nan seksyon Materyèl la Dokimantasyon Hub la: https://www.truenas.com/docs/hardware
- Fowòm TrueNAS yo bay opòtinite pou kominike avèk lòt itilizatè TrueNAS epi diskite sou konfigirasyon yo: https://forums.truenas.com
Kontakte nou
- Having issues? Please contact TrueNAS Enterprise Support to ensure a smooth resolution.
| Kontakte Metòd | Kontak Opsyon |
| Web | https://www.truenas.com/support |
| Imèl | support@truenas.com |
| Telefòn | Monday‑Friday, 6:00AM to 6:00PM Pacific Standard Time:
• Ozetazini sèlman gratis: 18554737449 opsyon 2 • Lokal ak entènasyonal: 14089434100 opsyon 2 |
| Telefòn | Telefòn apre lè (24×7 sipò nivo Gold sèlman):
• Ozetazini sèlman gratis: 18554995131 • Entènasyonal: 1408-8783140 (Pòs apèl entènasyonal yo pral aplike) |
| Adrès | iXsystems, Inc. dba TrueNAS ‑ 541 Division St, CampBell, CA 95008, Etazini |

- Sipò: 8554737449 oswa 14089434100
- Imèl: support@truenas.com
Konfòmite
Aparèy sa a konfòm ak Pati 15 règleman FCC yo. Operasyon an sijè a de kondisyon sa yo:
- Aparèy sa a pa ka lakòz entèferans danjere.
- Aparèy sa a dwe aksepte nenpòt entèferans resevwa, enkli entèferans ki ka lakòz operasyon endezirab.
NON MODÈL:
- TrueNAS Model Mini E+:
- CAN ICES-3 (A) / NMB-3 (A)
- VOLTAGE: 100-240VAC
- Current 10-5A Max
- AVÈTISMAN: To remove all hazardous voltages, dekonekte tout fil kouran.

- frekans: 50/60Hz
- KONTAK: support@iXsystems.com
- www.iXsystems.com
- 18554737449
Dokiman / Resous
 | Mini R Basic Rack |
Referans
- Fowòm Kominote TrueNAS - TrueNAS ak TrueCommand Diskisyonforums.truenas.com
- TrueNAS Dokimantasyon Hubwww.truenas.com
- Pwodwi | TrueNAS Dokimantasyon Hubwww.truenas.com
- TrueNAS Customer Support | Open Enterprise Storagewww.truenas.com
- Manyèl itilizatèmanual.tools