1. Entwodiksyon
This manual provides detailed instructions for the installation, operation, and maintenance of the OOYCYOO 60A MPPT Solar Charge Controller, Model EC60A. This device is designed to efficiently manage power flow from solar panels to various battery types, including 12V, 24V, 36V, and 48V systems.
Tanpri li manyèl sa a byen anvan enstalasyon ak itilizasyon pou asire bon fonksyonman ak sekirite.
2. Karakteristik kle
- 60A MPPT Charging: Utilizes Maximum Power Point Tracking technology for efficient solar energy conversion.
- Multi-Stage Chaje: Prezante yon 4-stage battery charging algorithm (Bulk Charge, Boost Charge, Float Charge, Equalization) for optimal battery health.
- Wide Voltage Sipò: Automatically detects and supports 12V, 24V, 36V, and 48V battery systems.
- Segondè Antre PV: Supports solar panel open circuit voltage up to 160VDC and input power up to 2800W (for 48V systems).
- Batri konpatibilite: Compatible with various battery types including AGM, Gel, Flooded, and Lithium (LFP), with pre-set and user-defined charging parameters.
- Segondè efikasite: Tracking efficiency not less than 98.1% and peak conversion efficiency up to 98%.
- Pwoteksyon avanse: Includes PV over current/power, PV short circuit, PV reverse polarity, night reverse charging, battery reverse polarity, over voltage, over discharge, overheating, lithium battery low temperature, load short circuit, load overload, and TVS high voltage pasajè.
- Ekspozisyon LCD: Integrated blacklight LCD for monitoring system status, including KWH charge amount.
- Refwadisman efikas: Die-cast aluminum construction with built-in cooling fan for effective heat dissipation.
3. Enstriksyon Sekirite
Tanpri obsève prekosyon sekirite sa yo pandan enstalasyon ak operasyon:
- Asire w tout koneksyon yo kòrèk epi byen fèmen anvan w mete kouran an sou li.
- Toujou konekte batri a an premye, answit panèl solè a, epi finalman chaj la. Dekonekte nan lòd envès.
- Pa demonte oswa eseye repare kontwolè a tèt ou. Kontakte pèsonèl kalifye pou sèvis.
- Enstale kontwolè a nan yon zòn ki byen ayere, lwen materyèl ki ka pran dife ak limyè solèy dirèk.
- Mete ekipman pwoteksyon pèsonèl (PPE) ki apwopriye lè w ap travay ak sistèm elektrik yo.
- Asire sistèm voltage pa depase volim maksimòm opinyon kontwolè atage (160VDC).
4. Pwodwi souview
The OOYCYOO 60A MPPT Solar Charge Controller features a robust design with an intuitive LCD display and clearly labeled terminals for easy connection.

Figi 4.1: Devan view of the OOYCYOO 60A MPPT Solar Charge Controller, showing the LCD display, control buttons, and terminal connections.

Figi 4.2: Detaye view of the controller highlighting the LCD display, control buttons (SET, A, B, C, D), 5-second reset function, and clearly marked Solar Panel, Battery, and Load terminals.
4.1. Components and Interface
- Ekspozisyon LCD: Shows real-time system parameters such as PV input voltage, batri voltage, load output, and charging status.
- Control Buttons (A, B, C, D, SET): Used for navigating menus, adjusting settings, and confirming selections.
- Tèminal Panèl Solè: Connect positive and negative leads from the solar array.
- Tèminal batri yo: Connect positive and negative leads to the battery bank.
- Tèminal Chaj: Connect positive and negative leads to DC loads.
5. Enstalasyon ak Enstalasyon
5.1. Enstalasyon Kontwolè a
Mount the controller vertically on a wall or a stable surface in a dry, well-ventilated indoor location. Ensure adequate clearance around the unit for proper airflow and heat dissipation. Avoid direct sunlight, high temperatures, and humid environments.
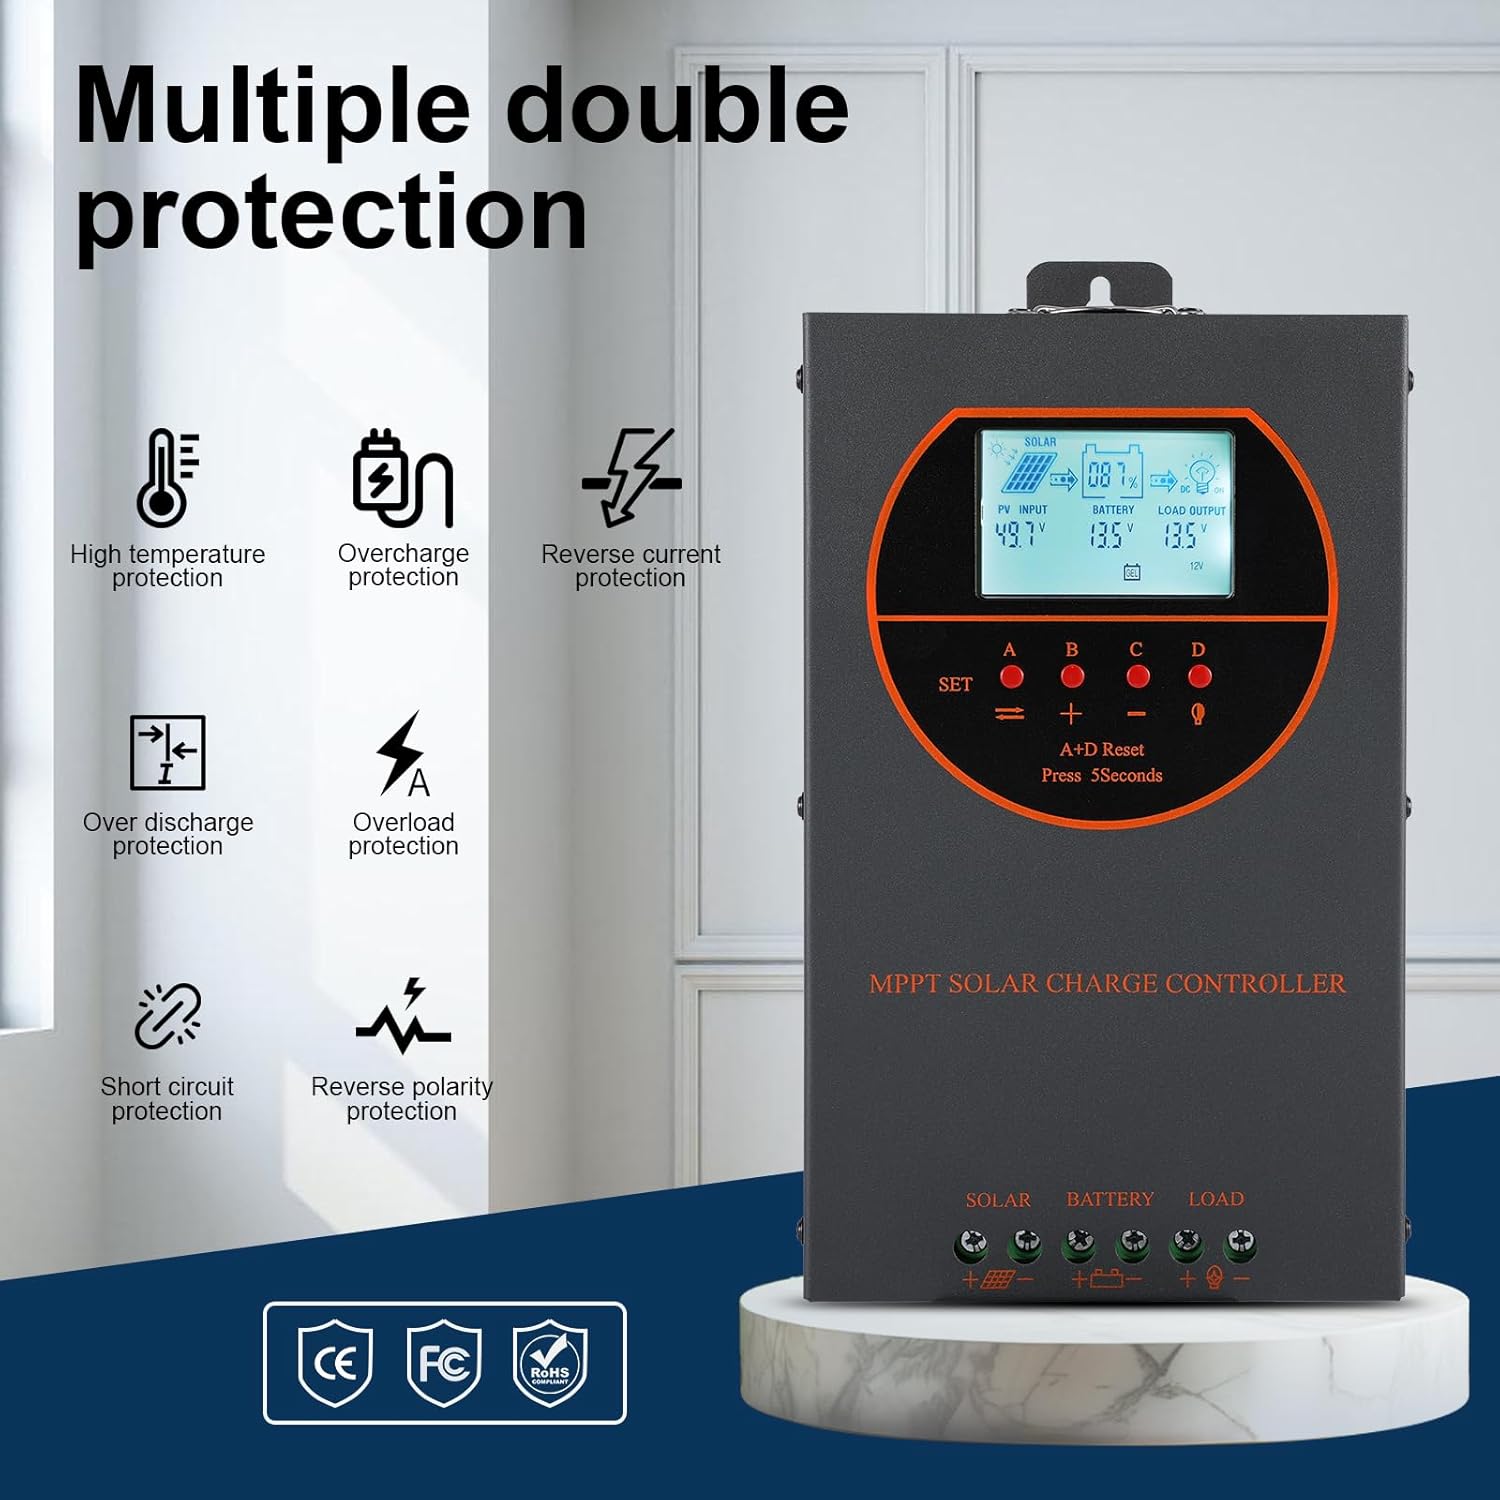
Figure 5.1: Dimensions of the OOYCYOO 60A MPPT Solar Charge Controller, showing approximate measurements of 14cm (5.5in) width, 5.5cm (2.2in) depth, and 23cm (9.1in) length.
5.2. Sekans Fil elektrik
Follow this wiring sequence carefully to prevent damage to the controller or other components:
- Konekte batri a: Connect the positive and negative terminals of the battery to the corresponding battery terminals on the controller. Ensure correct polarity. The controller will automatically detect the battery voltage (12V/24V/36V/48V).
- Konekte panèl solè a: Connect the positive and negative leads from the solar panel array to the corresponding PV input terminals on the controller. Ensure correct polarity.
- Konekte chaj DC a (Si ou vle): Connect the positive and negative leads of your DC load to the corresponding load terminals on the controller.
Enpòtan: Always connect the battery first and disconnect the solar panel first when disassembling the system.

Figure 5.2: Illustrative wiring diagram showing connections from solar panels to the controller, then to the battery, and finally to DC and AC loads via an inverter. This diagram also shows the possibility of connecting two 60A controllers in parallel for increased capacity.
5.3. Sistèm Voltage and Power Configuration
The controller automatically identifies the battery system voltage. Ensure your solar panel array's open circuit voltage (Voc) and maximum input power are within the specified limits for your battery system:
| Sistèm batri | Max. PV Open Circuit Voltage (Voc) | Max. PV Antre pouvwa |
|---|---|---|
| 12V | ≤72V | 720W |
| 24V | ≤108V | 1440W |
| 36V | ≤144V | 2100W |
| 48V | ≤160V | 2800W |

Figure 5.3: Diagram illustrating the connection of multiple PV modules in series to the controller, with a table detailing recommended system parameters for 12V, 24V, and 48V systems, including battery float voltage, anba voltage pwoteksyon, rekiperasyon voltage, and maximum input power.
6. Operasyon
6.1. Ekran LCD ak Endikatè
The LCD display provides real-time information about the solar charging system. Key indicators include:
- Antre PV: Montre vol aktyèl latage and power from the solar panels.
- Batri: Montre volim batri aktyèl latage ak estati chaje.
- Chaj Sòti: Indicates the status of the DC load output.
- KWH: Displays the total accumulated charge in kilowatt-hours.
6.2. Battery Type Selection
The controller is compatible with various battery types. You can select the appropriate battery type through the controller's settings menu to ensure optimal charging. Supported types include:
- JEL
- AGM
- USER (user-defined parameters)
- SEL (Sealed)
- FLD (Inonde)
- LI (Lityòm)
- LiFePO4

Figure 6.1: Diagram illustrating the controller's strong adaptability to various battery types (GEL, AGM, USER, SEL, FLD, LI, LiFePO4) and a graph showing the 4-stage charging process: Bulk Charge, Constant Charging (Boost), and Float Charge.
6.3. Charging Algorithm
Kontwolè a anplwaye yon 4-stage charging algorithm to maximize battery life and performance:
- Chaj esansyèl: Delivers maximum current to rapidly charge the battery to approximately 80% capacity.
- Ranfòse Chaj: Charges the battery at a higher voltage to ensure full charge and equalization.
- Chaje Flote: Kenbe batri a nan yon volim ki an sekiritetage to prevent self-discharge and overcharging.
- Egalizasyon: Periodically overcharges flooded batteries to balance cell voltages and prevent sulfation. (Applicable to flooded batteries only, if enabled).
7. Antretyen
Regular maintenance ensures the longevity and optimal performance of your solar charge controller:
- Tcheke Koneksyon: Enspekte tout koneksyon fil elektrik yo detanzantan pou wè si yo sere epi si gen korozyon.
- Kontwolè pwòp: Keep the controller clean and free from dust. Use a dry cloth to wipe the exterior. Ensure ventilation openings are not obstructed.
- Siveye pèfòmans: Regularly check the LCD display for normal operating parameters. Note any unusual readings.
- Enspeksyon batri: Inspect batteries for any signs of damage, leakage, or corrosion. Clean battery terminals as needed.
NAN. Depanaj
This section addresses common issues you might encounter with the OOYCYOO 60A MPPT Solar Charge Controller.
8.1. Pwoblèm komen ak solisyon yo
| Pwoblèm | Kòz posib | Solisyon |
|---|---|---|
| No display/Controller not powering on | Batri a pa konekte oswa li gen ti vòltajtage; reverse polarity. | Tcheke koneksyon batri ak voltage. Ensure correct polarity. Charge battery if voltage twò ba. |
| Pa gen chaj solè | Solar panel not connected; reverse polarity; low sunlight; PV over-voltage / kouran. | Check solar panel connections and polarity. Ensure sufficient sunlight. Verify PV voltage and current are within limits. |
| Chaj la pa fonksyone | Load not connected; load short circuit; overload; battery low voltage. | Check load connections. Inspect for short circuits or overloads. Ensure battery has sufficient charge. |
| Surchof kontwolè | Poor ventilation; excessive load/PV input. | Ensure adequate airflow around the controller. Reduce load or PV input if consistently overheating. |
8.2. Fonksyon Pwoteksyon
The controller includes multiple protection features to safeguard the system:
- PV sou kouran/pouvwa
- PV Kout Awondisman
- PV ranvèse polarite
- Lannwit chaje ranvèse
- Batri ranvèse polarite
- Battery Over Voltage
- Batri sou egzeyat
- Battery Overheating, Controller Overheating
- Lityòm batri tanperati ki ba
- Chaje Kout Awondisman
- Chaj Surcharge
- TVS High Voltage Transient

Figure 8.3: Visual representation of the multiple protection features integrated into the controller, including low voltage, overheat, short circuit, reverse protection, overload, and overcurrent protection.

Figi 8.4: Entèn view of the controller, highlighting key components such as copper coil transformers and capacitors, which contribute to its robust performance and protection features.
9. Espesifikasyon teknik
| Paramèt | Spesifikasyon |
|---|---|
| Rated chaj aktyèl | 60A |
| Sistèm nominal Voltage | 12V/24V/36V/48V DC Auto Identifying |
| Batri Voltage Range | 9V ~ 55V |
| Max. PV Open Circuit Voltage | 160VDC |
| Maksimòm puisans PV (Sistèm 12V) | 720W |
| Maksimòm puisans PV (Sistèm 24V) | 1440W |
| Maksimòm puisans PV (Sistèm 36V) | 2100W |
| Maksimòm puisans PV (Sistèm 48V) | 2800W |
| Pouvwa Tèminal | 6-12 AWG |
| Dimansyon (L * W * H) | 11 x 6 x 2.5 pous (apeprè 27.9 x 15.2 x 6.3 cm) |
| Pwa | 4.07 liv (apeprè 1.8 kg) |
| Efikasite Suivi | ≥98.1% |
| Peak Conversion Efficiency | Jiska 98% |
| Refwadisman | Die-cast aluminum housing, built-in cooling fan |
| Kalite batri sipòte | AGM, Gel, Flooded, Lithium (LFP), Sealed, User-defined |
| Materyèl | Aliminyòm |
| Nimewo Modèl Atik | EC60A |
| UPC | 750864834470 |
10. Sipò ak Kontak
For technical support, warranty claims, or further assistance, please contact OOYCYOO customer service through the retailer where the product was purchased or visit the official OOYCYOO store on Amazon:

