1. Entwodiksyon
This manual provides comprehensive instructions for setting up, operating, and maintaining your GameSir G7 Pro Wired Controller. Please read this manual thoroughly before use to ensure optimal performance and longevity of your device.

Imaj: Devan view of the GameSir G7 Pro Wired Controller.
2. Pake kontni
Verifye ke tout atik ki nan lis anba a yo enkli nan pakè ou a:
- GameSir G7 Pro Wired Controller
- 3-meter USB-C to USB-A Cable
- Kle san fil 2.4G
- Smart Auto Start-Stop Charging Station
- Swappable D-Pads (2 types)
- Manyèl itilizatè ak Dokimantasyon

Image: All components included in the GameSir G7 Pro package.
3. Setup & Connectivity
The GameSir G7 Pro offers tri-mode connectivity for various platforms.

Image: Tri-mode connectivity options for the GameSir G7 Pro.
3.1. Xbox (Wired Connection)
- Connect the USB-C end of the provided cable to the controller.
- Connect the USB-A end of the cable to an available USB port on your Xbox Series X|S or Xbox One console.
- The controller will automatically power on and connect to your console.
3.2. PC (2.4G Wireless & Wired Connection)
2.4G Wireless Koneksyon:
- Insert the 2.4G wireless dongle into an available USB-A port on your PC.
- Ensure the mode switch on the back of the controller is set to the 2.4G wireless icon.
- Press the Xbox button on the controller to power it on. The controller will automatically pair with the dongle.
- Experience ultra-responsive gaming with a 1000Hz polling rate.
Koneksyon filaire:
- Connect the USB-C end of the provided cable to the controller.
- Konekte bout USB-A kab la nan yon pò USB ki disponib sou òdinatè w la.
- The controller will automatically power on and connect.
Videyo: Ofisyèl finiview of the GameSir G7 Pro Wired Controller for Xbox and PC.
3.3. Android (Bluetooth Connection)
- Ensure the mode switch on the back of the controller is set to the Bluetooth icon.
- On your Android device, enable Bluetooth and search for new devices.
- Select "GameSir G7 Pro" from the list of available devices to pair.
4. Key Features & Controls
4.1. TMR Sticks
The GameSir G7 Pro features Mag-Res TMR sticks, combining the durability of Hall Effect technology with the precision of traditional potentiometer sticks. This design ensures stable polling rates and drift-free performance.

Image: Detail of the TMR Sticks technology.
4.2. Hall Effect Analog Triggers
Precision-tuned Hall Effect analog triggers provide smooth and linear input for accurate control. The triggers also feature clicky Micro Switch trigger stops, allowing users to switch between full range and short-travel modes based on preference.

Image: Hall Effect Analog Triggers with Micro Switch trigger stops.
4.3. Bouton Customizable
The controller includes four extra customizable buttons: two mini bumpers (L5/R5) and two lockable back buttons. These can be mapped for macros or quick actions, enhancing gameplay control.
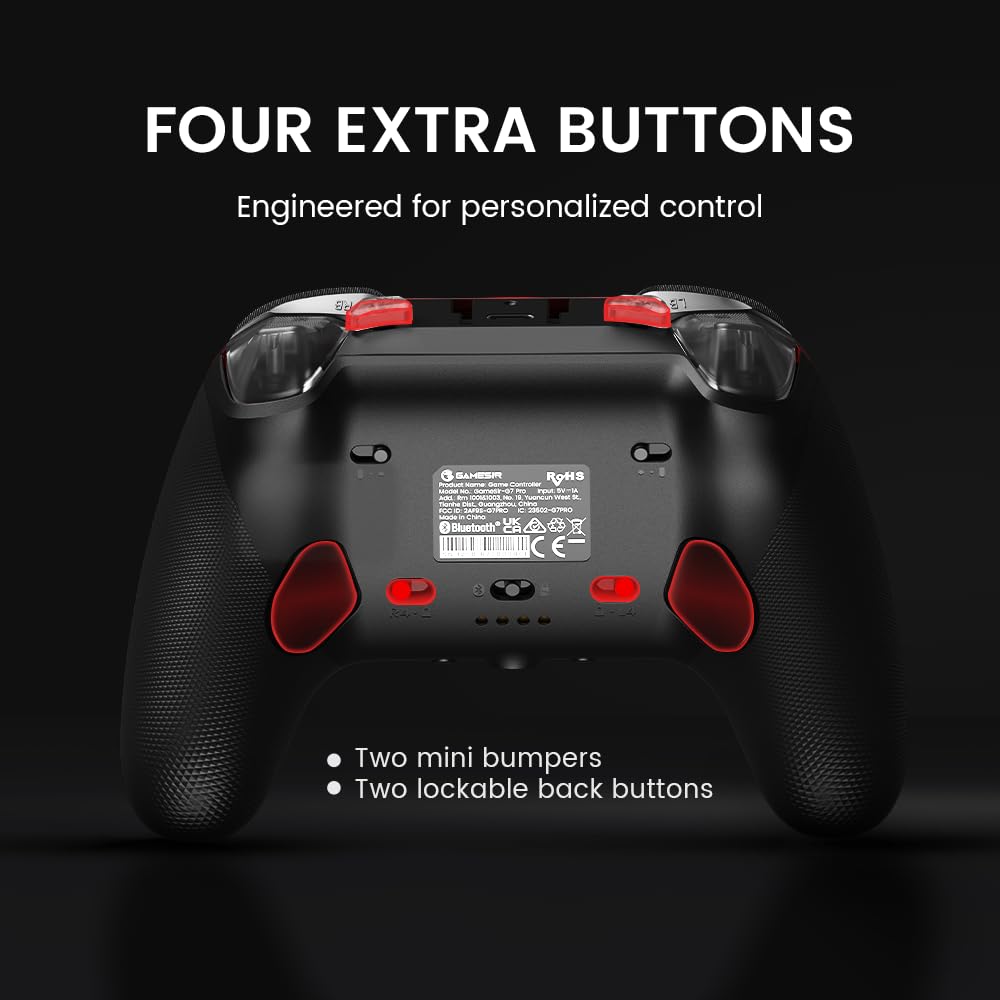
Image: Location of the four extra customizable buttons.
4.4. GameSir Nexus App
Utilize the upgraded GameSir Nexus app for advanced customization. This app allows for gyro settings, stick curve adjustments, and button-to-mouse mapping, providing deeper control over your gaming experience.
4.5. PC Gyro Aiming
For PC users, the built-in gyroscope can be mapped to sticks, buttons, or mouse for precise and intuitive aiming.

Image: PC Gyro Aiming in action.
5. Chaje
The GameSir G7 Pro includes a Smart Auto Start-Stop Charging Station and a built-in 1200mAh battery. Simply place the controller on the station to initiate charging. Remove it to resume gameplay.

Image: GameSir G7 Pro on its charging station.
6. Personnalisation
The controller features a magnetic faceplate that is detachable in three parts, allowing for easy customization. The D-Pad is also swappable, with two different shapes included to suit user preference.

Image: Detachable faceplate and swappable D-Pad for customization.
7. Espesifikasyon
| Karakteristik | Detay |
|---|---|
| Nimewo Modèl | GameSir-G7 Pro |
| Koneksyon | Wired (Xbox), 2.4G Wireless & Wired (PC), Bluetooth (Android) |
| Baton | GameSir Mag-Res TMR Sticks |
| Deklanche | Hall Effect Analog Triggers with Micro Switch Trigger Stops |
| Polling Rate (PC) | 1000Hz |
| Bouton siplemantè | 4 (L5/R5 bumpers + 2 lockable back buttons) |
| Jiroskop | Built-in (PC-only) |
| Batri | 1200mAh (enkli) |
| Pwa | 1.72 liv |
| Dimansyon pake | 7.13 x 7.09 x 3.78 pous |
| Manifakti | Jwèt Mesye |
| Dat lage | 12 oktòb 2025 |
NAN. Depanaj
- Kontwolè a pa konekte: Ensure the correct mode (Wired, 2.4G, Bluetooth) is selected on the controller. For 2.4G wireless, ensure the dongle is properly inserted. For Bluetooth, ensure your device's Bluetooth is enabled and the controller is in pairing mode.
- Retard Antre: For PC, ensure you are using the 2.4G wireless dongle or a wired connection for optimal 1000Hz polling rate. Reduce distance between controller and dongle for wireless.
- Baton flote: The TMR sticks are designed to be drift-free. If you experience issues, ensure the controller firmware is up to date via the GameSir Nexus App.
- Pwoblèm chaj: Ensure the controller is correctly seated on the charging station and the station is powered. Check the charging indicator lights.
9. Garanti & Sipò
For warranty information, technical support, or further assistance, please refer to the official GameSir website or contact GameSir customer service. Keep your proof of purchase for warranty claims.
Ofisyèl Websit: www.gamesir.hk