1. Entwodiksyon
This manual provides instructions for the VETEK 4K 64MP Camcorder, model NPX108-2. This device is designed for high-quality video recording and photography, featuring 4K Ultra HD video resolution at 60 frames per second (FPS) and 64-megapixel image resolution. It includes an 18X digital zoom, a 4.0-inch 270-degree rotating touchscreen, and WiFi connectivity. The camcorder is equipped with an external microphone, a handheld stabilizer, and a 2.4G wireless remote control to enhance your recording experience.
Kontni pake:
- VETEK 4K 64MP Camcorder
- DV-108 Battery (4500mAh)
- Kat SD 64GB
- USB kab
- 2.4G Wireless Remote kontwòl
- Pòtatif estabilize
- Lens Hood
- Mikwofòn ekstèn
- Dirije limyè ranpli
- Manyèl itilizatè
- Bag Kamera

2. Konpozan souview
Familyarize w ak diferan pati ak kontwòl kamera videyo w la.

Pò ak entèfas:

Kontwòl:

3. Inisyal Enstalasyon
3.1 Chaje batri a
Insert the provided DV-108 battery into the camcorder. Connect the camcorder to a power source using the USB cable. The battery takes approximately 4-5 hours to fully charge and provides about 3 hours of continuous use.

3.2 Mete Kat SD a
Locate the SD card slot on the camcorder. Insert the provided 64GB SD card into the slot until it clicks into place. Ensure the card is inserted correctly to avoid damage.
3.3 Tache Pwodwi pou Telefòn
- Mikwofòn ekstèn: Attach the external microphone to the hot shoe mount on top of the camcorder and connect its cable to the MIC port.
- Handheld Stabilizer: Secure the handheld stabilizer to the bottom tripod mount of the camcorder for improved stability during recording.
- Lens Hood: Attach the lens hood to the front of the lens to protect it and reduce glare.
4. Operasyon Enstriksyon
4.1 Power On/Off
Press and hold the Power button to turn the camcorder on or off.
4.2 Anrejistre Videyo ak Pran Foto
Use the Mode button to switch between video recording and photo capture modes. Press the Quick Video button to start/stop video recording or the Quick Photo button to take a picture.


4.3 Zoom dijital
The camcorder features an 18X digital zoom. Use the zoom controls (W/T buttons) on the camcorder or the handheld stabilizer to adjust the zoom level.

4.4 Operasyon Touch Screen
The 4.0-inch 270-degree rotating touchscreen allows for easy navigation of menus, settings, and playback of recordings.
4.5 Koneksyon WiFi
Connect the camcorder to your smartphone via WiFi using the XDV PRO app. This allows you to view recordings, control the camera remotely, and transfer files.


4.6 WebCam Fonksyonalite
Connect the camcorder to a computer using the USB cable and select "PC CAM" mode to use it as a webcam for video calls and streaming.


4.7 2.4G Remote Control
The included 2.4G wireless remote control allows you to operate the camcorder from up to 65 feet away in any direction.

4.8 Mikwofòn ekstèn
The external microphone utilizes X-Y Stereo Pickup Technology to effectively reduce background noise and improve audio quality. Adjust the sound sensitivity from -10dB to +20dB for optimal audio capture.

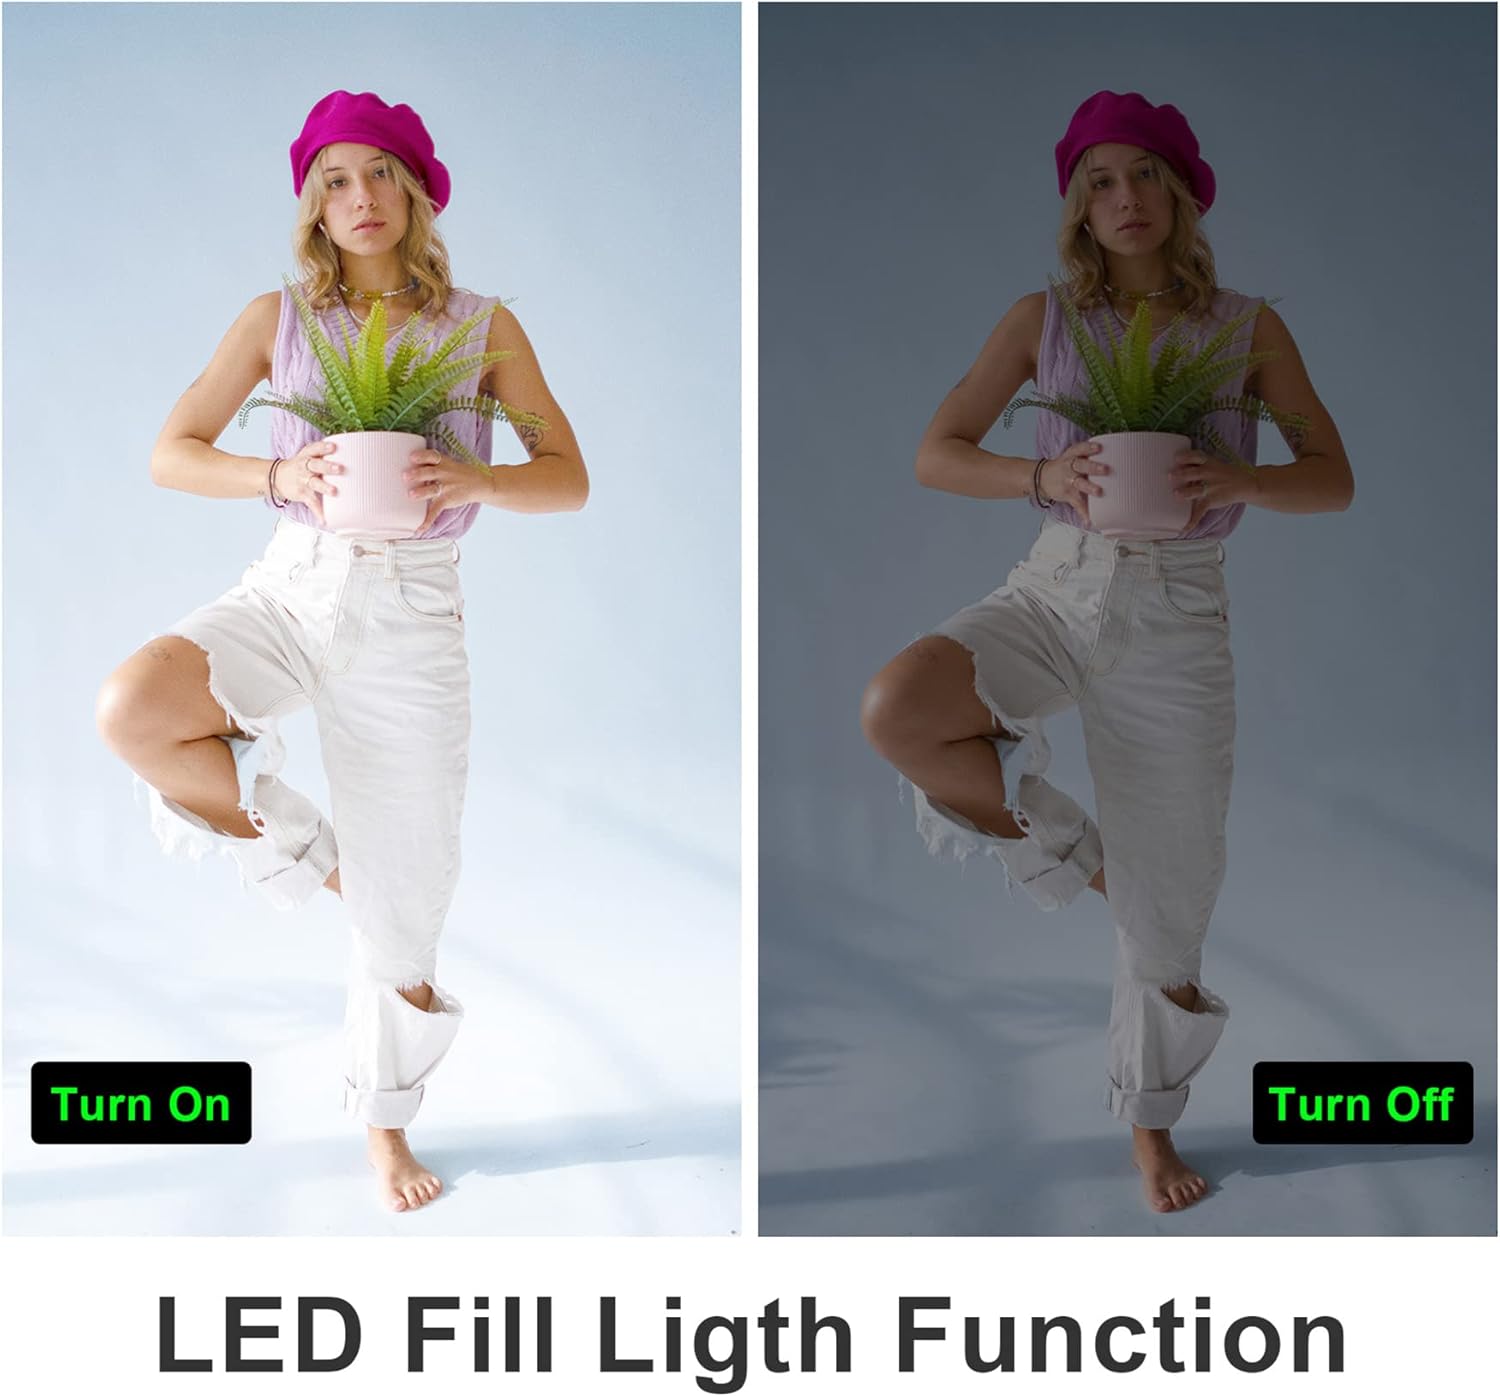
4.9 LED Fill Light
Activate the built-in LED fill light for improved illumination in low-light conditions.
4.10 Slow Motion and Time-Lapse
The camcorder supports slow-motion recording for capturing fast-moving objects and time-lapse recording for condensing long events into short videos.

4.11 Sòti HDMI
Connect the camcorder to a TV or monitor using an HDMI cable (not included) to view anrejistreman ou yo sou yon ekran ki pi gwo.

5. Antretyen
5.1 Swen Batri
- Chaje batri a konplètman anvan premye itilize.
- Evite ekspoze batri a nan tanperati ekstrèm.
- If not using the camcorder for an extended period, remove the battery.
5.2 Netwayaj
- Sèvi ak yon twal mou epi sèk pou netwaye kò kamera a.
- For the lens and touchscreen, use a specialized lens cleaning cloth and solution.
- Pa sèvi ak pwodui netwayaj abrazif oswa solvang.
5.3 Depo
Store the camcorder in a cool, dry place away from direct sunlight and dust. Use the provided camera bag for protection during transport.
NAN. Depanaj
Refer to the following tips for common issues:
- Fixed Focal Length: This camera has a fixed focal length and does not support optical zoom. Zooming is digital.
- Autofocus Delay: Autofocus may require a 2-3 second delay buffer time to adjust.
- Kalite videyo: The quality of recorded video may not be as high as still photos, especially in challenging lighting conditions.
- Microphone Range: The built-in microphone has a pickup distance of approximately 6.5 feet. The external microphone can extend this range to about 16.4 feet.
- Kamera pa limen: Asire w ke batri a byen chaje epi li byen mete l.
- Erè Kat SD: Ensure the SD card is inserted correctly and is not full or corrupted. Try reformatting the card (this will erase all data).
- Pwoblèm koneksyon WiFi: Ensure the XDV PRO app is installed and the camcorder's WiFi is enabled. Check your smartphone's WiFi settings.

7. Espesifikasyon
| Karakteristik | Spesifikasyon |
|---|---|
| Nimewo Modèl | NPX108-2 |
| Rezolisyon videyo | 4K Ultra HD (3840x2160) @ 60FPS |
| Rezolisyon imaj | 64 megapiksèl |
| Zoom dijital | 18X |
| Gwosè ekran | 4.0-inch Touch Screen (270-degree rotation) |
| Koneksyon | Wi-Fi, USB, HDMI |
| Kapasite batri | 4500mAh Lityòm Polymère |
| Lavi batri | Approx. 3 hours recording |
| Depo | SD Card (up to 64GB included) |
| Karakteristik espesyal | Anti-shake, Face Detection, Night Vision, Webcam Mode, Slow Motion, Time-Lapse, External MIC Support, LED Fill Light |
| Dimansyon | 6.8 x 3.2 x 3.8 pous |
| Pwa | 3.61 liv |
8. Enfòmasyon sou Garanti
VETEK products typically come with a standard manufacturer's warranty. Please refer to the warranty card included in your package or contact customer support for specific details regarding warranty coverage and duration.
9. Sipò pou Kliyan
For further assistance, technical support, or inquiries regarding your VETEK 4K 64MP Camcorder, please visit the official VETEK website or contact their customer service department. Contact information can usually be found on the product packaging or the brand's online store.


