1. Entwodiksyon
This manual provides detailed instructions for the installation, operation, and maintenance of your Xigmatek Aqua V AIR Arctic Mid-Tower PC Case. Please read this manual thoroughly before beginning any installation to ensure proper setup and safe operation. Retain this manual for future reference.
2. Enfòmasyon sou Sekirite
Obsève prekosyon sekirite sa yo pandan enstalasyon ak operasyon:
- Toujou dekonekte ekipman pou kouran an nan priz miray la anvan ou enstale oswa retire nenpòt konpozan.
- Mete yon braslè ponyèt anti-estatik pou anpeche domaj akòz dechaj elektwostatik (ESD) sou konpozan sansib yo.
- Handle components carefully. Avoid touching pins or circuit boards directly.
- Ensure proper ventilation around the PC case to prevent overheating.
- Kenbe ti pati ak zouti lwen timoun yo.
- Pa eseye modifye bwat la oswa konpozan li yo, paske sa ka anile garanti a epi poze risk pou sekirite.
3. Pake kontni
Verifye ke tout atik yo prezan nan pakè a:
- Xigmatek Aqua V AIR Arctic Mid-Tower PC Case
- Accessory kit (screws, standoffs, cable ties)
- Manyèl Itilizatè (dokiman sa a)
If any items are missing or damaged, contact your retailer or Xigmatek support.
4. Pwodwi souview
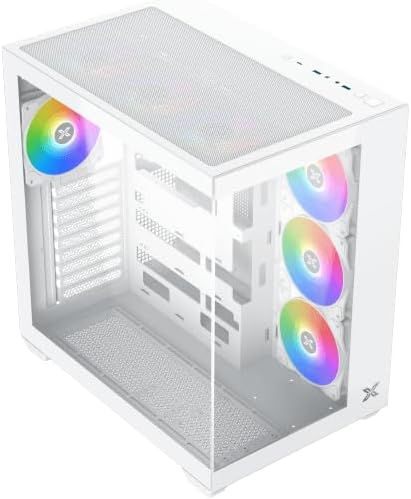
The Xigmatek Aqua V AIR Arctic is a mid-tower PC case designed for high-performance gaming configurations. It features tempered glass panels for component visibility and optimized airflow with pre-installed ARGB fans.

Figi 4.1: Devan-gòch view of the Xigmatek Aqua V AIR Arctic PC case, showcasing the tempered glass front and side panels, and the pre-installed ARGB fans.

Figi 4.2: Dèyè view of the PC case, showing the I/O shield cutout, expansion slots, and rear fan mount.
Figi 4.3: Anglè anwo-anba view, highlighting the top mesh panel for additional cooling and the internal layout.
5. Enstalasyon ak Enstalasyon
Follow these steps to install your PC components into the Xigmatek Aqua V AIR Arctic case.
5.1. Prepare Ka a
- Mete bwat la sou yon sifas plat epi ki estab.
- Remove the tempered glass side panel by unscrewing the thumb screws at the rear and carefully sliding it off. Place it on a soft, non-abrasive surface to prevent scratches.
- Remove the opposite steel side panel by unscrewing the thumb screws and sliding it off.
5.2. Enstalasyon mèr
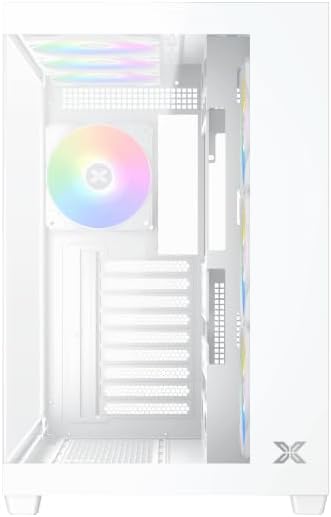
Figi 5.1: Enteryè view of the case, illustrating the motherboard mounting area and cable routing cutouts.
- Install the I/O shield into the cutout at the rear of the case.
- Align your motherboard with the pre-installed standoffs. Ensure the standoffs match your motherboard's form factor (ATX, Micro ATX).
- Secure the motherboard using the provided screws from the accessory kit. Do not overtighten.
5.3. Enstalasyon Inite Alimantasyon (PSU)
- Locate the PSU mounting bracket at the bottom rear of the case.
- Slide your PSU into the designated compartment from the rear of the case.
- Fikse PSU a nan bwat la avèk vis ki vini ak ekipman pouvwa a.
5.4. Enstalasyon Disk Depo
The case supports multiple storage drives:
- SSD 2.5 pous: Mount directly to the SSD trays located behind the motherboard tray. Secure with screws.
- Disk Difisil 3.5 pous: Install into the drive cage located beneath the PSU shroud. Slide the drive into the tray and secure with screws.
5.5. Enstalasyon Kat Grafik (GPU) ak Kat Ekspansyon
- Retire kouvèti fant ekspansyon ki nesesè yo nan dèyè bwat la.
- Insert your graphics card or other expansion cards into the appropriate PCIe slots on the motherboard.
- Secure the cards with the provided screws.
5.6. Jesyon kab

Figi 5.2: View behind the motherboard tray, illustrating the ample space and tie-down points for effective cable management.
Sèvi ak ouvèti pou kab yo ak pwen mare ki dèyè plato kat manman an pou òganize kab yo. Sa amelyore sikilasyon lè a ak estetik li.
- Connect all necessary power cables from the PSU to the motherboard, GPU, and storage drives.
- Connect front panel cables (USB, audio, power/reset switches, LED indicators) to the corresponding headers on your motherboard. Refer to your motherboard manual for specific header locations.
- Connect the ARGB fan cables to the integrated fan controller or directly to your motherboard's ARGB headers if available.
5.7. Fan and Radiator Support
The Xigmatek Aqua V AIR Arctic comes with 7 pre-installed 120mm ARGB fans. Additional cooling options are available:
- Devan: Supports up to 3 x 120mm or 2 x 140mm fans / 240mm, 280mm, 360mm radiators.
- Top: Supports up to 3 x 120mm or 2 x 140mm fans / 240mm, 280mm, 360mm radiators.
- Dèyè: Supports 1 x 120mm fan.
- Anba: Supports up to 3 x 120mm fans.
Ensure proper fan orientation for optimal airflow (intake at front/bottom, exhaust at rear/top).
6. Opere
Once all components are installed and cables are connected, replace the side panels. Connect your monitor, keyboard, mouse, and power cable. Press the power button on the front panel to start your system.
The pre-installed ARGB fans can be controlled via the integrated controller (if present) or through compatible motherboard software, allowing customization of lighting effects and fan speeds.
7. Antretyen
Antretyen regilye ede asire pèfòmans optimal ak lonjevite konpozan PC ou yo.
- Netwayaj pousyè: Periodically clean dust filters (top, front, bottom) to maintain good airflow. Use compressed air to remove dust from inside the case and components.
- Netwayaj eksteryè: Siye sifas eksteryè yo ak yon mou, damp twal. Evite pwodui netwayaj abrazif oswa solvan.
- Verifikasyon Jesyon Kab: Occasionally check cable routing to ensure no cables are obstructing fans or airflow.
NAN. Depanaj
Si ou rankontre pwoblèm, gade etap depanaj komen sa yo:
- Sistèm nan pa limen:
- Asire w ke PSU a limen epi li byen konekte nan priz miray la.
- Verify all power cables (24-pin ATX, 8-pin CPU, PCIe, SATA) are securely connected.
- Tcheke koneksyon switch pouvwa panèl devan an ak kat manman an.
- Pa gen okenn rezilta ekspozisyon:
- Ensure the monitor cable is connected to the graphics card (not the motherboard I/O if using a dedicated GPU).
- Remete kat grafik la ak modil RAM yo.
- Fans not spinning or ARGB not working:
- Check fan power connections to the motherboard or fan controller.
- Verify ARGB connections to the controller or motherboard headers.
- Ensure any fan control software or BIOS settings are correctly configured.
For more complex issues, consult your component manuals or contact Xigmatek technical support.
9. Espesifikasyon
| Karakteristik | Detay |
|---|---|
| Non modèl | Aqua V AIR Arctic |
| Nimewo Modèl | EN45837 |
| Kalite Ka | Mid-Tower |
| Mèr konpatibilite | ATX, Mikwo ATX |
| Materyèl | Steel Alloy, Tempered Glass |
| Koulè | Blan |
| Fanatik pre-enstale | 7 x 120mm fanatik ARGB |
| Max GPU Longè | 410 mm |
| Pò USB | 3 |
| Pwa | 8.8 Kilogram |
10. Garanti ak sipò
Xigmatek products are manufactured to high quality standards. For warranty information, please refer to the warranty card included with your product or visit the official Xigmatek website. For technical support or inquiries, please contact Xigmatek customer service through their official channels.
Ofisyèl Websit: www.xigmatek.com


