1. Entwodiksyon
Thank you for choosing the Yard Force 60V Cordless Self-Propelled Electric Lawn Mower. This manual provides essential information for the safe and efficient operation, maintenance, and troubleshooting of your new lawn mower. Please read this manual thoroughly before initial use and keep it for future reference.
2. Enfòmasyon sou Sekirite
Toujou bay sekirite priyorite lè w ap itilize ekipman elektrik. Si ou pa swiv enstriksyon sekirite yo, ou ka blese gravman oswa domaje materyèlman.
Règ jeneral sekirite:
- Li tout enstriksyon yo ak anpil atansyon anvan ou itilize tondeuz la.
- Mete ekipman pwoteksyon pèsonèl (PPE) ki apwopriye, tankou pwoteksyon pou je, pwoteksyon pou tande, ak soulye solid.
- Kenbe timoun yo ak moun ki t ap pase yo lwen zòn operasyon an.
- Do not operate the mower in wet conditions or on excessively steep slopes.
- Asire w ke batri a byen chaje anvan w itilize li epi retire li lè w pa ap itilize l oswa pandan antretyen.
- Inspect the mower for damage before each use. Do not operate if damaged.
- Sèvi sèlman ak pyès ranplasman ak akseswa ki apwouve pa manifakti a.
3. Konpozan souview
Familiarize yourself with the main components of your Yard Force 60V Cordless Self-Propelled Electric Lawn Mower.

Figure 3.1: Complete Lawn Mower Assembly with Battery and Charger.
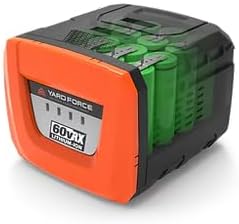
Figure 3.2: Yard Force 60V Lithium-Ion Battery.
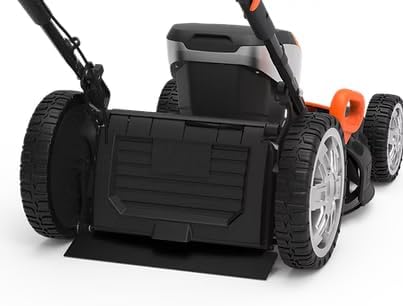
Figure 3.3: Battery Compartment on the Mower Deck.

Figure 3.4: Mower Wheel and Height Adjustment Mechanism.
4. Enstalasyon
4.1. Asanble
Your lawn mower may require minor assembly upon unboxing. This typically involves unfolding and securing the handle, and attaching the grass collection bag if applicable. Refer to the quick start guide included in the packaging for detailed visual instructions.
4.2. Chaje batri
Before first use, fully charge the 60V 4Ah Lithium-Ion battery. Connect the charger to a standard power outlet and insert the battery. The charger's indicator lights will show the charging status. A full charge typically takes approximately 60 minutes with the 4A rapid charger.
4.3. Enstalasyon batri
Open the battery compartment cover on the mower deck (refer to Figure 3.3). Slide the fully charged battery into the compartment until it clicks securely into place. Close the cover firmly.
5. Operasyon Enstriksyon
5.1. Ajiste wotè koupe a
The mower features a 7-position one-touch height adjustment. Locate the height adjustment lever near the wheels (refer to Figure 3.4). Pull the lever outwards and move it to the desired cutting height, ranging from 1 1/4" to 3 3/4". Ensure all wheels are set to the same height for an even cut.
5.2. Kòmanse Mower la
To start the mower, ensure the battery is installed. Press and hold the safety button, then pull the bail lever towards the handle. The motor will start. Release the safety button once the motor is running.
5.3. Fonksyon Oto-Propulse
This model is equipped with self-propelled technology and variable speed control. To engage the self-propelled function, activate the separate self-propel lever (if present, consult your quick start guide for exact location). Adjust the speed as needed for comfortable operation.
5.4. Teknik Coupe
For optimal results, mow when the grass is dry. Overlap cutting swaths slightly to ensure complete coverage. Avoid cutting more than one-third of the grass blade length at a time. The 3-in-1 functionality allows for mulching, bagging, or side discharge. Attach the grass bag for collection or the side discharge chute for dispersal.

Figure 5.1: Operating the Lawn Mower.

Figure 5.2: Mowing a Residential Lawn.
6. Antretyen
Antretyen regilye asire lonjevite ak pèfòmans optimal tondeuz gazon ou an.
6.1. Netwayaj
After each use, disconnect the battery and clean the mower deck, blades, and grass bag. Use a damp cloth to wipe down exterior surfaces. Do not use water jets or immerse the mower in water.
6.2. Swen lam
Periodically inspect the cutting blade for sharpness and damage. A dull or damaged blade can lead to poor cutting performance and strain the motor. If necessary, have the blade sharpened or replaced by a qualified service technician. Always wear heavy-duty gloves when handling the blade.
6.3. Depo
Store the mower in a dry, secure location, away from direct sunlight and extreme temperatures. The foldable handle allows for compact storage. Remove the battery before storing for extended periods.
NAN. Depanaj
Seksyon sa a adrese pwoblèm komen ou ka rankontre ak tondeuz gazon ou an.
Mower Does Not Start:
- Asire w ke batri a konplètman chaje ak byen antre.
- Check that the safety button is pressed before pulling the bail lever.
- Verify that the bail lever is fully engaged.
- Inspect the battery terminals and mower contacts for debris or corrosion.
Pèfòmans koupe pòv:
- The cutting blade may be dull or damaged. Refer to Section 6.2 for blade care.
- Grass may be too wet or too long. Mow when grass is dry and consider raising the cutting height.
- The mower deck may be clogged with grass clippings. Disconnect battery and clean thoroughly.
Twòp Vibration:
- The cutting blade may be unbalanced or bent. Have it inspected and replaced if necessary.
- Check for loose fasteners on the mower deck or handle.
8. Espesifikasyon
| Karakteristik | Spesifikasyon |
|---|---|
| Mak | Fòs Lakou |
| Nimewo Modèl | YF60VRX21-SP |
| Sous pouvwa | DC 60V (batri) |
| Kalite motè | Brushless |
| Koupe Lajè | 20 pous |
| Gwosè pil | 21 pous |
| Koupe Ajisteman Wotè | 7-Position (1 1/4" to 3 3/4") |
| Kapasite batri | 1 x 4Ah |
| Charger | Chargeur rapid 4A |
| Tan kouri san chaj | Jiska 60 minit |
| Kapasite Sak Zèb | 2 bushel / 65L |
| Gwosè rou devan | 8 pous |
| Gwosè wou dèyè | 12 pous |
| Pwa atik | 86 liv |
| Dimansyon pwodwi | 36"D x 17"W x 24"H |
| UPC | 846325004084 |
9. Garanti ak sipò
Yard Force products are designed for durability and performance. For warranty information, product registration, or technical support, please refer to the warranty card included with your product or visit the official Yard Force websit la. Kenbe prèv acha ou a pou nenpòt reklamasyon garanti.


