1. Entwodiksyon
This manual provides detailed instructions for the setup, operation, and maintenance of your JoFomp 17.3" Large Digital Wall Clock. Please read this manual thoroughly before use to ensure proper functionality and longevity of the product.
2. Enfòmasyon sou Sekirite
- Ensure the clock is connected to a stable power source (5V/2A adapter included).
- Pa ekspoze aparèy la nan tanperati ekstrèm, limyè solèy dirèk, oswa imidite ki wo.
- Kenbe soti nan atenn timoun yo.
- Pa eseye demonte oswa repare aparèy la tèt ou. Kontakte sipò kliyan pou asistans.
- Kontwòl remote la mande pou 2 pil AAA (ki pa enkli).
- A 1 AAA battery (not included) is required for the memory function to retain settings during power outages.
3. Pake kontni
Verifye ke tout atik yo prezan nan pakè a:
- JoFomp 17.3" Digital Wall Clock
- Kontwòl Remote
- 5V/1A DC pouvwa adaptè
- Kòd pouvwa
- Mounting Hooks (2)
- Mounting Template Ruler
- Manyèl Itilizatè (dokiman sa a)

Figi 3.1: Akseswa ki enkli yo ak inite prensipal la.
4. Pwodwi souview
The JoFomp 17.3" Large Digital Wall Clock features a clear LED display and multiple functions for convenience.

Figure 4.1: Front display of the digital wall clock.
4.1 Ekspozisyon Karakteristik
- Ekspozisyon tan: Large 17.3" LED digits.
- Dat ekspozisyon: Month and Day.
- Jou nan semèn: Indicated by illuminated text (Mon-Sun).
- Tanperati: Displays in Celsius or Fahrenheit.
- Imidite: Displays relative humidity percentage.
- Doub Alam: Two independent alarm settings.
- Endikatè DST: Daylight Saving Time status.

Figure 4.2: Labeled display functions.
4.2 Back Panel and Buttons
The back of the clock houses control buttons and connection ports.

Figure 4.3: Back panel with labeled components.
- Bouton Anviwònman: Five buttons for manual adjustments (Light, SET, +, -, Alarm).
- Memory Battery Compartment: For 1 AAA battery (not included) to retain settings.
- Pouvwa Port: Pou konekte adaptè pouvwa a.
- Twou Mounting: Pou enstalasyon sou miray.
5. Enstalasyon
5.1 Koneksyon pouvwa
- Connect the power cord to the clock's power port.
- Plug the 5V/2A power adapter into a standard electrical outlet. The clock will power on and display.
Nòt: The clock requires continuous power to operate. It is not battery-powered for primary display.
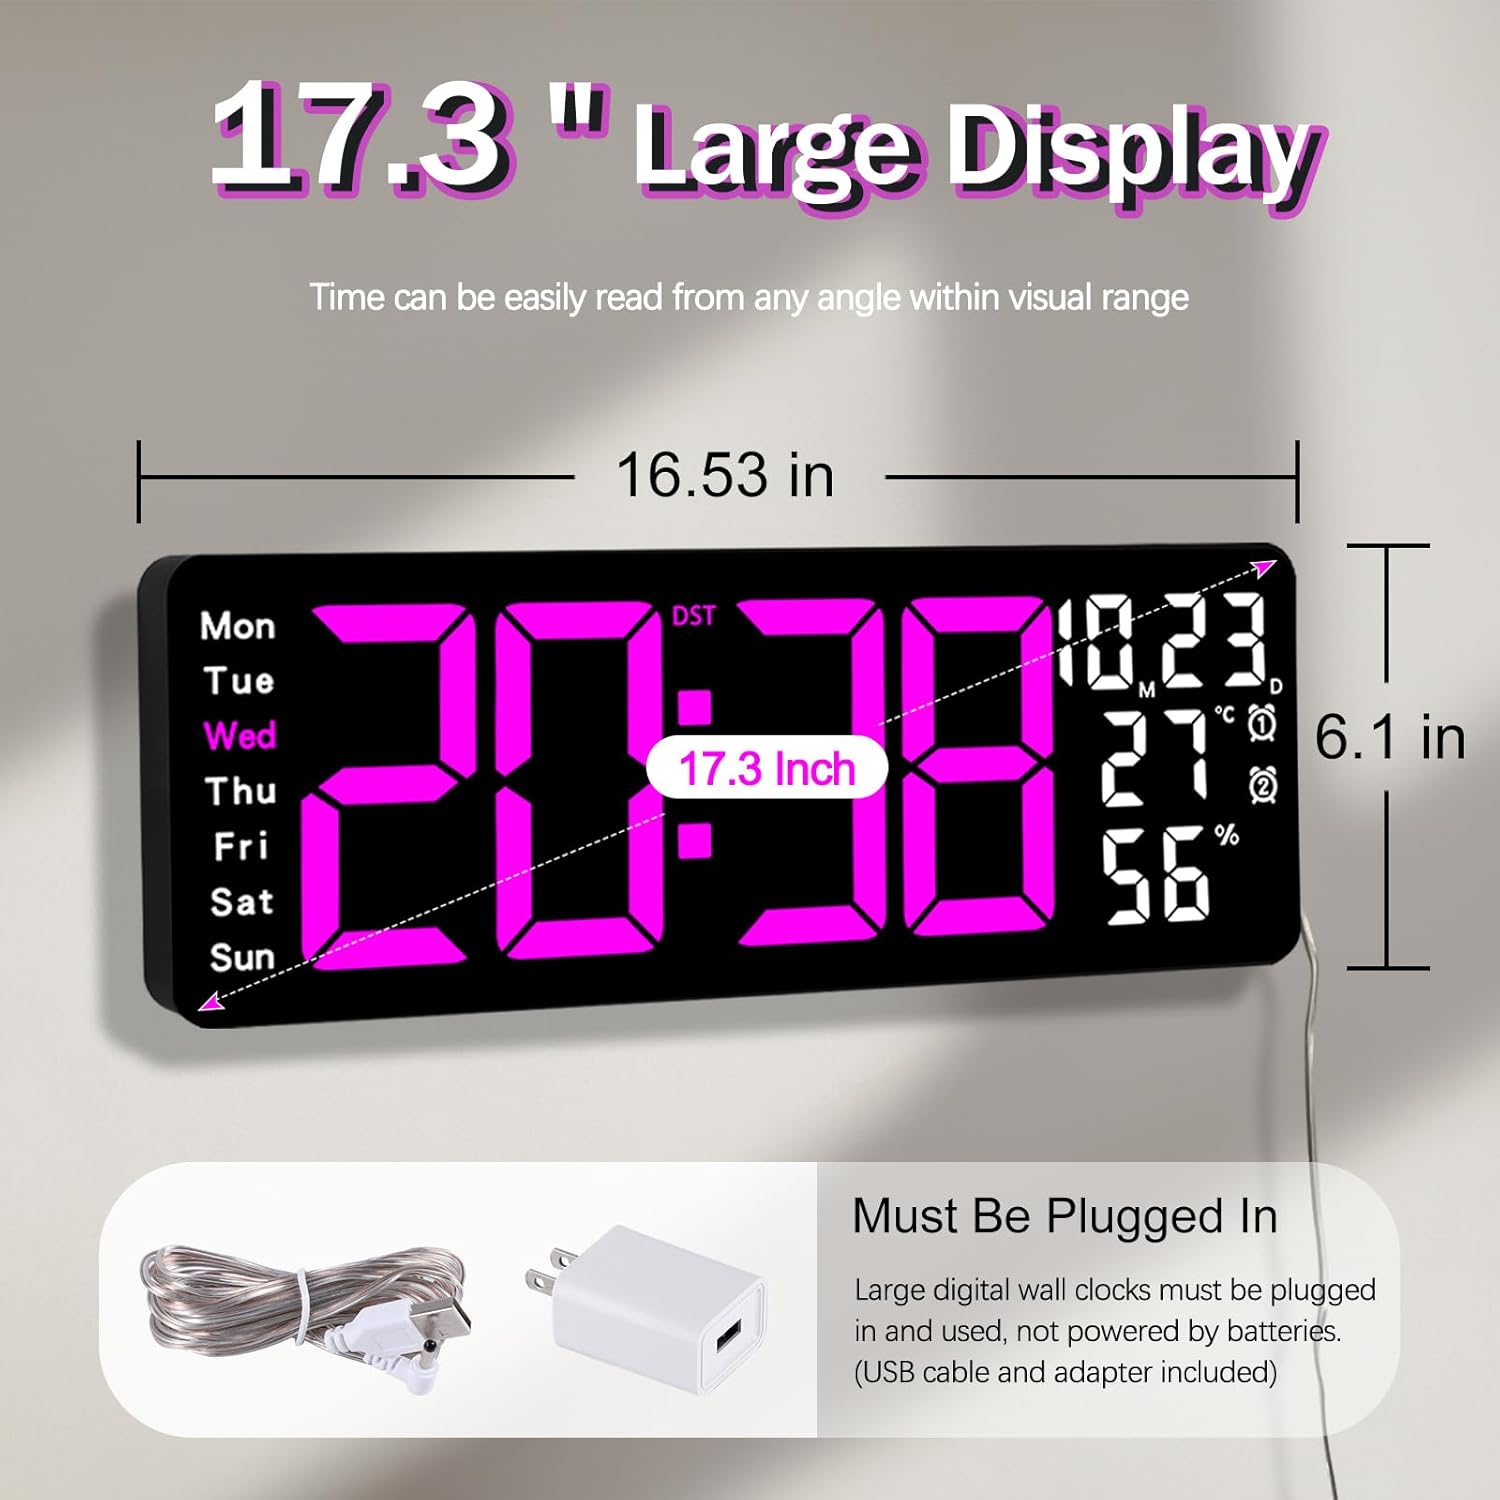
Figure 5.1: Power connection and dimensions.
5.2 Memory Battery Installation (Optional)
To retain time and settings during a power outage, install a 1 AAA battery (not included) into the memory battery compartment on the back of the clock.
- Locate the memory battery compartment on the back of the clock.
- Louvri kouvèti lòj la.
- Mete yon pil AAA 1.5V, asire w polarite a kòrèk (+/-).
- Fèmen kouvèti lòj la byen.
5.3 Montaj mi
Use the included mounting template ruler and hooks for easy wall installation.
- Determine the desired location for your clock.
- Place the mounting template ruler on the wall at the desired height.
- Mark the positions for the mounting hooks according to the ruler's indications.
- Install the mounting hooks into the wall at the marked positions.
- Carefully hang the clock onto the installed hooks, ensuring it is level and secure.
6. Operasyon Enstriksyon
The clock can be operated using either the remote control or the buttons on the back.
6.1 Tan ak Dat Anviwònman
Use the remote control or the "SET" button on the back of the clock.
- Peze a SET button (on remote or back of clock) to enter setting mode.
- Sèvi ak la + epi - bouton yo pou ajiste valè ki ap flache a (pa egzanp, èdtan, minit, ane, mwa, jou).
- Peze SET again to confirm the current setting and move to the next parameter.
- Repeat until all settings are configured.
6.2 12/24 Hour Format Conversion
Pou chanje ant fòma lè 12 èdtan ak 24 èdtan:
- Peze dedye a 12/24H bouton sou kontwòl remote la.
- Alternatively, during time setting, the format option will appear.

Figure 6.1: 12/24H format conversion.
6.3 Konvèsyon Inite Tanperati (°C/°F)
Pou chanje ant inite tanperati Sèlsiyis ak Fahrenheit:
- Peze a ° C / ° F. bouton sou kontwòl remote la.
6.4 Alarm Setting (Dual Alarms)
Revèy la sipòte de alam endepandan.
- Peze a ALAM button on the remote control or the back of the clock.
- Sèvi ak + epi - pou fikse tan alam vle a.
- Peze ALAM again to confirm and move to the next alarm or exit.
- To activate/deactivate an alarm, press the corresponding alarm button (e.g., AL1 or AL2) sou remote la.
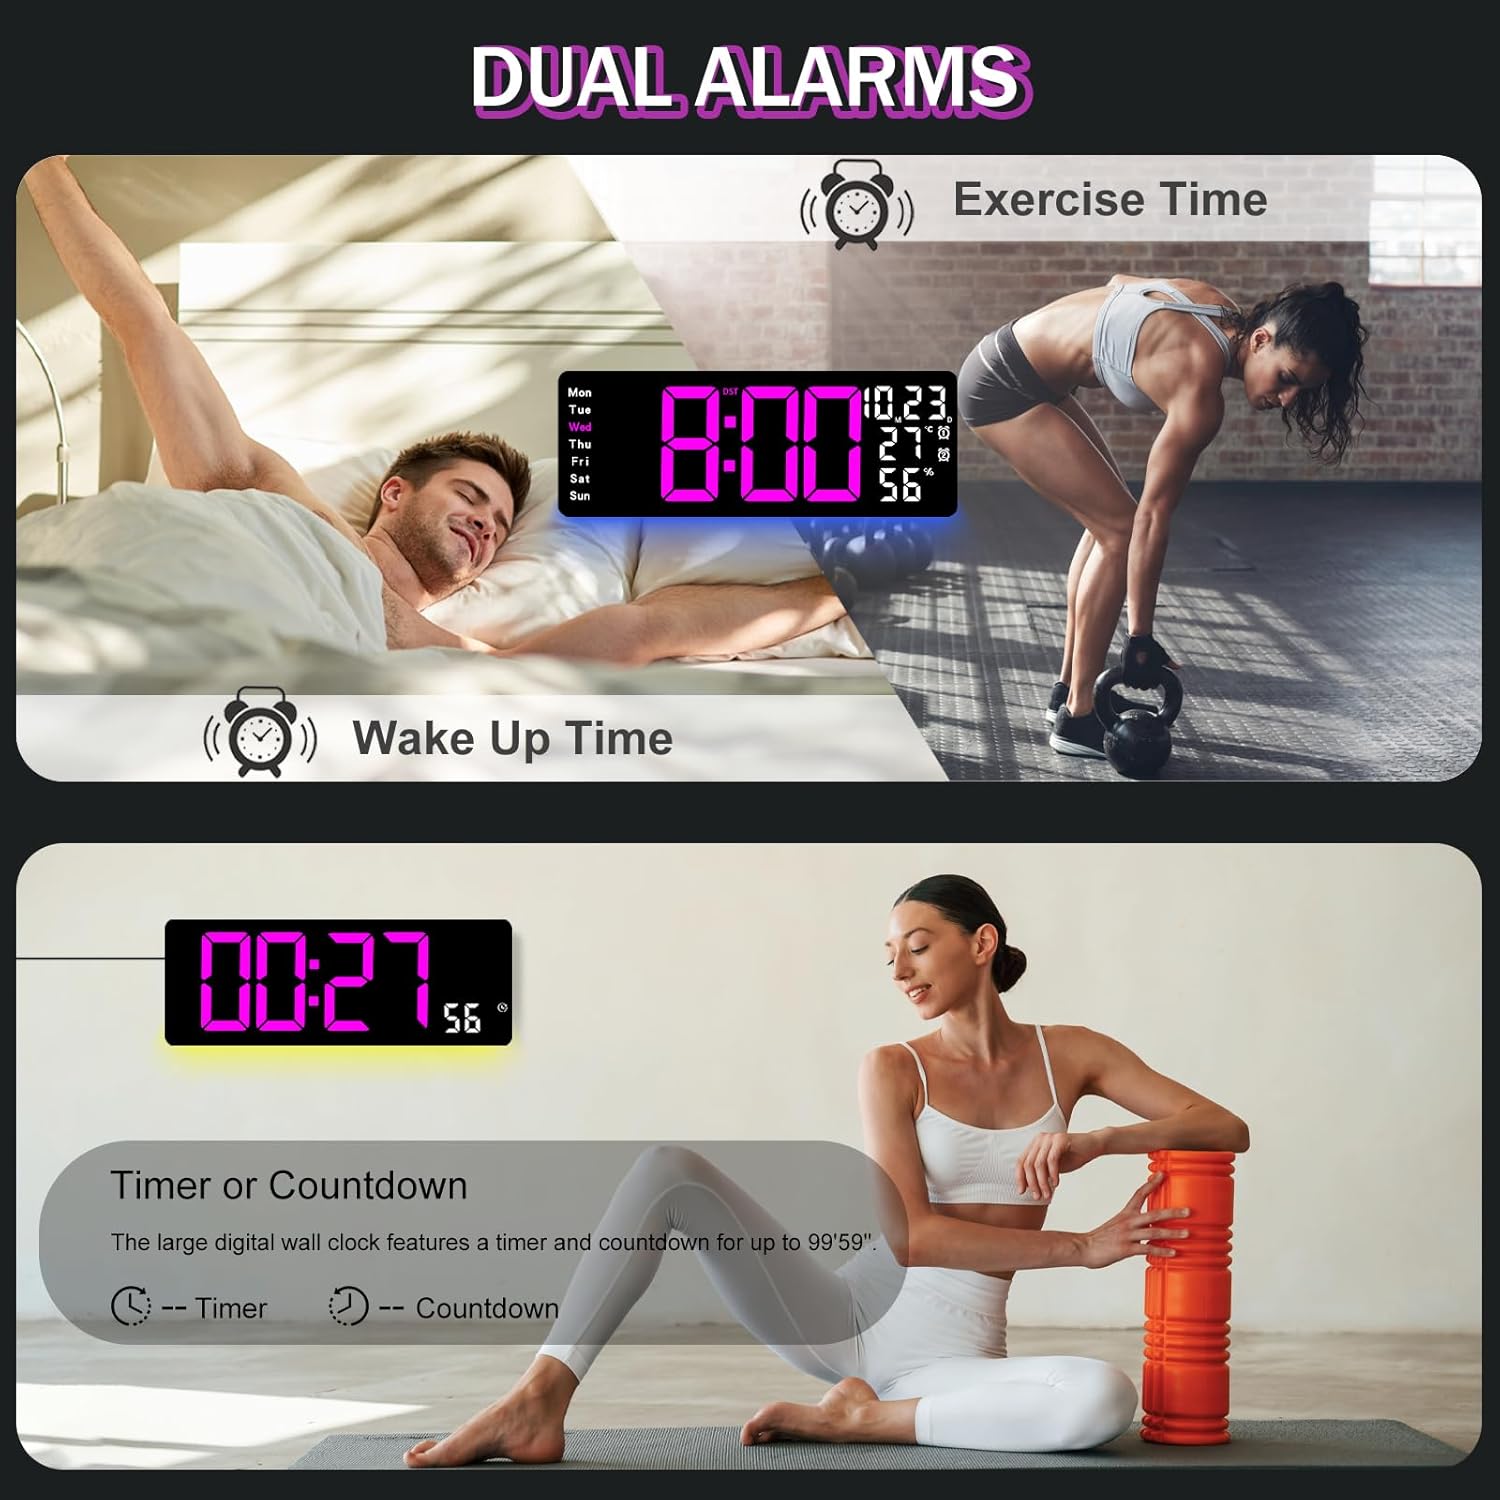
Figure 6.2: Dual alarm and timer functions.
6.5 Ajisteman klète
The clock offers 10 levels of brightness, adjustable manually or automatically.
- Otomatik klète: The built-in light sensor adjusts brightness based on ambient light. Activate this mode by pressing the OTO bouton sou remote la.
- Manual Brightness: Peze a KLEYE button on the remote, then use + epi - to select one of the 10 levels.

Figure 6.3: Custom and auto-brightness settings.

Figure 6.4: Brightness regulator illustration.
6.6 Ambient Light Features
The clock includes a night light feature at the bottom with multiple color options.
- Peze a LIMYÈ button on the remote control or the back of the clock to cycle through 8 fixed colors and 1 multi-color mode.
- In multi-color mode, the colors automatically convert. Press OK to fix a favorite color.
- Adjust the brightness of the ambient light using the + epi - buttons when the ambient light is active.

Figure 6.5: Multiple ambient night light options.

Figure 6.6: 9 color ambient light options.
6.7 Fonksyon revèy ak konte a rebours
The clock features a timer (count-up) and countdown function up to 99 minutes and 59 seconds.
- Peze a TIMER bouton sou kontwòl remote la.
- Sèvi ak + epi - to set the desired time for countdown.
- Peze KÒMANSE/KANPE to begin or pause the timer/countdown.
- Peze RESET pou netwaye revèy la.

Figure 6.7: Timing function (count-up/countdown).
Video 6.1: Demonstration of multi-functional features including night light change, brightness control, count-up, and countdown. This video also shows the time, date, day, alarm clock, temperature, and humidity displayed on the same screen, along with 12/24 hour conversion, Celsius/Fahrenheit conversion, and DST enablement. The back design and buttons are also briefly shown.
6.8 Lè Ete (DST)
If DST is observed in your region, you can enable or disable it.
- Long peze la - button on the remote control to enable or disable DST. The DST indicator will appear/disappear on the display.

Figure 6.8: Enabling and disabling Daylight Saving Time.

Figure 6.9: Daylight Saving Time (DST) functionality.
6.9 Itilizasyon kontwòl Remote
The remote control provides convenient access to all clock functions without needing to reach the clock directly.

Figure 6.10: Remote control and its functions.

Figure 6.11: Remote control in use.
- Ensure the remote control has 2 AAA batteries installed (not included).
- Point the remote control directly at the clock for optimal response.
- Each button on the remote corresponds to a specific function as described in this manual.
7. Antretyen
- Clean the clock's display and body with a soft, dry cloth. Avoid abrasive cleaners or solvents.
- Ensure the power adapter and cord are free from damage.
- Replace the memory battery annually to ensure settings are retained during power interruptions.
NAN. Depanaj
| Pwoblèm | Kòz posib | Solisyon |
|---|---|---|
| Afich revèy la etenn. | Pa gen ekipman pou pouvwa. | Check if the power adapter is securely plugged into the clock and the outlet. Ensure the outlet is functional. |
| Remote kontwòl pa travay. | Low or dead batteries in remote; obstruction; remote out of range. | Replace remote batteries (2 AAA). Ensure no obstructions between remote and clock. Point directly at the clock within effective range. |
| Settings lost after power outage. | No memory battery or dead memory battery. | Install a fresh 1.5V AAA battery in the memory compartment. |
| Incorrect temperature/humidity reading. | Sensor interference or placement. | Ensure the clock is not placed near heat sources, direct sunlight, or in areas with extreme drafts. Allow time for the sensor to stabilize. |
| Ambient light not changing colors. | Stuck in fixed color mode. | Press the LIGHT button on the remote to cycle through modes. If stuck on a fixed color, press the OK button to release it from fixed mode. |
9. Espesifikasyon
| Karakteristik | Detay |
|---|---|
| Mak | JoFomp |
| Nimewo Modèl | 6669 |
| Kalite ekspozisyon | Dijital dirije |
| Gwosè ekspozisyon | 17.3 pous |
| Dimansyon pwodwi | 16.5" lajè x 6.7" wotè |
| Sous pouvwa | Corded Electric (5V/2A adapter included) |
| Batri memwa | 1 x AAA (pa enkli) |
| Nivo klète | 10 (Auto/Manual) |
| Ambient Light Colors | 8 Fixed + 1 Multi-color |
| Karakteristik espesyal | Large Display, Adjustable Brightness, Temperature Display, Humidity Display, Dual Alarms, Timer, Countdown, DST, Remote Control |
| Kalite aliye | Mi mòn |
| Pwa atik | 1.95 liv |
10. Garanti ak sipò
JoFomp products are designed for reliability and performance. For warranty information or technical support, please refer to the contact details provided with your purchase or visit the official JoFomp websit la. Kenbe resi acha ou kòm prèv acha.


