Entwodiksyon
The VILTROX DC-X2 DSLR Camera Field Monitor is a professional-grade touchscreen monitor designed to enhance your photography and videography experience. Featuring a 2000-nit high-brightness display, 4K full HD 1920x1080 resolution, and a 6-inch IPS panel, it ensures crystal-clear image quality even in challenging lighting conditions. This manual provides detailed instructions for setting up, operating, and maintaining your DC-X2 monitor.
Ki sa ki nan bwat la
Upon unboxing your VILTROX DC-X2 monitor, please verify that all the following components are included:
- DX-X2/D-X3 monitor *1
- Hard-koki pote ka
- Custom pan-tilt head
- NP-F550 batri
- Quick-detach sunshade
- Custom screen protector
- HDMI kab
- Mini HDMI kab
- Manyèl elektwonik
- Kat garanti
- USB-C pouvwa kab

Image: The VILTROX DC-X2 monitor displayed with its comprehensive set of accessories, including cables, battery, sunshade, and mounting head.
Enstalasyon
1. Attaching the Pan-Tilt Head
Secure the custom pan-tilt head to your camera's hot shoe or a compatible mounting point. Ensure it is firmly tightened to prevent wobbling during use.
2. Monte monitè kè bebe a
Attach the VILTROX DC-X2 monitor to the pan-tilt head. The monitor features a robust design for secure attachment.
3. Mete monitè a an fonksyon
The DC-X2 supports multiple power supply options:
- NP-F Series Lithium Batteries: Insert a compatible NP-F series battery into the battery slot on the rear of the monitor.
- DC IN 12-18V/2A: Connect the provided DC power adapter to the DC IN port for continuous power.
- Type-C (≥9V/3A): Use a Type-C cable with a power bank or compatible power source for flexible power options.

Image: Visual representation of the three power input options: Type-C, DC IN, and NP-F battery slot.
4. Konekte ak Kamera
Connect your DSLR or mirrorless camera to the monitor using the appropriate HDMI or Mini HDMI cable. The monitor supports up to 4K 30Hz input/loop-through.
Enstriksyon Operasyon
1. Power On/Off
Press and hold the power button located on the side of the monitor to turn it on or off. A green indicator light will confirm power status.
2. Entèfas ekran taktil
The DC-X2 features an intuitive touchscreen interface. Tap on icons and slide controls to navigate menus and adjust settings. The main menu provides quick access to various monitoring functions and system settings.
3. Customizable Shortcut Keys
The monitor includes 4 customizable shortcut keys (F1-F4) for quick access to frequently used functions. These can be configured via the system settings menu to suit your personalized usage habits, greatly improving shooting efficiency.

Imaj: Gwo plan view of the VILTROX DC-X2 monitor highlighting the four customizable shortcut keys on its side.
Professional Monitoring Features
The DC-X2 monitor is equipped with a comprehensive suite of professional monitoring tools to assist with accurate focus and exposure:
- Parade Waveform: Visualizes the luminance and chrominance levels of your video signal.
- Vector Graph: Displays color information, helping to ensure accurate color balance.
- Istogram klète: Shows the distribution of tones in your image, aiding in exposure control.
- Auxiliary Focus (Focus Peaking): Highlights in-focus areas with a selectable color (e.g., red, green, blue) for precise manual focusing.
- Audio Column (Volume Bar): Displays audio levels to prevent clipping.
- Imaj Flip: Flips the image horizontally or vertically, useful for various camera setups.
- Koulè fo: Uses a spectrum of colors to represent different exposure levels, helping to identify overexposed or underexposed areas.
- Zebra Crossing: Indicates areas of overexposure with zebra stripes.
- Custom 3D LUT: Supports importing and storing custom 3D LUTs via a USB-A interface for on-set color grading and preview.
- Aspect Ratio Markers: Provides various aspect ratio guides (e.g., 4:3, 16:9, 2.35:1) for precise framing.
- Center Mark & Safe Area: Helps with composition and ensuring critical elements are within broadcast-safe zones.
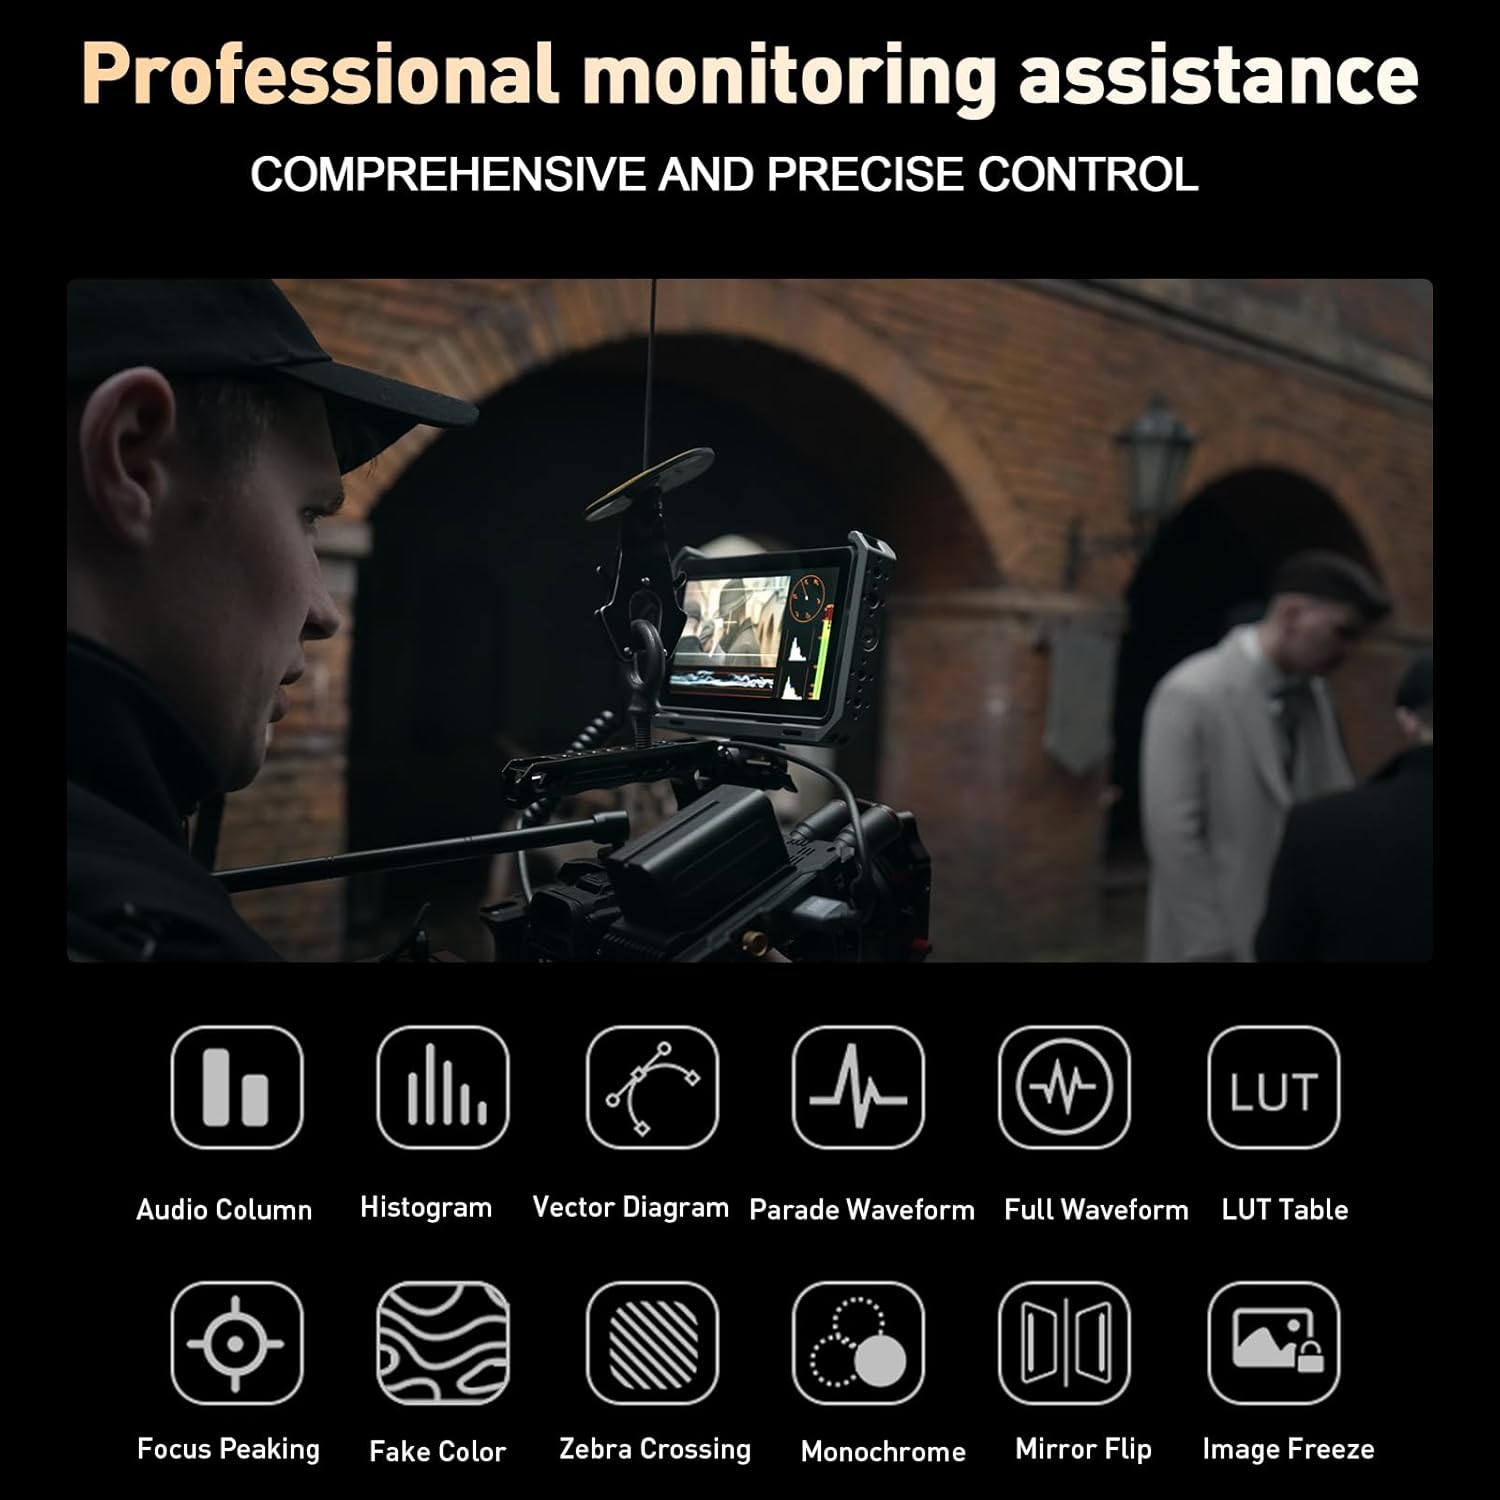
Image: Icons representing the various professional monitoring functions available on the VILTROX DC-X2 monitor.

Imaj: Yon vizyèl souview of the auxiliary monitoring tools, including histogram, vector, parade, full waveform, 3D LUT, focus peaking, false color, and more.
3D LUT Application
The DC-X2 supports importing and storing custom 3D LUTs (Look-Up Tables) from a USB-A drive. This feature allows you to apply specific color grades or camera profiles directly to your monitoring feed, providing a more accurate representation of your final output.
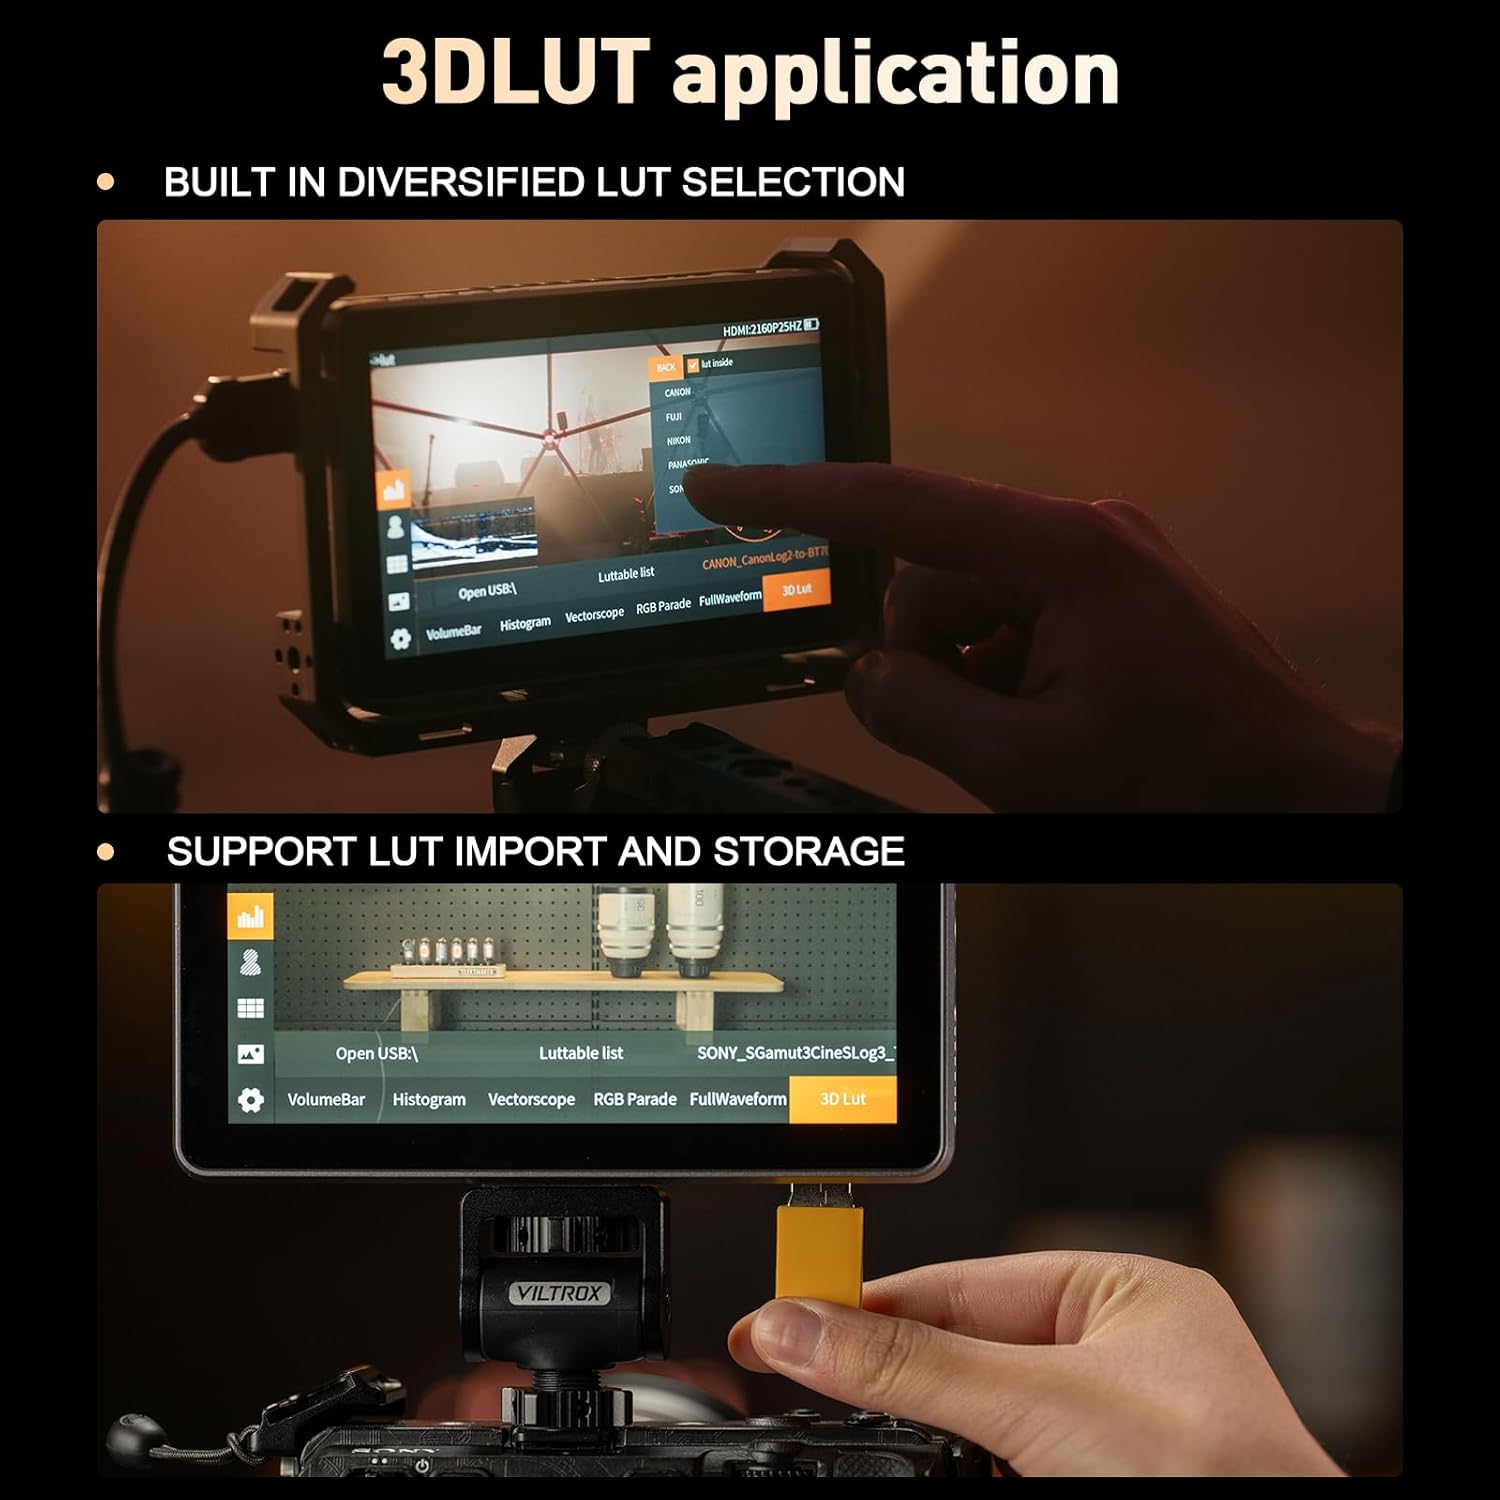
Image: The monitor screen showing the 3D LUT selection menu and a USB drive connected for LUT import.
Sunshade Installation
The VILTROX DC-X2 includes a quick-detach sunshade designed to improve screen visibility in bright outdoor conditions. To install, simply align the sunshade with the monitor's frame and press until it clicks into place. The sunshade can be folded for compact storage and also provides protection for the screen when closed.

Image: The VILTROX DC-X2 monitor shown with its quick-release lens hood attached, demonstrating its use in bright environments.
Espesifikasyon
| Karakteristik | Spesifikasyon |
|---|---|
| Dimansyon pwodwi | 6.1 x 0.98 x 3.86 pous |
| Pwa atik | 2.86 liv |
| Nimewo Modèl Atik | DC-X2 |
| Kanpe Screen Display Size | 6.0 pous |
| Aspè rapò | 16:9 |
| Rezolisyon | 1920 x 1080 (FHD 1080p) |
| Imaj klète | 2000 nits |
| Pwopòsyon Imaj Kontrèman | 1000:1 |
| Viewang yo | 160° |
| Kalibrasyon koulè | SRGB/Rec.70 |
| Rafrechisman pousantaj | 30Hz (4K input) / 60Hz (display) |
| Total pò USB | 1 (USB-A for LUT import) |
| Voltage | 12 Vòlt (DC) |
| Manifakti | VILTROX |

Image: A comparison table highlighting the differences and similarities between the VILTROX DC-X2 and DC-X3 models, including display screen, resolution, contrast, brightness, and viewang ing.

Imaj: Yon eksplozyon view of the VILTROX DC-X2 monitor showing its internal cooling fan and all-aluminum body for efficient heat dissipation.
Depanaj
If you encounter any issues with your VILTROX DC-X2 monitor, please refer to the following common troubleshooting steps:
- Pa gen pouvwa: Ensure the battery is fully charged or the DC power adapter is securely connected. Check the power source.
- Pa gen siyal: Verify that the HDMI/Mini HDMI cable is correctly connected to both the camera and the monitor. Ensure the camera's output settings are compatible with the monitor's input (e.g., 4K 30Hz).
- Ekran an ap tranble/distòsyon: Check cable connections. Try a different HDMI cable. Ensure the monitor's firmware is up to date.
- Ekran taktil la pa reponn: Power cycle the device. If the issue persists, perform a factory reset via the system settings menu.
- Surchof: Ensure the monitor's fan is not obstructed. Operate in a well-ventilated area. The intelligent temperature control system is designed to manage heat effectively.
For more detailed troubleshooting or issues not listed here, please consult the electronic manual provided or contact VILTROX customer support.
Garanti ak sipò
The VILTROX DC-X2 DSLR Camera Field Monitor comes with a standard manufacturer's warranty. Please refer to the warranty card included in your package for specific terms and conditions regarding coverage and duration.
For technical support, product inquiries, or warranty claims, please visit the official VILTROX website or contact their customer service department. Contact information can typically be found on the warranty card or the VILTROX brand store on Amazon.
Nòt: Kenbe resi acha ou a kòm prèv acha pou rezon garanti.


