Entwodiksyon
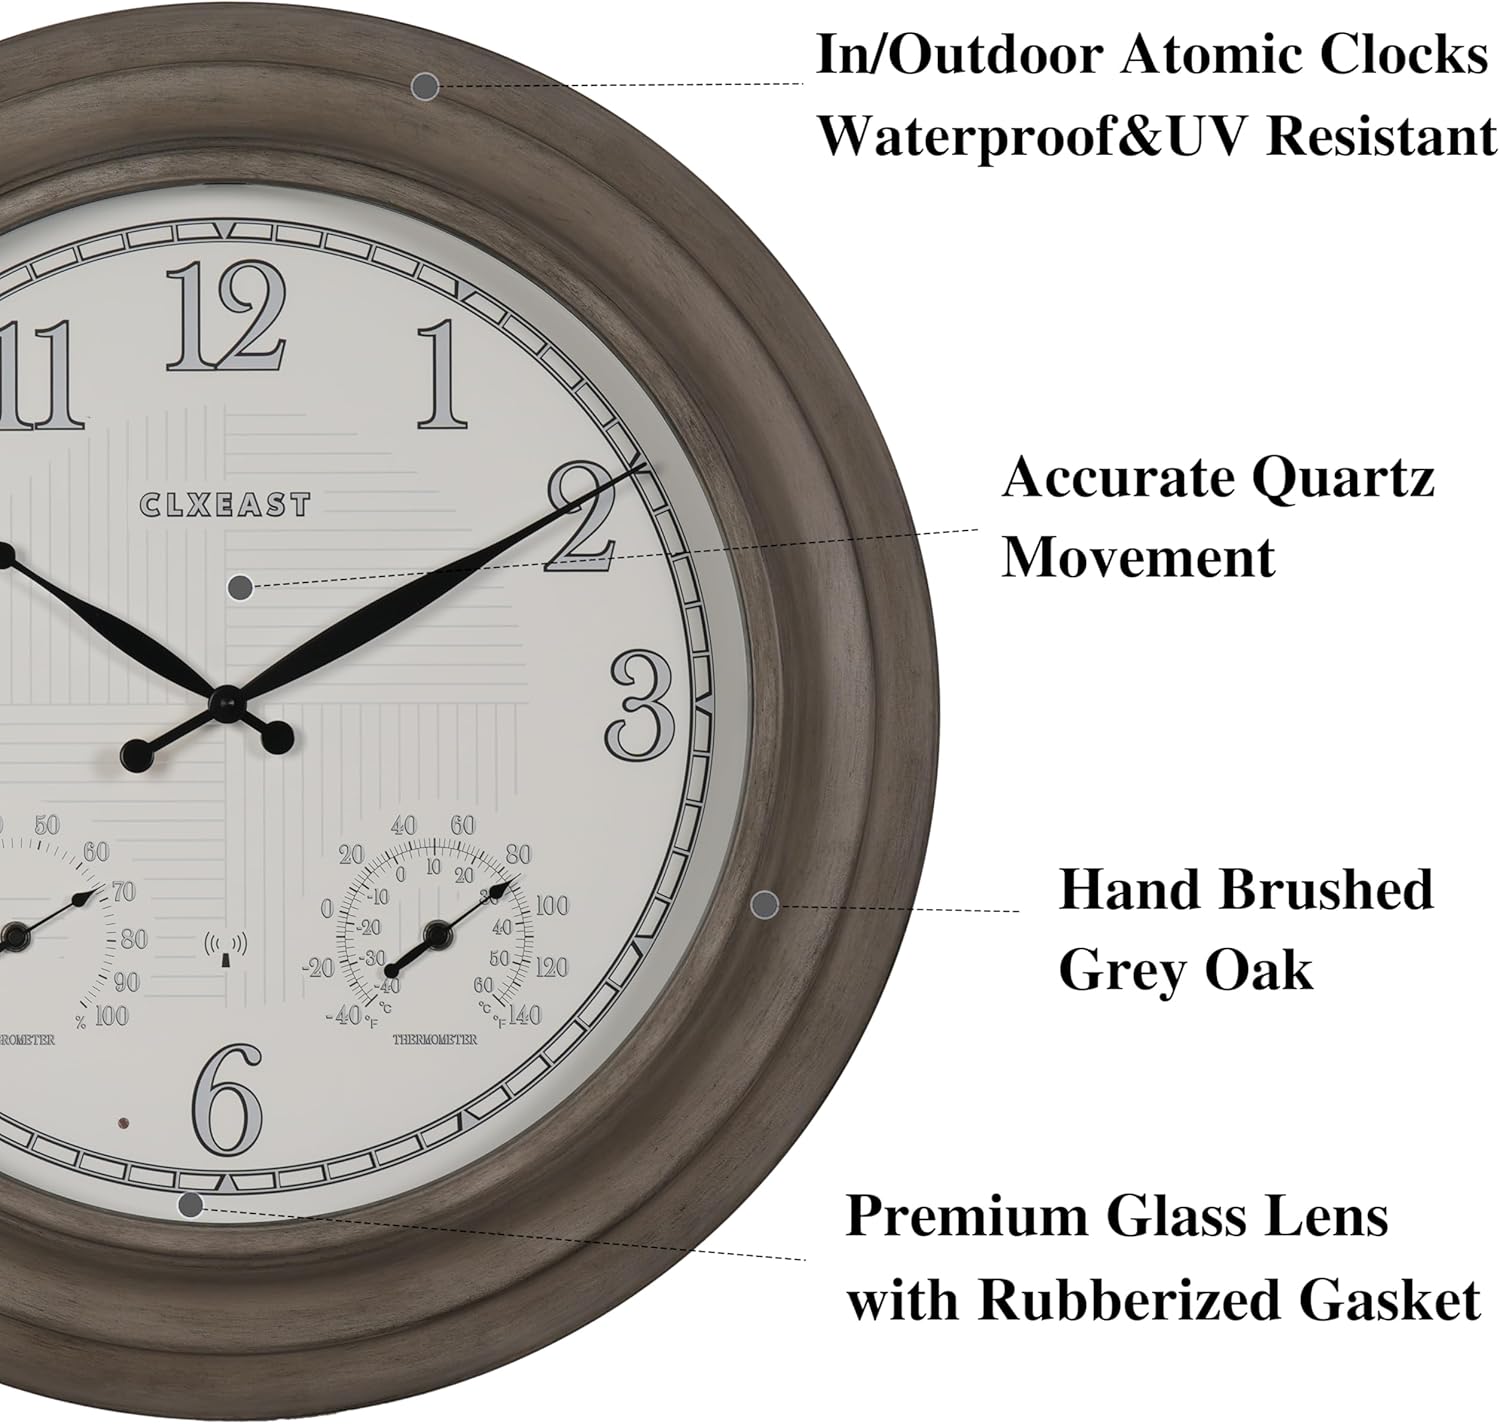
Thank you for choosing the CLXEAST 24 Inch Self-Illuminated In/Outdoor Atomic Wall Clock. This oversized timepiece combines precise atomic timekeeping with practical features such as integrated temperature and humidity sensors, and a smart LED light sensor for automatic illumination. Designed for durability, it is UV resistant and weatherproof, making it suitable for various indoor and outdoor settings. Please read this manual carefully to ensure proper setup, operation, and maintenance of your new clock.

The CLXEAST 24 Inch Atomic Wall Clock, showcasing its appearance in both daylight and with its smart LED illumination activated at night.
Enstalasyon
Follow these steps to set up your CLXEAST Atomic Wall Clock:
- Enstalasyon batri:
- Jwenn konpatiman pil yo sou dèyè revèy la.
- Insert four (4) D batteries into the designated compartments. Ensure correct polarity (+/-).
- Open the circular cover in the center of the back panel. Insert one (1) AA battery into the clock mechanism. Ensure correct polarity.
Dèyè view of the clock, indicating the locations for battery insertion and control switches.
- Initial Time Synchronization:
- Once batteries are installed, the clock will automatically begin searching for the WWVB atomic time signal from Fort Collins, CO.
- The clock hands will rotate to 12:00 and then move to the correct time once the signal is received and processed. This process may take several minutes to several hours depending on your location and signal strength.
- Allow the thermometer and hygrometer at least 3 hours to fully calibrate themselves to the environment for accurate readings.

The clock's atomic time feature automatically sets and adjusts for Daylight Saving Time across four USA time zones: Pacific, Mountain, Central, and Eastern.
- Seleksyon Zòn Tan:
- On the back of the clock mechanism, locate the time zone switch (P, M, C, E).
- Slide the switch to select your desired time zone: P (Pacific), M (Mountain), C (Central), or E (Eastern).
- Anviwònman Tan DST:
- The clock has an On/Off option for automatic Daylight Saving Time adjustments.
- Locate the DST switch on the back of the clock mechanism and set it to 'On' for automatic adjustment or 'Off' to disable.
- Montaj:
- The clock features a keyhole slot on the back for easy wall mounting.
- Choose a suitable location, ensuring it is stable and can support the clock's weight (8.8 pounds).
- For outdoor use, select a location that offers some protection from direct extreme weather conditions, although the clock is weatherproof.

The CLXEAST clock seamlessly integrated into an outdoor patio setting, demonstrating its suitability for exterior decor.
Opere
Your CLXEAST Atomic Wall Clock is designed for ease of use once set up:
- Atomic Time Synchronization: The clock continuously receives the WWVB signal to maintain accurate time, adjusting automatically for any minor deviations.
- Smart LED Light Sensor:
- The integrated light sensor automatically activates a warm, ambient dial backlight during dark conditions.
- The backlight automatically shuts off in normal daylight.
- Two backlight modes are available: 'Always On' and 'Always Off'. Select your preferred mode using the switch on the back of the clock.
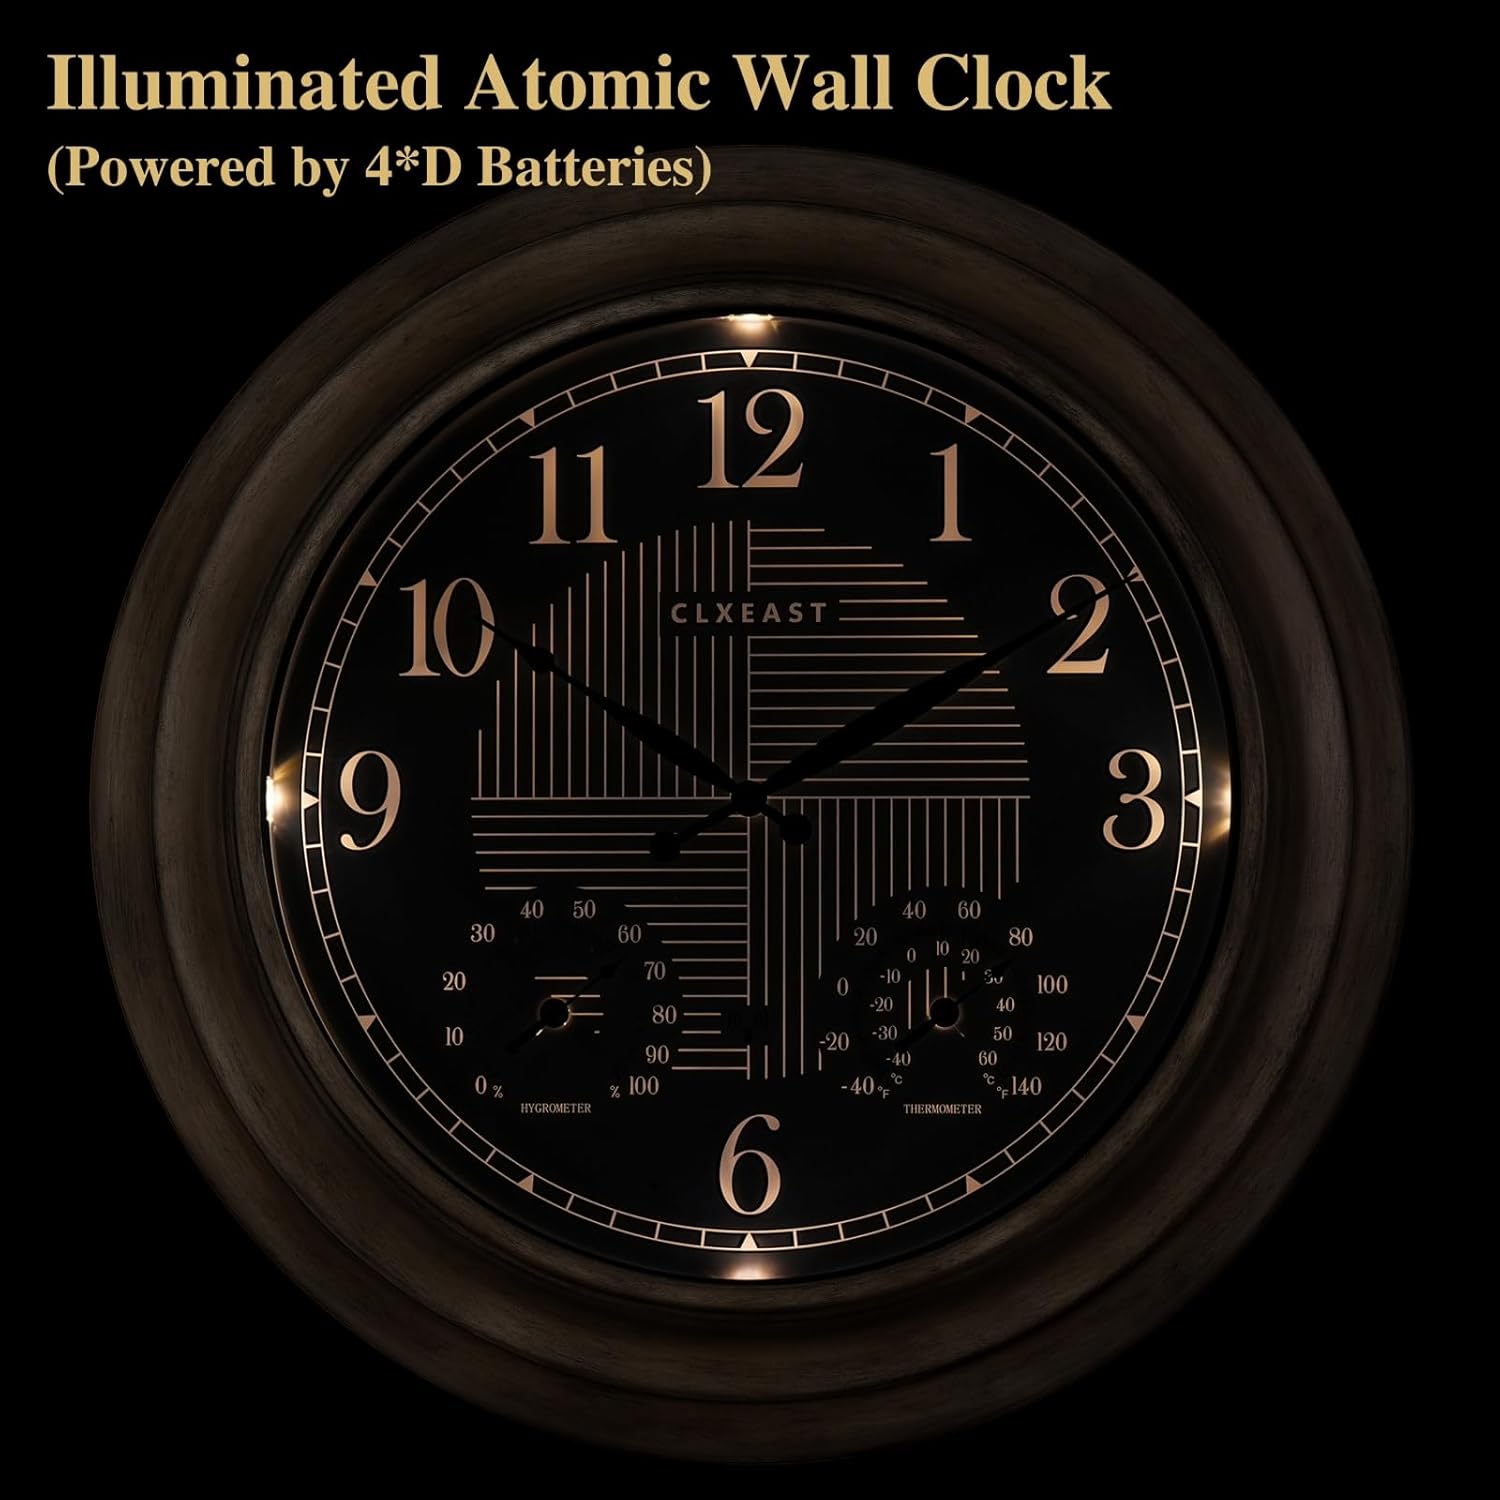
The CLXEAST clock with its dial illuminated, powered by 4 D batteries, providing visibility in low-light conditions.

A smart sensor detects the environment and automatically turns the lights on/off, offering two backlight modes: Always On and Always Off.
- Ekspozisyon tanperati ak imidite: The clock features built-in adjustable thermometer and hygrometer sensors. The thermometer measures temperatures from -40°F to 140°F, and the hygrometer provides humidity readings from 1% to 99% relative humidity. These automatically measure indoor and outdoor conditions.
Antretyen
To ensure the longevity and optimal performance of your CLXEAST clock, follow these maintenance guidelines:
- Netwayaj: Use a soft, dry cloth to clean the clock's surface. Avoid abrasive cleaners or solvents that may damage the finish or the glass lens.
- Pwoteksyon move tan: While the clock is UV resistant and IP56 weatherproof with sealed gaskets, prolonged exposure to extreme weather conditions (e.g., direct heavy rain, intense sunlight for extended periods) may affect its lifespan. Consider placing it under a covered patio or porch for added protection.
- Ranplasman batri: Replace all batteries (4 D and 1 AA) annually or when the clock's performance diminishes (e.g., dimming backlight, inaccurate timekeeping). Always replace all batteries at once with new ones to ensure consistent power.
Depanaj
If you encounter any issues with your CLXEAST clock, refer to the following common problems and solutions:
| Pwoblèm | Kòz posib | Solisyon |
|---|---|---|
| Clock not setting time or inaccurate time. | Weak or no atomic signal; incorrect time zone; low batteries. | Ensure clock is in an open area away from electronic interference. Verify time zone setting. Replace all batteries. Press the 'Reset' button on the back of the clock. |
| Limyè dèyè a pa fonksyone oswa li fèb. | Low D batteries; incorrect backlight mode; insufficient darkness. | Replace D batteries. Check the backlight mode switch (Always On/Always Off). Ensure the environment is dark enough for the light sensor to activate. |
| Temperature or humidity readings are inaccurate. | Sensors not yet calibrated; extreme environmental changes. | Allow at least 3 hours for sensors to calibrate after setup or significant environmental changes. Ensure sensors are not obstructed. |
| Clock hands are stuck or not moving smoothly. | Low AA battery; obstruction. | Replace the AA battery. Check for any physical obstructions to the clock hands. |
Espesifikasyon
- Mak: CLXEAST
- Nimewo Modèl: TM2227H60-N-RC
- Koulè: Farmhouse Grey Oak
- Kalite ekspozisyon: Analòg
- Style: Farmhouse
- Karakteristik espesyal: Atomic Time, Daylight Saving Time by WWVB, Illuminated, Temperature & Humidity Display, Weatherproof & UV Resistant
- Dimansyon pwodwi: 24.4" lajè x 24.4" wotè
- Sous pouvwa: Batri Powered
- Kalite chanm: Dining Room, Farmhouse, Home Office, Living Room, Pool, Patio, Garden, Backyard, Porch
- Fòm: Round
- Itilizasyon anndan/deyò: Indoor, Outdoor (IP56 Waterproof)
- Materyèl: Akrilik, Vè, Metal
- Materyèl ankadreman: Metal
- Batri obligatwa: 4 D batteries (for illumination/atomic signal), 1 AA battery (for clock movement) - Not Included
- Kalite montaj: Mi mòn
- Pwa atik: 8.8 liv
- Gade Mouvman: Quartz
- Koulè Dial: Black (illuminated), White (daytime)
- Fòm revèy: Multi Display
Garanti ak sipò
The CLXEAST 24 Inch Self-Illuminated In/Outdoor Atomic Wall Clock comes with a Garanti limite. For specific details regarding warranty coverage, terms, and conditions, please refer to the warranty card included with your product or contact CLXEAST customer support directly.
For technical assistance, troubleshooting not covered in this manual, or warranty claims, please contact CLXEAST customer support through their official website or the contact information provided in your product packaging. Please have your model number (TM2227H60-N-RC) and purchase details ready when contacting support.


