Entwodiksyon
This manual provides detailed instructions for the assembly, operation, and maintenance of your Vetroo AL800 Mid Tower ATX PC Computer Case. Please read this manual thoroughly before beginning installation to ensure proper setup and optimal performance.

Figure 1: Vetroo AL800 Mid Tower ATX PC Computer Case (Black)
Enfòmasyon sou Sekirite
- Toujou dekonekte ekipman pou kouran an nan priz miray la anvan ou enstale oswa retire nenpòt konpozan.
- Handle components with care to avoid damage from electrostatic discharge. Consider using an anti-static wrist strap.
- Keep the case and components away from liquids and excessive humidity.
- Asire bon vantilasyon pou anpeche surchof.
- Pa eseye modifye bwat la oswa konpozan li yo, paske sa ka anile garanti a epi poze risk pou sekirite.
Kontni pake
Verifye ke tout atik yo prezan nan pakè a:
- Vetroo AL800 Mid Tower ATX PC Computer Case
- Bwat akseswa (vis, distansè, lyen kab)
- Pre-installed 1x 120mm PWM/ARGB Fan (rear)
- Manyèl Itilizatè (dokiman sa a)
Karakteristik kle
- ARGB LED Strip: Integrated LED lighting and ARGB case fans can be synchronized with compatible motherboards via a 5V 3-pin interface.
- Door Opening Design: Features a 4mm thick tempered glass side panel with a convenient door-opening mechanism for easy access to internal components.
- High Performance Airflow: A mesh front panel and strategically placed dust filters ensure optimal airflow and system cooling.
- Lajè konpatibilite: Supports ATX, M-ATX, and ITX motherboards. Accommodates GPUs up to 340mm in length and CPU coolers up to 165mm in height.
- Sipò pou refwadisman likid: Front panel supports up to a 360mm liquid cooling radiator.
- Sipò pou fanatik: Supports up to 8 x 120mm fans.
- Jesyon kab senp: Includes two soft silicone cord grommets for organized cable routing.
- Powerful I/O Panel: Features 1x USB 3.2 Type-C port, 2x USB 3.0 ports, and a combined microphone/headphone jack.
Enstalasyon ak Enstalasyon
1. General Preparation
- Mete bwat la sou yon sifas plat epi ki estab.
- Open the tempered glass side panel by gently pulling it open. It is hinged for easy access.
- Remove the tempered glass panel if necessary for easier installation by lifting it off its hinges once open.

Figure 2: Tempered Glass Door Opening Design
2. Enstalasyon mèr
- Install the I/O shield (if applicable) into the rear opening of the case.
- Align your ATX, M-ATX, or ITX motherboard with the pre-installed standoffs.
- Secure the motherboard using the provided screws from the accessory box.
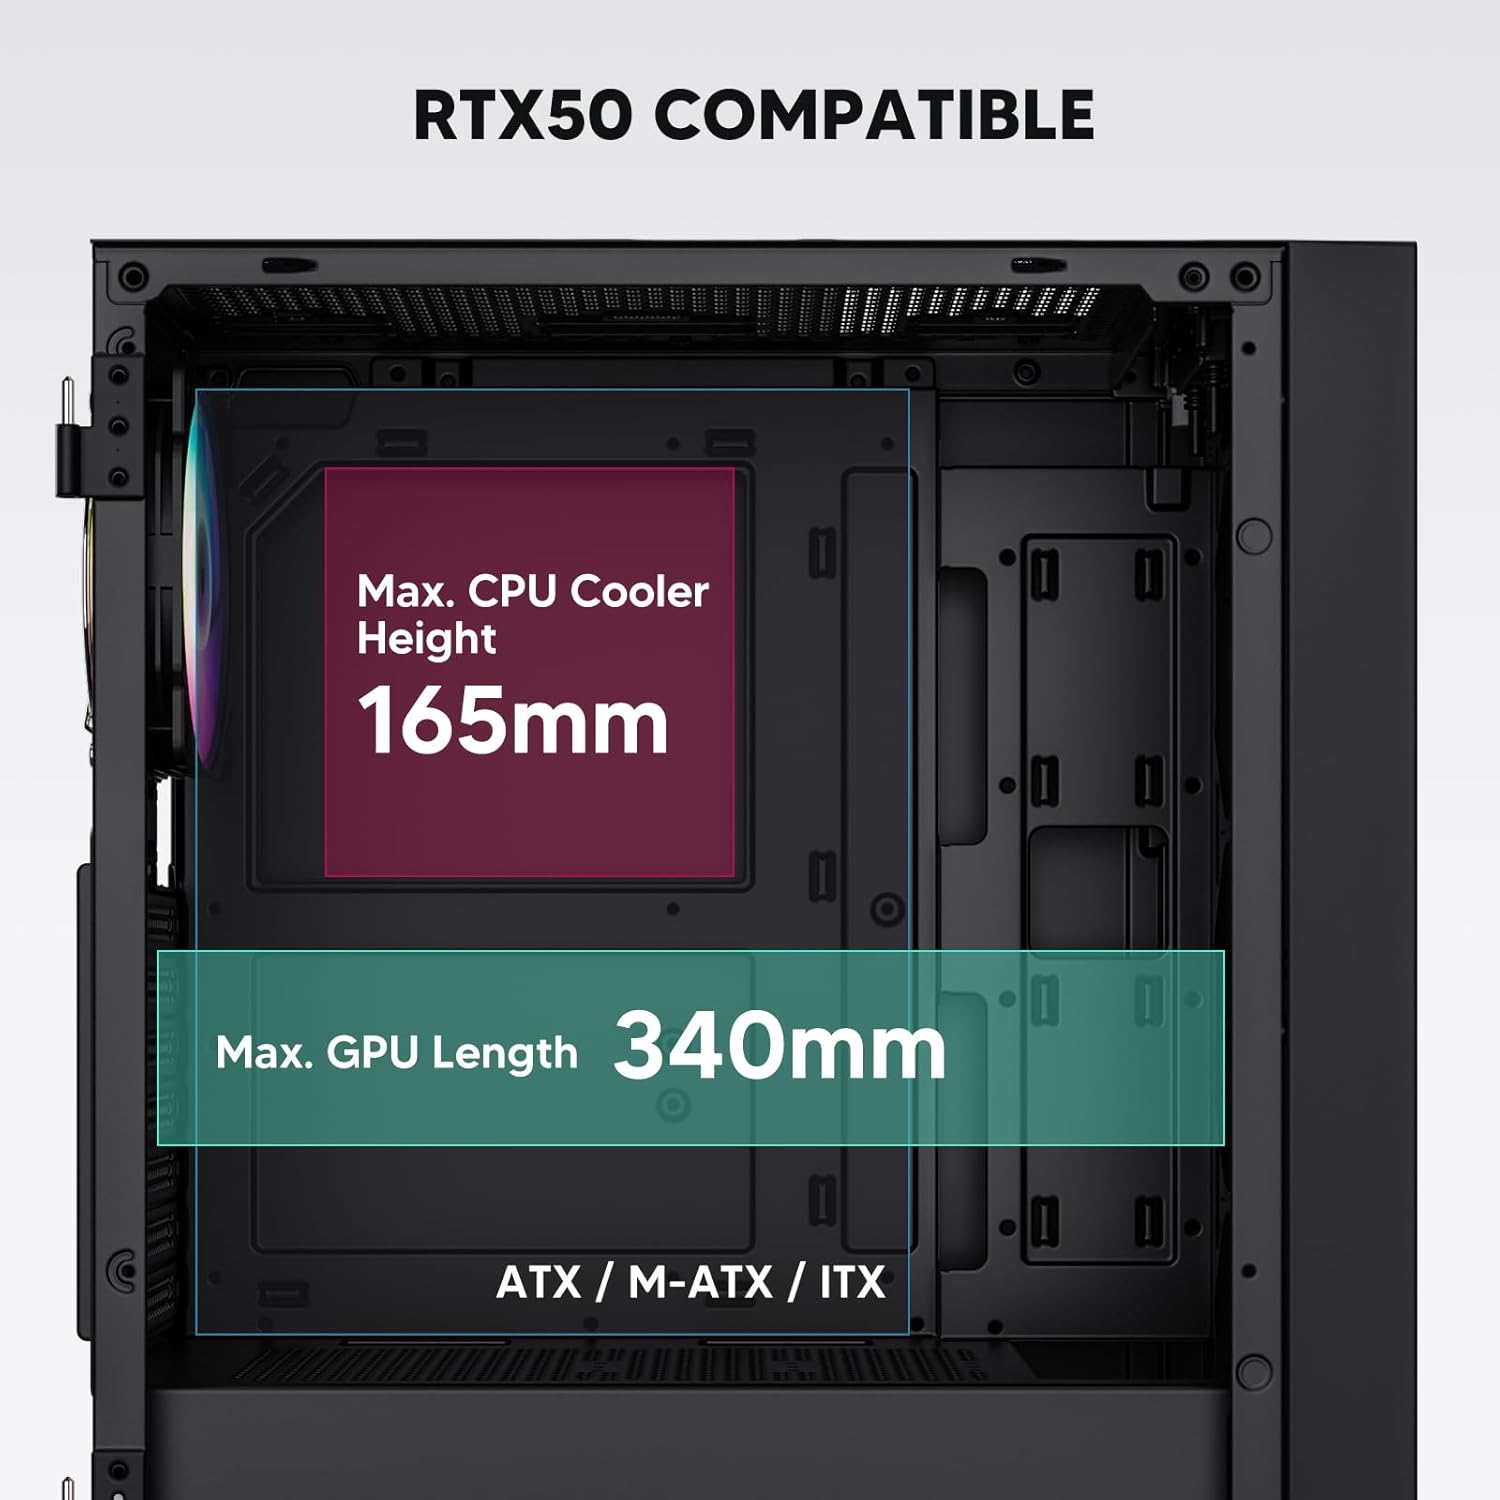
Figure 3: Motherboard and Component Clearance (Max CPU Cooler Height 165mm, Max GPU Length 340mm)
3. Storage Device Installation (HDD/SSD)
- Locate the dedicated mounting points for SSDs and HDDs.
- Install 2.5" SSDs onto the SSD trays or mounting brackets.
- Install 3.5" HDDs into the drive cage located at the bottom of the case.
- Secure all drives with the appropriate screws.

Figure 4: Internal Layout with Drive Bay Locations (SSD, HDD, Power Supply)
4. Enstalasyon ekipman pou pouvwa
- Mount your power supply unit (PSU) in the dedicated compartment at the bottom rear of the case.
- Ensure the PSU fan faces downwards (if the case has a bottom vent) or upwards, depending on your cooling preference.
- Secure the PSU with screws from the rear of the case. The case supports PSUs up to 200mm in length.
5. Enstalasyon Kat Ekspansyon (GPU)
- Retire kouvèti fant PCI-E ki nesesè yo nan dèyè bwat la.
- Mete kat grafik ou a oswa lòt kat ekspansyon yo nan fant PCI-E kat manman an.
- Secure the cards with screws. The case supports GPUs up to 340mm in length.
6. Cooling System Installation (Fans/Radiators)
- The case comes with one pre-installed 120mm PWM/ARGB fan at the rear.
- Additional fans (120mm or 140mm) can be installed at the front, top, and bottom.
- Liquid cooling radiators up to 360mm can be installed at the front, and up to 240mm at the top.
- Refer to the diagram for supported fan and radiator configurations.

Figure 5: Fan and Liquid Radiator Support Diagram
7. Koneksyon Panèl Devan an
- Connect the front panel cables (Power, Reset, USB 3.0, USB Type-C, HD Audio) to the corresponding headers on your motherboard.
- Consult your motherboard manual for the exact pin layout of these headers.
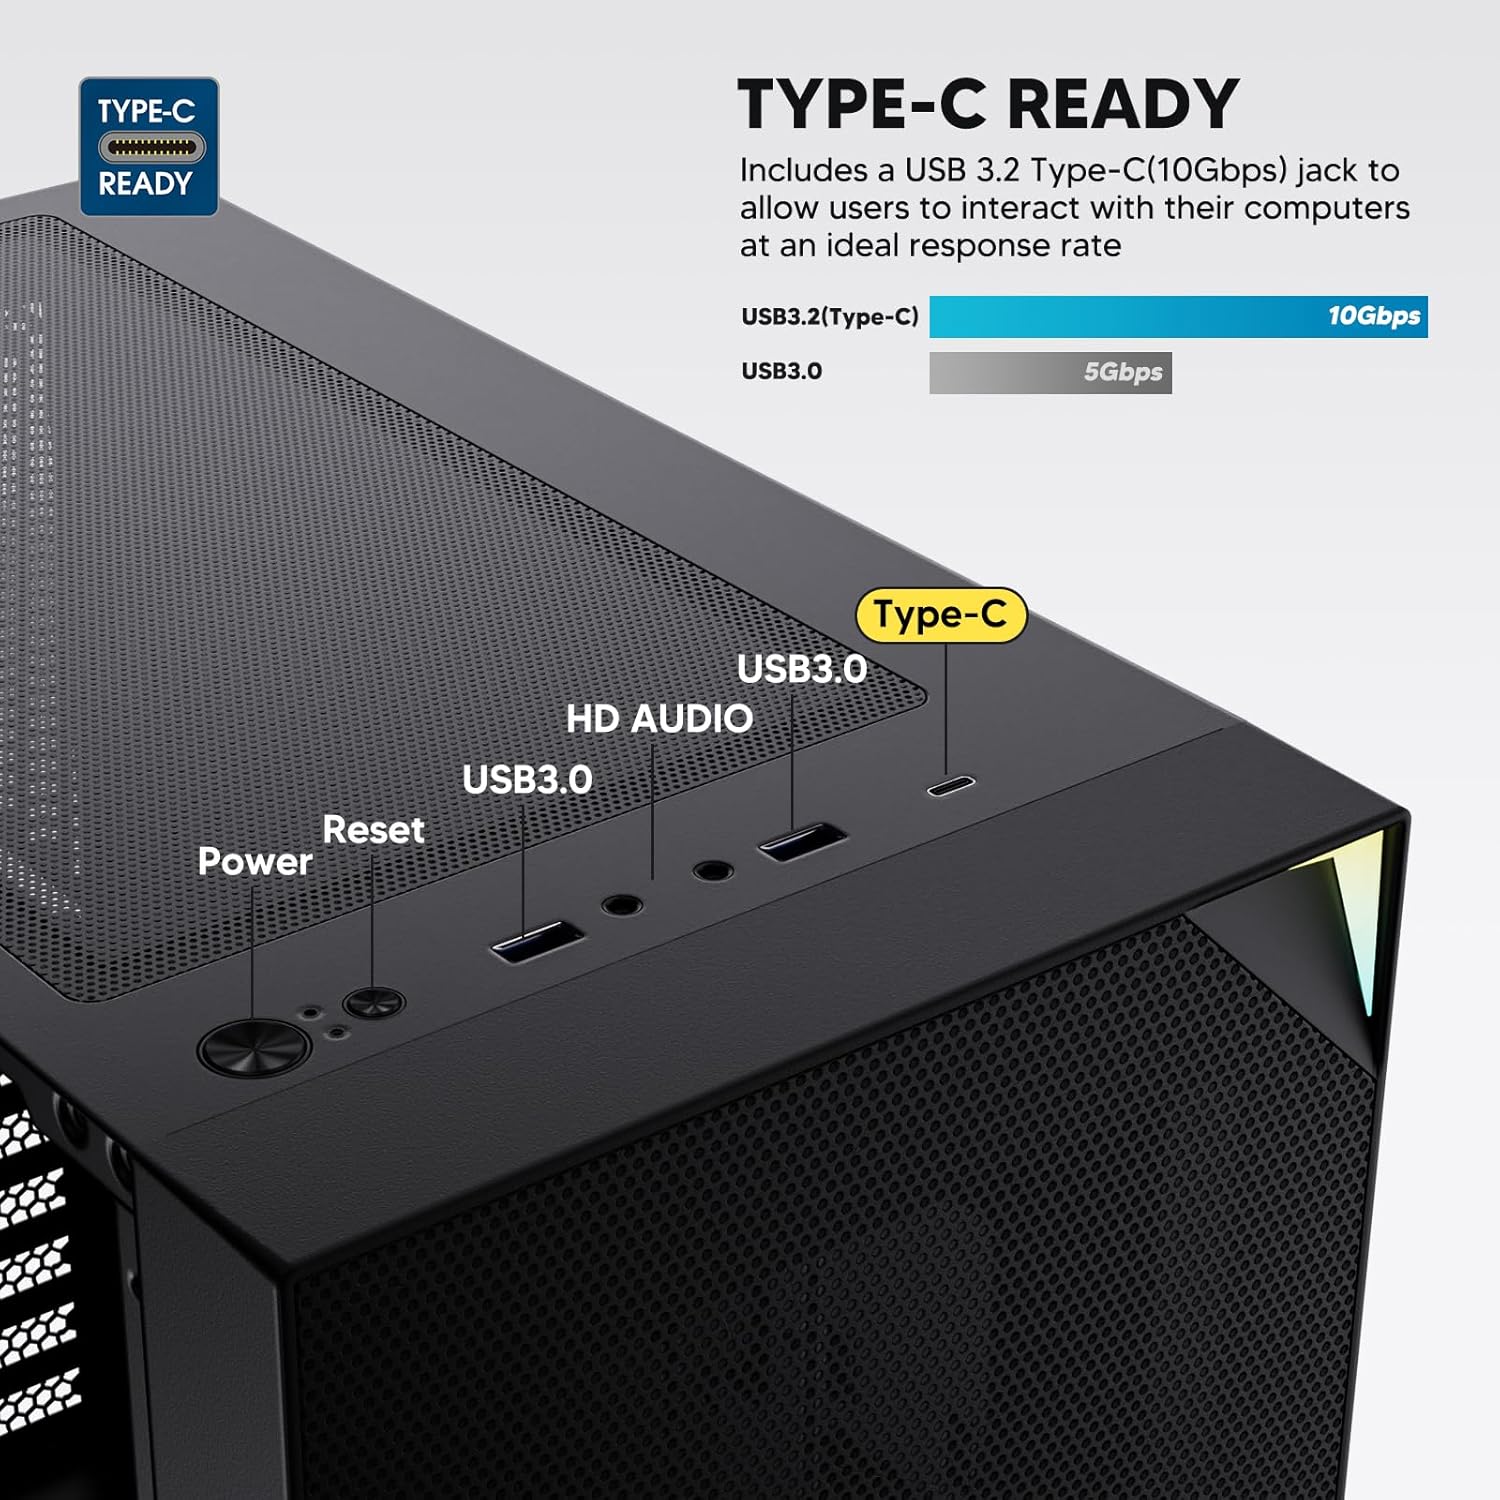
Figure 6: Top I/O Panel Connections
8. ARGB and PWM Connections
- The pre-installed fan and ARGB LED strip require connection to your motherboard.
- Connect the 4-pin PWM connector from the fan to a compatible fan header on your motherboard for speed control.
- Connect the 3-pin ARGB connector from the fan and LED strip to a 5V 3-pin ARGB header on your motherboard for lighting synchronization. Do not connect to a 12V RGB header, as this will damage the LEDs.
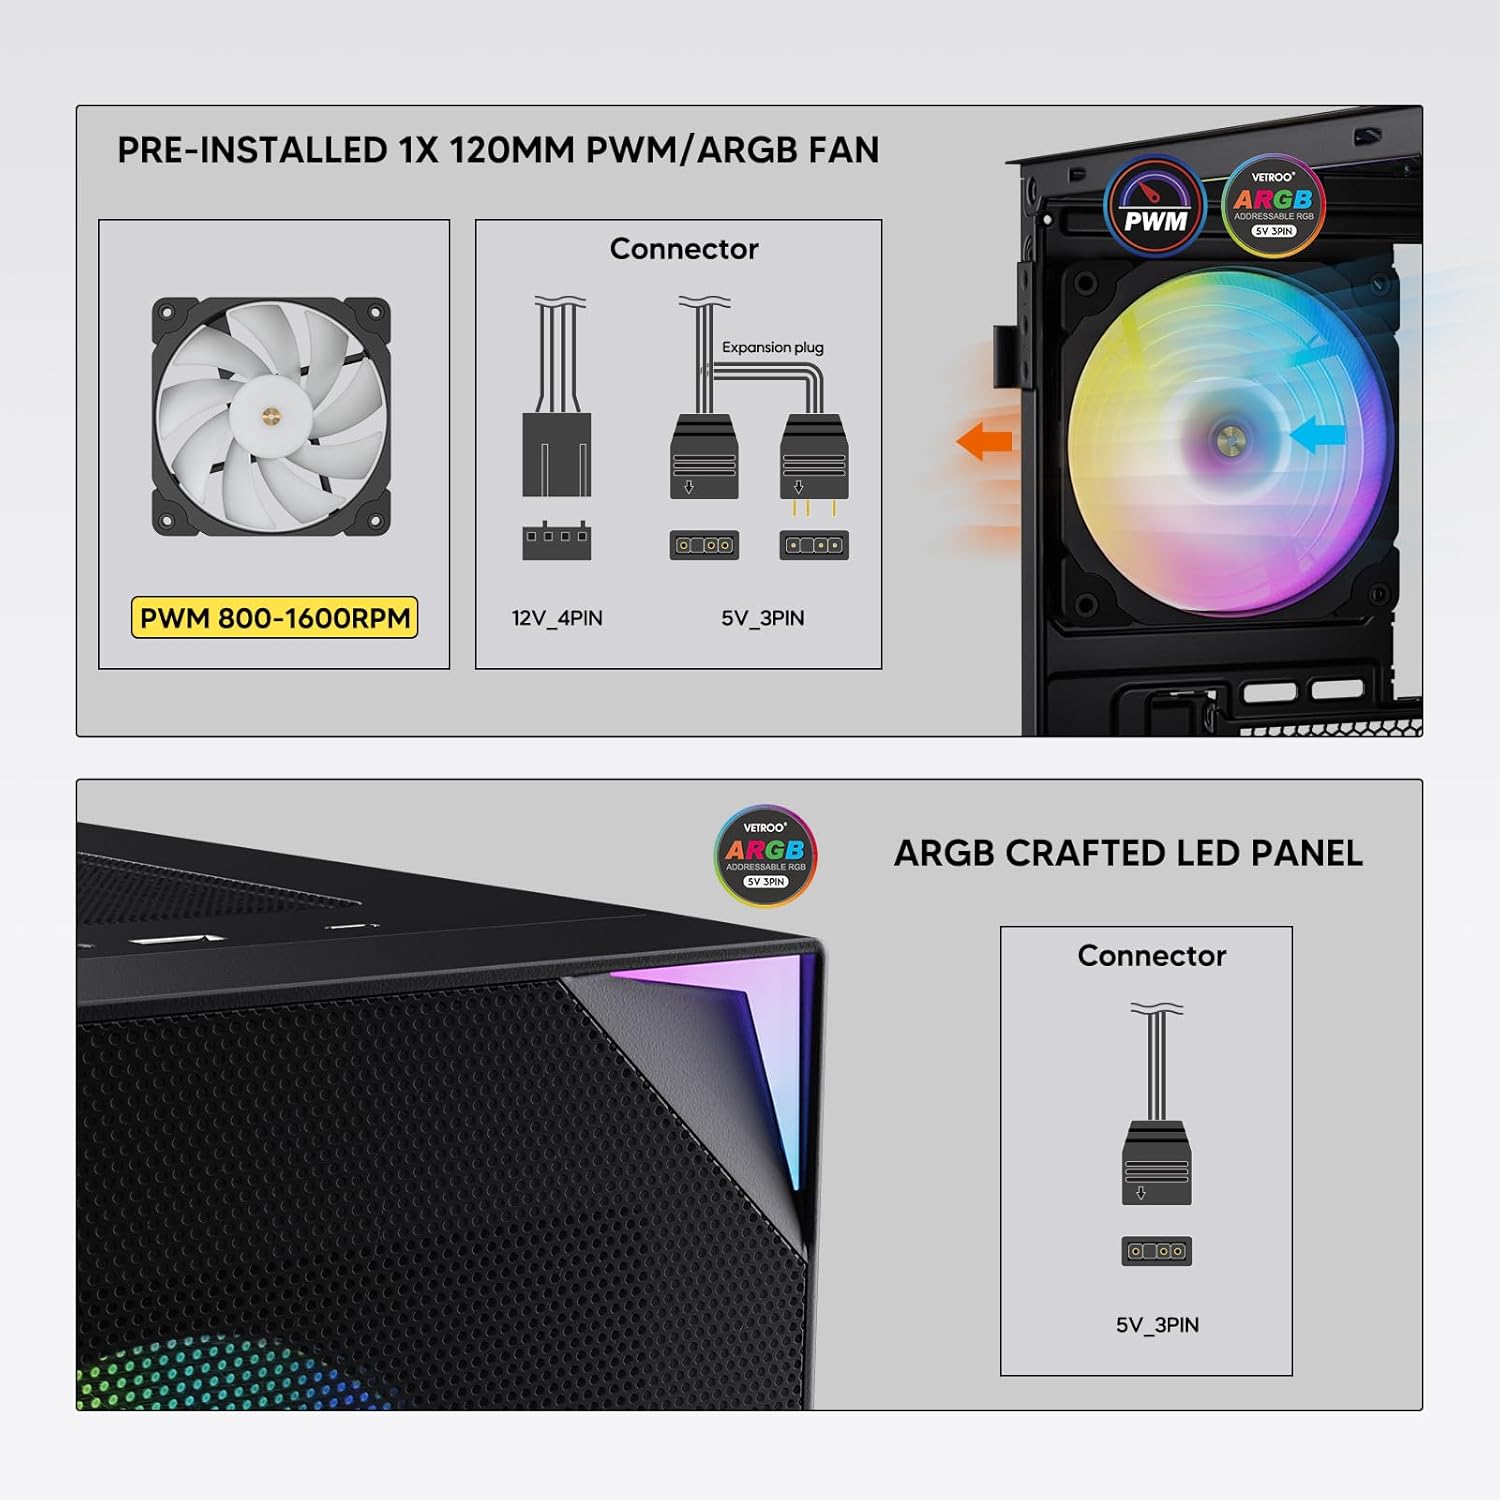
Figure 7: PWM and ARGB Connector Details
9. Jesyon kab
- Sèvi ak fant pou kab yo ak pwen mare ki dèyè plato kat manman an pou òganize kab yo.
- The soft silicone grommets help protect cables and provide a clean look.
- Bon jesyon kab amelyore sikilasyon lè a ak estetik li.
Operasyon
1. Premye Limen
- After all components are securely installed and cables connected, close the tempered glass side panel.
- Connect your monitor, keyboard, mouse, and power cable to the PC.
- Flip the power switch on your PSU to the 'ON' position.
- Press the power button on the top I/O panel of the case to start your system.
2. Kontwòl ekleraj ARGB
- If connected to a compatible motherboard's 5V 3-pin ARGB header, the lighting of the pre-installed fan and LED strip can be controlled via your motherboard's RGB software (e.g., ASUS Aura Sync, MSI Mystic Light Sync, Gigabyte RGB Fusion, ASRock Polychrome Sync).
- Refer to your motherboard's manual for specific instructions on using its ARGB control software.
3. Airflow Management
- The mesh front panel is designed for optimal air intake.
- Ensure that intake fans (typically front and bottom) and exhaust fans (typically rear and top) are configured to create positive or neutral air pressure for efficient cooling and dust prevention.

Figure 8: Airflow Diagram with Dust Filters
Antretyen
1. Netwayaj Filtè Pousyè
- The case is equipped with dust filters on the top and bottom panels.
- Regularly check and clean these filters to maintain optimal airflow and prevent dust buildup inside the system.
- Gently remove the magnetic dust filters and clean them with compressed air or by rinsing with water (ensure they are completely dry before re-installation).
2. Tempered Glass Panel Care
- Clean the tempered glass panel with a soft, lint-free cloth and a non-abrasive glass cleaner.
- Avoid harsh chemicals or abrasive materials that could scratch or damage the glass.
Depanaj
- Sistèm nan pa limen:
- Asire w ke kab kouran an byen konekte ak tou de PSU a ak priz miray la.
- Verify the PSU switch is in the 'ON' position.
- Check that the front panel power button cable is correctly connected to the motherboard header.
- Confirm all power cables (24-pin ATX, CPU, GPU) are properly seated in the motherboard and components.
- Fans Not Spinning / ARGB Not Lighting Up:
- Check that the fan's PWM connector is securely plugged into a motherboard fan header.
- Verify the ARGB 3-pin connector is correctly attached to a 5V 3-pin ARGB header on the motherboard (not 12V RGB).
- Ensure your motherboard's ARGB software is installed and configured correctly.
- Pò USB yo pa fonksyone:
- Confirm the USB 3.0 and USB Type-C front panel cables are correctly connected to their respective motherboard headers.
- Check your motherboard manual for correct header locations.
- For other component-specific issues, refer to the instruction manuals for your motherboard, CPU, GPU, and other installed hardware.
Espesifikasyon
| Mak | Vetroo |
| Non modèl | AL800 |
| Nimewo Modèl Atik | VT-CASE-AL800-BK (FBA) |
| Kalite Ka | Mid Tower |
| Mèr konpatibilite | ATX, M-ATX, ITX |
| Koulè | Nwa |
| Materyèl | Metal, Vè apeze |
| Pwa atik | 12.37 liv (apeprè 5.61 kg) |
| Dimansyon pwodwi (LxWxH) | 18.4 x 8.6 x 17.9 pous (apeprè 46.7 x 21.8 x 45.5 cm) |
| Max GPU Longè | 340 mm |
| Max CPU Cooler Wotè | 165 mm |
| Max PSU Longè | 200 mm |
| Front I / O pò | 1x USB 3.2 Type-C, 2x USB 3.0, HD Audio (Mic/Headphone), Power, Reset |
| Sipò fanatik | Front: 3x 120mm or 2x 140mm; Top: 2x 120mm or 2x 140mm; Rear: 1x 120mm; Bottom: 2x 120mm |
| Sipò pou radyatè | Front: 120/140/240/280/360mm; Top: 120/140/240mm; Rear: 120mm |
| Fanatik pre-enstale | 1x 120mm PWM/ARGB (Rear) |
Garanti ak sipò
For warranty information, technical support, or to inquire about replacement parts, please visit the official Vetroo websit la oubyen kontakte sèvis kliyan yo dirèkteman. Kenbe prèv acha ou pou reklamasyon garanti.
Official Vetroo Store: Vetroo Amazon Store
Dokiman ki gen rapò - AL800
 |
Manyèl Itilizatè Bwat PC Vetroo AL800 la Manyèl itilizatè pou bwat PC Vetroo AL800 la, ki detaye etap enstalasyon pou konpozan tankou kat manman an, ekipman pouvwa a, fanatik yo, radyatè likid yo, HDD yo, SSD yo, ak kat grafik yo. Gen ladan l gid koneksyon panèl E/S la ak lis akseswa yo. |
 |
Manyèl Enstriksyon Bwat Jwèt Vetroo AL800 Full Tower Manyèl enstriksyon konplè pou bwat PC jwèt Vetroo AL800 Full Tower la. Aprann kijan pou enstale ekipman pouvwa ou, kat manman ou, kondwi depo (SSD/HDD), kat grafik ou, epi konprann opsyon sipò fanatik ak radyatè. Gen ladan l yon lis akseswa ak gid detaye etap pa etap. |
 |
Manyèl Itilizatè Bwat PC Vetroo MESH-7C AL SERIES Manyèl itilizatè detaye pou bwat PC Vetroo MESH-7C AL SERIES la, ki kouvri espesifikasyon yo, dimansyon yo, akseswa yo, ak etap enstalasyon pyès ki nan konpitè pou konstwi òdinatè w la. |
 |
Manyèl Enstriksyon pou Bwat PC Vetroo M05 M-ATX la Manyèl enstriksyon detaye pou asanblaj bwat PC Vetroo M05 M-ATX la, ki kouvri enstalasyon konpozan, itilizasyon akseswa, ak koneksyon panèl E/S. |
 |
Manyèl Itilizatè Bwat PC Vetroo AL900 ATX la Manyèl itilizatè pou bwat jwèt Vetroo AL900 ATX pou òdinatè, ki detaye asanblaj, enstalasyon konpozan tankou ekipman pou pouvwa a, ak koneksyon panèl E/S la. |
 |
Manyèl Itilizatè ak Gid Enstalasyon pou Refwadisè CPU Vetroo U6 la Manyèl itilizatè detaye ak gid enstalasyon pou Vetroo U6 CPU Cooler la, ki kouvri konpatibilite ak sòkèt Intel LGA 1700/1200/115X ak AMD AM5/AM4/AM3(+)/AM2(+)/FM2(+)/FM1. Gen ladan lis pyès ak enstriksyon asanblaj etap pa etap. |