1. Pwodwi souview
The BANRIA DIY Bluetooth-Compatible Speaker Kit is an all-in-one electronic project designed for both educational purposes and personal entertainment. This kit allows users to assemble a functional speaker system that supports multiple audio input methods, including Bluetooth, AUX, USB-disk, and TF cards. It also features an integrated FM radio, a digital display, and dynamic LED lights, providing a comprehensive audio experience. This project is ideal for enhancing soldering skills and understanding basic electronic principles.

Figure 1.1: Assembled BANRIA DIY Bluetooth Speaker Kit with remote control.
2. Components in Package
Before beginning assembly, please verify that all components listed below are present in your package.
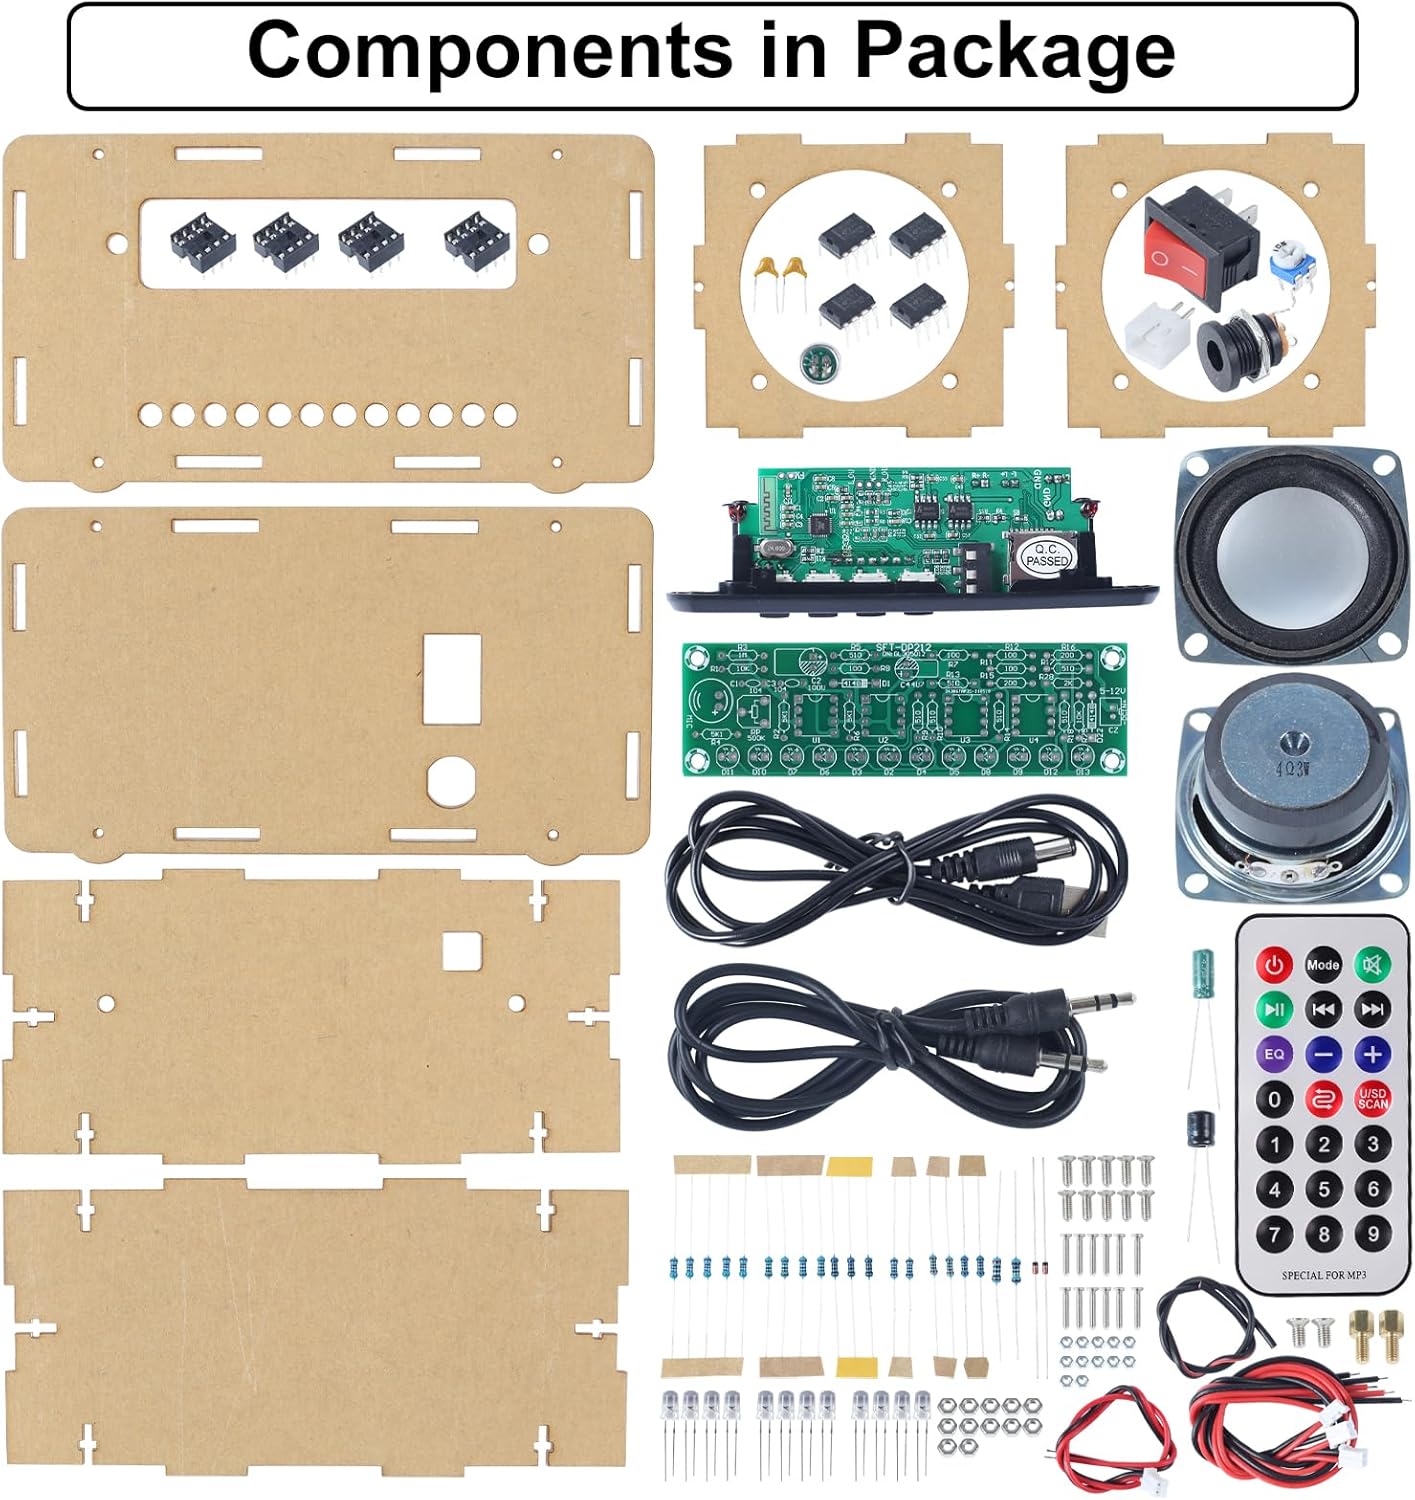
Figi 2.1: Plis paseview of all components included in the DIY speaker kit.
- Acrylic Case Panels (various shapes and sizes)
- Main Control Board (pre-soldered Bluetooth/MP3/FM module)
- LED Spectrum Indicator Board (for soldering)
- Oratè (2x)
- Kontwòl Remote
- Chanjman pouvwa
- Audio Jack (AUX)
- Port USB
- TF Kat plas
- Resistors, Capacitors, Diodes (for LED board)
- LED Lights (various colors)
- Konekte Fil
- Screws and Nuts for assembly
- USB pouvwa kab
- AUX Audio Kab
3. Enstriksyon Asanble
This kit requires soldering for the LED spectrum indicator board and careful assembly of the acrylic casing. A detailed English soldering manual is available for download on the product page under the "Technical Specification" section. Please refer to that document for step-by-step visual guidance.
3.1 Soldering the LED Spectrum Indicator Board
The main Bluetooth-compatible module board comes pre-soldered. Your primary soldering task involves assembling the LED flashing light kit. Identify the resistors, capacitors, diodes, and LEDs, and solder them onto the designated points on the LED spectrum indicator PCB. Ensure correct polarity for diodes and LEDs.

Figure 3.1: Schematic Diagram for the LED Spectrum Indicator.
3.2 Wiring and Case Assembly
Once the LED board is soldered, connect the wires from the main control board to the speakers, power switch, AUX port, and the newly assembled LED board according to the wiring diagram.

Figure 3.2: Wiring Diagram for the DIY Bluetooth Speaker Kit.
Carefully assemble the acrylic shell using the provided screws and nuts. Ensure all components are securely mounted and wires are not pinched. Some users find it helpful to use a small magnet to hold nuts in place during assembly.
4. Operasyon Enstriksyon
4.1 Limen/Etenyen
Connect the speaker kit to a USB power source using the provided USB cable. Use the power switch located on the back of the unit to turn the speaker on or off. For full power off, use the physical switch. The remote control can put the main unit into standby, but the LED bargraph may remain active.
4.2 Input and Play Modes
The speaker supports multiple input sources. Use the "Mode" button on the unit or the remote control to cycle through the available modes: Bluetooth (BT), FM Radio (FM), AUX, USB-disk, and TF Card.

Figure 4.1: The speaker supports 5 different input and play modes.
Mòd Bluetooth (BT)
Switch to Bluetooth mode. The digital display will show "BT". On your mobile device, search for Bluetooth devices and select the speaker (usually named "Bluetooth Speakers" or similar). Once paired, you can play audio from your device.
Mòd radyo FM (FM)
Switch to FM mode. To auto-scan for stations, press and hold the "Play/Pause/SCAN-FM" button on the unit or the remote. The speaker will scan and save available stations. Use the "VOL-/Prev" and "VOL+/Next" buttons to navigate between saved stations.

Figure 4.2: FM Radio features including antenna setup, automatic station search, and power-off memory.
Mòd AUX
Connect an external audio device (e.g., smartphone, MP3 player) to the AUX port using the provided 3.5mm audio cable. Switch the speaker to AUX mode. Audio will play from the connected device.
USB-disk / TF Card Mode
Mete yon kle USB oswa yon kat TF (MicroSD) ki gen dosye odyo MP3 ladan l. files into the respective slots. The speaker will automatically detect and begin playing music from the inserted storage.

Figure 4.3: Two primary ways to play music: via AUX cable and Bluetooth 5.0.
4.3 Kontwòl ak Ekspozisyon
The speaker features an LCD digital display and controls on the front panel, complemented by a full-function remote control.

Figure 4.4: The digital display shows various modes and information.

Figure 4.5: Front panel controls and remote control functions.
- Ekran LCD Display: Shows current mode (BT, FM, AUX), frequency, volume level, and track information.
- bouton mòd: Chanje sous opinyon yo youn apre lòt.
- Play/Pause/SCAN-FM: Plays/pauses audio; long press in FM mode to auto-scan.
- VOL-/Prev: Decreases volume; short press for previous track/station.
- VOL+/Next: Increases volume; short press for next track/station.
- Adjust Spectrum Sensitivity: A knob (potentiometer) on the side or back to adjust the responsiveness of the LED lights.
- Kontwòl Remote: Provides full control over power, mode, volume, track selection, EQ settings, and direct station/track selection.
5. Karakteristik ak Kapasite
- Koneksyon Bluetooth 5.0: Ensures stable signal transmission and good sound quality for wireless audio streaming from compatible devices.
- Lektur milti-sous: Supports music playback from USB drives, TF cards, and external devices via AUX input, in addition to Bluetooth.
- Radyo FM entegre: Features a built-in antenna for clear reception, automatic station search, and power-off memory to retain last channel settings.
- Ekspozisyon dijital: Provides clear and intuitive information regarding current mode, frequency, and volume.
- 12 Colored LED Lights: Dynamic LED lights enhance the visual experience, reacting to audio playback.
- Kontwòl Remote: Offers convenient operation from a distance.
- Konsepsyon pòtab: Compact dimensions (4.64 x 6.88 x 1.37 inches) and light weight (12.3 ounces) make it easy to transport for indoor or outdoor use.

Figure 5.1: Key features including remote control, LED lights, and speaker specifications.

Figure 5.2: The compact size makes the speaker portable for various environments.
6. Antretyen
To ensure the longevity and optimal performance of your DIY speaker kit, follow these maintenance guidelines:
- Netwayaj: Use a soft, dry cloth to wipe down the acrylic casing. Evite pwodui netwayaj abrazif oswa solvan ki ka domaje plastik la.
- Manyen: Handle the assembled unit with care, especially the acrylic case, which can be fragile. Avoid dropping or subjecting it to strong impacts.
- Sous pouvwa: Always use a stable USB power source. Disconnect power when the unit is not in use for extended periods.
- Depo: Sere oratè a nan yon kote ki fre epi sèk, lwen limyè solèy dirèk ak tanperati ekstrèm.
NAN. Depanaj
If you encounter issues with your DIY speaker kit, refer to the following common problems and their solutions:
| Pwoblèm | Kòz posib | Solisyon |
|---|---|---|
| Pa gen kouran/Aparèy la pa limen. |
|
|
| Pa gen son ki soti nan moun kap pale. |
|
|
| FM radio not receiving stations clearly. |
|
|
| LED lights not working or flickering incorrectly. |
|
|
| Acrylic case difficult to assemble or cracks. |
|
|
8. Espesifikasyon
| Karakteristik | Detay |
|---|---|
| Dimansyon pwodwi | 4.64 x 6.88 x 1.37 pous |
| Pwa atik | 12.3 ons |
| Nimewo Modèl | d421cf57-5a36-46b5-b7b1-9565c32b1c31 |
| Koneksyon Teknoloji | Bluetooth (Bluetooth 5.0), USB, 3.5mm Jack (AUX), TF Card |
| Kalite kontwolè | Kontwòl Remote |
| Karakteristik espesyal | Digital Display, LED Lights, FM Radio, Soldering Practice Kit |
| Aparèy konpatib | Smartphone, USB-disk, TF Card, any device with 3.5mm audio output |
| Audio Sòti Mode | Stereo |
| Manifakti | BANRIA |
| Peyi orijin | Lachin |
9. Sipò ak Plis Enfòmasyon
For additional support, detailed assembly instructions, or inquiries regarding your BANRIA DIY Bluetooth-Compatible Speaker Kit, please refer to the official user manual PDF available for download on the product's Amazon page under the "Technical Specification" section. You may also contact BANRIA customer support through the Amazon platform for further assistance.


