1. Entwodiksyon
The QNAP TS-264-8G-US is a 2-bay high-performance desktop Network Attached Storage (NAS) device designed for efficient data management and connectivity. It is powered by an Intel Celeron N5105/N5095 quad-core processor, offering robust performance for various tasks. This NAS supports up to 16 GB DDR4 memory and SATA 6 Gb/s drives, providing flexible storage options. Key features include dual 2.5GbE ports for accelerated file sharing and large file transfers, and dual M.2 PCIe Gen3x2 NVMe SSD slots for cache acceleration or SSD storage pools to enhance overall system performance. The integrated Intel® AES-NI encryption engine ensures data security without compromising speed. Multiple USB 3.2 Gen 2 Type-A ports offer high-speed connectivity for external devices.
2. Ki sa ki nan bwat la
Upon unboxing your QNAP TS-264-8G-US, please verify that all the following items are included:
- TS-264-8G-US NAS Unit
- Ethernet kab x 1
- Kòd kouran x 1
- Vis tèt plat (pou HDD 3.5") x 12
- Vis tèt plat (pou HDD 2.5") x 12
- AC adaptè
3. Fizik Plis paseview
Familiarize yourself with the physical components and ports of your QNAP TS-264-8G-US NAS.

Imaj 1: Devan View. The front panel features the QNAP logo, power button, status indicators, and a USB port for quick access.
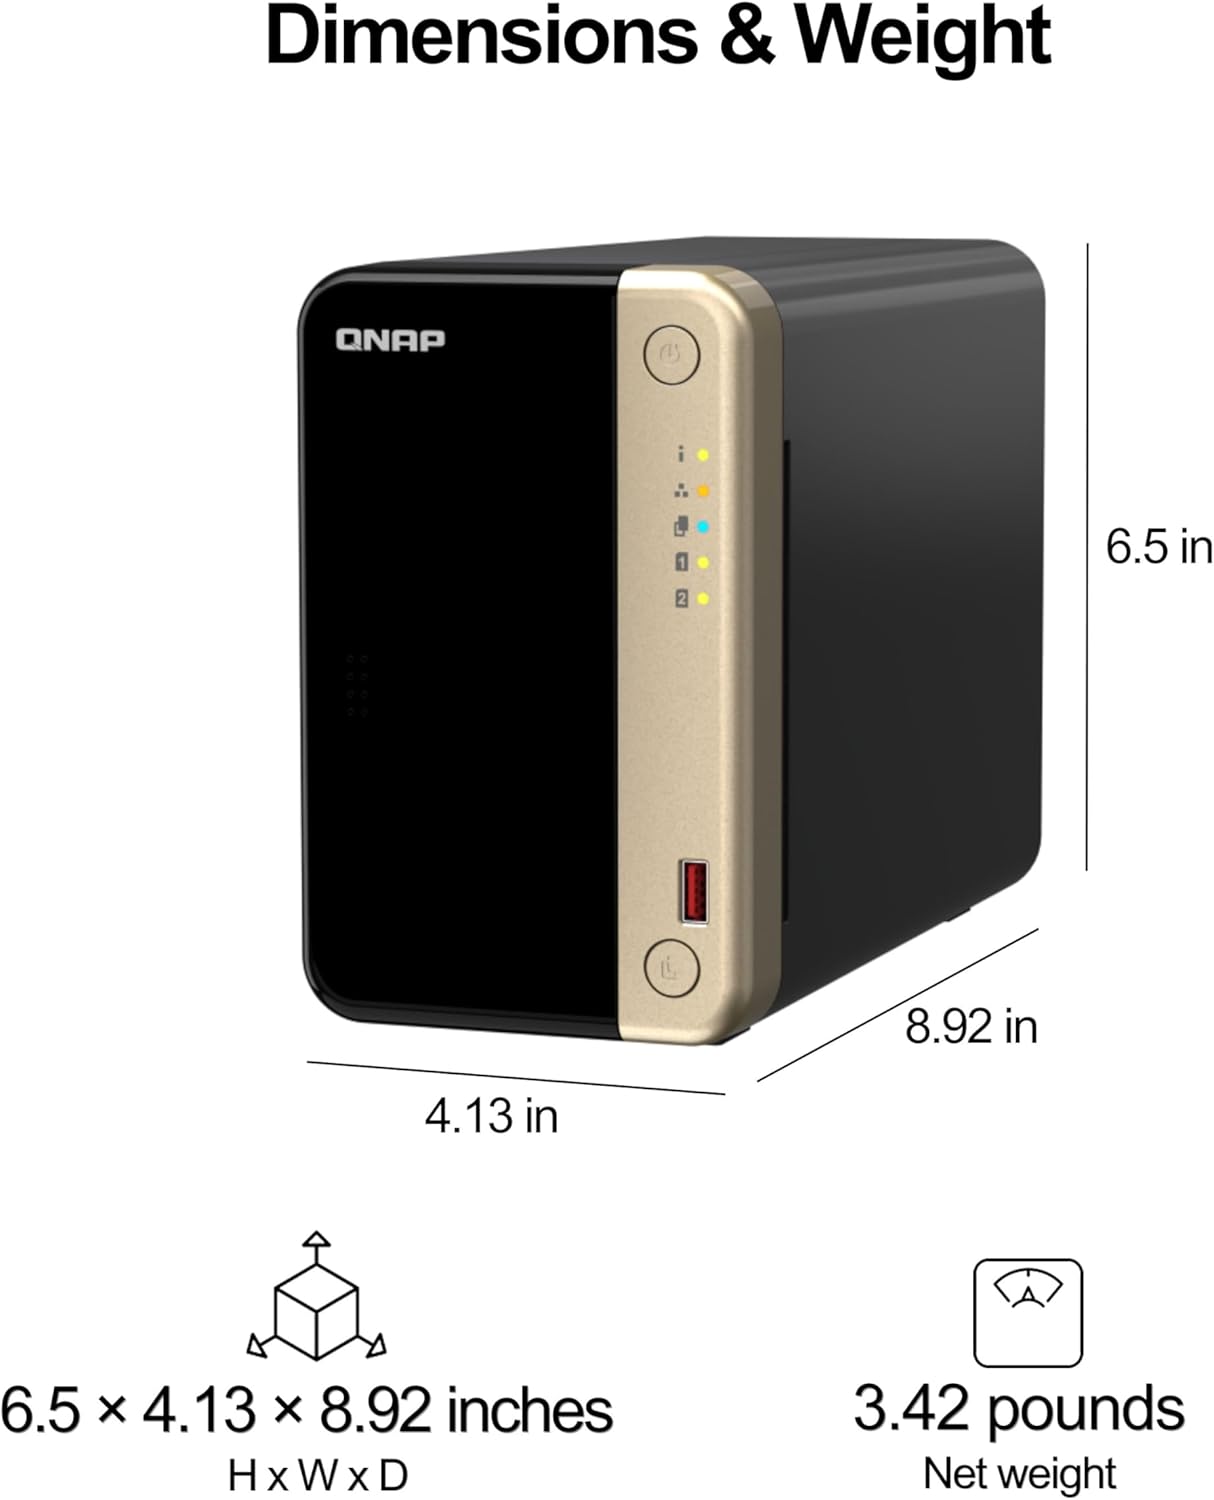
Image 2: Dimensions and Weight. This image illustrates the compact dimensions (6.5 x 4.13 x 8.92 inches) and net weight (3.42 pounds) of the NAS unit.

Imaj 3: Dèyè View. The rear panel includes two 2.5GbE ports, two USB 3.2 Gen 2 ports, two USB 2.0 ports, one HDMI 2.0 output, a reset button, and the DC power input.
Front Panel
- Bouton pouvwa: Used to power on/off the NAS.
- Endikatè Status: LEDs indicating system status, LAN activity, and individual disk activity.
- Pò USB 3.2 Jen 2 Kalite-A: For quick connection of external USB devices.
Panèl dèyè
- 2.5GbE Ports (x2): Dual 2.5 Gigabit Ethernet ports for high-speed network connectivity.
- Pò USB 3.2 Gen 2 Kalite-A (x2): High-speed USB ports for connecting peripherals.

Image 4: M.2 NVMe SSD. The NAS supports M.2 NVMe SSDs for enhanced performance.
- Pò USB 2.0 (x2): Standard USB ports for additional device connections.
- HDMI 2.0 Output: For direct display connection, supporting 4K resolution.
- Bouton Reyajiste: Used to reset the NAS configuration.
- Antre pouvwa DC: Connects to the provided AC adapter for power.
4. Enstalasyon
Follow these steps to set up your QNAP TS-264-8G-US NAS:
4.1 Enstalasyon kondwi
The TS-264-8G-US is a diskless NAS, meaning you need to install your own 3.5-inch or 2.5-inch SATA hard drives (HDDs) or solid-state drives (SSDs).
- Carefully open the NAS enclosure to access the drive bays.
- Insert your chosen drives into the bays. Use the provided flat head screws to secure 3.5-inch HDDs or 2.5-inch HDDs/SSDs.
- For M.2 NVMe SSDs, locate the dedicated M.2 PCIe slots on the motherboard and install the SSDs as per the instructions.
- Close and secure the NAS enclosure.
Video 1: Drive Installation Overview. This video demonstrates the process of installing hard drives into a QNAP NAS, including securing them with screws and sliding them into the bays. It highlights the tool-free design for easy installation and hot-swapping capabilities.
4.2 Koneksyon Inisyal
- Connect one end of the provided Ethernet cable to a 2.5GbE port on the NAS and the other end to your router or network switch.
- Connect the AC adapter to the DC power input on the NAS and plug it into a power outlet.
- Press the power button on the front panel to turn on the NAS. The status LEDs will illuminate.
4.3 Software Setup (QTS Smart Installation)
Once the NAS is powered on and connected to your network, you can proceed with the software setup using the QTS Smart Installation system:
- Louvri a web browser on a computer connected to the same network as the NAS.
- Navigate to the QNAP website or use the Qfinder Pro utility to locate your NAS on the network.
- Follow the on-screen prompts of the QTS Smart Installation wizard to initialize the disks, install the operating system (QTS), and configure basic settings.
- Create an administrator account and set a strong password.
- Configure storage pools and volumes according to your data redundancy and capacity needs.
Videyo 2: Pwodwi a finiview and Setup. Videyo sa a bay yon ti apèsi souview of the NAS and touches upon the initial setup process, including connecting cables and accessing the QTS Smart Installation system.
5. Opere
The QNAP TS-264-8G-US runs on the QTS operating system, offering a user-friendly interface for managing your data and NAS functions.
5.1 File Access and Sharing
- File Estasyon: Sèvi ak la File Station application within QTS to browse, manage, and share files stored on your NAS via a web navigatè.
- SMB/AFP File Pataje: Access shared folders on your NAS from Windows, macOS, or Linux computers using standard network protocols.
- MyQNAPCloud: Securely access your files from anywhere with MyQNAPCloud, QNAP's remote access service.
5.2 Sovgad Done ak Senkronizasyon
- Replikatè QNAP NetBak: Effortlessly back up your Windows computers.
- Machin Tan: Use Time Machine for backing up Mac computers.
- Senkronizasyon backup ibrid: Consolidate backup and synchronization tasks to local, remote, and cloud storage.
5.3 Multimedia Management
- Centrally store and organize personal or family photos, music, and videos.
- Utilize multimedia applications within QTS for streaming and playback.
6. Antretyen
Antretyen regilye asire lonjevite ak pèfòmans optimal NAS QNAP ou a.
- Data Scrubbing: Periodically perform data scrubbing to check for and correct data inconsistencies on your storage volumes. This can be scheduled via the Storage Manager in QTS.
- Mizajou mikrolojisyèl: Keep your QTS firmware updated to the latest version to benefit from new features, security patches, and performance improvements.
- Sistèm refwadisman: Ensure the NAS is placed in a well-ventilated area. The integrated fan helps maintain optimal operating temperatures for the internal components.
- Koneksyon UPS: For enhanced data protection against power outages, connect your NAS to an Uninterruptible Power Supply (UPS).
NAN. Depanaj
If you encounter issues with your QNAP TS-264-8G-US NAS, consider the following basic troubleshooting steps:
- Tcheke Koneksyon: Verify that all power and network cables are securely connected.
- LED estati: Observe the status LEDs on the front panel for any error indications. Refer to the QTS user manual for LED status definitions.
- Restart NAS: Try restarting the NAS through the QTS interface or by pressing the power button.
- Bouton Reyajiste: If the NAS is unresponsive, use the reset button on the rear panel. A short press will restart the NAS, while a longer press (3 seconds) will reset network settings.
- QNAP Support: For more complex issues, visit the official QNAP support website for detailed FAQs, knowledge base articles, and technical assistance.
8. Espesifikasyon
| Karakteristik | Detay |
|---|---|
| Modèl | TS-264-8G-US |
| Processeur | Intel Celeron N5105/N5095 Quad-core |
| memwa | 8GB DDR4 RAM (ou ka ogmante l jiska 16GB) |
| Kondwi Bays | 2 x 3.5-inch/2.5-inch SATA 6Gb/s HDD/SSD |
| M.2 Fant | 2 plas pou SSD M.2 PCIe Gen3x2 NVMe |
| Pò Ethernet | 2 x 2.5GbE (2.5G/1G/100M) |
| Pò USB | 2 x USB 3.2 Gen 2 Type-A, 2 x USB 2.0 Type-A |
| Sòti HDMI | 1 x HDMI 2.0 (up to 4K) |
| Dimansyon (HxWxD) | 13 x 9 x 11 pous (apeprè) |
| Pwa | 5.1 liv (apeprè) |
9. Garanti ak sipò
QNAP products come with a complete service warranty that guarantees excellent service and peace of mind. For additional coverage, you may purchase a QNAP Extended Warranty Service.
- Garanti estanda: Each QNAP product includes a standard warranty.
- Garanti pwolonje: You can purchase an extended warranty for additional coverage. Register your QNAP product within 9 months of purchase to be eligible for a warranty extension, which can stretch your warranty coverage up to 5 years.
- Plan Rekiperasyon Done: Optional 2-year and 3-year data recovery plans are available for purchase to protect your valuable data.
For support, please visit the official QNAP websit oswa kontakte sèvis kliyan yo.


