1. Entwodiksyon
This manual provides detailed instructions for the safe and effective operation, setup, and maintenance of your Orion Motor Tech AC Vacuum Pump and Gauge Set. This kit is designed for servicing automotive and residential HVAC systems that use R134a, R22, and R410a refrigerants. Please read this manual thoroughly before use to ensure proper function and to prevent damage to the equipment or injury.
2. Enfòmasyon sou Sekirite
Always observe the following safety precautions when operating this equipment:
- Mete ekipman pwoteksyon pèsonèl ki apwopriye, tankou linèt sekirite ak gan, lè w ap manyen febrifuj oswa lè w ap opere ponp lan.
- Asire w ke zòn travay la byen ayere pou anpeche akimilasyon vapè frijidè yo.
- Do not operate the vacuum pump without sufficient oil. Check the oil level before each use.
- Disconnect the power supply before performing any maintenance or repairs on the vacuum pump.
- Handle refrigerants with care. Refer to local regulations for proper handling and disposal.
- Never expose the equipment to rain or wet conditions.
- Kenbe timoun yo ak pèsonèl ki pa otorize lwen zòn travay la.
3. Pake kontni
Verifye ke tout atik yo prezan nan twous ou a:
- 1x Vacuum Pump
- 1x Manifold Gauge Set
- 1x R134a Self-Sealing Can Tap
- 1x R134a Puncture Can Tap
- 1x Leak Detector
- 3x Charging Hoses (Red, Yellow, Blue)
- 1x Low-Pressure Quick Coupler
- 1x High-Pressure Quick Coupler
- 1x Can Tap Adapter (1/2" to 1/4")
- 2x Angled Adapters (1/4" to 5/16")
- 1x Vacuum Pump Oil (0.26 qt / 250 mL)
- 1x Valve Core Wrench
- 1x Pè Gan Travay
- 1x Bag Depo
- 1x Storage Case (for gauges and accessories)
- 1x manyèl enstriksyon

Image: The complete Orion Motor Tech AC Vacuum Pump and Gauge Set, showing the vacuum pump, manifold gauge set in its case, charging hoses, leak detector, and vacuum oil.
4. Pwodwi souview
4.1 Ponp vakyòm
The vacuum pump is designed to remove air and moisture from AC systems, creating a vacuum necessary for proper refrigerant charging. It features an all-copper motor for efficient operation and an aluminum alloy casing for heat dissipation and corrosion resistance.
- Fenèt transparan: Allows for easy monitoring of the oil level.
- Filtè echapman: Reduces noise and prevents gas escape.
- Built-in Fan & Vents: Ensures efficient heat dissipation during operation.
- Lajè konpatibilite: Includes adapters for various hose sizes (1/4" to 3/8").
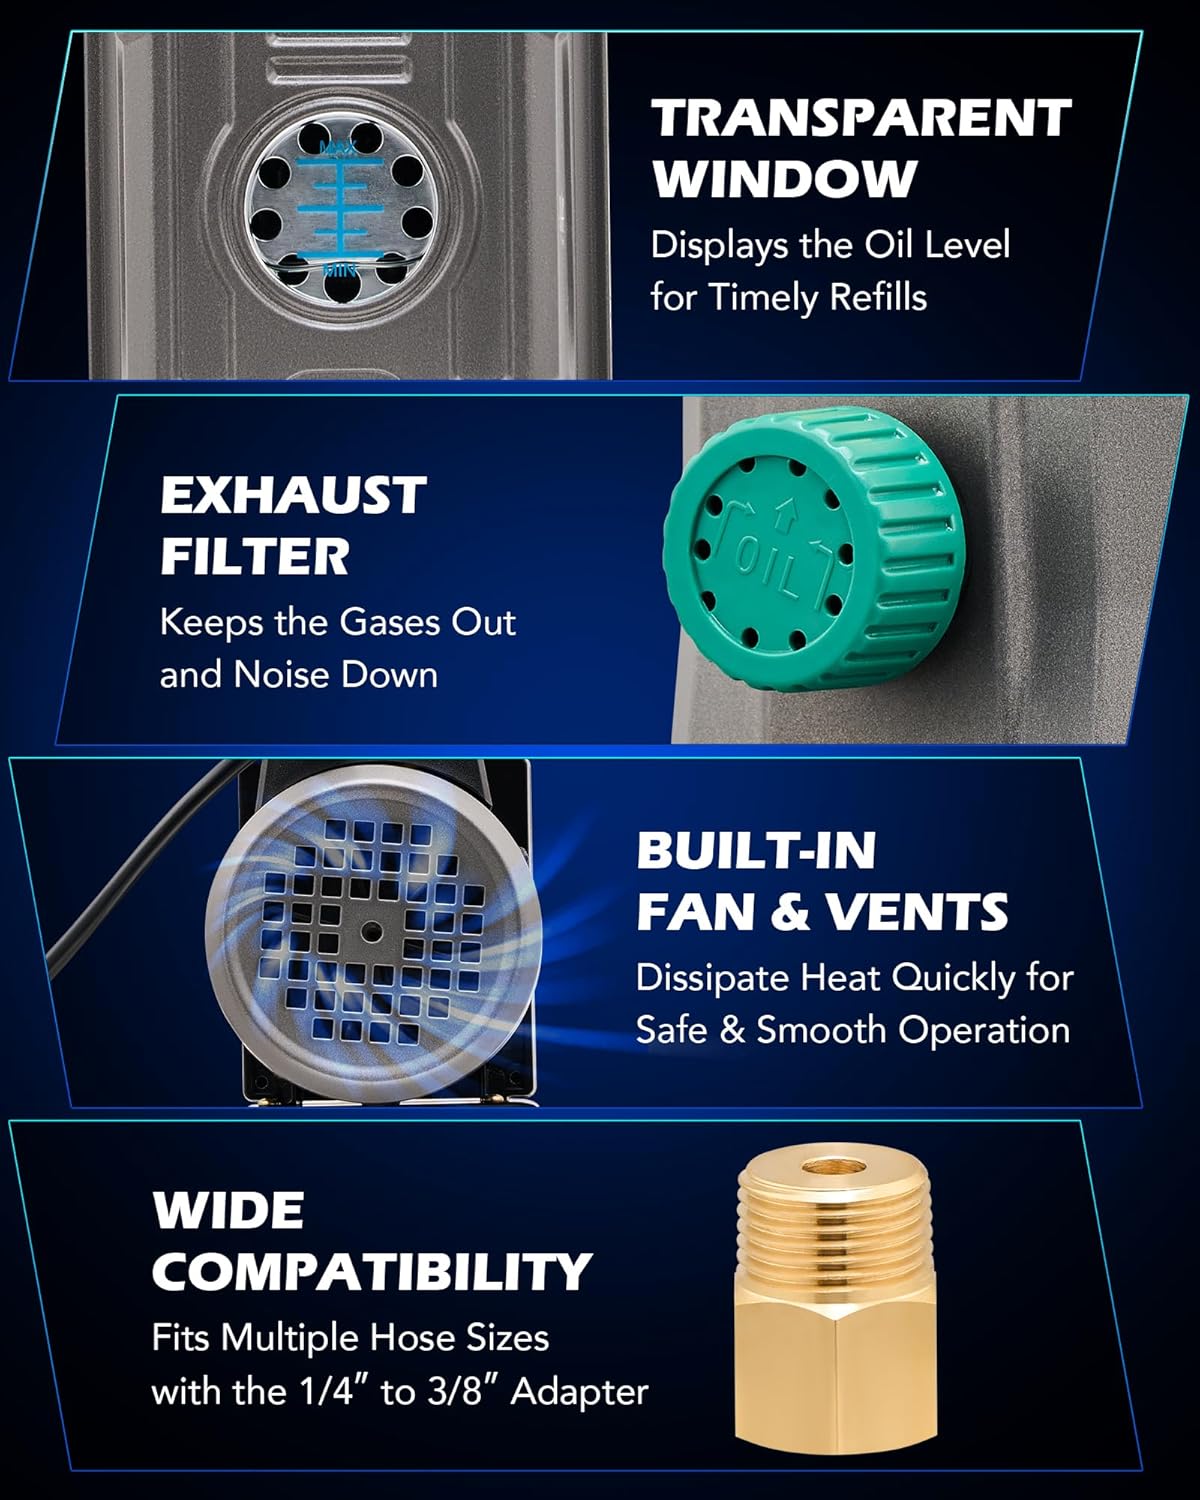
Imaj: Detaye view of the vacuum pump highlighting its transparent oil window, exhaust filter, cooling fan, and hose compatibility features.
4.2 Manifold Gauge Set
The 4-way manifold gauge set provides accurate pressure readings for R134a, R22, and R410a refrigerants, essential for diagnostic checking, charging, and recovery processes. It features a durable design for reliable performance.
- Presizyon: Provides readings with ±1.6% accuracy.
- Shock-Resistant Core: Enhances durability and maintains accuracy.
- Calibration Screw: Allows for precise adjustment of the gauge pointer to zero.
- Moisture Indicator: Helps monitor the quality of the refrigerant.
- Hook pratik: For hands-free use during service.

Image: The manifold gauge set with its key features labeled, including the gauges, valves, and indicators.
4.3 Charging Hoses
The kit includes three color-coded charging hoses (red, yellow, blue) designed for high pressure resistance and flexibility. They are 5 feet long and constructed with four reinforced nylon barriers.
- Presyon travay: Up to 800 psi.
- Pete Presyon: Up to 4000 psi.
- Leak-Proof Structure: Features top pin design with guide hole and slip-resistant sealing gaskets.

Image: The charging hoses, highlighting their robust construction and pressure ratings.
5. Enstalasyon
Follow these steps for initial setup of the vacuum pump and manifold gauge set:
- Ajoute lwil ponp vakyòm: Unscrew the oil cap on the vacuum pump. Carefully pour the provided vacuum pump oil into the oil reservoir until it reaches the center of the sight glass. Do not overfill. Securely replace the oil cap.
- Connect Hoses to Manifold Gauge:
- Konekte a blue hose to the LOW (blue) port on the manifold gauge.
- Konekte a red hose to the HIGH (red) port on the manifold gauge.
- Konekte a yellow hose to the SERVICE (yellow) port on the manifold gauge.
- Connect Vacuum Pump to Manifold Gauge: Connect one end of the black charging hose (or the yellow hose if using a 3-hose setup) to the vacuum pump's inlet port and the other end to the VAC (center) port on the manifold gauge. Ensure all connections are tight.
- Prepare Quick Couplers/Adapters: Attach the appropriate quick couplers (R134a) or angled adapters (R410a) to the ends of the blue and red hoses, depending on the refrigerant type of the system you are servicing.
6. Operasyon Enstriksyon
This section outlines the general procedures for vacuuming and charging an AC system. Always refer to the vehicle or system manufacturer's specifications for exact refrigerant types and quantities.
6.1 Vacuuming the AC System
- Connect to AC System:
- Connect the blue hose's quick coupler to the low-pressure service port of the AC system.
- Connect the red hose's quick coupler to the high-pressure service port of the AC system.
- Open Manifold Valves: Fully open both the LOW (blue) and HIGH (red) valves on the manifold gauge.
- Start Vacuum Pump: Turn on the vacuum pump. The low-pressure gauge should immediately drop into a vacuum (below 0 psi).
- Sistèm Evakyasyon: Allow the vacuum pump to run for at least 30-60 minutes, or longer for larger systems, to ensure all moisture and non-condensable gases are removed. The goal is to reach a deep vacuum, typically around 29.9 inHg (750 microns or lower).
- Tcheke pou fwit: After evacuation, close both the LOW and HIGH valves on the manifold gauge, then turn off the vacuum pump. Monitor the low-pressure gauge for 15-30 minutes. If the needle rises, there is a leak in the system. Use the provided leak detector to locate and repair any leaks before proceeding.
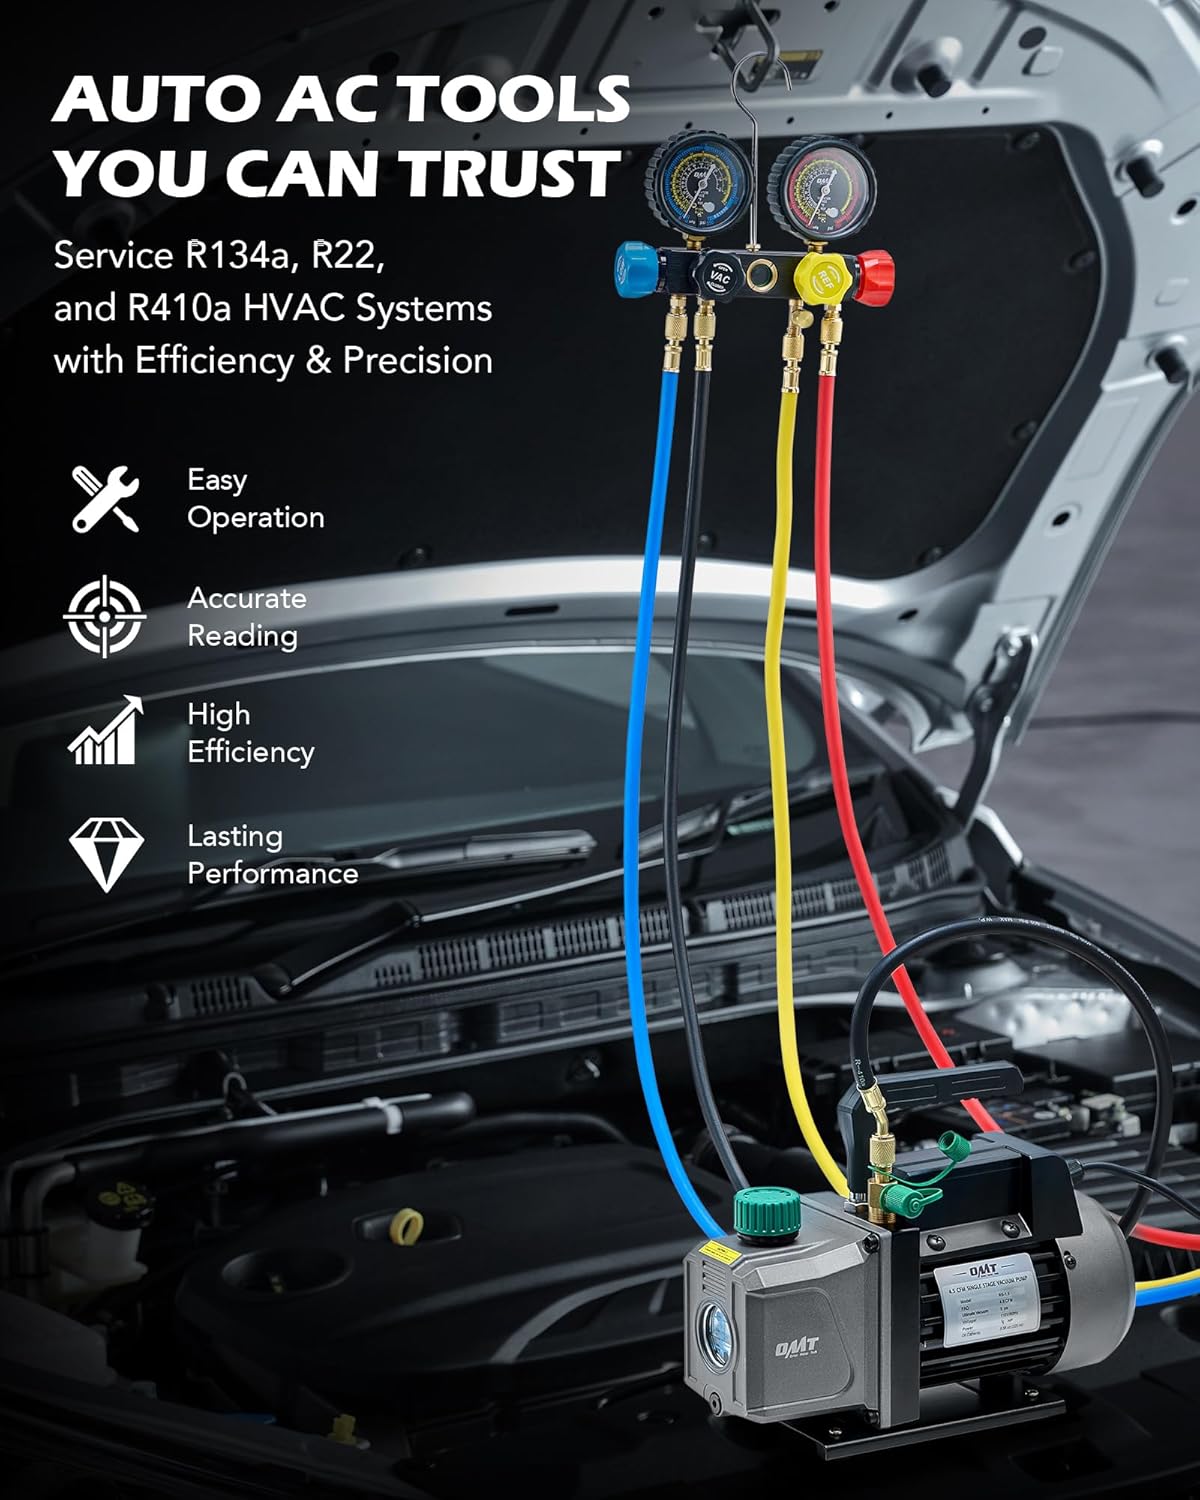
Image: The vacuum pump and manifold gauge set connected to an automotive AC system, illustrating a typical setup for vacuuming or charging.
6.2 Charging the AC System
Ensure the system has been successfully vacuumed and holds a vacuum before charging.
- Connect Refrigerant Can/Tank: Connect the yellow service hose to the refrigerant can tap or tank. If using a can, attach the appropriate can tap (self-sealing or puncture type) and open the can valve.
- Purge Air from Yellow Hose: Slightly loosen the yellow hose connection at the manifold gauge or the can tap to allow a small amount of refrigerant to escape, purging any air from the hose. Retighten immediately.
- Chaj frijidè:
- For most systems, refrigerant is added through the low-pressure side. Start the vehicle engine and turn the AC to maximum cooling.
- Slowly open the LOW (blue) valve on the manifold gauge to allow refrigerant to flow into the system. Monitor the low-pressure gauge and the amount of refrigerant added (if using a scale).
- Close the LOW valve periodically to allow the system to stabilize and check pressure readings.
- Do not overcharge the system. Refer to the manufacturer's specifications for the correct refrigerant amount.
- Dekonekte: Once charging is complete and pressures are stable, close the refrigerant can/tank valve, then close the LOW and HIGH valves on the manifold gauge. Disconnect the quick couplers from the AC service ports.
6.3 Using the Leak Detector
The electronic leak detector helps pinpoint refrigerant leaks.
- Pouvwa sou: Turn on the leak detector and allow it to warm up according to its specific instructions.
- Scan System: Slowly move the detector's probe around all potential leak points in the AC system, such as connections, hoses, and components (compressor, condenser, evaporator).
- Identify Leaks: The detector will typically emit an audible alarm or change its indicator light when a refrigerant leak is detected.

Image: A technician using the leak detector to inspect an AC system for refrigerant leaks.
7. Antretyen
7.1 Vacuum Pump Oil Change
Regular oil changes are crucial for the longevity and performance of your vacuum pump. Change the oil after every 10 hours of operation or if the oil appears cloudy or discolored.
- Vide lwil fin vye granmoun: Place a suitable container under the oil drain plug located at the bottom of the pump. Remove the drain plug and the oil cap to allow the old oil to drain completely.
- Ranplase bouchon drenaj la: Once drained, replace and tighten the oil drain plug.
- Ajoute nouvo lwil: Pour new vacuum pump oil into the reservoir until it reaches the center of the sight glass.
- Bouchon byen fèmen: Ranplase bouchon lwil la byen fèm.
7.2 Netwayaj Jeneral ak Depo
- Clean the exterior of the vacuum pump and manifold gauge with a damp twal. Pa sèvi ak pwodwi chimik piman bouk.
- Ensure all hoses and connections are free of debris before storage.
- Store the kit in its provided storage bag and case in a cool, dry place, away from direct sunlight and extreme temperatures.
- Always cap the vacuum pump's inlet and outlet ports when not in use to prevent contamination.
NAN. Depanaj
| Pwoblèm | Kòz posib | Solisyon |
|---|---|---|
| Vacuum pump not starting | Pa gen kouran, switch ki pa bon, pwoblèm motè | Check power connection. Ensure switch is ON. Contact support if motor is unresponsive. |
| Pump not pulling sufficient vacuum | Low oil level, contaminated oil, leaks in connections, worn pump components | Check and refill/change oil. Tighten all hose connections. Inspect hoses and O-rings for damage. |
| Manifold gauges not reading correctly | Gauge out of calibration, internal damage, hose blockage | Use calibration screw to zero gauges. Check hoses for kinks or blockages. |
| Refrigerant not flowing during charging | Can tap not fully engaged, low refrigerant in can, clogged hose | Ensure can tap is properly installed and valve is open. Replace can. Check hoses for blockages. |
9. Espesifikasyon
- Nimewo Modèl: FBA-VPHC00BGE
- Vacuum Pump Flow Rate (FAD): 4.5 CFM (7.6 m³ / h)
- Vacuum Pump Rated Power: 1/3 hp (248W)
- Vacuum Pump Ultimate Vacuum: 37.5 Microns (5 Pa)
- Vacuum Pump Oil Capacity: 0.24 qt (225 mL)
- Vacuum Pump Item Weight: 22.1 liv
- Manifold Gauge Accuracy: ± 1.6%
- Longè kawotchou: 5 pye.
- Hose Working Pressure: 800 psi
- Hose Burst Pressure: 4000 psi
- Refrijeran konpatib: R134a, R22, R410a
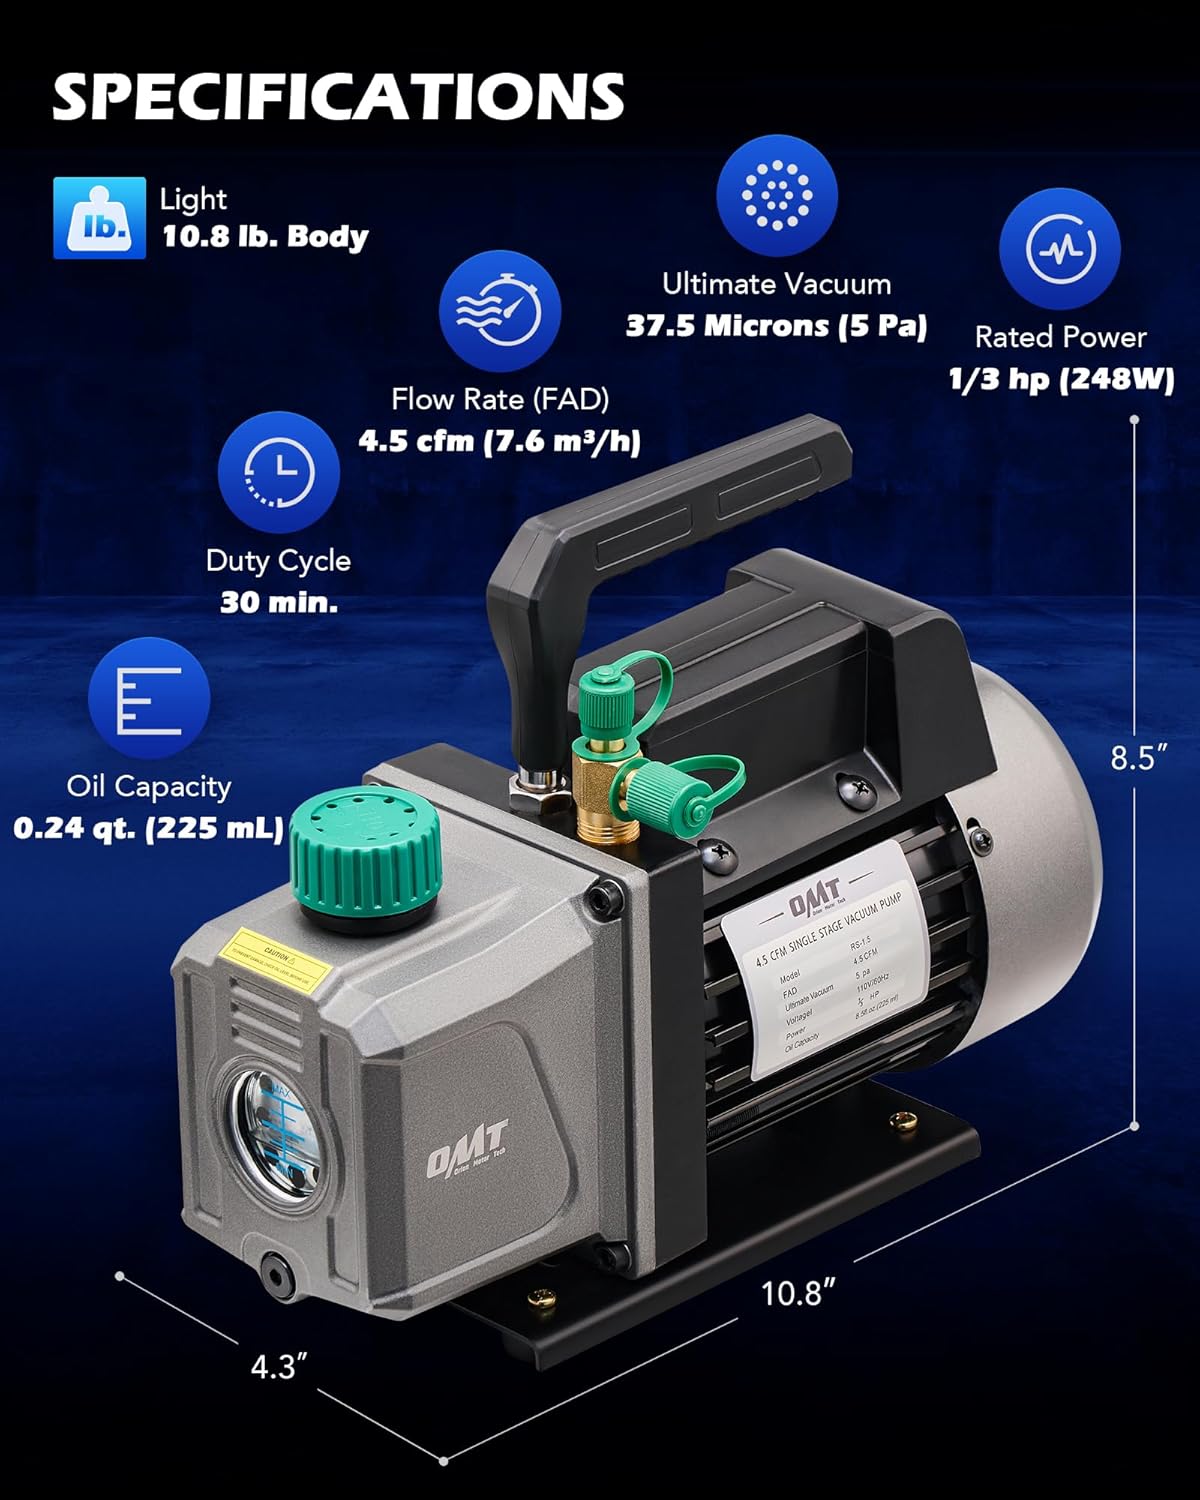
Image: Technical specifications and dimensions of the vacuum pump.
10. Garanti ak sipò
For warranty information or technical support, please contact Orion Motor Tech directly through their official websit la oswa magazen kote ou te achte pwodwi a. Kenbe prèv acha ou pou reklamasyon garanti.


