Entwodiksyon
This manual provides detailed instructions for the safe and effective use of your Orion Motor Tech AC Vacuum Pump and Gauge Set. This comprehensive kit is designed for servicing various automotive and indoor HVAC systems, compatible with refrigerants such as R134a, R12, R22, and R502. The kit includes a robust vacuum pump, a precise 3-way manifold gauge set, a leak detector, and all necessary hoses and adapters to facilitate efficient AC repair and maintenance tasks.

Figure 1: Orion Motor Tech AC Vacuum Pump and Gauge Set components.
Ki sa ki nan bwat la
Your Orion Motor Tech AC Vacuum Pump and Gauge Set includes the following components:
- 1x Vacuum Pump (1/3 hp, 4 CFM)
- 1x Manifold Gauge Set (3-way)
- 1x Leak Detector
- 1x Evacuation/Charging Hose (Yellow)
- 1x Low-Pressure Hose (Blue)
- 1x High-Pressure Hose (Red)
- 1x Low-Pressure Quick Coupler
- 1x High-Pressure Quick Coupler
- 1x R134a Self-Sealing Can Tap
- 1x R134a Puncture Can Tap
- 1x Can Tap Adapter (1/4" to 1/2")
- 1x Vacuum Adapter (1/4" to 3/8")
- 1x Vacuum Pump Oil (0.26 qt.)
- 1x Pè Gan Travay
- 1x Teflon Tape
- 1x Bag Depo
- 1x depo ka
- 1x manyèl enstriksyon

Figure 2: Complete contents of the vacuum pump kit.
Espesifikasyon
| Karakteristik | Spesifikasyon |
|---|---|
| Manifakti | Orion Motor Tech |
| Nimewo Modèl | FBA-VPHB00AOG |
| Pwa atik | 10.56 liv |
| Dimansyon pwodwi | 10.8 x 4.3 x 8.5 pous |
| Pouvwa ponp vakyòm | 1/3 hp (248W) |
| Vacuum Pump Flow Rate | 4 CFM (6.8 M³/H) |
| Ultim vakyòm | 37.5 Microns (5 Pa) |
| Kapasite lwil oliv | 0.26 qt. (250 mL) |
| Kawotchou Travay Presyon | 600 psi |
| Presyon pete kawoutchou | 3000 psi |
| Refrijeran konpatib | R134a, R12, R22, R502 |

Figure 3: Vacuum pump specifications and dimensions.
Enfòmasyon sou Sekirite
Always prioritize safety when working with AC systems and refrigerants. Failure to follow safety guidelines can result in injury or damage to equipment.
- Mete Ekipman Pwoteksyon Pèsonèl (EPI): Always wear safety glasses and gloves to protect against refrigerant exposure.
- Travay nan yon zòn ki byen vantile: Ensure adequate ventilation to prevent the accumulation of refrigerant vapors.
- Handle Refrigerants with Care: Refrigerants can cause frostbite upon contact and are harmful if inhaled. Follow all local regulations for handling and disposal.
- Tcheke pou fwit: Before charging, always perform a thorough leak check using the provided leak detector to ensure system integrity.
- Proper Vacuum Pump Operation: Ensure the vacuum pump is filled with the correct amount of oil before operation. Do not overfill.
- Avoid Over-tightening Connections: Tighten hose connections firmly but avoid excessive force, which can damage seals and lead to leaks.
Enstalasyon
1. Prepare the Vacuum Pump
- Unscrew the oil cap on the vacuum pump.
- Carefully pour the provided vacuum pump oil into the oil-filling port until the oil level is between the 'MIN' and 'MAX' marks on the sight glass. Do not overfill.
- Ranplase bouchon lwil la byen fèm.
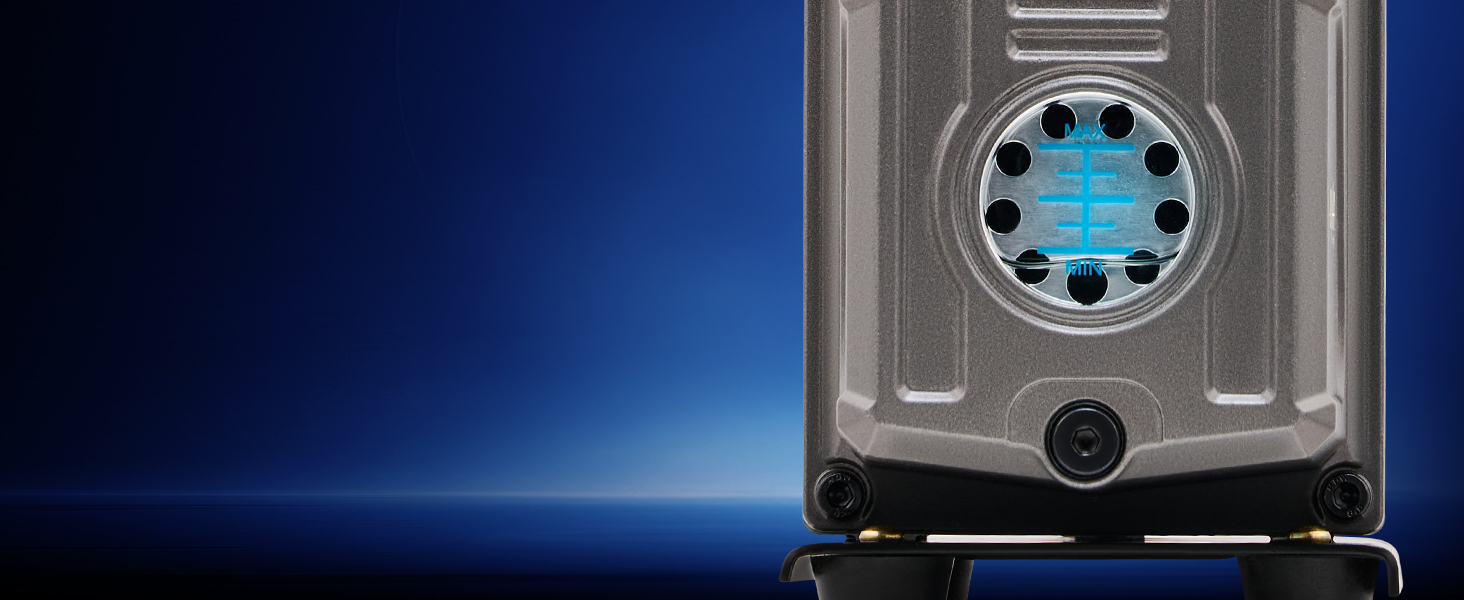
Figure 4: Filling the vacuum pump with oil.
2. Connect the Manifold Gauge Set
- Attach the blue low-pressure hose to the 'LO' port on the manifold gauge.
- Attach the red high-pressure hose to the 'HI' port on the manifold gauge.
- Attach the yellow evacuation/charging hose to the central 'VAC' port on the manifold gauge.
- Connect the other end of the yellow hose to the vacuum pump's inlet port. Use the appropriate adapter (1/4" to 3/8") if necessary.

Figure 5: Manifold gauge set with connected hoses.
3. Connect to the AC System
- Locate the high and low-pressure service ports on your vehicle's AC system.
- Connect the low-pressure quick coupler to the blue hose and attach it to the AC system's low-pressure port.
- Connect the high-pressure quick coupler to the red hose and attach it to the AC system's high-pressure port.
- Asire ke tout koneksyon yo sere pou anpeche koule.
Video 1: Demonstrates connecting the air conditioning gauge and pump set to an automotive AC system.
Enstriksyon Operasyon
1. Evacuating the AC System (Pulling a Vacuum)
Evacuating the AC system removes air and moisture, which can cause damage and reduce cooling efficiency.
- Ensure all valves on the manifold gauge set are closed.
- Open the low-pressure (blue) and high-pressure (red) valves on the manifold gauge set to allow the vacuum pump to draw from the AC system.
- Turn on the vacuum pump. The low-pressure gauge should immediately drop to -30 inHg (inches of mercury).
- Allow the vacuum pump to run for at least 15-30 minutes (longer for larger systems or if significant moisture is suspected) to ensure a deep vacuum.
- After the desired vacuum is reached, close the low-pressure and high-pressure valves on the manifold gauge set.
- Fèmen ponp vakyòm lan.
Video 2: Demonstrates the vacuuming process for an AC system using the Orion Motor Tech kit.
2. Performing a Leak Test
After evacuation, it is crucial to perform a leak test to confirm the system holds the vacuum.
- With the vacuum pump off and manifold valves closed, observe the low-pressure gauge for 15-30 minutes.
- If the gauge needle rises, it indicates a leak in the system. Proceed to use the leak detector to pinpoint the leak.
- If the gauge needle remains steady at -30 inHg, the system is leak-free and ready for refrigerant charging.

Figure 6: Manifold gauges for monitoring system pressure during leak test.
3. Using the Leak Detector
The included leak detector helps identify refrigerant leaks in your AC system.
- Turn on the leak detector and allow it to warm up according to its instructions.
- Slowly move the detector's probe along all refrigerant lines, fittings, and components of the AC system.
- The detector will emit an audible alarm or visual signal if a leak is detected.
- Repair any identified leaks before proceeding with refrigerant charging.
Video 3: Demonstrates the use of the leak detector to find refrigerant leaks.
4. Charging the AC System with Refrigerant
Only charge the system with the correct type and amount of refrigerant specified by the manufacturer.
- Connect the appropriate R134a can tap to a refrigerant can.
- Attach the refrigerant can to the yellow evacuation/charging hose.
- Slightly open the can tap to purge any air from the yellow hose before fully opening the can.
- Start the vehicle's engine and turn the AC to maximum cooling and fan speed.
- Slowly open the low-pressure (blue) valve on the manifold gauge set to allow refrigerant to enter the system. Monitor the low-pressure gauge.
- Add refrigerant in small increments, allowing the system to stabilize between additions. Refer to your vehicle's specifications for the correct charge amount.
- Once the system is fully charged, close the low-pressure valve on the manifold gauge set and the can tap.
- Disconnect the hoses from the AC system, ensuring to close the quick couplers first to minimize refrigerant loss.
Video 4: Unboxing and initial setup of the OMT Vacuum Pump, showing components and connections.
Videyo 5: Finiview of the Orion Motor Tech R1234yf AC Vacuum Pump and Gauge Set, including usage demonstration.
Videyo 6: Yon ti prezantasyonview video titled "Don't buy for R134". This video may highlight specific compatibility issues or user experiences with R134a refrigerant, despite the product's listed compatibility.
Antretyen
1. Vacuum Pump Oil Change
Regularly check the oil level and clarity in the vacuum pump's sight glass. Change the oil if it appears cloudy, discolored, or below the 'MIN' mark.
- Ensure the vacuum pump is off and disconnected from power.
- Place a suitable container under the oil drain valve located at the bottom of the pump.
- Open the oil drain valve and remove the oil cap to allow the old oil to drain completely.
- Close the drain valve and refill with new vacuum pump oil as described in the Setup section.

Figure 7: Location of the oil drain valve.
2. Netwayaj
Wipe down the manifold gauge set and hoses after each use to remove any refrigerant residue or dirt. Store all components in the provided case and bag in a clean, dry place.
Depanaj
| Pwoblèm | Kòz posib | Solisyon |
|---|---|---|
| Vacuum pump not pulling full vacuum (-30 inHg) | Low oil level, dirty oil, leaks in connections, faulty pump. | Check/refill oil, change oil, tighten all connections, check for leaks with detector, inspect pump for damage. |
| System not holding vacuum | Leak in AC system or manifold/hose connections. | Perform a thorough leak test with the detector. Tighten connections. Repair any identified leaks. |
| Refrigerant not flowing into system | Manifold valves closed, can tap not fully engaged, clogged hose. | Ensure manifold valves are open, check can tap operation, inspect hoses for blockages. |
Garanti ak sipò
For warranty information, technical support, or service inquiries regarding your Orion Motor Tech AC Vacuum Pump and Gauge Set, please refer to the contact information provided in the product packaging or visit the official Orion Motor Tech websit la. Kenbe resi acha ou kòm prèv acha pou nenpòt reklamasyon garanti.


