1. Entwodiksyon
Welcome to the world of sewing with your new SINGER M3300 Lightweight & Portable Sewing Machine. This machine is designed for versatility, offering 97 stitch applications suitable for various fabrics and projects, from basic mending to creative decorative work. Its user-friendly features, including a built-in needle threader and a one-step buttonhole, make sewing accessible and enjoyable for all skill levels.
This manual provides detailed instructions to help you set up, operate, and maintain your sewing machine, ensuring years of reliable performance. Please read through this manual carefully before using your machine for the first time.

Figure 1.1: The SINGER M3300 Sewing Machine, a lightweight and portable model designed for various sewing tasks.
2. Enstriksyon Sekirite
To ensure safe operation of your sewing machine, please observe the following precautions:
- Toujou debranche machin nan nan priz elektrik la lè w ap retire kouvèti yo, w ap wile l, oswa lè w ap fè nenpòt lòt ajisteman antretyen itilizatè ki mansyone nan manyèl enstriksyon an.
- Do not allow children to play with the machine. Close supervision is necessary when the machine is used by or near children.
- Use this machine only for its intended use as described in this manual. Use only attachments recommended by the manufacturer as contained in this manual.
- Never operate this machine if it has a damaged cord or plug, if it is not working properly, if it has been dropped or damaged, or dropped into water.
- Pa janm lage oswa mete nenpòt objè nan nenpòt ouvèti.
- Pa sèvi ak deyò.
- Pa opere kote yo ap itilize pwodwi aerosol (espre) oswa kote yo administre oksijèn.
- Pou dekonekte, vire tout kontwòl yo nan pozisyon koupe, apresa retire ploge nan priz.
- Kenbe dwèt lwen tout pati k ap deplase. Swen espesyal yo mande alantou zegwi a machin a koud.
- Toujou sèvi ak plak zegwi apwopriye a. Plak la mal ka lakòz zegwi a kraze.
- Pa sèvi ak zegwi koube.
- Pa rale oswa pouse twal pandan w ap koud. Li ka devye zegwi a ki lakòz li kraze.
3. Machine Components
Familiarize yourself with the main parts of your SINGER M3300 sewing machine:

Figure 3.1: Key components of the SINGER M3300, including the thread tension dial, stitch width dial, stitch length dial, bobbin stopper, threading guide, reverse sewing lever, and stitch selector dial.
- Kadran Tansyon Fil: Ajiste tansyon fil anwo a.
- Stitch Width Dial: Controls the width of zigzag and decorative stitches.
- Stitch Length Dial: Controls the length of stitches.
- Bobbin Stopper: Stops bobbin winding when full.
- Threading Guide: Guides the upper thread through the machine.
- Reverse Sewing Lever: Engages reverse stitching for securing seams.
- Kadran Seleksyon Pwen: Selects the desired stitch pattern.
4. Enstalasyon
4.1 Debalaj ak plasman
Carefully remove the machine from its packaging. Place the machine on a stable, flat surface. Ensure there is adequate space around the machine for comfortable operation and fabric handling.
4.2 Koneksyon pouvwa
Connect the power cord to the machine's power input and then plug it into a suitable electrical outlet. Ensure the foot controller is also connected to the machine.
4.3 Pwodwi pou Enkli
Your SINGER M3300 comes with a range of essential accessories located in the storage area at the front of your machine. These include:
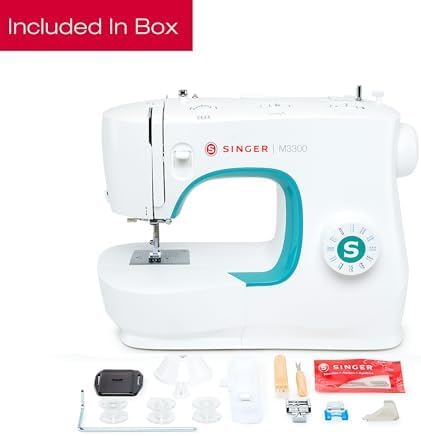
Figure 4.1: The SINGER M3300 sewing machine shown with its standard included accessories, such as bobbins, needles, and various presser feet.
- Bi jeneral pye
- Pye bouton
- Bouton koud pye
- Zip pye
- Edge/Quilting Guide
- Tournvis
- Seam Ripper/Lint Brush
- Pack of Needles
- Bobbins (Class 15 transparent)
- Thread Spool Cap
- Boutèy lwil oliv
- Plak reprize
4.4 Bobinaj la
- Mete yon bobin fil sou pin bobin la.
- Gide fil la nan gid fil anwo a epi li fè wonn disk tansyon bobin lan.
- Mete fil la nan twou ki nan bobin nan soti anndan pou deyò.
- Place the bobbin onto the bobbin winder spindle and push the spindle to the right.
- Press the foot controller to start winding. The bobbin winder will stop automatically when the bobbin is full.
- Koupe fil la epi retire bobin la.
4.5 Mete fil anwo a
- Leve pye pye a.
- Mete yon bobin fil sou pin bobin la.
- Swiv chemen anfile nimewote ki endike sou machin nan, pandan w ap gide fil la nan tout gid ak disk tansyon yo.
- Bring the thread up through the take-up lever from right to left.
- Continue guiding the thread down to the needle bar.
- Fil zegwi a soti devan dèyè.
4.6 Drawing Up the Bobbin Thread
- Insert the wound bobbin into the bobbin case (front loading bobbin system).
- Kenbe fil anwo a alalejè ak men gòch ou.
- Turn the handwheel towards you to lower the needle into the needle plate and then raise it. The upper thread will catch the bobbin thread, forming a loop.
- Pull the upper thread gently to bring the bobbin thread loop up through the needle plate opening.
- Pull both threads (upper and bobbin) under the presser foot and towards the back of the machine.

Figure 4.2: The front-loading bobbin system of the SINGER M3300, designed for easy access and insertion of the bobbin.
5. Operasyon Enstriksyon
5.1 Seleksyon pwen
Turn the Stitch Selector Dial to choose from the 97 available stitch applications. Refer to the stitch chart on the machine for visual guidance.

Figure 5.1: Key operational features including the built-in needle threader, one-step buttonhole, reverse sewing lever, and ample sewing space.
5.2 Ajiste longè ak lajè pwen an
Use the Stitch Length Dial to adjust the length of your stitches, making them longer or shorter as needed. The Stitch Width Dial controls the width of zigzag and decorative stitches.
5.3 Sewing a Straight Stitch
- Select the straight stitch pattern on the Stitch Selector Dial.
- Set the stitch length to your desired setting (e.g., 2.5 for general sewing).
- Place your fabric under the presser foot, aligning the edge with a seam guide on the needle plate.
- Bese pye presser la.
- Peze pedal la dousman pou kòmanse koud. Gide twal la san pwoblèm.
5.4 Sewing a Zigzag Stitch
- Select a zigzag stitch pattern.
- Adjust the stitch length and width according to your project needs.
- Proceed as with straight stitching, guiding the fabric evenly.
5.5 One-Step Buttonhole
The M3300 features a convenient one-step buttonhole function:
- Tache pye bouton an.
- Place the button you intend to use into the buttonhole foot's holder. This automatically sets the correct buttonhole size.
- Select the buttonhole stitch pattern.
- Position your fabric under the foot and lower the presser foot.
- Begin sewing. The machine will automatically sew all four sides of the buttonhole.
5.6 Using the Free Arm
To use the free arm for sewing tubular items like cuffs, sleeves, or pant hems, simply slide off the removable accessory storage compartment at the front of the machine. This exposes the narrow free arm, allowing fabric to be easily maneuvered around it.
5.7 Using the Built-in Needle Threader
The built-in needle threader simplifies threading the needle:
- Leve zegwi a nan pozisyon ki pi wo li yo.
- Lower the needle threader lever.
- Hook the thread under the threader hook.
- Release the lever, and the thread will be pulled through the needle eye.
5.8 Koud an ranvèse
To secure the beginning and end of a seam, press and hold the Reverse Sewing Lever while stitching. The machine will sew in reverse. Release the lever to resume forward stitching.
6. Antretyen
Regular maintenance ensures the longevity and smooth operation of your sewing machine.
6.1 Netwaye machin nan
Toujou debranche machin nan anvan w netwaye.
- Feed Dogs and Bobbin Area: Remove the needle plate and bobbin case. Use the lint brush (included accessory) to remove any lint or dust accumulated around the feed dogs and in the bobbin area.
- Eksteryè: Wipe the exterior surfaces of the machine with a soft, dry cloth. Do not use harsh chemicals or abrasive cleaners.
6.2 Changing the Needle
Change the needle regularly, especially after every 8-10 hours of sewing or when starting a new project. A dull or bent needle can cause skipped stitches, thread breakage, or damage to fabric.
- Etenn machin nan epi deploge li.
- Lage zegwi a clamp screw using the screwdriver.
- Remove the old needle by pulling it downwards.
- Insert a new needle with the flat side facing the back of the machine, pushing it up as far as it will go into the needle clamp.
- Sere cl zegwi aamp vis byen.
NAN. Depanaj
Seksyon sa a adrese pwoblèm komen ou ka rankontre ak solisyon yo.
| Pwoblèm | Kòz posib | Solisyon |
|---|---|---|
| Sote pwen | Incorrectly inserted needle, bent needle, wrong needle size for fabric, improper threading. | Re-insert needle correctly, replace bent needle, use appropriate needle, re-thread machine. |
| Kase Fil | Incorrect threading, too much upper thread tension, poor quality thread, bent needle, burr on needle plate. | Re-thread machine, adjust tension, use good quality thread, replace needle, check needle plate for damage. |
| Bobbin Jamming / Tangling | Improperly wound bobbin, incorrect bobbin insertion, lint in bobbin case. | Re-wind bobbin evenly, ensure bobbin is inserted correctly, clean bobbin area. |
| Machin pa manje twal | Feed dogs lowered, presser foot not lowered. | Leve chen transpò yo, desann pye près la. |
8. Espesifikasyon
| Karakteristik | Detay |
|---|---|
| Nimewo Modèl | M3300 |
| Stitch Applications | 97 |
| Kalite boutonnyè | 1-etap |
| Zegwi Threader | Bati-an |
| Bra gratis | Wi |
| Dimansyon (pwodwi) | 15.8P x 38.5W x 20.4H Santimèt |
| Pwa | 6.17 kg |
| Materyèl | Metal, Plastik |
| Manifakti | SINGER |
| Peyi orijin | Vyetnam |
9. Garanti ak sipò
Your SINGER M3300 sewing machine is covered by a manufacturer's warranty. For specific warranty details, including duration and coverage, please refer to the warranty card included with your product or visit the official SINGER websit.
For technical support, service, or to purchase additional accessories, please contact SINGER customer service or visit their official support page. Online resources, including FAQs and video tutorials, may also be available to assist you with common questions and operational guidance.


