Entwodiksyon
Mèsi pou acha aasing the Trexonic Retro Record Player. This versatile audio system combines vintage aesthetics with modern functionality, allowing you to enjoy your favorite music from various sources including vinyl records, CDs, Bluetooth devices, AM/FM radio, and USB/SD cards. This manual provides detailed instructions for setup, operation, and maintenance to ensure optimal performance and longevity of your device.

Image: The Trexonic Retro Record Player, showcasing its classic design with the turntable lid open and a vinyl record in place.
Enfòmasyon enpòtan sou sekirite
Tanpri li enstriksyon sekirite sa yo ak anpil atansyon anvan ou itilize aparèy la. Kenbe manyèl sa a pou referans pita.
- Pa ekspoze aparèy sa a lapli oswa imidite.
- Pa bloke okenn ouvèti vantilasyon. Enstale li dapre enstriksyon manifakti a.
- Pa enstale tou pre okenn sous chalè tankou radyatè, rejis chalè, recho, oswa lòt aparèy (tankou amplifiers) ki pwodui chalè.
- Pwoteje kòd elektrik la pou yo pa mache oswa kwense, sitou nan priz, resipyan konvenyans, ak pwen kote yo sòti nan aparèy la.
- Itilize sèlman atachman/akseswa manifakti a espesifye.
- Deploge aparèy sa a pandan tanpèt zèklè oswa lè li pa itilize pou yon peryòd tan ki long.
- Refere tout sèvis yo bay pèsonèl sèvis kalifye. Reparasyon nesesè lè aparèy la domaje nenpòt fason, tankou kòd kouran oswa ploge domaje, likid koule oswa objè tonbe nan aparèy la, aparèy la te ekspoze a lapli oswa imidite, li pa fonksyone nòmalman. , oswa li te tonbe.
Karakteristik pwodwi
The Trexonic Retro Record Player is equipped with a variety of features for a comprehensive audio experience:
- 3-Speed Belt-Driven Turntable: Plays 33 1/3, 45, and 78 RPM vinyl records.
- Bluetooth entegre: Wirelessly stream music from compatible devices.
- Jwè CD: Supports standard audio CDs.
- Radyo AM/FM: Integrated tuner with backlit display.
- USB/SD Input: For MP3 playback and recording vinyl to MP3.
- Antre oksilyè (3.5mm): Konekte aparèy odyo ekstèn yo.
- Kas ekoutè Jack: Pou koute prive.
- Sòti liy RCA: Connect to external speakers or audio systems.
- Alarm Clock with Timer: Programmable alarm and sleep timer functions.
- Oratè Stereo entegre: For immediate audio playback.
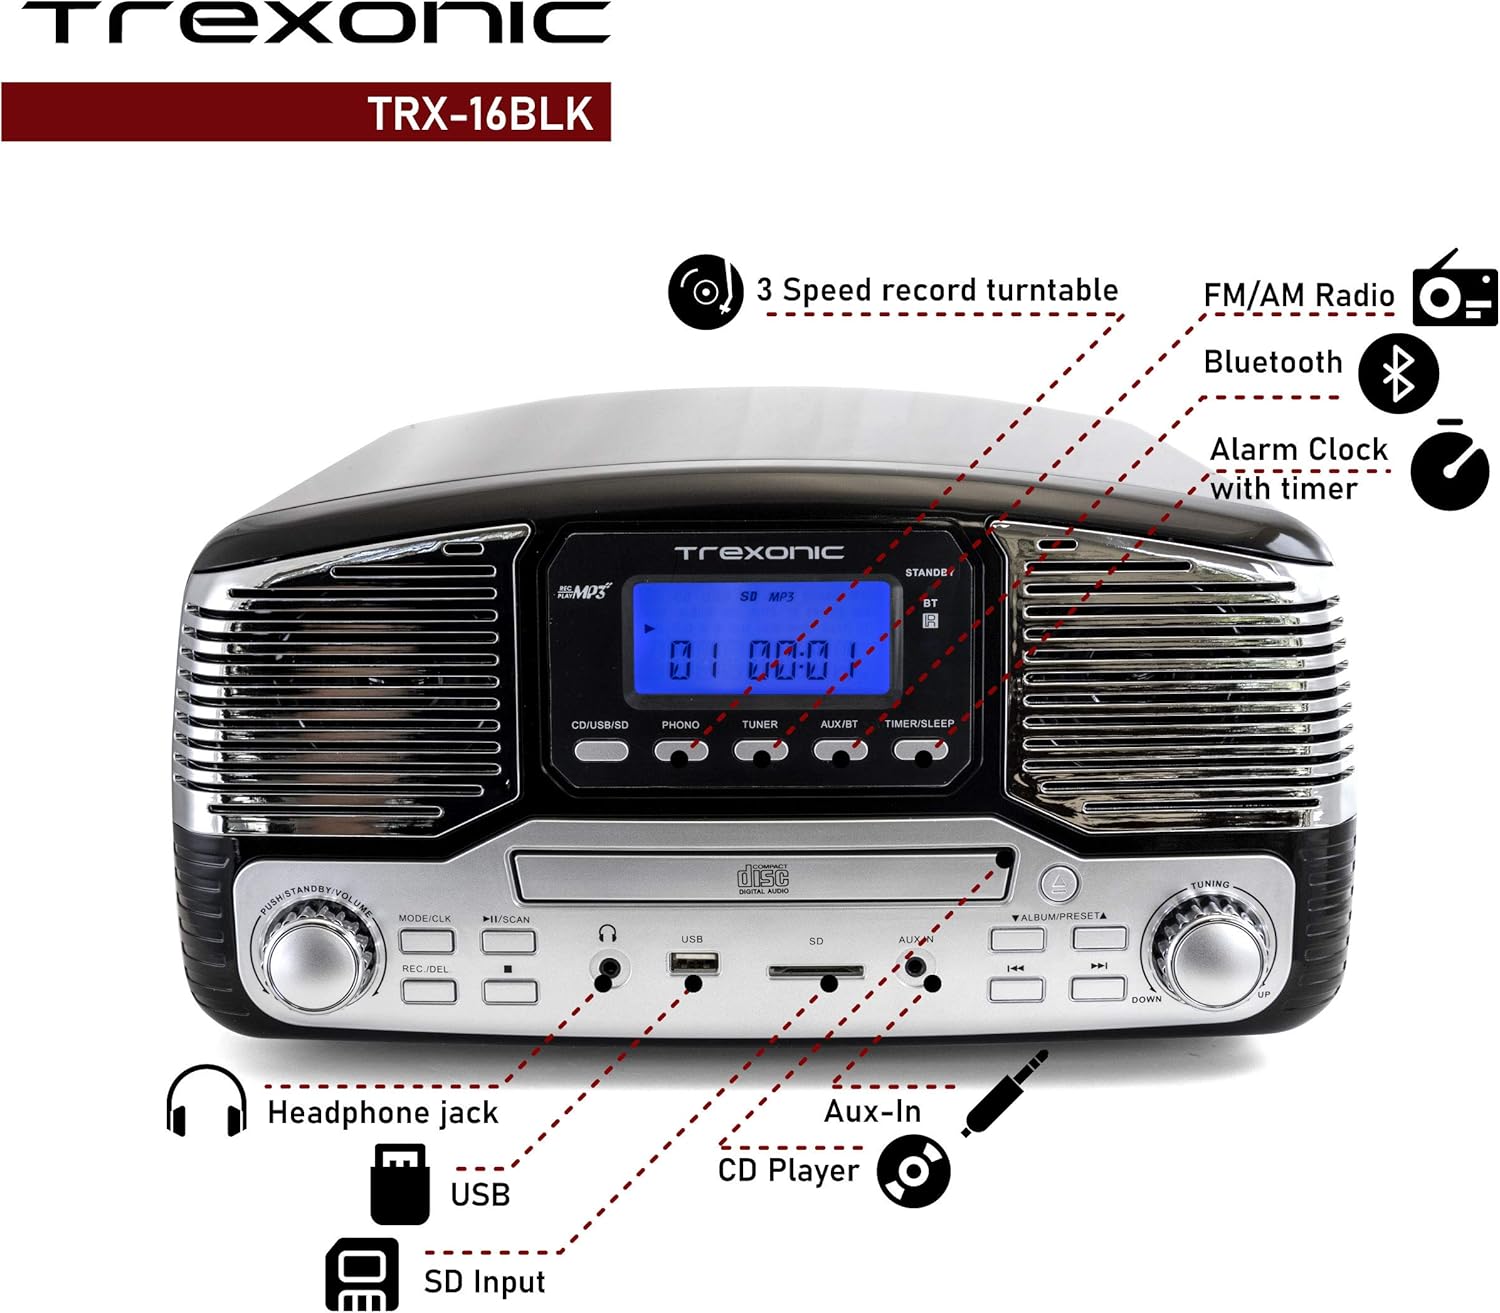
Image: A detailed diagram highlighting the key features and control locations on the Trexonic Retro Record Player.
Kontwòl ak Fonksyon
Familiarize yourself with the various controls and ports on your Trexonic Retro Record Player:

Imaj: Gwo plan view of the digital display and mode selection buttons (CD/USB/SD, PHONO, TUNER, AUX/BT, TIMER/SLEEP).
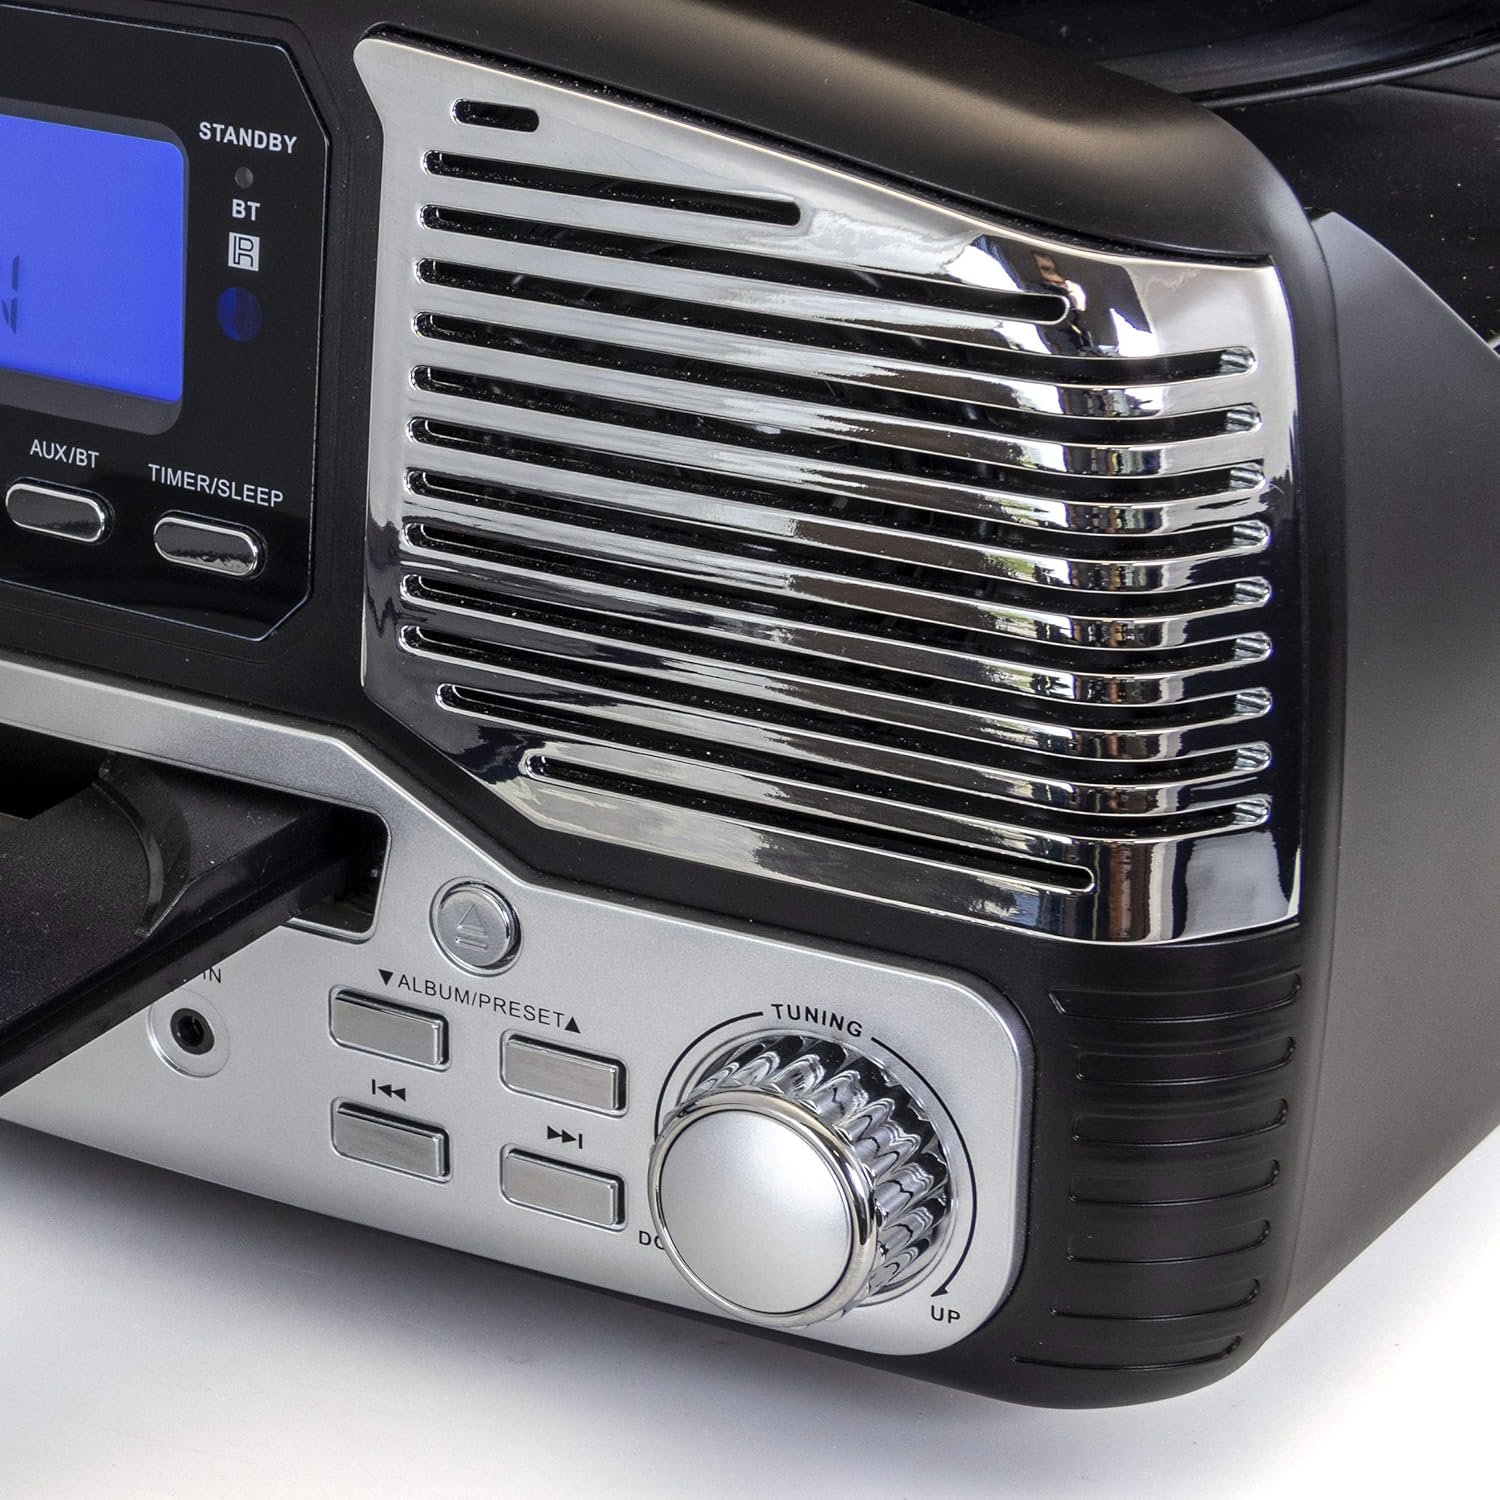
Imaj: Gwo plan view of the tuning knob and track navigation buttons (SCAN, ALBUM/PRESET, UP, DOWN).
Kontwòl kle yo enkli:
- Bouton pouvwa/volim: Limen/etenn aparèy la epi li ajiste volim nan.
- Mode/CLK Button: Selects audio source (CD/USB/SD, PHONO, TUNER, AUX/BT) and sets clock.
- Bouton ANREJISTREMAN/EFASE: Initiates recording to USB/SD or deletes files.
- Play/Pause, Stop, Skip Buttons: Standard playback controls for CD/USB/SD.
- Bouton akor: For manual radio station selection.
- Timer/Sleep Button: Activates sleep timer or alarm settings.
- Kas ekoutè Jack: Sòti 3.5mm pou kas ekoutè.
- Pò USB: Pou kle USB yo.
- Plas kat SD: Pou kat memwa SD.
- AUX IN Jack: Antre 3.5mm pou aparèy odyo ekstèn.
- RCA Line Out (Rear): Konekte ak ekstèn amplifiers oswa oratè ki mache ak pisans.
- FM Antenna (Rear): Pou resepsyon radyo FM.
Premye konfigirasyon
Follow these steps to set up your Trexonic Retro Record Player:
- Debake: Retire aparèy la nan anbalaj li avèk prekosyon. Kenbe materyèl anbalaj yo pou transpò oswa depo pita.
- Plasman: Mete aparèy la sou yon sifas plat epi ki estab, lwen limyè solèy dirèk, sous chalè, ak twòp pousyè oswa imidite.
- Koneksyon pouvwa: Connect the AC power adapter to the DC 12V IN (1000mA) jack on the rear of the unit, then plug the adapter into a standard wall outlet.
- Antèn FM: Extend the FM wire antenna located at the back of the unit for optimal radio reception.
- External Connections (Optional): If connecting to external speakers or an amplifier, use RCA cables to connect the LINE OUT jacks on the rear of the unit to the corresponding input jacks on your external audio equipment.

Image: The rear panel of the Trexonic Retro Record Player, illustrating the connection points for power, FM antenna, and RCA line-out.
Enstriksyon Operasyon
Jwe Vinyl Records
This unit supports 33 1/3, 45, and 78 RPM records.
- Leve kouvèti pousyè tè a.
- Place a record on the turntable platter. If playing a 45 RPM single, place the included 45 RPM adapter on the center spindle.
- Mete switch seleksyon vitès la sou vitès ki apwopriye a (33, 45, oswa 78 RPM) pou dosye w la.
- Peze a MODE/CLK button repeatedly until "PHONO" is displayed.
- Gently lift the tone arm from its rest and move it over the record. The platter will begin to rotate.
- Carefully lower the tone arm onto the desired track of the record.
- Ajiste volim nan lè l sèvi avèk la Pouvwa / Volim bouton.
- When the record finishes, the tone arm will automatically return to its rest (for most records). Lift the tone arm and return it to its rest manually if needed.

Imaj: Yon gwo plan view of the turntable in operation, showing the stylus tracking a vinyl record.
Playing Compact Discs (CD)
- Peze a MODE/CLK button repeatedly until "CD" is displayed.
- Peze a Louvri/FÈMEN bouton pou louvri plato CD a.
- Mete yon CD ak bò etikèt la anlè nan plato a.
- Peze a Louvri/FÈMEN button again to close the tray. The unit will read the CD and begin playback automatically.
- Sèvi ak la JWE/POZ, SISPANN, ak SOTE bouton pou kontwole lèktur.

Image: The Trexonic Retro Record Player with its CD tray extended, ready for disc insertion or removal.
Konekte via Bluetooth
- Peze a MODE/CLK button repeatedly until "BT" (Bluetooth) is displayed. The unit will enter pairing mode, indicated by a flashing Bluetooth icon on the display.
- Enable Bluetooth on your external device (smartphone, tablet, etc.) and search for available devices.
- Select "Trexonic" or "TRX-16BLK" from the list of devices.
- Once paired, the Bluetooth icon will stop flashing and remain solid. You can now stream audio wirelessly to the unit.
Sèvi ak radyo AM/FM
- Peze a MODE/CLK button repeatedly until "TUNER" is displayed.
- Vire a Akor knob to manually select your desired AM or FM radio station.
- For better FM reception, adjust the position of the FM wire antenna on the rear of the unit.
USB/SD Card Functions (Playback & Recording)
The unit supports MP3 playback from USB flash drives and SD cards, and can record audio from vinyl to MP3 format.
- Lektur: Insert a USB flash drive into the USB port or an SD card into the SD card slot. Press the MODE/CLK button until "USB" or "SD" is displayed. The unit will automatically detect and play MP3 files. Use playback controls to navigate.
- Recording (Vinyl to MP3):
- Asire w ke gen yon kle USB oswa yon kat SD ki mete nan òdinatè a.
- Select "PHONO" mode.
- Start playing your vinyl record.
- Peze a REC/DEL button to begin recording. The display will indicate recording status.
- Peze REC/DEL again to stop recording. The recorded MP3 file will be saved to the USB drive or SD card.
Connecting External Devices (AUX-In)
- Connect one end of a 3.5mm audio cable (not included) to the AUX IN jack on the front of the unit.
- Connect the other end of the cable to the headphone jack or audio output of your external device (e.g., MP3 player, smartphone).
- Peze a MODE/CLK button repeatedly until "AUX" is displayed.
- Play audio from your external device. The sound will be routed through the Trexonic Retro Record Player's speakers.
Setting the Alarm and Sleep Timer
Detailed instructions for setting the alarm and sleep timer are typically found in the full product manual. Generally, these functions are accessed via the KOMÒM/DÒM button and navigation controls.
- Mete revèy: Peze epi kenbe MODE/CLK to enter clock setting mode, then use navigation buttons to adjust time.
- Mete Alam: Peze KOMÒM/DÒM to cycle through alarm settings (e.g., alarm time, source).
- Revèy dòmi: Peze KOMÒM/DÒM repeatedly to set a countdown timer for the unit to automatically turn off.
Antretyen
Proper care will ensure the longevity of your Trexonic Retro Record Player.
- Netwaye inite a: Siye deyò a avèk yon twal mou epi sèk. Pa sèvi ak pwodui netwayaj abrazif oswa solvan.
- Netwaye Stylus la: Use a soft brush (not included) to gently brush the stylus from back to front to remove dust. Do not touch the stylus with your fingers.
- Kouvèti pousyè: Kenbe kouvèti pousyè a fèmen lè w pa ap itilize li pou pwoteje platin an kont pousyè ak debri.
- Swen Dosye: Keep your vinyl records clean and stored vertically in their sleeves to prevent warping and dust accumulation.
Gid depanaj
If you encounter any issues, please refer to the following table before seeking professional service.
| Pwoblèm | Kòz posib | Solisyon |
|---|---|---|
| Pa gen pouvwa | Kòd kouran an pa byen konekte. | Asire w ke kòd kouran an byen branche nan aparèy la ak nan priz miray la. |
| Pa gen son ki soti nan moun kap pale | Volim nan twò ba oswa twò ba. Mòd ki pa kòrèk la chwazi. | Ogmante volim nan. Peze MODE/CLK to select the correct audio source. |
| Turntable not spinning or sound distorted | Speed setting incorrect. Stylus dirty or damaged. Tone arm not properly lowered. | Check the speed selector. Clean or replace stylus. Ensure tone arm is fully lowered onto the record. |
| CD a pa ap jwe | CD inserted incorrectly or disc is scratched/dirty. Incorrect mode. | Ensure CD is inserted label-side up. Clean or try another CD. Select "CD" mode. |
| Pwoblèm appariement Bluetooth | Device too far. Bluetooth not enabled on external device. | Move devices closer. Ensure Bluetooth is enabled and "Trexonic" is selected. |
| Resepsyon radyo pòv | FM antenna not extended or positioned correctly. | Fully extend and adjust the FM wire antenna. Try repositioning the unit. |
Espesifikasyon teknik
| Karakteristik | Spesifikasyon |
|---|---|
| Nimewo Modèl | TRX-16BLK |
| Antre pouvwa | DC 12V, 1000mA (via AC adapter) |
| Vitès platin | 33 1/3, 45, 78 RPM |
| Koneksyon | Bluetooth, Wired (AUX-In, RCA Line-Out) |
| Sipò medya yo | Vinyl Records, Audio CDs, USB (MP3), SD Card (MP3) |
| Frekans Radyo | AM/FM |
| Dimansyon (Apeprè) | 13 x 12 x 6 pous (Dimansyon Pake) |
| Pwa (Apeprè) | 8 liv |
| Materyèl | Plastik |
Enfòmasyon sou garanti ak sipò kliyan
Trexonic products are designed and manufactured to the highest quality standards. For specific warranty details, please refer to the warranty card included with your purchase or visit the official Trexonic website. If you require technical assistance or have questions regarding your product, please contact Trexonic customer support through their official channels.
Tanpri kenbe prèv ou achte pou reklamasyon garanti.


