1. Pwodwi souview
The AJA Ki Pro GO is a portable multi-channel H.264 recorder and player designed for professional video workflows. It enables simultaneous recording of up to four channels of HD and SD video directly to readily available USB drives, offering redundant recording capabilities for enhanced reliability.
Equipped with 4 x 3G-SDI and 4 x HDMI digital video inputs, the Ki Pro GO provides flexible channel assignments, allowing connection to a wide range of modern video sources, including various cameras. Its Genlock-free recording feature simplifies integration by permitting the mixing and matching of incoming video sources without requiring external synchronization.
For audio, the unit supports high-quality 2-channel embedded audio or balanced XLR analog audio, which can be assigned to any recording channel. A multi-channel matrix monitoring function allows for the display of multiple video channels on a single HDMI monitor, streamlining monitoring tasks.
With a compact 2RU design, the Ki Pro GO is both portable and rack-mountable, making it suitable for diverse production environments.
Karakteristik kle:
- Multi-channel H.264 recording and playback.
- Five USB recording media slots, compatible with commercially available USB 3.0 media.
- Redundant recording capability.
- Genlock-free input for flexible source integration.
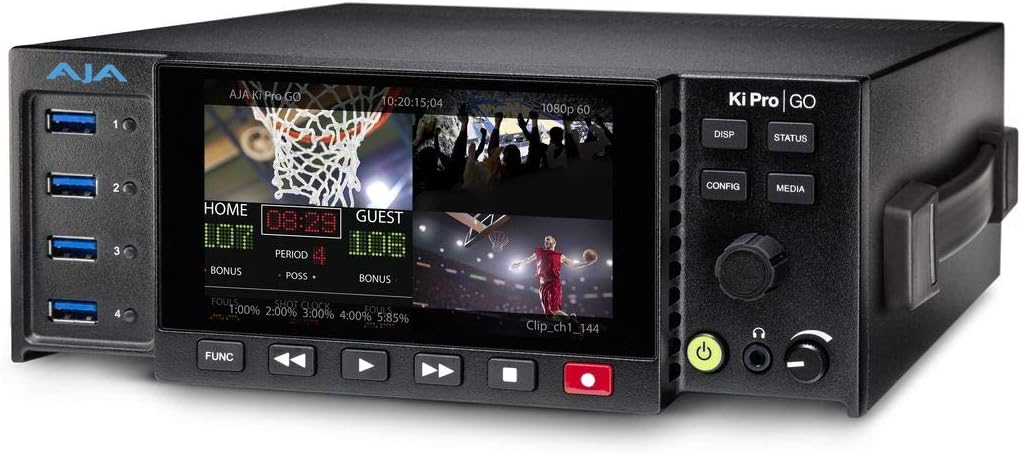
Figi 1: Devan view of the AJA Ki Pro GO, showing the display with a multi-view layout, USB ports on the left, and control buttons on the right.
2. Gid Enstalasyon
2.1 Debalaj ak enspeksyon
- Carefully remove the Ki Pro GO unit and all accessories from its packaging.
- Inspect the unit for any signs of physical damage. If damage is found, contact your dealer immediately.
- Verifye ke tout konpozan ki nan lis anbalaj la prezan.
2.2 Koneksyon pouvwa
- Connect the provided power supply to the 12V-18V DC input on the rear of the Ki Pro GO.
- Branche ekipman pou pouvwa a nan yon priz kouran AC ki apwopriye.
- The unit will power on automatically or can be powered on using the front panel power button.
2.3 Video Input Connections
The Ki Pro GO supports both 3G-SDI and HDMI video inputs.
- Connect your video sources (e.g., cameras, switchers) to the SDI IN 1-4 or HDMI IN 1-4 ports on the rear panel.
- Asire ke câbles yo byen konekte.
2.4 Koneksyon Antre Odyo
Audio can be input via embedded SDI/HDMI or balanced XLR analog inputs.
- For analog audio, connect XLR cables from your audio source to the ANALOG AUDIO IN (CH 1/L, CH 2/R) ports.
- Adjust the +48V MIC/LINE switch as appropriate for your microphone or line-level source.
2.5 USB Media Installation
The Ki Pro GO records to standard USB 3.0 drives.
- Insert up to five formatted USB 3.0 drives into the USB ports on the front panel.
- Ensure drives are properly seated. The unit will detect and prepare them for recording.
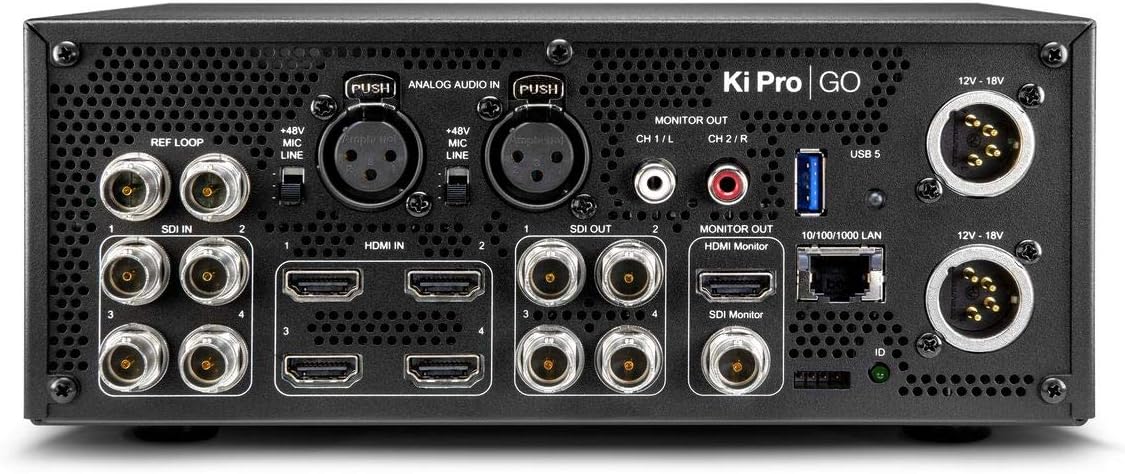
Figi 2: Dèyè view of the AJA Ki Pro GO, showing various input/output ports including SDI, HDMI, XLR audio, LAN, and power inputs.
3. Operasyon Enstriksyon
3.1 Premye Limen ak Konfigirasyon
- After connecting power, the unit will boot up. The front display will show the current status.
- Peze a KONFIG bouton pou jwenn aksè nan meni prensipal la.
- Use the rotary knob to navigate through menu options and press to select.
- Configure video input settings, audio routing, and recording parameters as needed.
3.2 Anrejistreman
- Ensure USB drives are inserted and recognized by the unit.
- Verify input signals are present and correctly configured on the multi-view ekspozisyon.
- Peze a DOSYE button (red button) on the front panel to begin recording. The button will illuminate red.
- Pou sispann anrejistreman, peze la SISPANN bouton.
- For redundant recording, ensure multiple USB drives are inserted; the unit will automatically record to all available drives.
3.3 Lektur
- Peze a MEDIA button to access recorded clips.
- Use the rotary knob to select the desired clip from the list.
- Peze a JWE bouton an (ikòn triyang lan) pou kòmanse lekti a.
- Sèvi ak la VIT VANSE epi RETIRE bouton pou navigasyon.
- Peze SISPANN pou fini lecture.
3.4 Siveyans
The Ki Pro GO offers multi-channel matrix monitoring via its HDMI monitor output.
- Connect an HDMI display to the HDMI MONITOR OUT port on the rear panel.
- Sèvi ak la DISP button on the front panel to cycle through display modes, including multi-view and single-channel views.

Figure 3: Closer front view of the AJA Ki Pro GO, highlighting the display and front panel controls for operation.
4. Antretyen
4.1 Netwayaj
Pou kenbe pèfòmans ak aparans optimal:
- Ensure the unit is powered off and disconnected from power before cleaning.
- Sèvi ak yon twal mou, sèk, ki pa gen pousyè pou siye sifas ekstèn yo.
- Pou mak ki difisil pou retire, yon ti kras damp cloth with a mild, non-abrasive cleaner can be used, followed by a dry cloth.
- Evite itilize pwodui chimik ki fò, solvan, oswa materyèl abrazif, paske sa yo ka domaje fini an.
- Kenbe ouvèti vantilasyon yo pwòp san pousyè ak debri.
4.2 Mizajou Firmware
AJA periodically releases firmware updates to improve performance, add features, or address issues. It is recommended to keep your Ki Pro GO firmware up to date.
- Visit the official AJA websit (www.aja.com) to check for the latest firmware for the Ki Pro GO.
- Follow the instructions provided with the firmware download for the update procedure. Typically, this involves loading the firmware onto a USB drive and updating via the unit's menu.
NAN. Depanaj
5.1 Pa gen pouvwa
- Tcheke Koneksyon Pouvwa: Ensure the power supply is securely connected to both the Ki Pro GO and a working AC outlet.
- Verifye ekipman pou pouvwa: Confirm the power supply is the correct one for the unit and is functioning.
5.2 No Video Input Detected
- Tcheke kab: Ensure all SDI or HDMI cables are correctly connected and not damaged.
- Sous Sòti: Verify that the video source is powered on and outputting a signal.
- Fòma Antre: Check that the input video format is supported by the Ki Pro GO.
- Konfigirasyon: Review the input settings in the Ki Pro GO's configuration menu.
5.3 Pwoblèm Anrejistreman
- USB Drive Status: Ensure USB drives are inserted, properly formatted, and have sufficient free space. Check the drive status on the unit's display.
- Konpatibilite kondwi: Use recommended USB 3.0 drives for optimal performance.
- Siyal Antre: Confirm that a valid video input signal is present and stable.
5.4 Pa gen odyo
- Sous odyo: Verify the audio source is active and connected correctly.
- XLR Settings: If using XLR, check the +48V MIC/LINE switch setting.
- Routage Odyo: Confirm audio routing settings in the Ki Pro GO's menu are correct for your inputs and outputs.
6. Espesifikasyon
| Karakteristik | Spesifikasyon |
|---|---|
| Mak | AJA |
| Nimewo Modèl | KI-PRO-GO-R0 |
| Pò USB | 5 |
| Chanèl | 4 (Multi-channel recording) |
| Antre Videyo | 4 x 3G-SDI, 4 x HDMI |
| Entrain Audio | Embedded SDI/HDMI, Balanced XLR Analog |
| Fòma anrejistreman | H.264 |
| Anrejistreman Medya | USB 3.0 Drives |
| Dimansyon pwodwi | 34.04 x 24.38 x 16 cm |
| Pwa pwodwi | 3.59 kg |
| Batri enkli | Non |
| Batri obligatwa | Non |
7. Garanti ak sipò
For detailed warranty information, please refer to the warranty card included with your product or visit the official AJA website. AJA provides technical support and resources for its products.
7.1 Sipò teknik
If you encounter issues not covered in this manual or require further assistance, please contact AJA Technical Support through their official websit:
- AJA Websit: www.aja.com/support
La website offers FAQs, knowledge base articles, and contact information for direct support.


