1. Entwodiksyon
Thank you for choosing the WORKPRO Multi-Purpose Heavy Duty Workbench. This workbench is designed for durability and versatility, providing a robust workspace with integrated lighting, storage, and power outlets. It is ideal for garage, workshop, or storage applications, offering a stable and organized environment for various tasks. Please read this manual thoroughly before assembly and operation to ensure safe and efficient use.
2. Enfòmasyon sou Sekirite
Toujou swiv prekosyon sekirite debaz yo lè w ap itilize pwodui sa a pou diminye risk pou blese oswa domaje.
- Asire ke tout eleman yo byen tache anvan ou itilize.
- Do not exceed the maximum load capacity for each shelf.
- Kenbe zòn travay la pwòp epi byen limen.
- Do not modify the workbench or its electrical components.
- Keep children and pets away from the workbench during assembly and operation.
- Unplug the workbench from the power source before cleaning or maintenance.
3. Pake kontni
Verifye ke tout pyès yo la anvan ou kòmanse asanblaj la. Si gen nenpòt pyès ki manke oswa ki domaje, kontakte sèvis kliyan.
- Workbench Frame Components (Metal)
- Work Surface (Top Shelf)
- Lower Storage Shelf
- Pegboard Back Panel
- Integrated Work Light
- Two Pull-Out Drawers
- Power Outlet Strip
- Assembly Hardware (Screws, Nuts, Bolts, Wrenches)
- Manyèl Enstriksyon
4. Enstriksyon Asanble
Assembly typically takes 1 to 1.5 hours with two people. Follow these steps carefully:
- Depake epi òganize: Lay out all components and hardware on a clean, flat surface. Identify each part using the provided parts list.
- Rasanble ankadreman an: Attach the vertical support legs to the horizontal crossbars using the provided bolts and wrenches. Ensure all connections are snug but do not fully tighten yet.
- Enstale etajè ki pi ba a: Slide the lower storage shelf into the designated slots on the frame. Secure it with the appropriate hardware.
- Attach Work Surface: Place the main work surface (top shelf) onto the upper frame. Secure it firmly with screws.
- Install Pegboard: Mount the pegboard back panel to the rear vertical supports.
- Rasanble tiwa yo: Construct the two pull-out drawers according to the instructions, ensuring the sliding mechanisms are correctly installed. Insert the assembled drawers into their respective compartments under the main work surface.
- Mount Work Light: Attach the integrated work light to the top frame above the pegboard using the provided clamps. Snap the light into place.
- Install Power Outlet Strip: Secure the power outlet strip to the side of the workbench frame.
- Sere final la: Once all components are in place, go back and fully tighten all bolts and screws to ensure the workbench is stable and secure.
- Konekte pouvwa: Plug the workbench's main power cord into a suitable electrical outlet.
5. Karakteristik souview
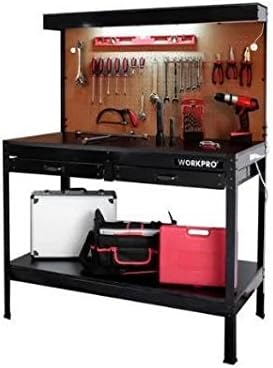
An jeneral view of the WORKPRO Multi-Purpose Heavy Duty Workbench, showcasing its integrated work light, pegboard, and storage drawers.
Integrated Work Light
The workbench features an overhead work light that provides ample illumination for your tasks. It is easily clamped and snapped into place during assembly and plugs into the integrated power strip.
Pegboard Back Panel
A sturdy pegboard forms the back panel, offering convenient vertical storage for tools and accessories. It allows for easy organization and quick access to frequently used items.
Pull-Out Drawers
Two smooth-gliding pull-out drawers are located under the main work surface, providing enclosed storage for smaller tools, parts, and supplies. These drawers operate smoothly without resistance.
Priz kouran entegre
The workbench includes a built-in power outlet strip with multiple receptacles, allowing you to conveniently power tools, chargers, and other electrical devices directly from your workspace.
Lower Storage Shelf
A spacious lower shelf provides additional storage capacity for larger items, equipment, or materials, keeping your main work surface clear and organized.
6. Operasyon
- Using the Work Surface: The main work surface is designed to withstand heavy use. Ensure items are placed evenly to distribute weight.
- Operating the Work Light: Plug the work light into one of the integrated power outlets. Use the light's switch to turn it on or off.
- Using Power Outlets: Plug your tools or devices directly into the power outlets on the side of the workbench. Ensure the workbench is plugged into a wall outlet.
- Aksè nan tiwa yo: Pull the drawer handles to open and push to close. Avoid forcing drawers if they stick.
- Utilizing Pegboard: Use standard pegboard hooks (not included) to hang tools and accessories on the pegboard.
7. Antretyen
- Netwayaj: Wipe down metal and wood surfaces with a damp twal ak savon dou. Evite pwodui netwayaj abrazif ki ka domaje fini an.
- Tcheke Materyèl: Periodically inspect all bolts and screws to ensure they remain tight. Re-tighten as necessary to maintain stability.
- Antretyen tiwa: Keep drawer slides clean and free of debris. Lubricate with a silicone spray if drawers become stiff.
- Ranplasman anpoul: If the work light bulb needs replacement, ensure the workbench is unplugged. Refer to the light fixture's specific instructions for bulb type and replacement procedure.
NAN. Depanaj
| Pwoblèm | Kòz posib | Solisyon |
|---|---|---|
| Workbench is wobbly/unstable. | pyès ki nan konpitè ki lach. | Check and tighten all bolts and screws. Ensure assembly is correct. |
| Tiwa yo difisil pou ouvri/fèmen. | Debris in slides; misaligned. | Clean drawer slides. Check for proper alignment during assembly. |
| Work light does not turn on. | Not plugged in; faulty bulb; power issue. | Ensure workbench is plugged into wall outlet. Check light's plug connection. Replace bulb if necessary. Verify wall outlet is functional. |
| Pati ki manke pandan asanblaj la. | Erè anbalaj. | Contact customer support with your product model and a list of missing parts. |
9. Espesifikasyon
| Karakteristik | Detay |
|---|---|
| Nimewo Modèl | 3468-T34562FD152706 |
| Materyèl | Metal (Frame), Wood (Shelves/Top) |
| Dimansyon pwodwi (D x W x H) | 23.75" x 47.25" x 61.5" |
| Load Capacity (Main Surface) | Jiska 220 liv |
| Load Capacity (Lower Shelf) | Jiska 220 liv |
| Kapasite Chaj (Etajè Anwo) | Jiska 40 liv |
| Koulè | Mawon, nwa |
| Asanble obligatwa | Wi |
10. Garanti & Sipò
For warranty information, technical support, or to order replacement parts, please refer to the contact information provided on your product packaging or visit the official WORKPRO websit. Kenbe resi acha ou pou reklamasyon garanti.


