1. Entwodiksyon
This manual provides essential information for the proper installation, operation, and maintenance of your Behringer Truth B1031A Active 2-Way Reference Studio Monitor. Please read this manual thoroughly to ensure optimal performance and longevity of your device. The B1031A is designed for professional audio applications, offering ultra-linear frequency response and precise sound reproduction.
2. Enstriksyon Sekirite Enpòtan
- Sous pouvwa: Connect the unit only to a power supply of the voltage specified in the manual or on the unit.
- Atè: Asire w ke aparèy la byen konekte atè pou anpeche chòk elektrik.
- Vantilasyon: Pa bloke ouvèti vantilasyon. Enstale an akò avèk enstriksyon fabrikan an.
- Dlo ak imidite: Do not use this apparatus near water or expose it to rain or moisture.
- Chalè: Pa enstale tou pre okenn sous chalè tankou radyatè, rejis chalè, recho, oswa lòt aparèy (tankou amplifiers) ki pwodui chalè.
- Netwayaj: Netwaye sèlman ak yon twal sèk.
- Sèvis: Refere tout sèvis yo bay pèsonèl sèvis kalifye. Reparasyon nesesè lè aparèy la domaje nenpòt fason, tankou kòd kouran oswa ploge domaje, likid koule oswa objè tonbe nan aparèy la, aparèy la te ekspoze a lapli oswa imidite, li pa fonksyone nòmalman. , oswa li te tonbe.
3. Pake kontni
Upon unpacking your Behringer Truth B1031A, please verify that all components are present and in good condition:
- Behringer Truth B1031A Active Studio Monitor (1 unit)
- Pouvwa kab
- Manyèl Itilizatè (dokiman sa a)
Si nenpòt atik ki manke oswa ki domaje, tanpri kontakte konsesyonè ou imedyatman.
4. Pwodwi souview
The Behringer Truth B1031A is an active 2-way reference studio monitor featuring an 8-inch Kevlar woofer and a 1-inch silk dome tweeter. It incorporates precision Class A/B amplifiers with active protection circuits, delivering 100 W for low frequencies and 50 W for high frequencies. Its design aims for ultra-linear frequency response and wide dispersion characteristics.
4.1. Front Panel

The front panel features the primary acoustic components: the 8-inch Kevlar woofer for low-frequency reproduction and the 1-inch silk dome tweeter for high frequencies. Indicator LEDs provide visual feedback on the monitor's power status and signal clipping.
4.2. Panel aryè
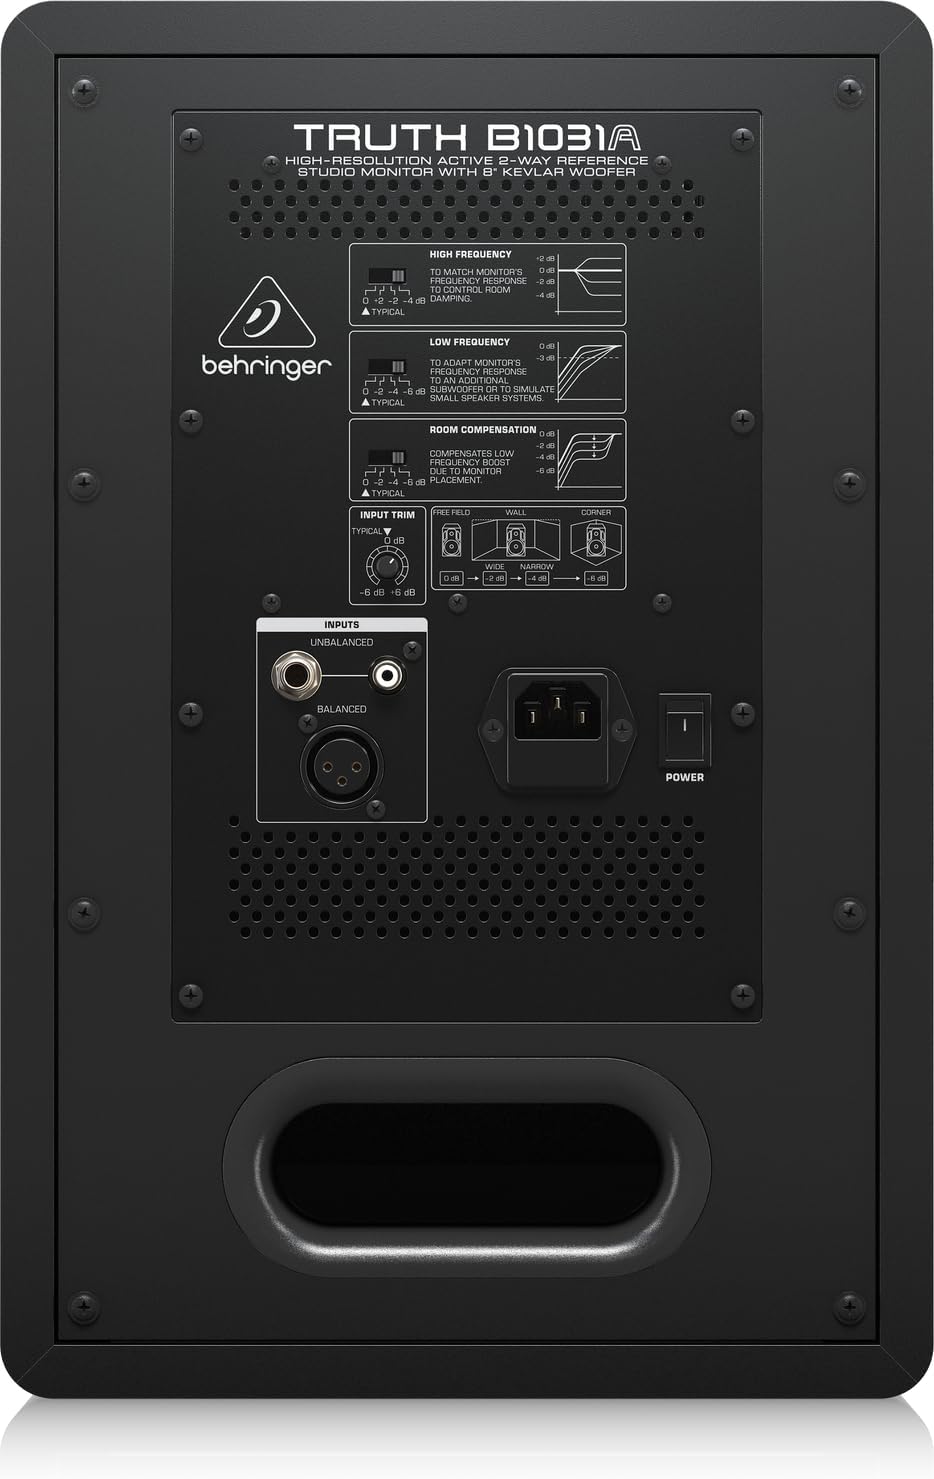
The rear panel houses all input connections and acoustic adjustment controls. These include:
- Antre XLR balanse: For professional audio connections.
- Balanced 1/4" TRS Input: For professional audio connections.
- Antre RCA dezekilib: Pou aparèy odyo konsomatè yo.
- Taye Antre: Ajiste sansiblite antre.
- High Frequency Adjustment: Allows tailoring of the high-frequency response.
- Low Frequency Adjustment: Allows tailoring of the low-frequency response.
- Room Compensation Switches: Adjusts the monitor's response to compensate for room acoustics (e.g., placement near walls or corners).
- Power Switch and IEC Power Inlet: For connecting the power cable and turning the unit on/off.
5. Enstalasyon
5.1. Plasman
Proper placement of your studio monitors is crucial for accurate sound reproduction. Consider the following guidelines:
- Triyang Stereo: Position the monitors and your listening position to form an equilateral triangle. The distance between the two monitors should be equal to the distance from each monitor to your head.
- Nivo Zòrèy: The tweeters should ideally be at ear level when you are in your primary listening position.
- Distans soti nan miray yo: Avoid placing monitors directly against walls or in corners, as this can exaggerate bass frequencies. If unavoidable, use the Konpansasyon chanm switches on the rear panel to adjust.
- Simetri: Ensure the left and right monitors are placed symmetrically within the room to maintain a balanced stereo image.
5.2. Koneksyon
Before making any connections, ensure the monitor is powered off and unplugged from the mains.
- Antre odyo: Connect your audio source (e.g., audio interface, mixer) to the B1031A using either an XLR, 1/4" TRS, or RCA cable. For optimal signal integrity, balanced XLR or TRS connections are recommended.
- Koneksyon pouvwa: Insert the supplied power cable into the IEC power inlet on the rear panel of the monitor, then plug the other end into a suitable AC power outlet.
6. Opere
6.1. Powering On / Off
- Ensure all audio connections are secure and the input trim is set to a low level.
- Flip the power switch on the rear panel to the 'ON' position. The power indicator LED on the front panel will illuminate.
- To power off, flip the power switch to the 'OFF' position. It is recommended to power off your audio source first, then the monitors.
6.2. Ajiste kontwòl yo
- Taye Antre: Use this knob to match the output level of your audio source. Start with a low setting and gradually increase until you achieve a comfortable listening level without distortion.
- High Frequency Adjustment: This switch allows you to boost or cut high frequencies to suit your listening environment or preference.
- Low Frequency Adjustment: This switch allows you to boost or cut low frequencies. This is particularly useful for compensating for room acoustics or if you are using a separate subwoofer.
- Room Compensation: These switches are designed to optimize the monitor's performance based on its placement in your room. Refer to the diagram on the rear panel for recommended settings when placing the monitor near walls or in corners.
7. Antretyen
To ensure the longevity and optimal performance of your Behringer Truth B1031A monitor, follow these maintenance guidelines:
- Netwayaj: Sèvi ak yon twal mou epi sèk pou netwaye deyò monitè a. Evite itilize pwodui netwayaj abrazif, solvan, oswa sir, paske sa yo ka domaje fini an.
- Pousyè: Regularly dust the speaker cones and vents to prevent accumulation, which can affect sound quality and cooling.
- Anviwònman: Operate the monitor in a stable environment, away from extreme temperatures, humidity, and direct sunlight.
- Transpò: When moving the monitor, ensure it is powered off and disconnected. Use appropriate packaging to protect it from physical damage.
NAN. Depanaj
If you encounter issues with your B1031A monitor, consult the following table for common problems and solutions:
| Pwoblèm | Kòz posib | Solisyon |
|---|---|---|
| Pa gen son | No power; incorrect input connection; input trim too low; audio source issue. | Check power cable and switch; verify audio cable connections; increase input trim; check audio source output. |
| Son defòme | Input signal too high; damaged cable; faulty audio source. | Reduce input trim or output level from source; try a different audio cable; test with another audio source. |
| Chanson oswa bri buz | Ground loop; interference from other electronics; unbalanced cable used for long runs. | Ensure proper grounding; move monitor away from other electronic devices; use balanced cables (XLR/TRS). |
| Uneven stereo image | Improper monitor placement; differing acoustic settings between monitors. | Adjust monitor placement for symmetry; ensure High/Low Frequency and Room Compensation settings are identical on both monitors. |
Si pwoblèm nan pèsiste apre ou fin eseye solisyon sa yo, tanpri kontakte sèvis kliyan Behringer oubyen yon teknisyen sèvis kalifye.
9. Espesifikasyon
Technical specifications for the Behringer Truth B1031A Active Studio Monitor:
| Karakteristik | Spesifikasyon |
|---|---|
| Non modèl | VERITE B1031A |
| Kalite Oratè | Active 2-Way Reference Studio Monitor |
| Woofer Dyamèt | 8 Inches (Kevlar cone) |
| Kalite twite | 1 Inch Silk Dome |
| AmpKalite lifier | Klas A/B |
| LF Amplifier Sòti | 100 Watts |
| HF Amplifier Sòti | 50 Watts |
| Total pwodiksyon Wattage | 150 Watts |
| Koneksyon Teknoloji | XLR, 1/4" TRS, RCA |
| Sous pouvwa | Fil elektrik (110 volts) |
| Dimansyon pwodwi (D x W x H) | 13.3" x 10.28" x 15.47" |
| Pwa atik | 24.91 liv |
| Koulè | Nwa |
| Materyèl | Metal |
10. Garanti ak sipò
Behringer products are designed and manufactured to high-quality standards. For detailed warranty information, including terms and conditions, please refer to the warranty card included with your product or visit the official Behringer website. For technical support, service, or spare parts, please contact your local Behringer dealer or authorized service center. You can also find support resources and contact information on the Magazen Behringer.


