1. Enfòmasyon sou Sekirite
Read all instructions carefully before using the Trisomy Walking Pad Treadmill. Keep this manual for future reference.
- Asire ke tapi an mete sou yon sifas ki plat ki estab.
- Kenbe timoun ak bèt kay lwen tapi a pandan operasyon an.
- Always use the safety key. Attach the clip to your clothing before starting.
- Pa sèvi ak tapi kous la si li domaje oswa si li pa fonksyone byen.
- Mete soulye atletik ki apwopriye.
- Konsilte yon doktè anvan ou kòmanse nenpòt nouvo pwogram egzèsis.
- Maximum user weight capacity: 350 lbs (158 kg).
- Ensure adequate clearance around the treadmill (at least 2 feet on sides and rear).
2. Pake kontni
Verifye ke tout atik yo prezan nan bwat la:
- Trisomy Walking Pad Treadmill (main unit)
- Manyèl itilizatè
- Gid Enstalasyon Rapid
- Kontwòl Remote
- Lwil lubrifyan
- Hex Screw for belt adjustment
- Magnetic Safety Key with clip
- Òt tablèt
- Handlebar Fixing Nuts (x2)
- Tablet Holder Nuts (x2)

Figure 2.1: All included components of the Trisomy Walking Pad Treadmill.
3. Gid Enstalasyon
3.1 Debalaj ak Plasman Inisyal
Carefully remove the treadmill from its packaging. Place it on a level surface in your desired exercise area. The treadmill is designed for easy mobility with built-in wheels.

Figure 3.1: The treadmill features smooth-rolling wheels for easy movement and storage.
3.2 Handlebar Assembly and Adjustment
The handlebar is adjustable to 6 different height levels (35" to 47") to accommodate various user heights. To adjust:
- Lift the handlebar to the upright position.
- Locate the handlebar fixing screws on each side.
- Rotate the screws counter-clockwise to loosen.
- Adjust the handlebar to your desired height, aligning the holes.
- Rotate the screws clockwise to secure the handlebar firmly in place.
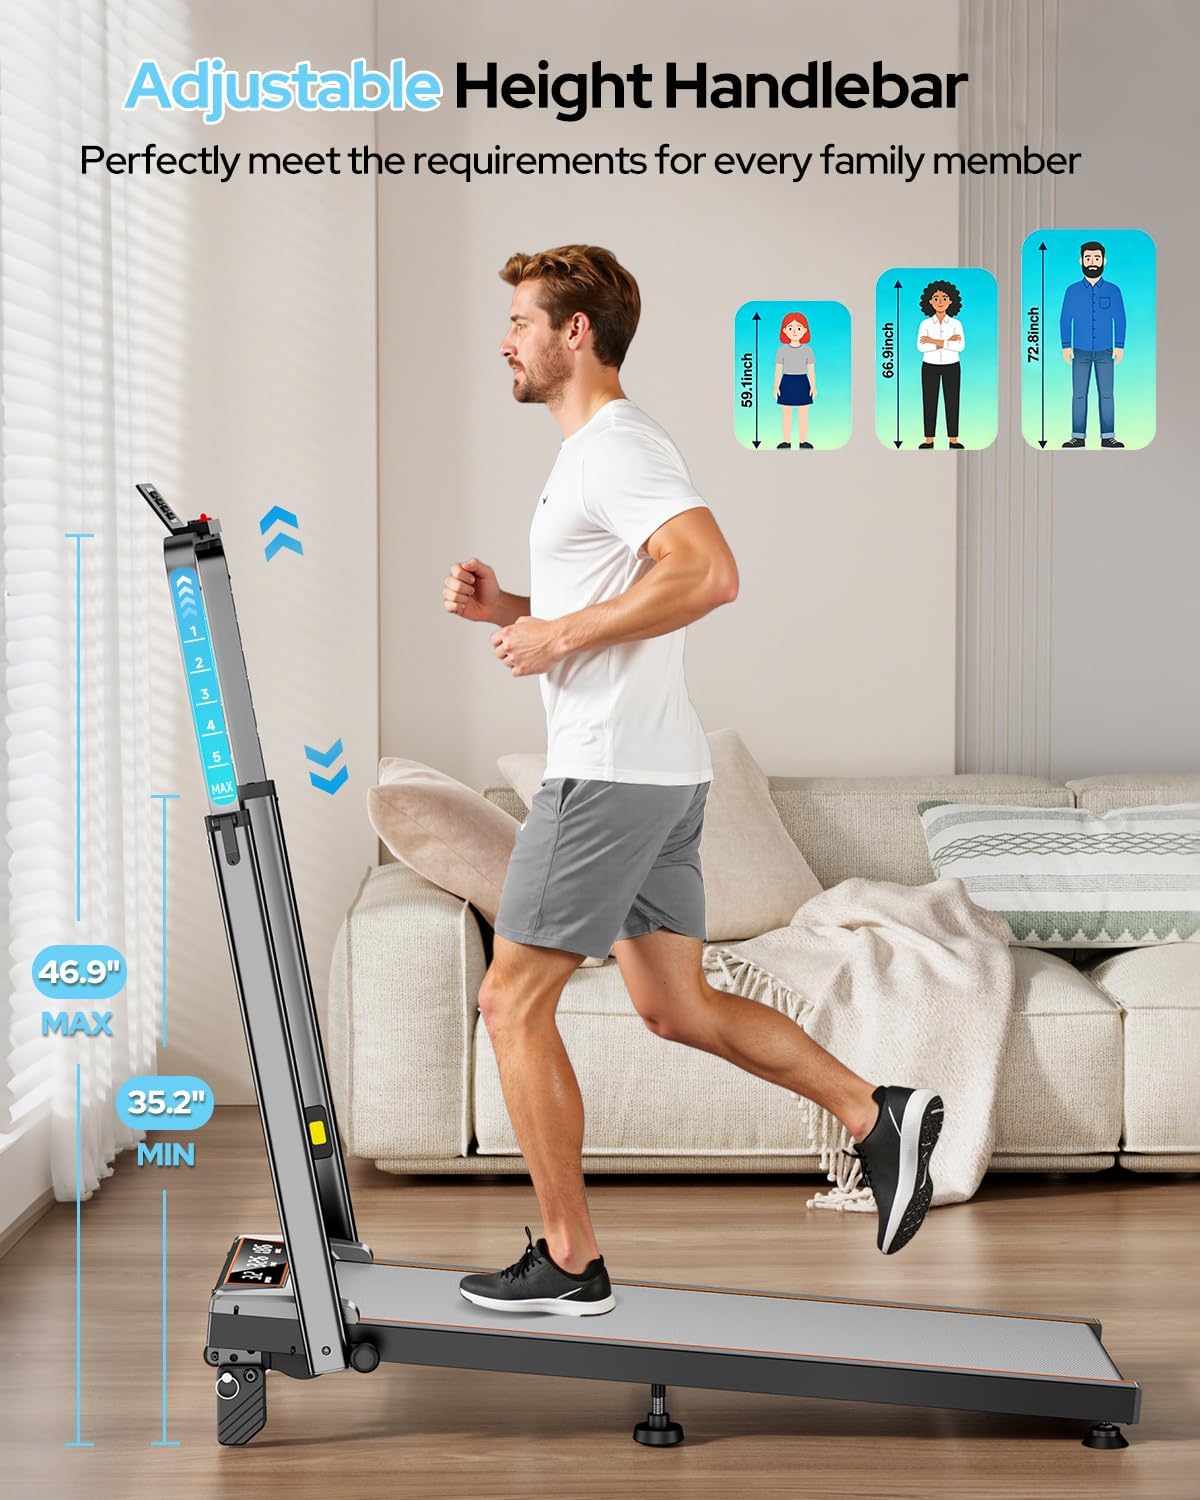
Figure 3.2: Adjusting the handlebar height for comfortable use.

Figure 3.3: The adjustable handlebar accommodates users from 35 to 47 inches in height.
3.3 Tablet Holder Installation
Attach the tablet holder to the top of the handlebar for convenient device placement during workouts.
- Align the tablet holder with the designated slots on the handlebar.
- Secure it using the provided tablet holder screws and nuts.
Figure 3.4: The tablet holder is easily attached to the handlebar.
3.4 Manual Incline Adjustment
The treadmill offers 3 manual incline levels: 0%, 6%, and 12%. To adjust the incline:
- Asire w ke tapi kous la etenn epi li debranche.
- Carefully lift the rear of the treadmill.
- Adjust the support feet to the desired incline level (0%, 6%, or 12%).
- Ensure both sides are set to the same level for stability.
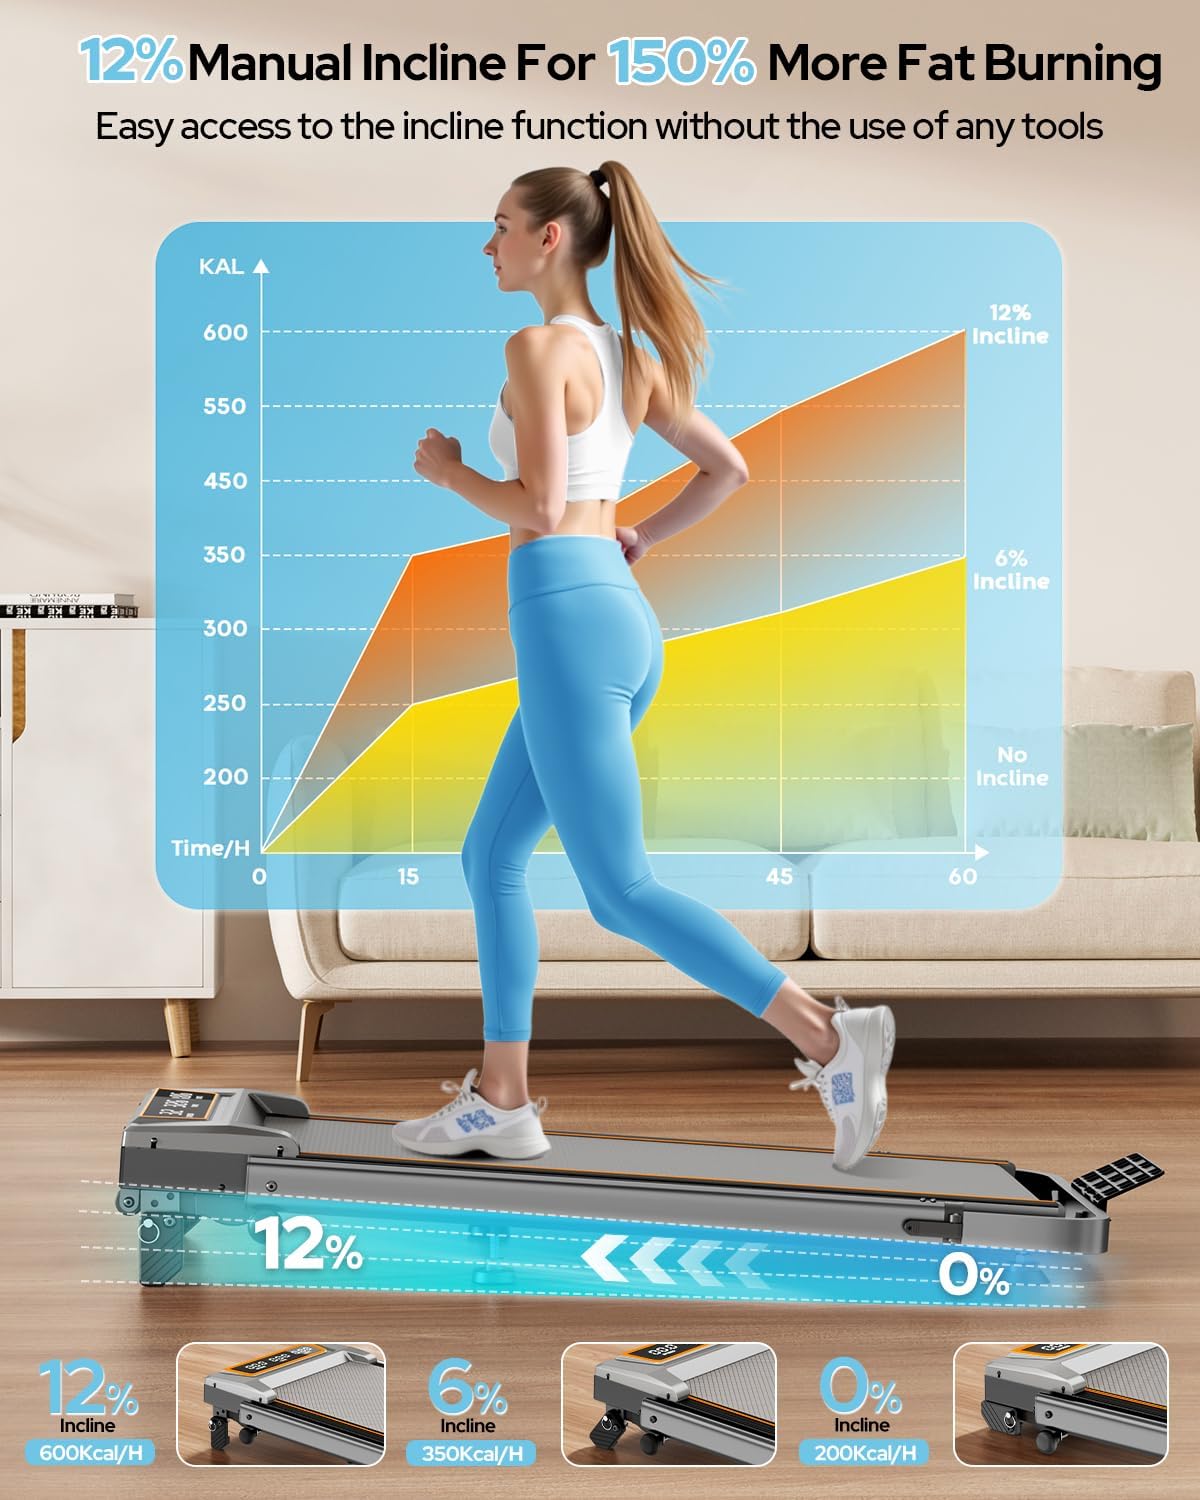
Figure 3.5: Manual adjustment of the treadmill's incline to 0%, 6%, or 12%.

Figure 3.6: The 12% incline setting can enhance calorie burn during workouts.
3.5 Ajisteman Belt Kouri
The running belt may require adjustment over time to ensure proper alignment and tension. Use the provided hex screw for this purpose.
- If the belt drifts to the right: Tighten the right screw slightly or loosen the left.
- If the belt drifts to the left: Tighten the left screw slightly or loosen the right.
- Self-Centering Function: The treadmill corrects slight belt misalignment during low-speed operation without a load.
Figure 3.7: Adjusting the running belt ensures smooth and safe operation.
3.6 Gid Videyo Asanblaj
Video 3.1: This video demonstrates the assembly process and key features of the Trisomy walking pad with handle bar.
4. Operasyon Enstriksyon
4.1 Powering On/Off and Safety Key
To power on, plug the treadmill into a grounded outlet and flip the power switch located at the rear of the motor housing. Before starting any exercise, attach the magnetic safety key to the designated area on the console and clip the other end to your clothing. The treadmill will not operate without the safety key in place. Removing the safety key will immediately stop the treadmill.
4.2 Sèvi ak kontwòl remote la
The remote control allows you to adjust speed, start/stop the treadmill, and activate the one-click MUTE function. The MUTE function turns off alert sounds, ideal for quiet environments like offices or when others are resting.

Figure 4.1: The remote control provides convenient access to speed and mute functions.
4.3 ki ap dirije Display
The clear LED display shows real-time workout data, including:
- Vitès: Current speed in MPH.
- Tan: Dire antrennman ou an.
- Distans: Total distance traveled in miles.
- Kalori: Estimasyon kalori boule.

Figure 4.2: The LED display provides essential workout metrics.
4.4 APP Control (FitShow)
Connect your smartphone to the treadmill via Bluetooth and use the FitShow APP to control settings and track your progress. The app offers various training modes and allows you to monitor your workout data.

Figure 4.3: Control the treadmill and track progress using the FitShow APP.
5. Karakteristik kle
- Gidon reglabl: 6-level height adjustment from 35 to 47 inches for comfortable use by various users.
- 12% Manual Incline: Three adjustable incline levels (0%, 6%, 12%) to vary workout intensity and target different muscle groups.
- Motè pwisan ak trankil: Equipped with a 3.5HP motor, operating at less than 40dB, offering a speed range of 0.6-6.0 MPH. Supports users up to 350 lbs.
- Absòpsyon chòk avanse: Features a 7-layer anti-slip running belt and multi-structure shock absorption system to protect joints and reduce impact.
- Konsepsyon pliyab ak ekonomize espas: Folds to a compact 4.72 inches thick for easy storage under furniture or in small spaces. Built-in wheels facilitate effortless movement.
- Sistèm kontwòl doub: Operate the treadmill via the intuitive LED display, magnetic remote control, or the dedicated smartphone APP.

Figure 5.1: The 4-in-1 design supports various exercise modes.

Figure 5.2: The compact design allows for easy storage in small spaces.
6. Antretyen
Antretyen regilye asire lonjevite ak pèfòmans optimal tapi kous ou a.
6.1 Netwayaj
- Siye sifas tapi woulant lan ak piblisiteamp twal apre chak itilizasyon pou retire swe ak pousyè.
- Evite itilize pwodui netwayaj abrazif oswa solvan ki ka domaje fini an.
6.2 Lubrification
The running belt requires periodic lubrication to reduce friction and extend its lifespan. Use the provided lubricant oil.
- Etenn epi deploge tapi an.
- Loosen the running belt by turning the rear roller bolts counter-clockwise.
- Apply a small amount of lubricant evenly under the center of the running belt.
- Tighten the running belt bolts until the belt is snug but not overly tight.
- Run the treadmill at a low speed for a few minutes to distribute the lubricant.
6.3 Ajisteman Belt Kouri
Refer to Section 3.5 for detailed instructions on adjusting the running belt tension and alignment.
NAN. Depanaj
If you encounter any issues, please refer to the following common solutions. For more complex problems, contact customer support.
| Pwoblèm | Kòz posib | Solisyon |
|---|---|---|
| Tapis roulan an pa limen. | Power cord not plugged in, power switch off, safety key not in place. | Check power connection, ensure power switch is ON, insert safety key. |
| Senti kous la sispann sanzatann. | Safety key removed, motor overload. | Re-attach safety key. Reduce load or speed. |
| Senti kous la glise oswa li pa nan sant la. | Belt tension too loose, belt misalignment. | Adjust running belt tension and alignment as per Section 3.5. |
| Bri dwòl pandan operasyon an. | Lack of lubrication, loose components. | Lubricate the running belt (Section 6.2). Check for and tighten any loose screws. |
8. Espesifikasyon
| Karakteristik | Detay |
|---|---|
| Mak | Trisomy |
| Nimewo Modèl | HSM-T12C1 |
| Koulè | Chabon gri |
| Dimansyon pwodwi (D x W x H) | 42.5" x 22.4" x 4.4" (folded) |
| Pwa atik | 48 liv |
| Materyèl | Alloy Steel |
| Vitès maksimòm | 6.0 Mil pou chak èdtan |
| Maksimòm Puissance | 3.5 HP |
| Pousan Incline Maksimòmtage | 12% (3 manual levels: 0%, 6%, 12%) |
| Kalite ekspozisyon | dirije |
| Kouri zòn Belt | 36" x 15" |
| Kapasite pwa | 350 liv |
| Nivo bri | <40dB |
9. Garanti ak sipò
The Trisomy Walking Pad Treadmill HSM-T12C1 comes with a 2-ane garanti. For technical assistance, product inquiries, or warranty claims, please contact Trisomy customer support. We offer lifetime technical support and 24/7 online assistance.
Refer to the included "User Manual" for detailed contact information and further support resources.

Figure 9.1: Locate support information within your user manual.