1. Entwodiksyon
This manual provides detailed instructions for the assembly, operation, and maintenance of your Canovire 6x4FT Outdoor Storage Shed. Please read all instructions carefully before beginning assembly and retain this manual for future reference.
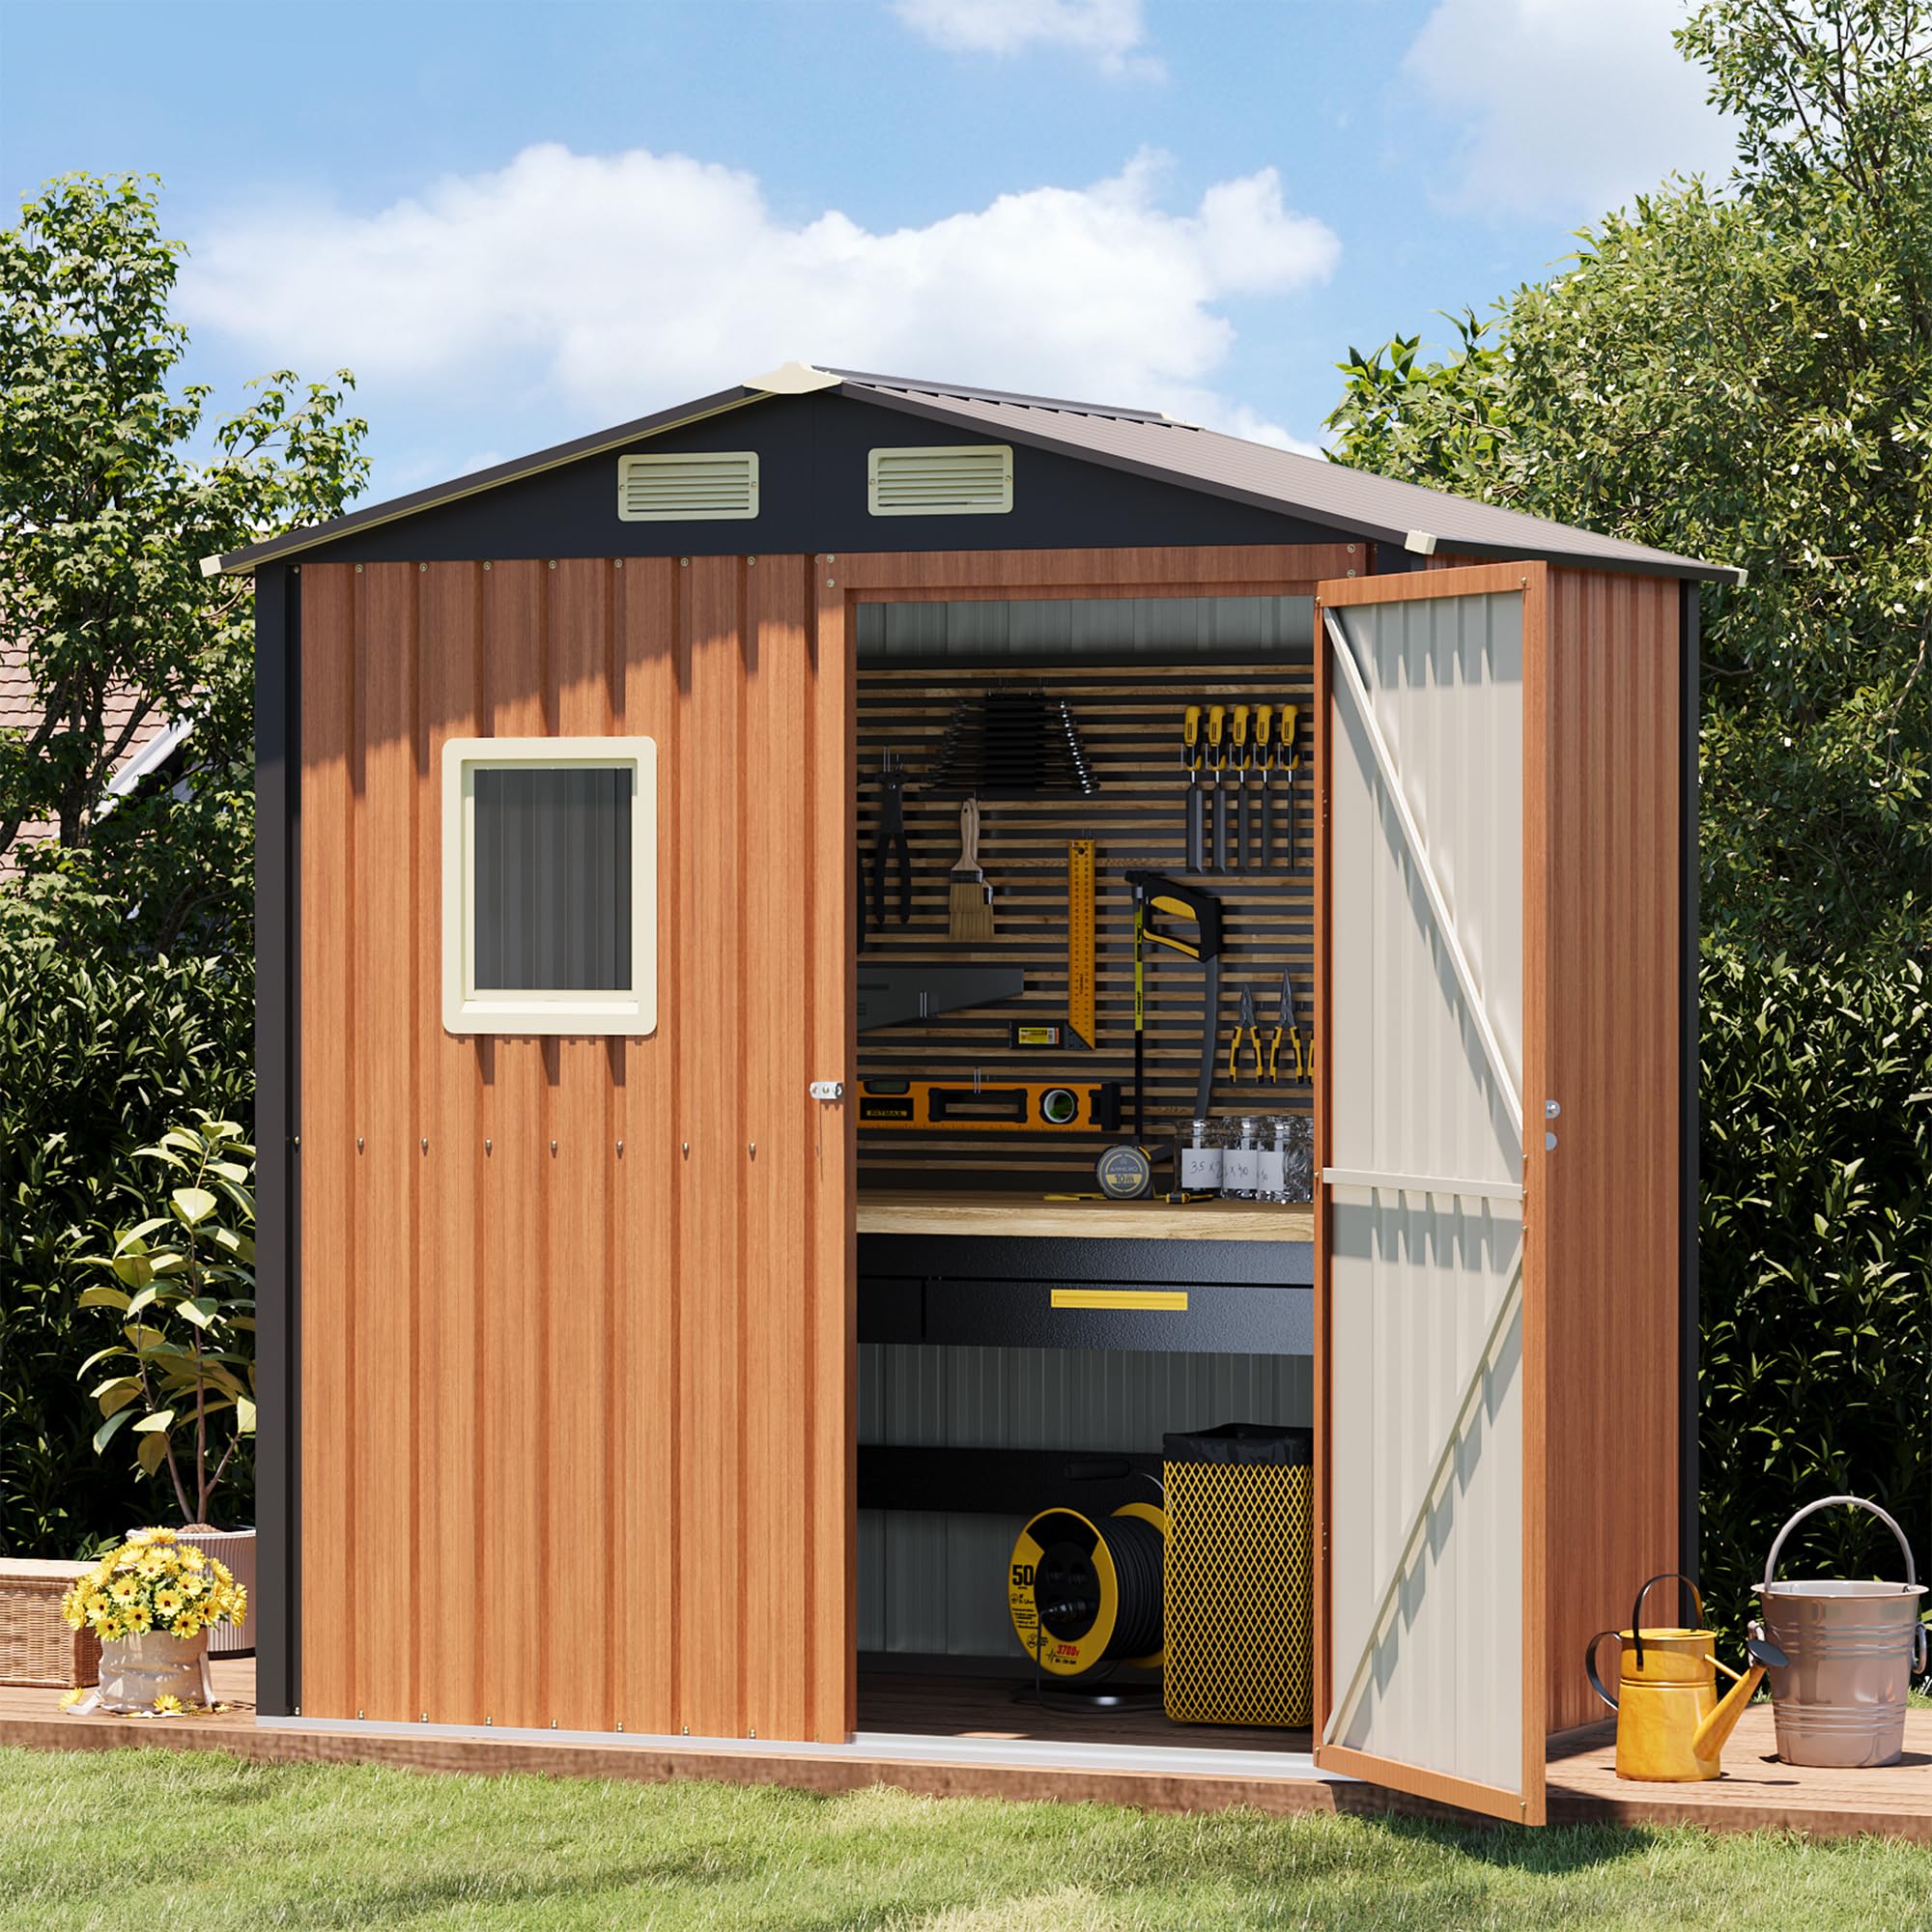
Figure 1: Canovire 6x4FT Outdoor Storage Shed (72.5"L x 47.1"W x 78.1"H)
2. Enfòmasyon sou Sekirite
AVÈTISMAN: Si ou pa swiv enstriksyon sekirite sa yo, ou ka blese oswa domaje pwodwi a.
- Toujou swiv enstriksyon asanble yo ak anpil atansyon.
- Wear appropriate safety gear, such as gloves, to avoid injury from sharp edges during assembly.
- Keep fingers and other body parts away from the door and window areas during assembly and use.
- Pa depase limit pwa abri a.
- Always keep the door locked when not in use to prevent unauthorized access.
- Ensure the shed is placed on a level and stable surface.
- Installation requires 2 to 3 people and typically takes 5 to 7 hours.
3. Pwodwi Features
The Canovire storage shed is designed for durability and versatile storage. Key features include:
- Konstriksyon dirab: Built with a durable steel frame, electro-galvanized coating, and premium paint finish for rust resistance.
- Konsepsyon ki enpèmeyab: Engineered to withstand harsh climates, featuring a sloping roof to prevent rainwater accumulation and UV-resistant performance.
- Depo an sekirite: Equipped with a lockable door to protect contents from theft and keep small animals out.
- Vantilasyon: Integrated air vents promote air circulation, reducing condensation and odors.
- Clear Window: Bay limyè natirèl andedan abri a.

Figure 2: Key features of the Canovire Storage Shed.

Figure 3: Slanted roof design for efficient drainage and UV protection.
4. Enstriksyon Asanble
Before starting assembly, ensure you have all parts and tools as listed in your packaging. It is recommended that 2 to 3 people work together for assembly, which typically takes 5 to 7 hours. Wear the provided gloves to avoid injury from sharp edges.
For a comprehensive visual guide, please refer to the official assembly video below. The video details each step, from base installation to door assembly.
Video 1: Canovire 6x4ft Shed Assembly Instruction. This video provides a step-by-step visual guide for assembling your storage shed, covering all major components and installation procedures.
Etap kle pou asanblaj la:
- Enstalasyon baz: Assemble the base frame and ensure it is square before tightening bolts.
- Asanble ankadreman: Attach the vertical frame components to the base.
- Enstalasyon panèl: Secure the wall panels to the frame, ensuring proper alignment.
- Enstalasyon fenèt: Install the window panel into the designated opening.
- Triangular Panel Assembly: Attach the triangular panels to form the upper structure.
- Top Frame Assembly: Secure the top frame components.
- Enstalasyon Panèl Do-kay: Install the roof panels, ensuring they overlap correctly for weather protection.
- Asanble Pòt: Assemble and attach the door, including hinges and locking mechanism.
- Tèks final yo: Verify all screws and bolts are tightened, and the shed is stable.
5. Operasyon Enstriksyon
Your Canovire storage shed is designed for straightforward use.
- Operasyon pòt: The shed features a single hinged, lockable door. To open, unlock the latch and pull the door outwards. To close, push the door firmly until it aligns with the frame, then secure the latch.
- Vantilasyon: The integrated air vents allow for natural air circulation. Ensure they are not obstructed to maintain proper airflow and reduce condensation.
- Depo: Sèvi ak ample interior space for gardening tools, outdoor equipment, seasonal items, or other storage needs. Consider adding shelving units (not included) for optimized organization.

Figi 4: Ample storage capacity within the 6x4FT shed.
6. Antretyen
Regular maintenance will prolong the life and appearance of your shed.
- Netwayaj: Clean the exterior surfaces periodically with mild soap and water. Avoid abrasive cleaners or harsh chemicals that could damage the finish.
- Enspeksyon: Annually inspect all screws, bolts, and connections to ensure they remain tight. Tighten any loose fasteners.
- Drenaj: Ensure the area around the shed is clear of debris to allow for proper water drainage from the sloping roof.
- Prevansyon rouye: Although the shed features a rust-resistant coating, promptly address any scratches or chips in the paint to prevent potential rust. Touch-up paint may be used if necessary.
NAN. Depanaj
| Pwoblèm | Kòz posib | Solisyon |
|---|---|---|
| Pòt yo pa fèmen byen. | Shed base is not square or level. | Check the base for levelness and squareness. Adjust as needed. Ensure all base frame bolts are tightened evenly. |
| Akimilasyon dlo andedan abri a. | Improper roof panel overlap or sealant application. | Review roof panel installation steps in the manual/video. Ensure all roof screws are tight and any necessary sealant is applied correctly. Check for obstructions in roof drainage. |
| Pati ki manke pandan asanblaj la. | Erè anbalaj. | Contact Canovire customer service immediately with your product details and a list of missing parts. |
| Difficulty tightening screws. | Misaligned holes or incorrect screw type. | Ensure components are correctly aligned. Use the correct screw type for each step as indicated in the instructions. Do not overtighten. |
8. Espesifikasyon
- Mak: Canovire
- Modèl: SHED DEPO
- Dimansyon pwodwi: 47.1"D x 72.5"W x 78.1"H (6x4 FT)
- Materyèl: Metal (asye elektwo-galvanize)
- Koulè: Woodlike
- Pwa atik: 103.62 liv
- Nivo rezistans dlo: Dlo repouse
- Asanble obligatwa: Yes (2-3 people, 5-7 hours recommended)
- Style pòt: Single Hinged, Lockable Door

Figure 5: Shed dimensions and included items (1 carton, 2 pairs gloves).
9. Garanti ak sipò
Canovire is committed to providing quality products and customer satisfaction. If you encounter any missing parts, product damage, or difficulties assembling your shed, please contact us anytime.
- Worry-free Service: We will guide you through every step to resolve any issues.
- Retounen: Pwodui sa a kalifye pou retounen fasil nan 30 jou.
- Manifakti: Canovire
- Kontakte: Refer to your purchase platform or product packaging for specific customer support contact information.