1. Entwodiksyon
This manual provides essential information for setting up, operating, maintaining, and troubleshooting your MINIX ER937-AI Mini PC. Please read this guide thoroughly before using the device to ensure optimal performance and longevity.
Kontni pake
- MINIX Elite ER937-AI Mini PC x 1
- VESA Mount x 1
- 19V/6.32A adaptè pouvwa x 1
- HDMI Kab x XNX
2. Pwodwi souview
The MINIX ER937-AI is a high-performance Mini PC designed for demanding tasks, including business applications, gaming, 3D rendering, and AI computing. It features an AMD Ryzen AI 9 HX 370 processor, Radeon 890M graphics, and advanced connectivity options.
Front and Rear Panel Interfaces
Familiarize yourself with the ports and buttons on your Mini PC.

Imaj 2.1: Front and Rear Panel Interfaces. The front panel includes USB 4.0, USB 3.2, Microphone, Audio Jack, and Power Button/LED. The rear panel features Power Jack, USB 4.0, 2.5G RJ45 LAN, DP 2.0, HDMI 2.1, USB 3.2, and Kensington Lock.
- Panèl devan: USB-C 4.0 (x2), USB-A 3.2 Gen2 (x2), Audio Jack, Microphone, Power Button with Fingerprint Sensor, Clear CMOS Button.
- Dèyè Panel: Power Jack, USB-A 3.2 Gen2 (x1), HDMI 2.1, DisplayPort 2.0, Dual 2.5G RJ45 LAN ports, Kensington Lock.
3. Gid Enstalasyon
3.1 Koneksyon Inisyal
- Konekte periferik: Connect your monitor(s) to the HDMI 2.1 and/or DisplayPort 2.0 ports. For multi-monitor setups, utilize the USB-C 4.0 ports which also support 8K@60Hz display output. Connect your keyboard and mouse to the available USB-A ports.
- Koneksyon pouvwa: Connect the provided 19V/6.32A power adapter to the Mini PC's power jack and then to a power outlet.
- Koneksyon Rezo (Si ou vle): For a wired connection, connect an Ethernet cable to one of the 2.5G RJ45 LAN ports. For wireless, Wi-Fi 7 is available after initial setup.
3.2 Premye Demaraj
- Press the power button located on the front panel. The power LED will illuminate.
- The system will boot into Windows 11 Pro. Follow the on-screen instructions to complete the initial Windows setup, including language, region, network configuration, and user account creation.
- During setup, you can configure the fingerprint sensor for secure and fast logins using Windows Hello.
3.3 Enstalasyon Mòn VESA
The included VESA mount allows you to attach the Mini PC to the back of a compatible monitor or TV, saving desk space.
- Attach the VESA mount bracket to the back of your monitor using the screws provided with your monitor (or the VESA mount if included). Ensure the mount is securely fastened.
- Slide the MINIX ER937-AI Mini PC onto the VESA mount until it clicks into place.
4. Operasyon Enstriksyon
4.1 Power On/Off ak rekòmanse
- Pouvwa sou: Peze bouton pouvwa a.
- Fèmen: Klike sou bouton Start la nan Windows, answit chwazi Power > Shut down.
- Rekòmanse: Klike sou bouton Start la nan Windows, answit chwazi Power > Restart.
- Fòse Fèmen: Si sistèm nan pa reponn, peze epi kenbe bouton pouvwa a pandan apeprè 5-7 segonn jiskaske aparèy la etenn. Sèvi ak sa sèlman kòm yon dènye rekou.
4.2 Koneksyon Rezo
- Wi-Fi 7: Access network settings in Windows to connect to available Wi-Fi 7 (2.4GHz/5GHz/6GHz) networks.
- 2.5G LAN: Plug an Ethernet cable into either of the two 2.5G RJ45 LAN ports for a high-speed wired connection.
- Bluetooth 5.4: Enable Bluetooth in Windows settings to pair with compatible devices such as keyboards, mice, or audio peripherals.
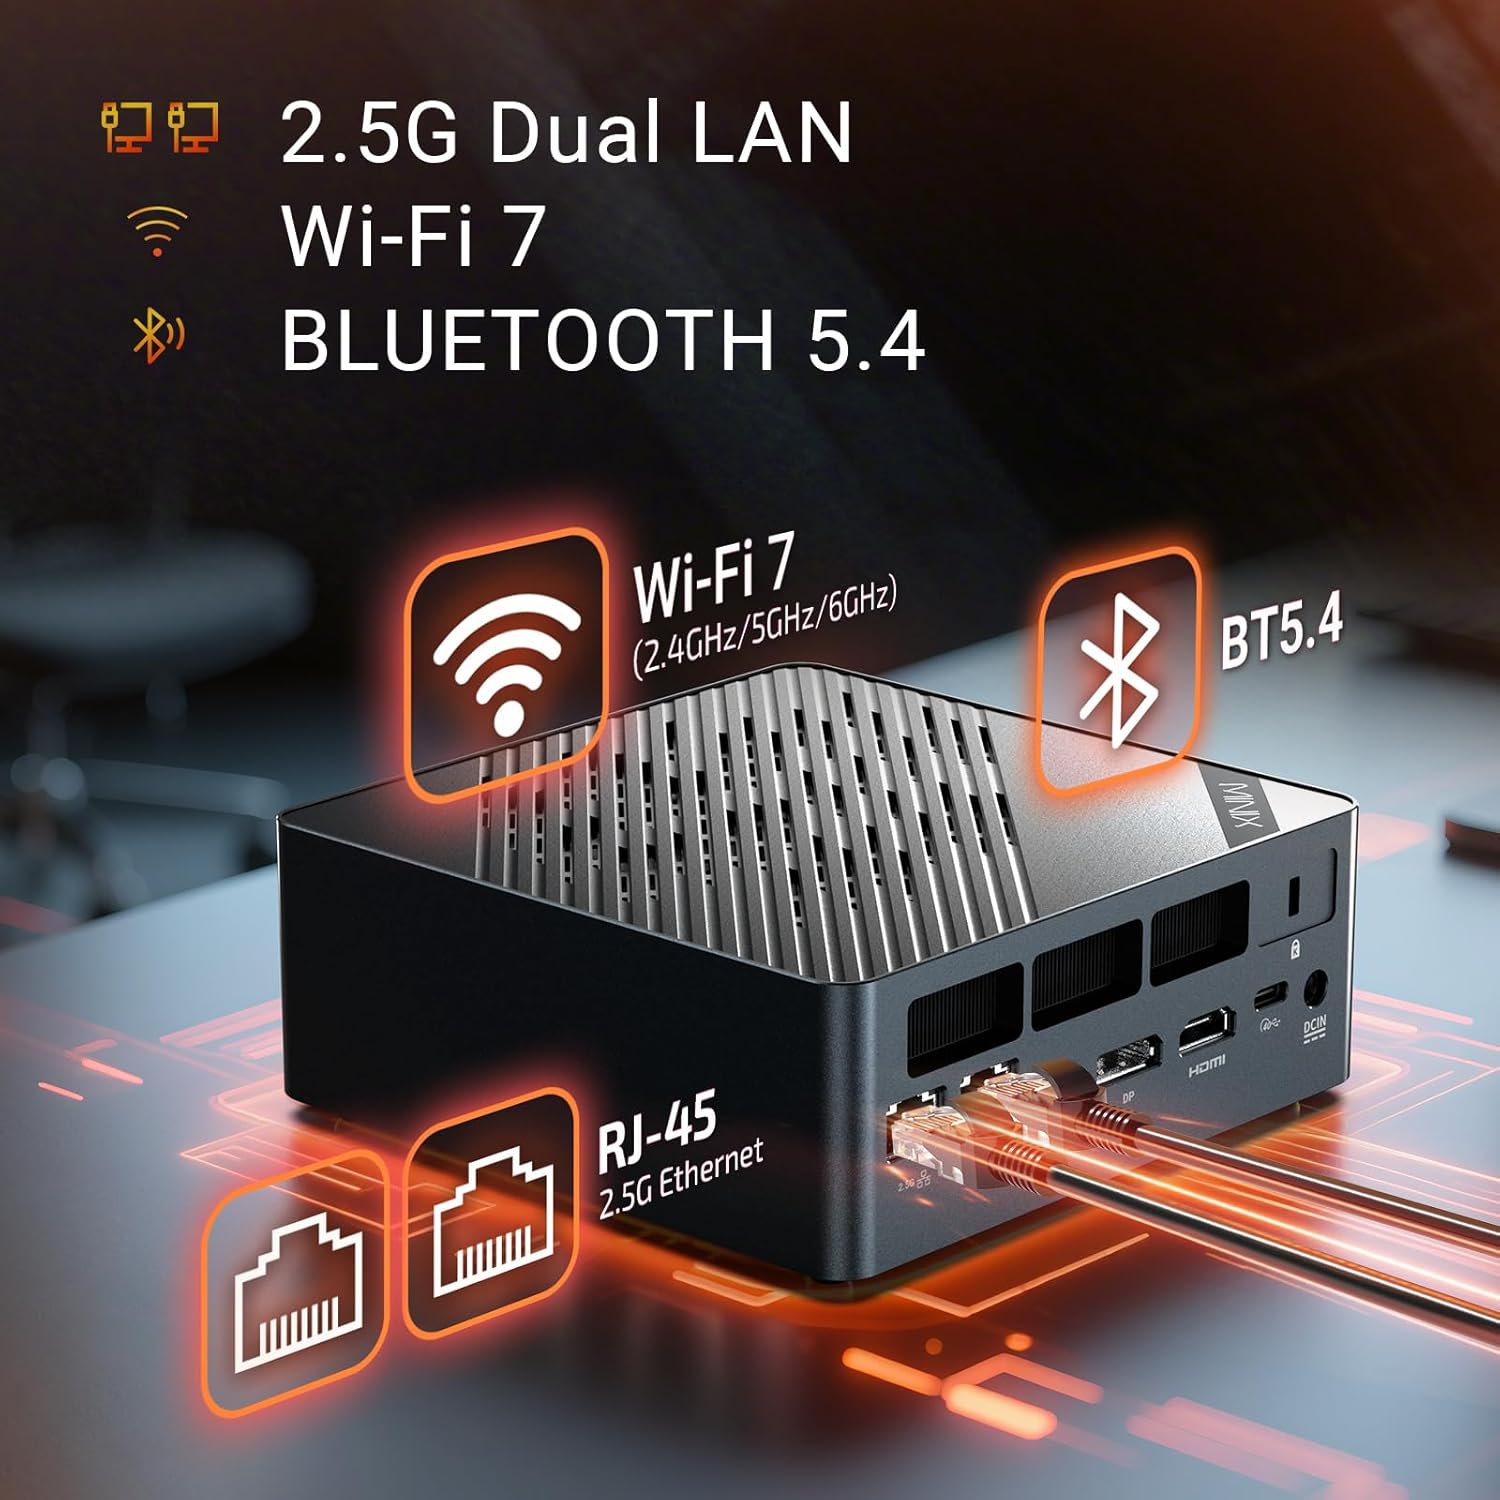
Imaj 4.1: Ultra-Fast Connections. The Mini PC supports Wi-Fi 7, Bluetooth 5.4, and dual 2.5G Ethernet for robust network performance.
4.3 Konfigirasyon ekspozisyon
The MINIX ER937-AI supports up to four 8K@60Hz displays simultaneously.
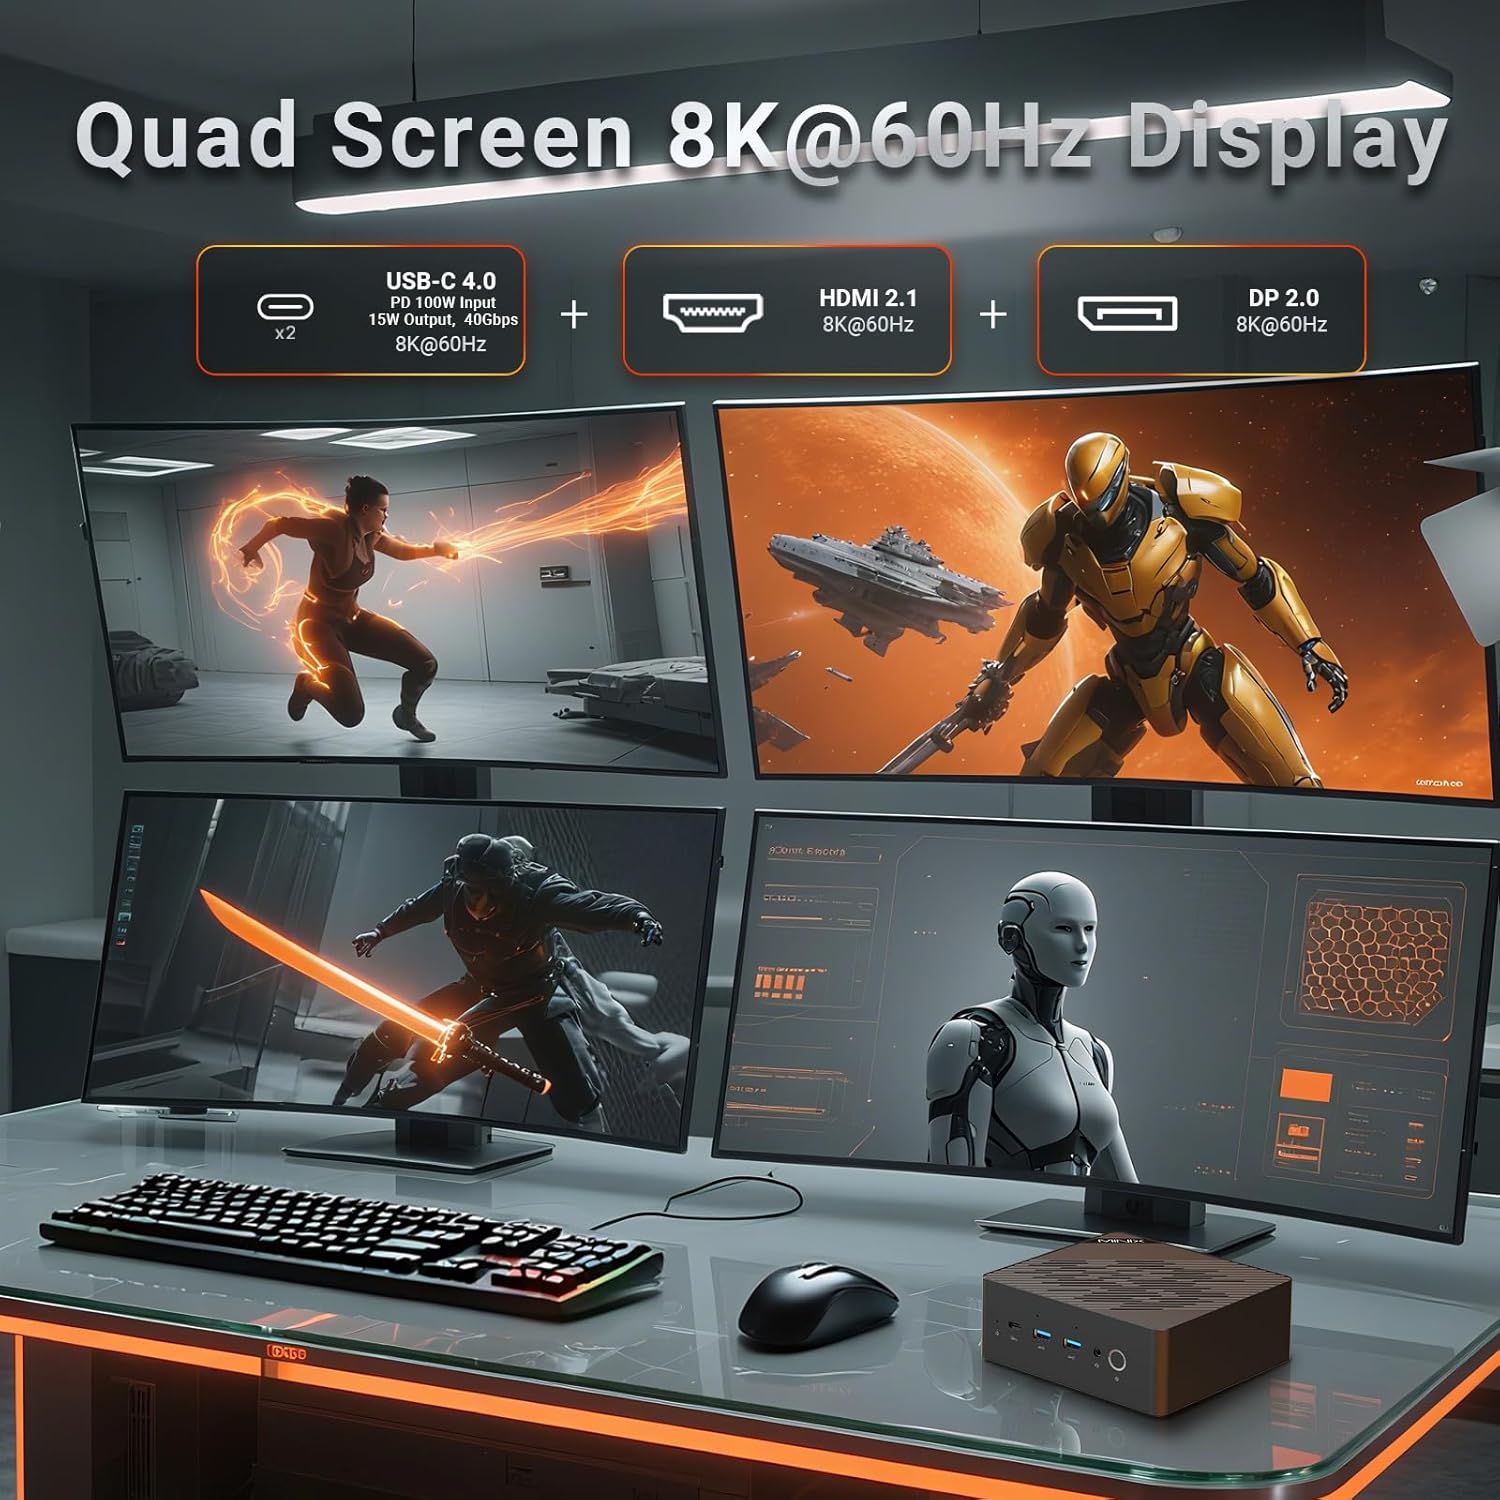
Imaj 4.2: Quad Screen 8K@60Hz Display. The Mini PC can drive up to four 8K monitors via USB-C 4.0, HDMI 2.1, and DisplayPort 2.0.
- Connect monitors using the HDMI 2.1, DisplayPort 2.0, and two USB-C 4.0 ports.
- In Windows Display Settings, you can configure display arrangement, resolution, and orientation.
4.4 USB-C 4.0 Functionality
The two USB-C 4.0 ports offer versatile functionality:
- Power Delivery (PD) Input: Supports 100W power input.
- Power Delivery (PD) Output: Provides 15W power output for charging compatible devices.
- Transfè Done: Up to 40Gbps for high-speed data transfer.
- Ekspozisyon Sòti: Supports 8K@60Hz video output.
4.5 Karakteristik IA
Leverage the AMD Ryzen AI 9 HX 370 processor's NPU for enhanced AI capabilities:
- Kopilòt Windows: Utilize AI-powered features within Windows 11 Pro, such as Recall and real-time translation.
- AI Acceleration: Benefit from up to 80 TOPS (Trillions of Operations Per Second) for AI tasks like drawing and voice interaction in compatible applications.
5. Antretyen ak Amelyorasyon
5.1 Sistèm refwadisman
The Mini PC features dual independent fans for efficient cooling of the CPU and SSD, ensuring stable performance under heavy loads.

Imaj 5.1: Dual Cooling Fans. Separate fans cool the CPU and SSD to prevent overheating and maintain performance.
To maintain optimal cooling, ensure the ventilation grilles are not obstructed. Periodically clean dust from the chassis using compressed air. The magnetic quick-release chassis allows for easy access for cleaning.
5.2 Ekspansyon Depo
The Mini PC comes with a 1TB M.2 2280 PCIe 4.0x4 NVMe SSD and includes a second M.2 2280 PCIe 4.0x4 NVMe slot for additional storage, supporting up to 8TB.

Imaj 5.2: Ample Memory & Storage. The Mini PC supports 32GB DDR5 RAM and a 1TB PCIe 4.0 NVMe SSD, with expansion options.
To install an additional SSD:
- Etenn Mini PC a epi dekonekte tout kab yo.
- Carefully open the chassis (refer to the magnetic quick-release mechanism).
- Locate the empty M.2 slot. Insert the new M.2 NVMe SSD at an angle and secure it with the provided screw.
- Close the chassis and reconnect cables. The new SSD will need to be initialized and formatted in Windows Disk Management.
5.3 Amelyorasyon RAM
The device is equipped with 32GB dual-channel DDR5-5600 RAM (2x DDR5 SO-DIMM slots) and is expandable up to 96GB.
To upgrade RAM:
- Etenn Mini PC a epi dekonekte tout kab yo.
- Louvri chasi a avèk prekosyon.
- Locate the DDR5 SO-DIMM slots. If replacing existing modules, gently push the clips on either side of the module outwards to release it.
- Insert new DDR5 SO-DIMM modules at an angle and push down until the clips snap into place.
- Close the chassis and reconnect cables.
5.4 Klè CMOS bouton
A Clear CMOS button is available on the front panel. This button can be used to reset BIOS settings to their default values if you encounter boot issues related to BIOS configuration. Consult technical support before using this feature.
NAN. Depanaj
If you encounter issues with your MINIX ER937-AI Mini PC, refer to the following common solutions:
- Pa gen pouvwa:
- Asire w ke adaptè kouran an byen konekte ak Mini PC a ak yon priz kouran ki fonksyone.
- Verifye si priz kouran an fonksyone byen lè w branche yon lòt aparèy.
- Pa gen ekspozisyon:
- Check that the monitor is powered on and the correct input source is selected.
- Ensure display cables (HDMI, DisplayPort, USB-C) are securely connected to both the Mini PC and the monitor.
- Try connecting to a different display port or using a different cable.
- Pwoblèm koneksyon rezo:
- For Wi-Fi, check Windows network settings, ensure Wi-Fi is enabled, and try reconnecting to your network.
- For wired LAN, ensure the Ethernet cable is properly connected and your router/modem is functioning.
- Restart your router/modem and the Mini PC.
- Capteur anprent dijital la pa fonksyone:
- Asire w ke dwèt ou pwòp epi sèk.
- Re-register your fingerprint in Windows Hello settings.
- System Performance Issues:
- Ensure the Mini PC has adequate ventilation and is not placed in an enclosed space.
- Check for excessive background processes in Task Manager.
- Mete ajou chofè yo ak Windows 11 Pro a nan dènye vèsyon yo.
If problems persist, refer to the Support section for further assistance.
7. Espesifikasyon
Detailed technical specifications for the MINIX ER937-AI Mini PC.
| Karakteristik | Spesifikasyon |
|---|---|
| Modèl | ER937-AI |
| Sistèm operasyon | Windows 11 Pro |
| Processeur | AMD Ryzen AI 9 HX 370 (12C/24T, up to 5.1GHz) |
| Grafik | AMD Radeon 890M, Ryzen AI NPU (80 TOPS overall) |
| RAM | 32GB DDR5-5600 (2x SO-DIMM slots, expandable to 96GB) |
| Depo | 1TB M.2 2280 PCIe 4.0x4 NVMe SSD (second slot expandable to 8TB) |
| Koneksyon san fil | Wi-Fi 7, Bluetooth 5.4 |
| Koneksyon filaire | Doub 2.5G RJ45 LAN |
| Pò USB | 2x USB-C 4.0 (PD 100W input, 15W output), 3x USB-A 3.2 Gen2 |
| Sòti videyo | HDMI 2.1, DisplayPort 2.0, 2x USB-C 4.0 (Quad 8K@60Hz support) |
| Odyo | Audio Jack, Dual Hidden Microphones |
| Sekirite | Fingerprint-enabled Power Button, Kensington Lock |
| Refwadisman | Dual Independent Fans (CPU & SSD) |
| Dimansyon (LxWxH) | 5.52 x 5.5 x 2.2 pous |
| Pwa | 2.06 liv |
8. Garanti ak sipò
8.1 Enfòmasyon sou Garanti
For specific warranty terms and conditions, please refer to the documentation included with your product or visit the official MINIX websit. Garanti a anjeneral gen ladan domaj nan materyèl ak nan fabrikasyon anba itilizasyon nòmal.
8.2 Sipò teknik
If you require technical assistance or have questions not covered in this manual, please use the following resources:
- Sipò sou entènèt: Visit your Amazon account, navigate to "Your Orders," and select "Ask Product Question" for the MINIX ER937-AI Mini PC.
- Ofisyèl Websit: For offline maintenance services and additional support resources, please visit the official MINIX websit.