1. Entwodiksyon
This manual provides detailed instructions for the installation, operation, and maintenance of your ViaBecs 10.2" Wireless Apple CarPlay and Android Auto Car Stereo. This unit is specifically designed for Honda CRV models manufactured between 2012 and 2016, utilizing CAN019-R and CAN020-R harnesses. Please read this manual thoroughly before installation and use to ensure proper functionality and safety.

Image: ViaBecs Android 13.0 Car Stereo with key features highlighted.
2. Konpatibilite Veyikil
The ViaBecs car radio system is compatible with Honda CRV models from 2012 to 2016. It is designed for a plug-and-play installation, retaining essential factory features such as steering wheel controls, reverse camera, 360° camera, and the JBL amplifier. Ensure your vehicle's dashboard matches the compatible configurations shown below.
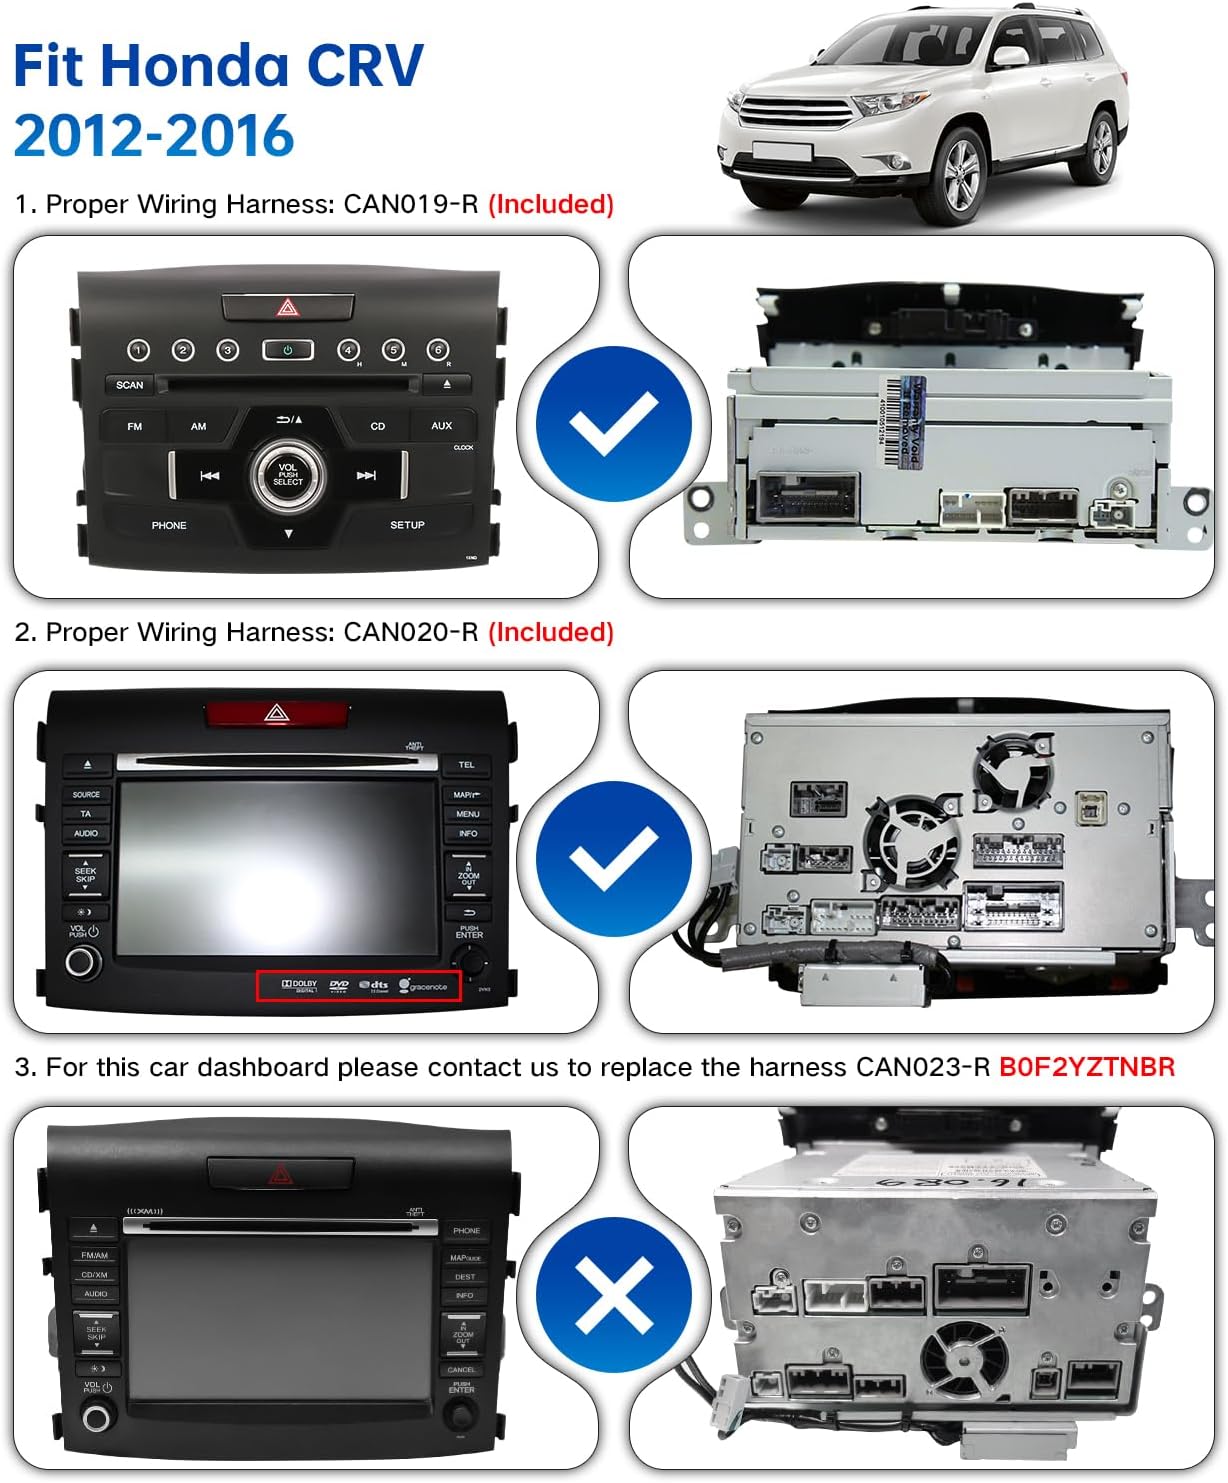
Image: Diagram illustrating compatible Honda CRV dashboards (2012-2016) and the included CAN019-R and CAN020-R wiring harnesses.
3. Enstalasyon ak Enstalasyon
3.1 Kontni pake a
- 10.2" Car Stereo Head Unit
- CAN019-R Wiring Harness (Included)
- CAN020-R Wiring Harness (Included)
- GPS antèn
- 4G Antèn
- Adaptè USB
- Mikwofòn ekstèn
- Installation Brackets and Screws
- Manyèl itilizatè
3.2 Etap enstalasyon yo
- Preparasyon: Asire w ke machin nan etenn epi batri a dekonekte anvan ou kòmanse enstalasyon an.
- Retire radyo faktori a: Carefully remove the existing factory radio and trim panels from your Honda CRV dashboard. Refer to your vehicle's service manual for specific instructions.
- Konekte fil elektrik yo: Identify the appropriate wiring harness (CAN019-R or CAN020-R) based on your vehicle's original radio configuration. Connect the new harnesses to the vehicle's wiring and the new head unit.

Image: Connection diagram for CAN019-R harness.

Image: Connection diagram for CAN020-R harness.
- Konekte antèn: Attach the GPS antenna and 4G antenna to their respective ports on the head unit. Position the antennas in a location with clear signal reception.
- Connect USB Adapters: Connect any necessary USB adapters for external devices.
- Inite Tèt Mòn: Secure the new head unit into the dashboard opening using the provided brackets and screws.
- Reconnect Battery & Test: Reconnect the vehicle battery and power on the head unit to test all functions, including audio, display, steering wheel controls, and camera inputs.

Image: Detailed radio wiring diagram showing all connections.
4. Operasyon Enstriksyon
4.1 General Interface
The unit runs on Android 13, offering a customizable and flexible interface. You can move apps by long-pressing, toggle between day/night mode, and utilize split-screen multitasking for enhanced convenience.

Image: Screenshot of the Android 13 car stereo interface.
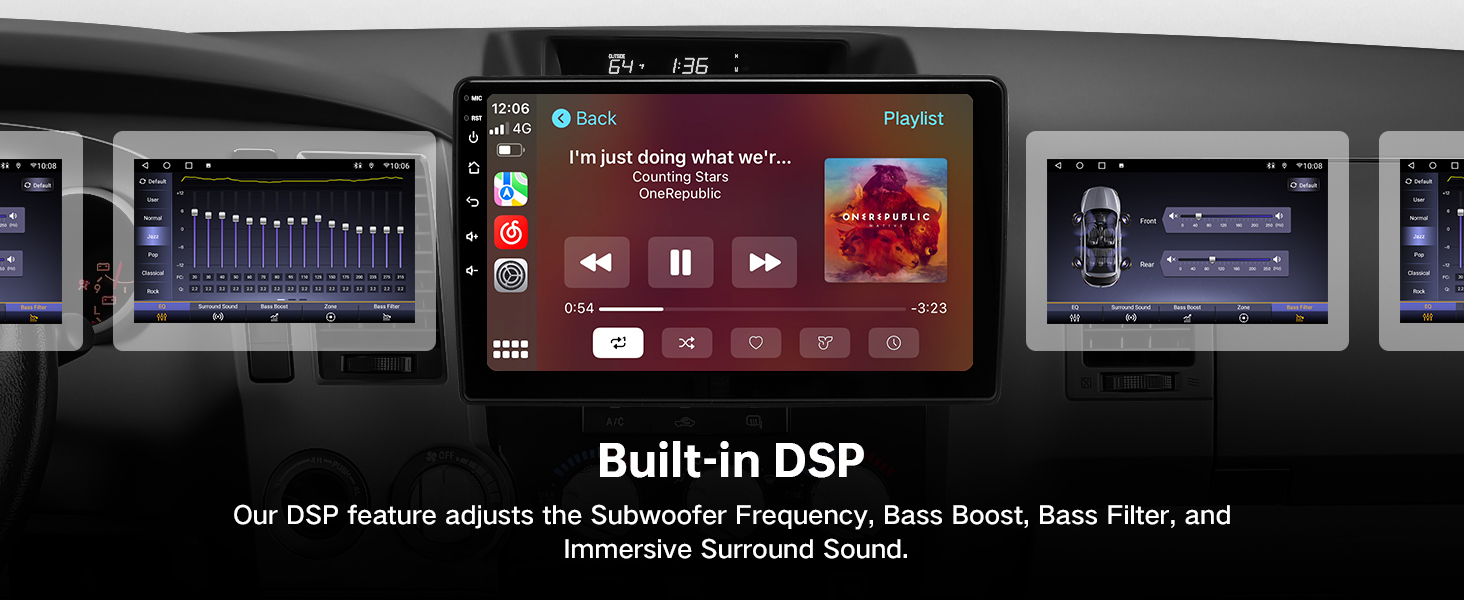
Image: Demonstration of split-screen multitasking feature.
4.2 San Fil Apple CarPlay ak Android Auto
This touchscreen car stereo supports wireless Apple CarPlay and both wireless and wired Android Auto. This allows for hands-free navigation, calls, messages, and music streaming.

Image: Visual representation of Apple CarPlay, Android Auto, and Mirror Link interfaces.

Image: Wireless Apple CarPlay in use.

Image: Wired and Wireless Android Auto in use.
4.2.1 Connecting Wireless CarPlay
- Tap the Home button on the head unit to access the mode selection screen.
- Select 'CarPlay' from the options.
- To enable auto-connect for CarPlay, go to Settings > Background Connection and turn it ON.
- If you prefer to use Bluetooth only and skip CarPlay, turn OFF Wi-Fi, disconnect CarPlay, and turn OFF 'Background Connection'.
- To connect, open the Bluetooth app on the head unit, tap 'Search', and select your iPhone's Bluetooth name.
- Enter the BT Password (default: 0000) if prompted.
- On your iPhone, accept the pairing request by tapping 'Pair' and 'Allow'.
- The head unit will automatically turn off Wi-Fi and turn on its hotspot for a wireless connection.
- A CarPlay connection request will appear on your iPhone; tap 'Connect'.
- Once connected, CarPlay will launch. Subsequent connections will be faster.
- If connection takes more than 40 seconds, open your iPhone's Wi-Fi settings and tap on the car radio's hotspot name to connect directly.
Video: Demonstration of connecting Wireless CarPlay on the ViaBecs head unit.
4.3 Bluetooth Koneksyon
Bluetooth 5.0 ensures instant connection for hands-free calling and audio streaming. The unit features a built-in noise-canceling microphone and a 3.5mm external MIC jack for clear sound in noisy environments.

Image: Illustration of the ultra-clear microphone feature and Bluetooth connectivity.
4.4 Navigasyon GPS
The unit includes built-in GPS navigation capabilities. Utilize pre-installed map applications or download your preferred navigation apps from the Play Store.
4.5 DSP & Audio Settings
Experience superior sound quality with the built-in DSP 36-band EQ and TDA7851 4*50W Amplifier output. This provides total control over frequency response, allowing customization for various music genres like Rock, Pop, and Jazz. The onboard 48-EQ graphic equalizer ensures optimal sound.

Image: Interface showing built-in DSP for audio customization.
4.6 4G & WiFi Connectivity
Stay connected with 4G SIM support and WiFi. Insert your 4G SIM card for online access to maps, apps, and updates directly from your dashboard. Connect to available Wi-Fi networks for internet access.

Image: Display showing DSP settings and options for WiFi/4G internet connectivity.
5. Antretyen
- Netwayaj: Sèvi ak yon twal mou epi sèk pou netwaye ekran an ak deyò aparèy la. Evite pwodui netwayaj abrazif oswa solvan.
- Mizajou lojisyèl: Periodically check for software updates to ensure optimal performance and access to new features. Updates can typically be found in the system settings under 'Check for Updates'.
- Evite tanperati ekstrèm: Pa ekspoze aparèy la anba tanperati ekstrèm oswa anba limyè solèy dirèk pou yon bon bout tan.
NAN. Depanaj
- Pa gen pouvwa: Tcheke tout koneksyon kouran yo epi asire w ke batri machin nan byen konekte. Verifye ke fizib yo entak.
- Pa gen son: Check speaker connections and audio settings. Ensure volume is not muted or set too low.
- CarPlay/Android Auto pa konekte: Refer to section 4.2.1 for detailed connection steps. Ensure Bluetooth and Wi-Fi are enabled on your phone and the head unit. Try restarting both devices.
- Ekran an pa reponn: Perform a soft reset by pressing and holding the power button for 10 seconds. If the issue persists, contact support.
- Pwoblèm siyal GPS: Asire w antèn GPS la byen konekte epi li gen yon vizyon klè. view nan syèl la.
7. Espesifikasyon
| Karakteristik | Spesifikasyon |
|---|---|
| Dimansyon pake | 19.69 x 14.17 x 5.12 pous |
| Pwa atik | 4.18 liv |
| ASIN | B0FJ2JYV4W |
| Nimewo Modèl Atik | CAN019-R & CAN020-R For CRV 12-16 |
| Manifakti | ViaBecs |
| Mak | ViaBecs |
| Koneksyon Teknoloji | Bluetooth 5.0/WiFi/USB |
| Aparèy konpatib | Machin |
| Kalite Connector | 3.5mm Jack, USB, RCA |
| Audio Sòti Mode | Stereo |
| Konfigirasyon chanèl son antoure | 5 |
| Kodaj videyo | H.264, H.265/HEVC |
| Sortie pouvwa | 50 Watts |
| Kantite Chanèl | 5 |
| Sòti Wattage | 200 Watts |
8. Garanti & Sipò
For warranty information, technical support, or any questions regarding your ViaBecs car stereo, please contact the seller, Kasa Offical Store. You can typically find their contact information on the product's purchase page or through your order history.

Image: Instructions on how to contact the Kasa Offical Store for support.