
1. Enfòmasyon enpòtan sou sekirite
Read all instructions carefully before installation and use. Failure to follow these instructions may result in electric shock, fire, or other hazards.
- Always disconnect power at the circuit breaker before servicing or cleaning the unit.
- Enstalasyon an dwe fèt pa yon elektrisyen kalifye, dapre tout kòd elektrik lokal ak nasyonal yo.
- Pa sèvi ak vantilatè sa a avèk okenn aparèy kontwòl vitès solid-state sof si li apwouve espesyalman pou itilize avèk modèl sa a.
- Asire bon baz pou redwi risk chòk elektrik.
- Aparèy sa a fèt sèlman pou itilizasyon vantilasyon jeneral. Pa sèvi avè l pou retire materyèl ak vapè danjere oswa eksplozif.
2. Pake kontni
Carefully unpack the fan and check for any shipping damage. Ensure all parts are present before discarding packaging materials. If any parts are missing or damaged, contact Akicon customer support.
Videyo: Akicon Bathroom Exhaust Fan Unboxing & Installation. This video demonstrates the unboxing process and shows the included components, as well as various installation methods.
- Lojman Fanatik Echapman
- Grille with LED Light and Humidity Sensor
- Kontwòl Remote
- Modèl dekoupaj klwazon sèch
- Hanger Bar/Suspension Brackets (for attic installation)
- Montaj Vis
- Manyèl Enstriksyon
3. Espesifikasyon
| Mak | Akicon |
| Non modèl | Akicon HumiditySensorRGB |
| Kapasite Flow Air | 110 pye kib pou chak minit (CFM) |
| Nivo bri | 1.5 son |
| Kouvèti Sal | Jiska 100 pye kare. |
| Kalite limyè | LED (Dimmable, RGB, 3 Color Temperatures: 2700K/4000K/5000K, Nightlight) |
| Karakteristik espesyal | Humidity Sensor, RGB Light, Dimmable LED, Nightlight, Quiet Operation |
| Kalite aliye | Mòn plafon |
| Sous pouvwa | AC |
| Dimansyon Lojman | 9" x 9" x 7.7" |
| Light Cover Dimension | 12" x 12" |
| Ouvèti plafon | 9-1/4" (L) x 9-1/4" (W) |
| Dyamèt kanal | Φ4" |
| Sètifikasyon | HVI, UL Listed |
4. Enstalasyon
4.1 Chèk Pre-Enstalasyon
Anvan ou kòmanse enstalasyon an, asire w de bagay sa yo:
- Verify that your soffit or attic has sufficient space for the fan housing. The required opening size is 9-1/4" x 9-1/4" and a minimum soffit/attic height of 7-3/4".
- Fèmen kouran nan zòn enstalasyon an nan disjoncteurs a.

Imaj: Pre-installation diagram illustrating the necessary ceiling opening dimensions (9-1/4" x 9-1/4") and minimum attic/soffit height (7-3/4") for proper fan installation.
4.2 Ceiling Opening
- Use the provided drywall cutout template to mark the ceiling opening.
- Carefully cut the 9-1/4" x 9-1/4" opening in the ceiling.
4.3 fil elektrik
Connect the electrical wires according to the label on the wires. Ensure black wire connects to black, white to white, and ground to ground. A neutral wire is required for operation.

Imaj: Detailed wiring diagram showing connections for the fan, including ground, neutral, and live wires to a junction box. This diagram is crucial for correct electrical installation.
4.4 Opsyon Enstalasyon
This fan supports multiple installation methods:
Option A: Bracket Attic Installation
This method is used when attic access is available and joists are present for mounting.
- Insert suspension brackets (CC) into the tabs on the fan housing and then slide suspension brackets (DD) into suspension brackets (CC).
- Screw the housing into the joists using appropriate screws.
- Tighten the screws until the fan housing is firmly secured to the brackets.
Option B: Bracket-Free Attic Installation
This method is used when attic access is available and the fan can be directly mounted to joists without additional brackets.
- Screw the fan housing directly into the joist using appropriate screws.
- Ensure the housing is securely fastened to prevent vibration.
Option C: No Attic Installation
This method is suitable when attic access is not available, allowing installation from below the ceiling.
- Remove the screws securing the motor to the housing, and unplug the wires connecting the motor to the housing.
- Remove the fan motor assembly from the housing.
- After connecting the ventilation duct, send the housing into the ceiling opening.
- Connect the wires correctly according to the label on the wires (black to black, white to white, ground to ground).
- Secure the housing to the joist from below.
- Reinstall the motor back into the housing and connect the plugs.
- Enstale griyaj la.
4.5 Enstalasyon griyaj
Once the fan housing is secured and wired, install the grille:
- Connect the light and sensor wires from the grille to the corresponding connectors in the fan housing.
- Align the grille mounting springs with the slots in the fan housing.
- Push the grille firmly into place until it is flush with the ceiling.
5. Operasyon
The Akicon Bathroom Exhaust Fan is operated using the included remote control. Ensure the remote has working batteries.
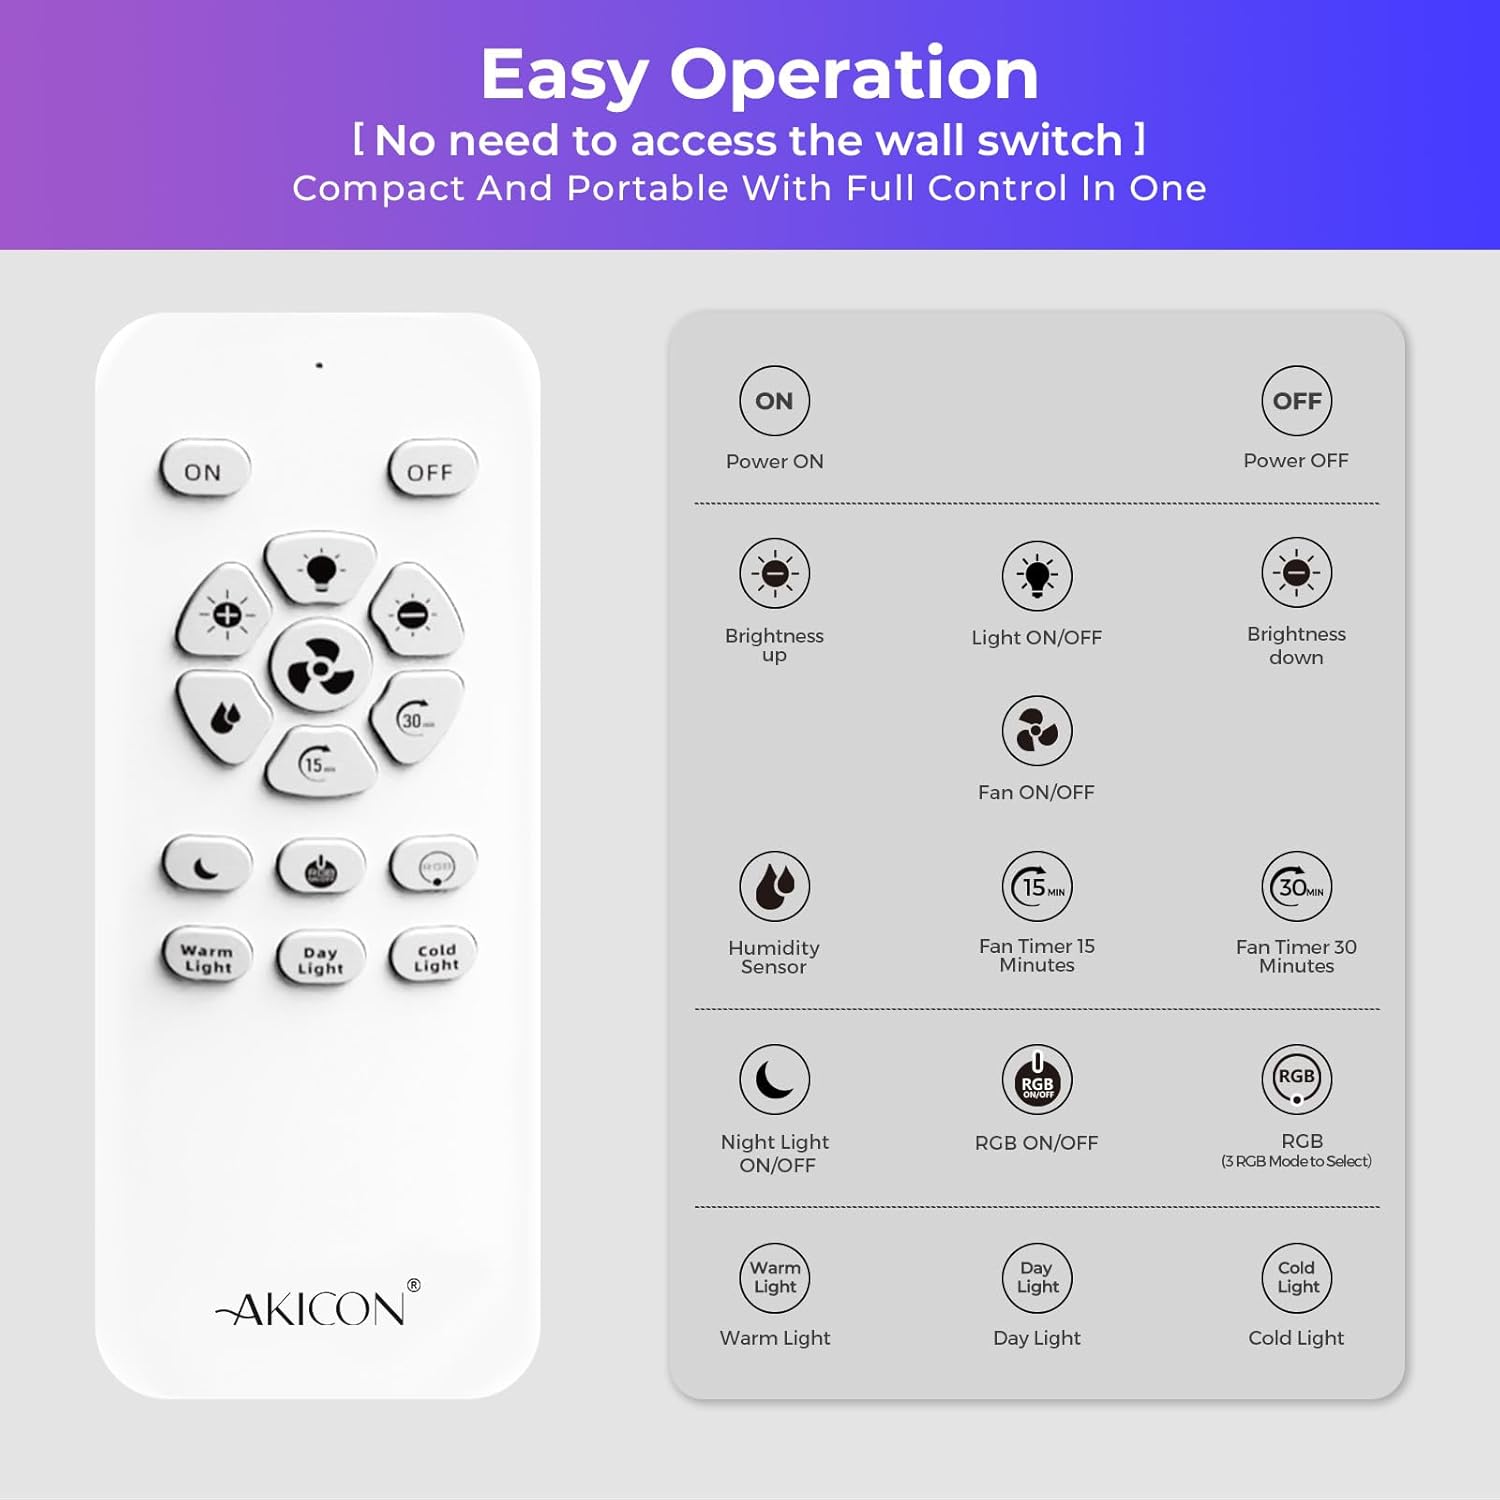
Imaj: Remote control layout with labeled buttons for power, brightness, light on/off, fan on/off, humidity sensor, fan timers (15/30 min), night light, RGB on/off, RGB mode switch, and color temperature selection (Warm, Day, Cold Light).
5.1 Fonksyon debaz
- Pouvwa ON/OFF: Press the 'ON' or 'OFF' button to turn the fan and light on or off.
- Vantilatè ON/OFF: Press the fan icon button to control the fan independently.
- Limyè ON/OFF: Press the light bulb icon button to control the light independently.
5.2 Capteur imidite
The fan features an integrated humidity sensor for automatic operation.
- Aktivasyon: Press the 'Humidity Sensor' button on the remote. The blue indicator light on the fan will flash during humidity detection mode.
- Operasyon otomatik: When indoor humidity exceeds 60% RH, the blue light illuminates steadily, and the fan activates automatically to reduce moisture.
- Dezaktivasyon: The fan will continue to operate until the humidity drops below 60% RH, then it will turn off.
Imaj: Visual explanation of the humidity sensor's function. It shows the fan activating when humidity is above 60% RH and remaining off when below 60% RH, with air circulation arrows.
5.3 Fonksyon ekleraj
The fan includes versatile lighting options:
- Dimmable dirije: Adjust brightness using the '+' and '-' buttons.
- 3 tanperati koulè: Select between 2700K (Warm Light), 4000K (Day Light), and 5000K (Cold Light) using the dedicated buttons.
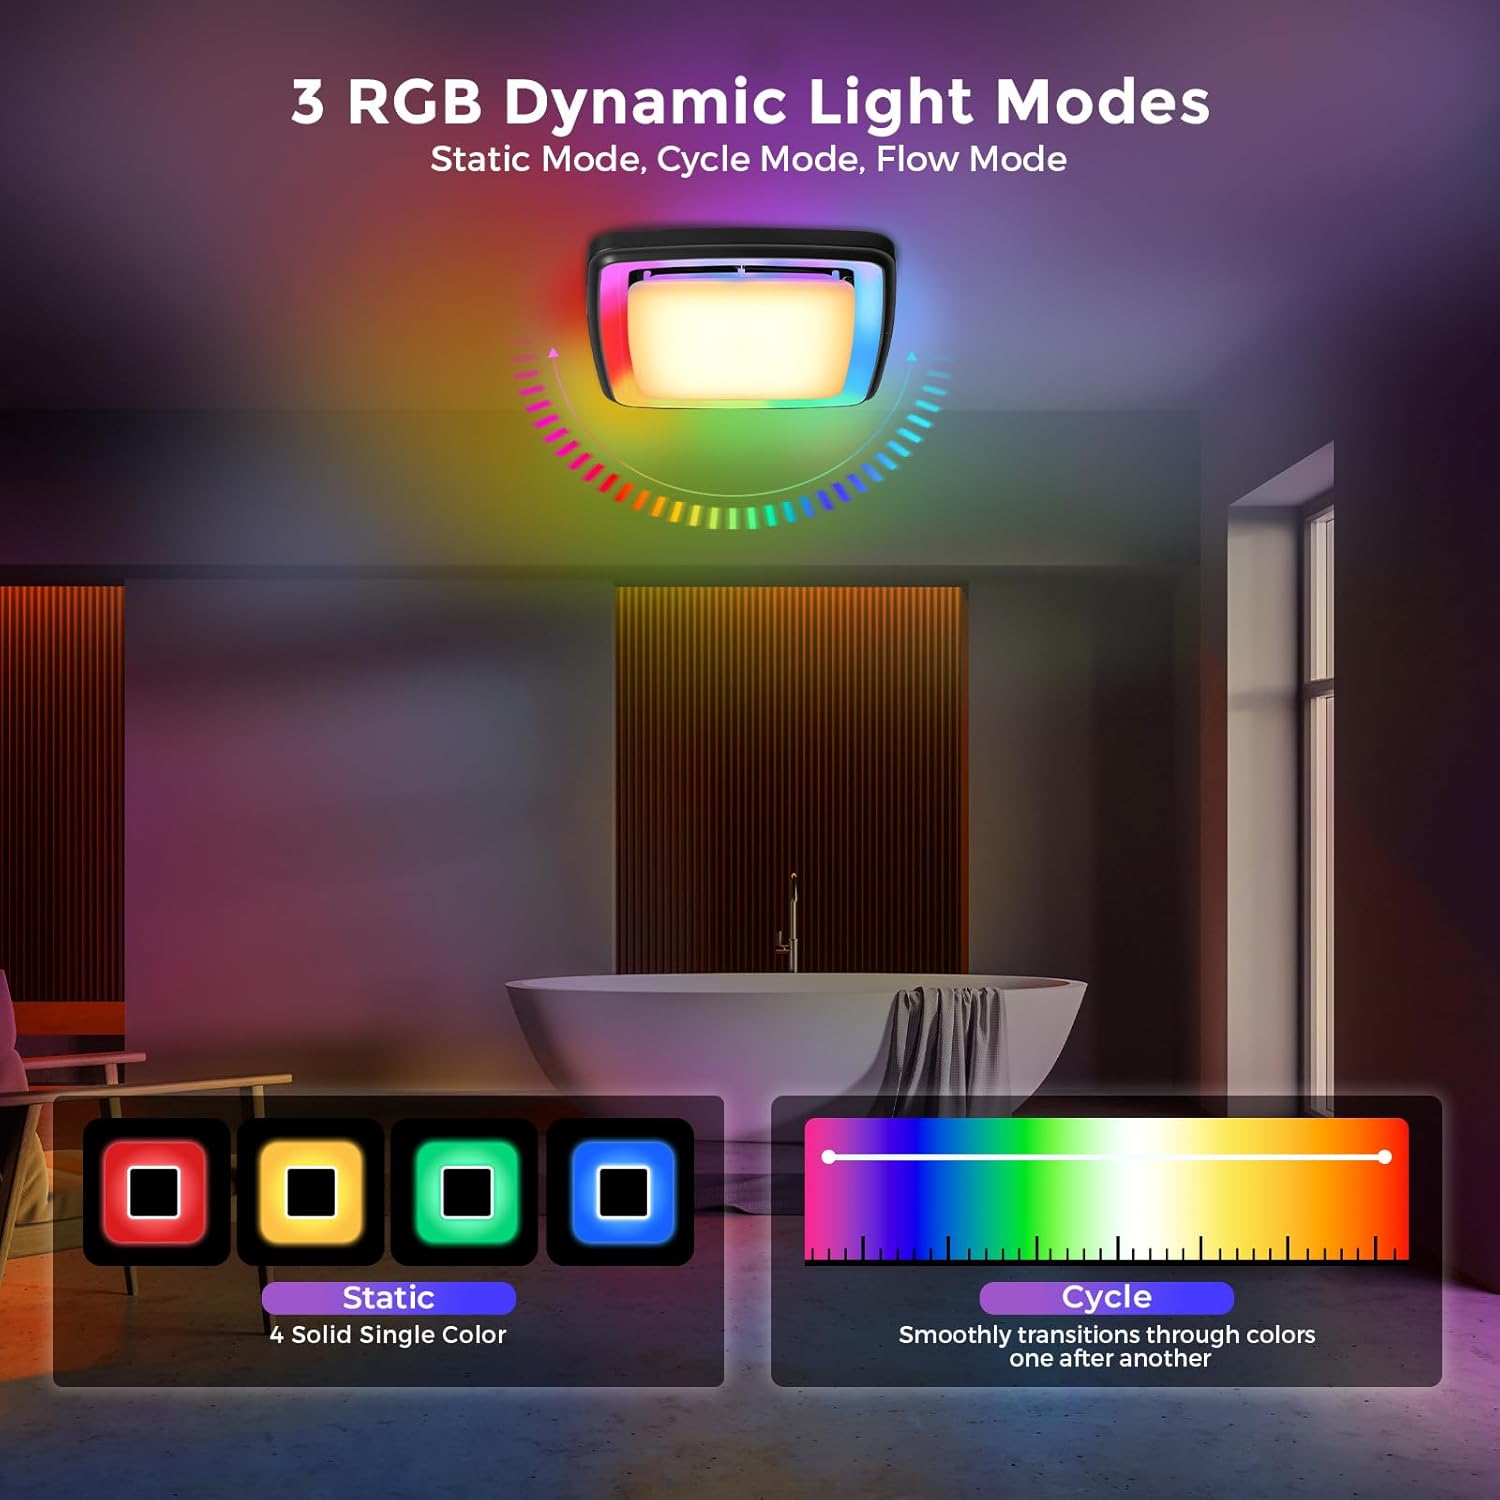
- RGB Dynamic Lighting: Press 'RGB ON/OFF' to activate. Use 'RGB Mode Switch' to cycle through Static, Cycle, and Flow modes.
- Nightlight: Press the 'Night Light ON/OFF' button to activate a soft 3000K nightlight.

Imaj: Depiction of the three RGB dynamic light modes: Static (four solid single colors), Cycle (smooth transitions through colors), and Flow (flowing chase light effect). This image helps visualize the different lighting options.

Imaj: Visual representation of the 3 CCT (Correlated Color Temperature) dimmable LED light settings (3000K, 4000K, 5000K) and the night light feature, demonstrating the adjustable brightness and color options.
5.4 Fonksyon revèy
Set the fan to operate for a specific duration:
- 15-Minit minutri: Press the '15 min' button.
- 30-Minit minutri: Press the '30 min' button.

Imaj: Illustration of the fan's timer function, showing the fan turning on and then automatically shutting off after a set period (15 or 30 minutes), useful for clearing steam after a shower.
6. Antretyen
Antretyen regilye asire pèfòmans optimal ak lonjevite fanatik echapman ou an.
6.1 Cleaning the Grille and Light Cover
- Dekonekte pouvwa: Toujou etenn kouran an nan disjonktè a anvan ou netwaye.
- Retire griyaj: Rale griy la dousman desann pou dekonekte sous dlo montaj yo.
- Netwaye: Wipe the grille and light cover with a soft, damp cloth. A mild, non-abrasive detergent can be used if necessary. Do not use harsh chemicals or abrasive cleaners.
- Sèk: Ensure all parts are completely dry before reattaching.
- Re-enstale griy la: Push the grille back into place until the springs engage securely.
6.2 Cleaning the Fan Motor and Housing
Periodically, the fan motor and housing may require cleaning to remove dust and debris.
- Dekonekte pouvwa: Fèmen kouran nan disjoncteurs a.
- Retire griyaj: Remove the grille as described above.
- Motè Aksè: Depending on your installation type, you may need to carefully remove the motor assembly from the housing. Refer to the installation section for guidance on motor removal.
- Netwaye: Use a vacuum cleaner with a brush attachment or a soft brush to remove dust from the fan blades, motor, and interior of the housing. Do not use water or liquids directly on electrical components.
- Remonte: Reinstall the motor assembly and grille, ensuring all connections are secure.
- Retabli pouvwa: Vire pouvwa tounen sou nan brekè a sikwi.
NAN. Depanaj
If you experience issues with your Akicon Bathroom Exhaust Fan, refer to the following troubleshooting guide:
| Pwoblèm | Kòz posib | Solisyon |
|---|---|---|
| Fanatik pa limen |
|
|
| Limyè pa limen |
|
|
| Vantilatè a fè bri oswa li vibre |
|
|
| Humidity sensor not working |
|
|
If the problem persists after trying these solutions, please contact Akicon customer support.
8. Garanti ak sipò
Akicon products are manufactured to high-quality standards and are warranted to be free from defects in materials and workmanship. For specific warranty details, duration, and terms, please refer to the warranty card included in your package or visit the official Akicon websit.
For technical assistance, troubleshooting not covered in this manual, or to report missing/damaged parts, please contact Akicon customer support:
- Imèl: Refer to warranty card or Akicon websit.
- Telefòn: Refer to warranty card or Akicon websit.
- Websit: Akicon Official Store