
1. Entwodiksyon
This manual provides detailed instructions for the safe and proper installation, operation, and maintenance of your USX MOUNT Full Motion TV Wall Mount, model XML925. This mount is designed to securely hold televisions ranging from 42 to 97 inches and weighing up to 150 lbs (68 kg). It offers full motion capabilities including tilt, swivel, and extension for optimal viewang ing.
2. Enfòmasyon sou Sekirite
WARNING: Failure to read and follow all instructions may result in personal injury, property damage, or voiding of your warranty. If you have any questions, please contact USX MOUNT customer service.
- Ensure the mounting surface can safely support the combined weight of the mount and your TV.
- This product is designed for installation on wood studs (12"/16"/18"/24"), solid concrete walls, or brick walls. DO NOT mount on drywall alone.
- Always use a stud finder to locate the center of wood studs.
- For concrete or brick walls, use appropriate concrete anchors (if not included, contact USX MOUNT for assistance).
- Pa depase kapasite pwa maksimòm lan ki se 150 liv (68 kg).
- Asire w tout vis yo byen sere, men pa sere yo twòp.
- Li rekòmande pou fè yon enstalasyon pwofesyonèl si ou pa sèten sou nenpòt etap.
3. Parts Included Overview
Before installation, verify that all components are present and undamaged. Refer to the image below for a visual guide to the included parts.

Imaj: Plis paseview of USX MOUNT XML925 TV Wall Mount components.
- Inite Plak Mi
- Sipò televizyon (2 moso)
- Hardware Bag (various screws, washers, spacers, concrete anchors, Allen key, open-end wrench)
- Mounting Modèl
- Nivo jarèt
- Cable Ties (3 pieces)
- Manyèl Enstriksyon
4. Enstalasyon
Etap 1: Tache parantèz sou televizyon
Ensure your TV's VESA pattern is compatible with the mount (Min: 200x100mm, Max: 600x400mm). Select the appropriate screws, washers, and spacers from the hardware bag. Attach the TV brackets to the back of your television. Ensure all four screws enter the VESA hole before tightening. Do not overtighten.
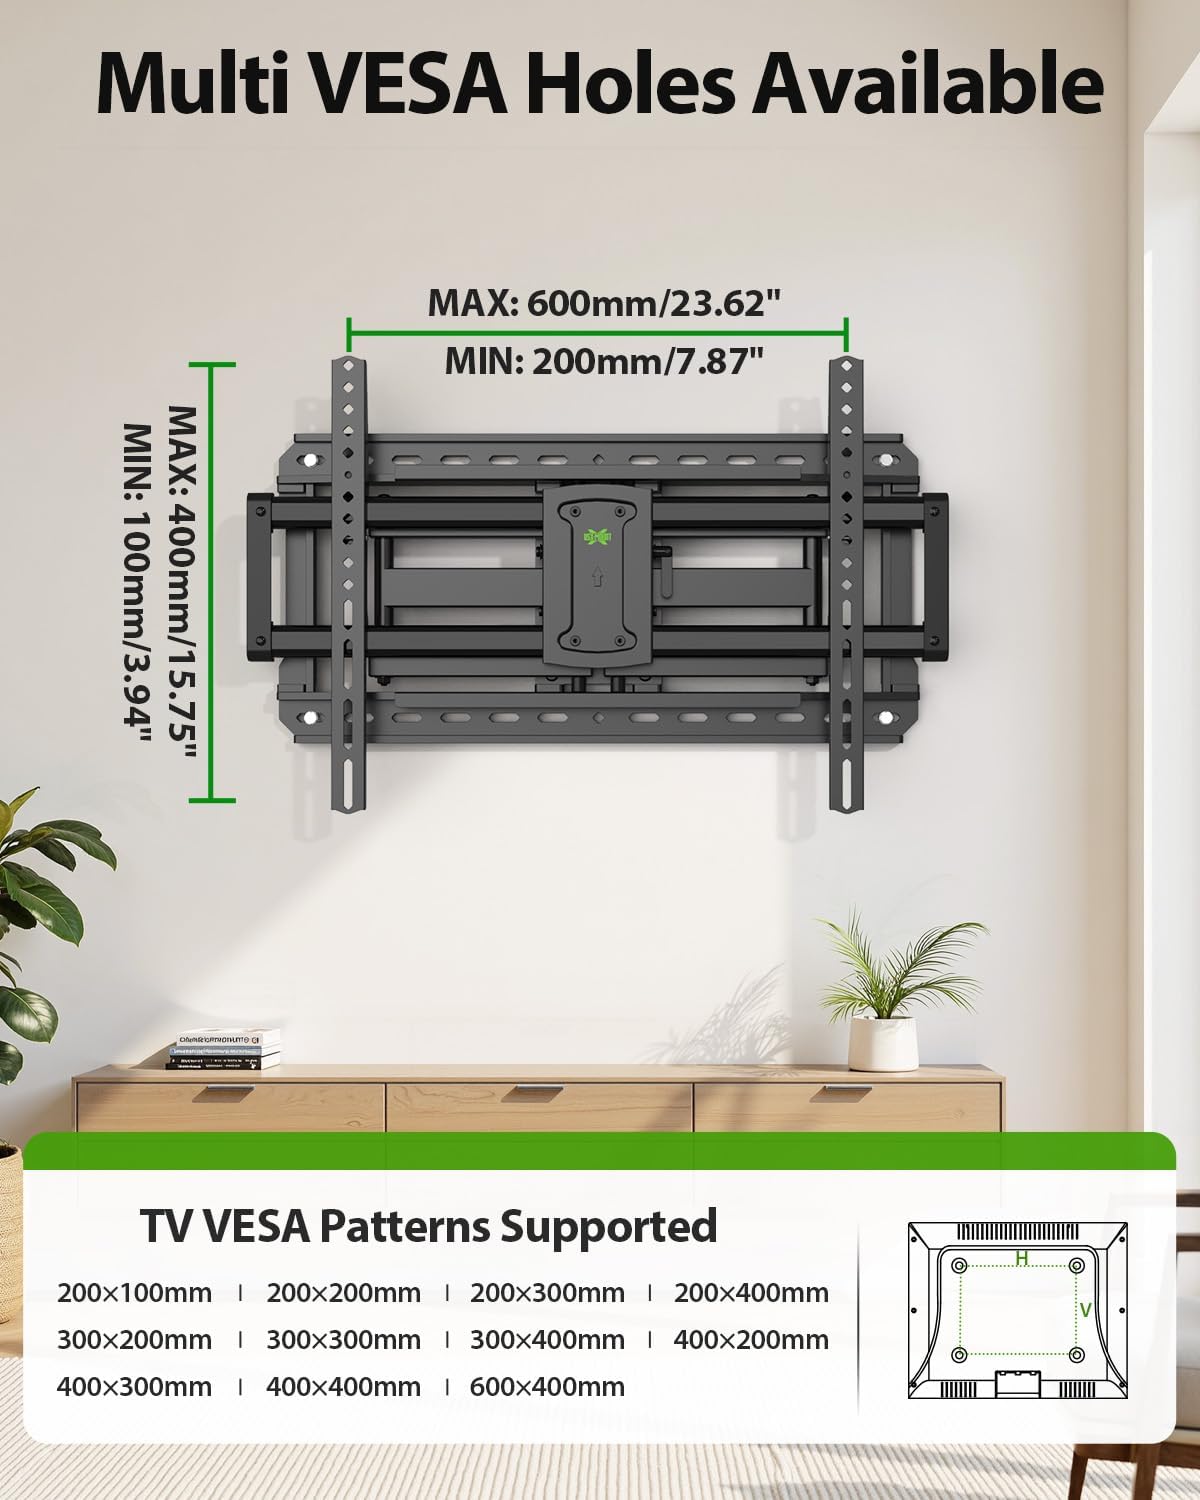
Image: Supported VESA patterns for TV attachment.
Video: This official product installation video demonstrates how to attach the brackets to your TV, ensuring proper screw selection and tightening.
Etap 2: Tache Plak Mi sou Mi
Determine your wall type (wood stud, solid concrete, or brick) and follow the corresponding instructions. Use the provided mounting template and bubble level to mark pilot hole locations accurately.
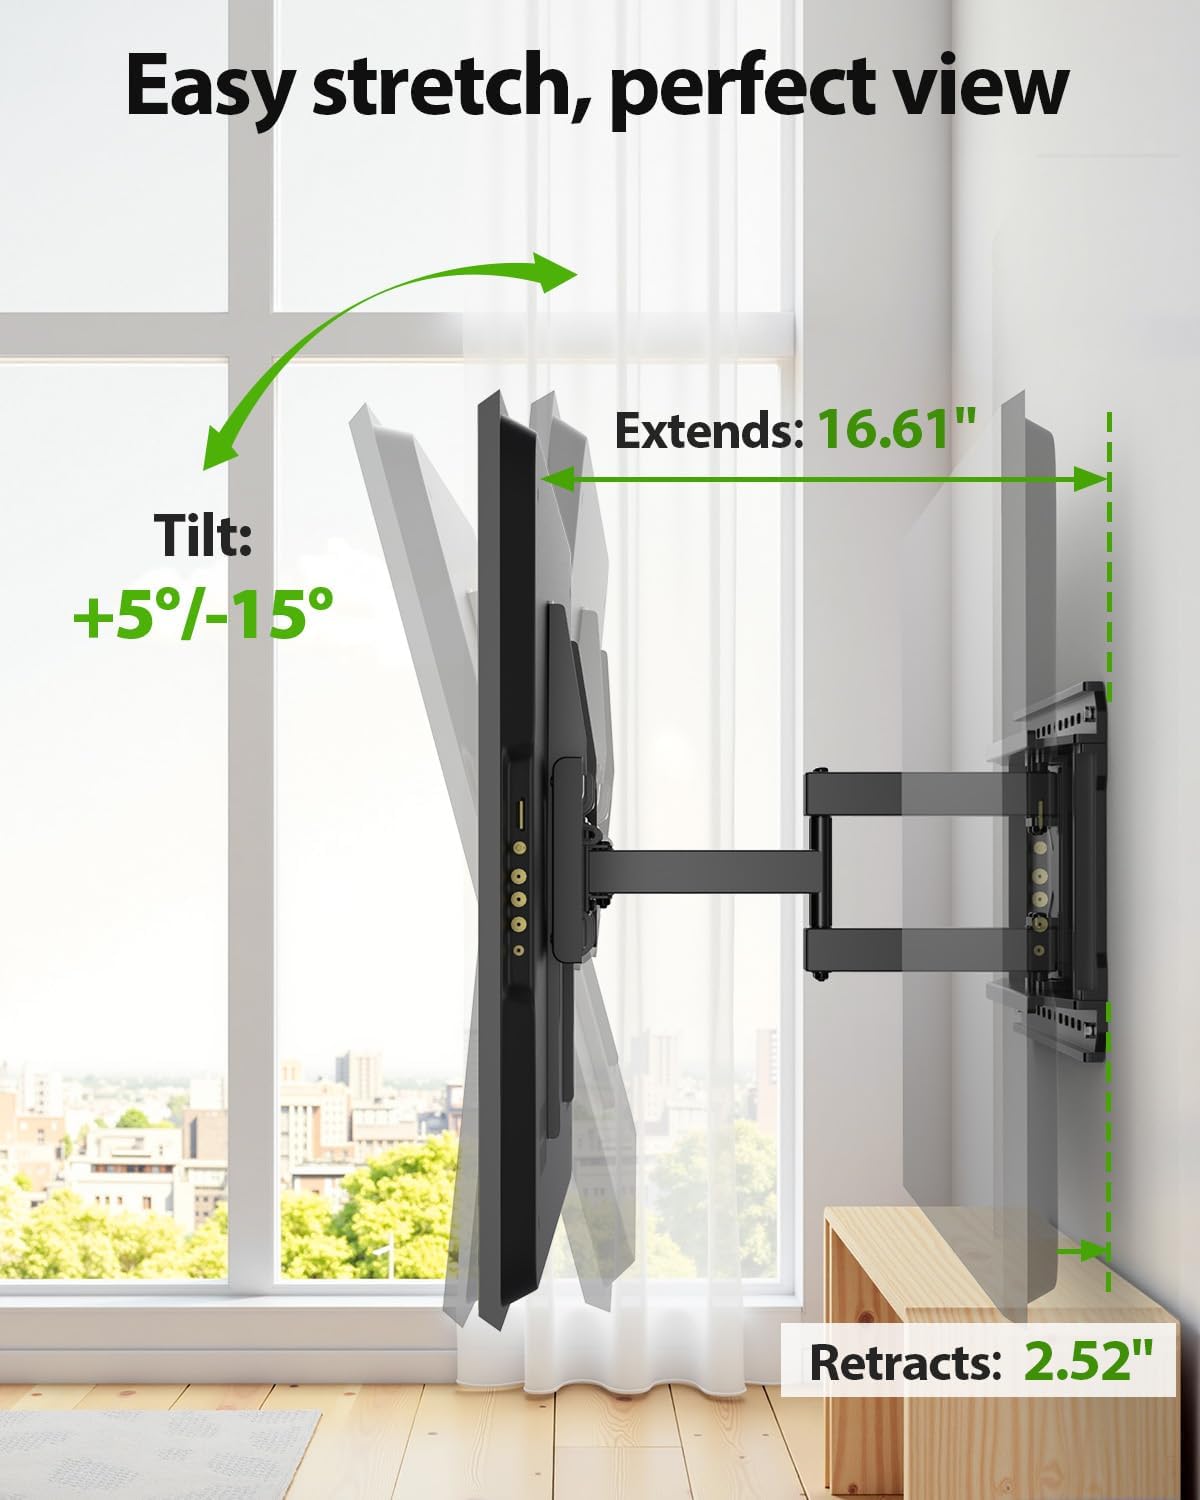
Image: Mounting options for different wall types (concrete, wood studs, brick).
2A. Wood Stud Installation
- Use a stud finder to locate the edges and center of your wood studs.
- Position the mounting template at your desired height, aligning the holes with your stud center line.
- Drill pilot holes using a 7/32 inch (5.5mm) diameter drill bit to a depth of 2.5 inches (64mm).
- Install the wall plate using four lag bolts. Tighten the lag bolts only until they are pulled firmly against the wall plate. Do not overtighten.
2B. Solid Concrete or Brick Wall Installation
- Position the mounting template at your desired height and mark the hole locations.
- Drill four pilot holes using a 3/8 inch (10mm) diameter masonry drill bit to a depth of 2.5 inches (64mm).
- Insert concrete anchors into the pilot holes.
- Install the wall plate using four lag bolts. Tighten the lag bolts only until they are pulled firmly against the wall plate. Do not overtighten.
Video: This official product installation video provides a visual guide for attaching the wall plate to both wood studs and concrete walls.
Step 3: Wall Plate Installation Integrity Test
After securing the wall plate, firmly pull on the mount to ensure it is tightly and securely fastened to the wall. This test helps confirm the stability of your installation.
Video: This official product installation video includes a demonstration of how to perform an integrity test on the installed wall plate.
Etap 4: Pandye epi byen fikse televizyon an sou plak miray la
Carefully lift the TV (with brackets attached) and hook it onto the wall plate. Ensure the TV is properly seated. Secure the TV to the wall plate by wrapping clips around the extension arms and tightening them using bolts.
Video: This official product installation video illustrates the process of hanging and securing your TV to the wall plate.
5. Operasyon
Your USX MOUNT Full Motion TV Wall Mount offers versatile adjustments for optimal viewing.
Ajisteman
- Ang baskil: Adjust the TV tilt from +5° to -15° to reduce glare and find the perfect vertical viewing angle. Loosen the tilting bolts, adjust, and then re-tighten.
- Angle pivotante: Swivel the TV up to ±45° left or right to view from different seating positions.
- Ajisteman nivelman: Correct any slight misalignments after installation with a ±4° leveling adjustment. This is typically done via screws on the TV plate.
- Ekstansyon ak Retrè: Extend the TV up to 16.61 inches (422mm) from the wall or retract it to a low profile of 2.52 inches (64mm).
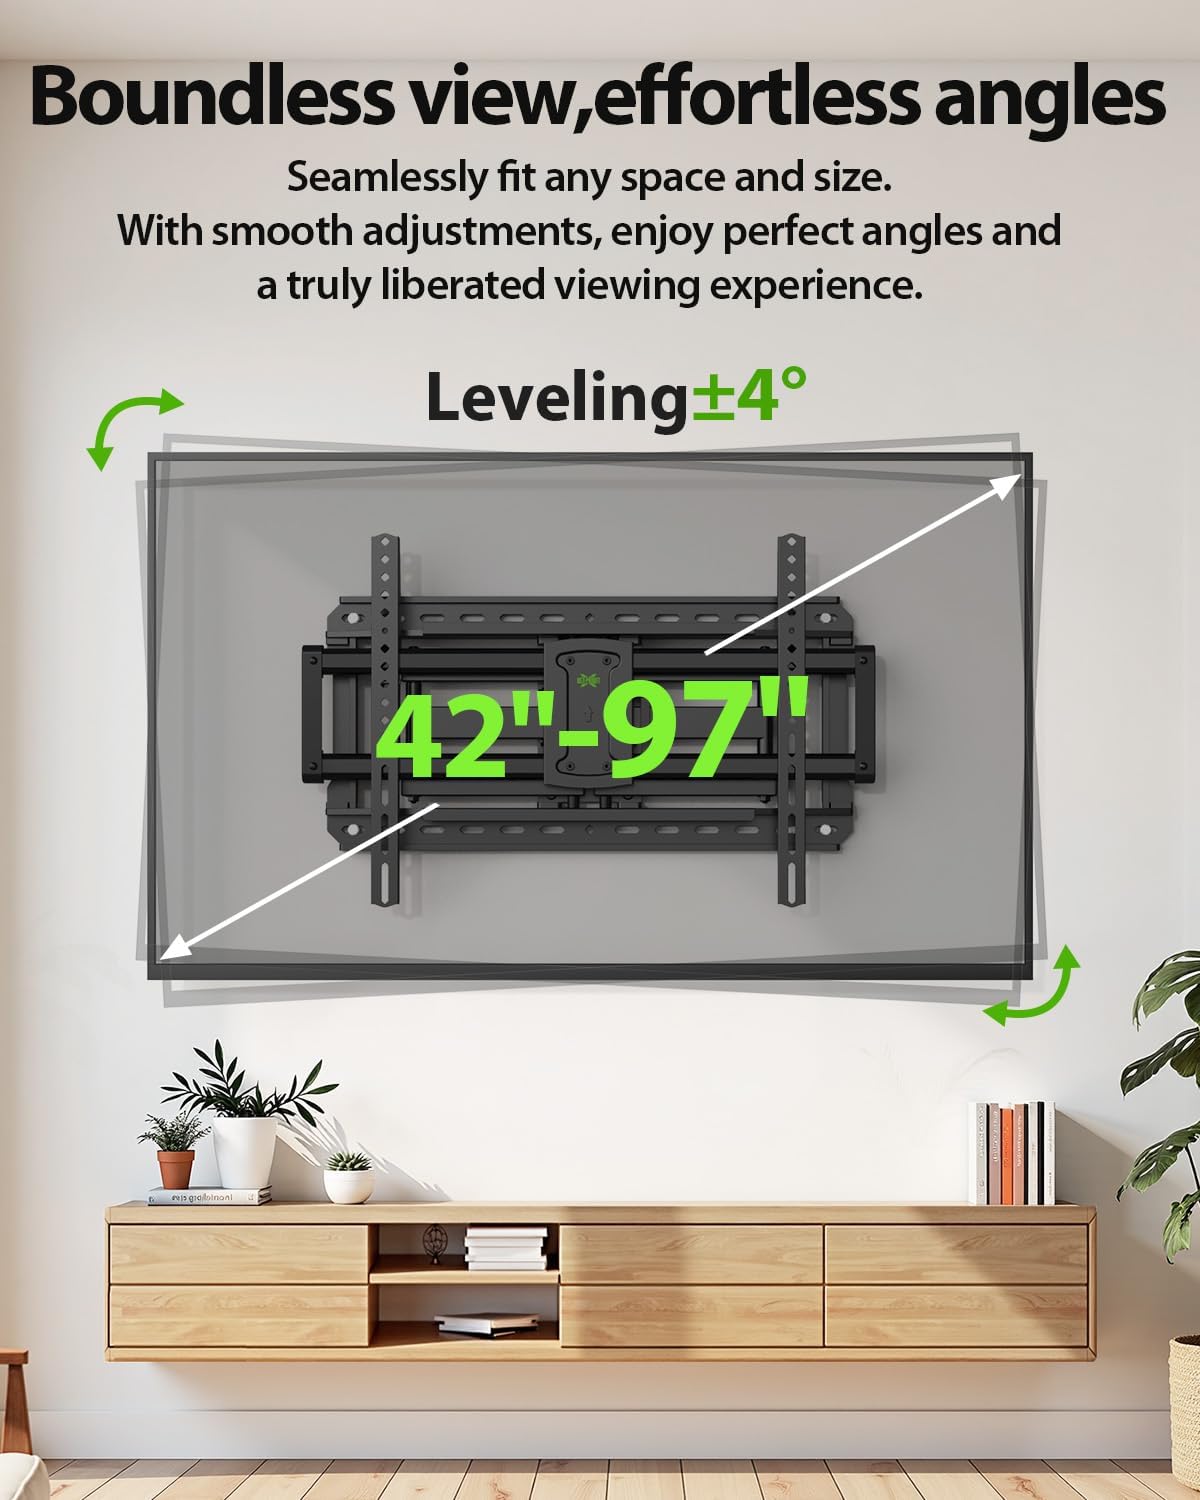
Image: Demonstrates the mount's extension, retraction, and tilt capabilities.
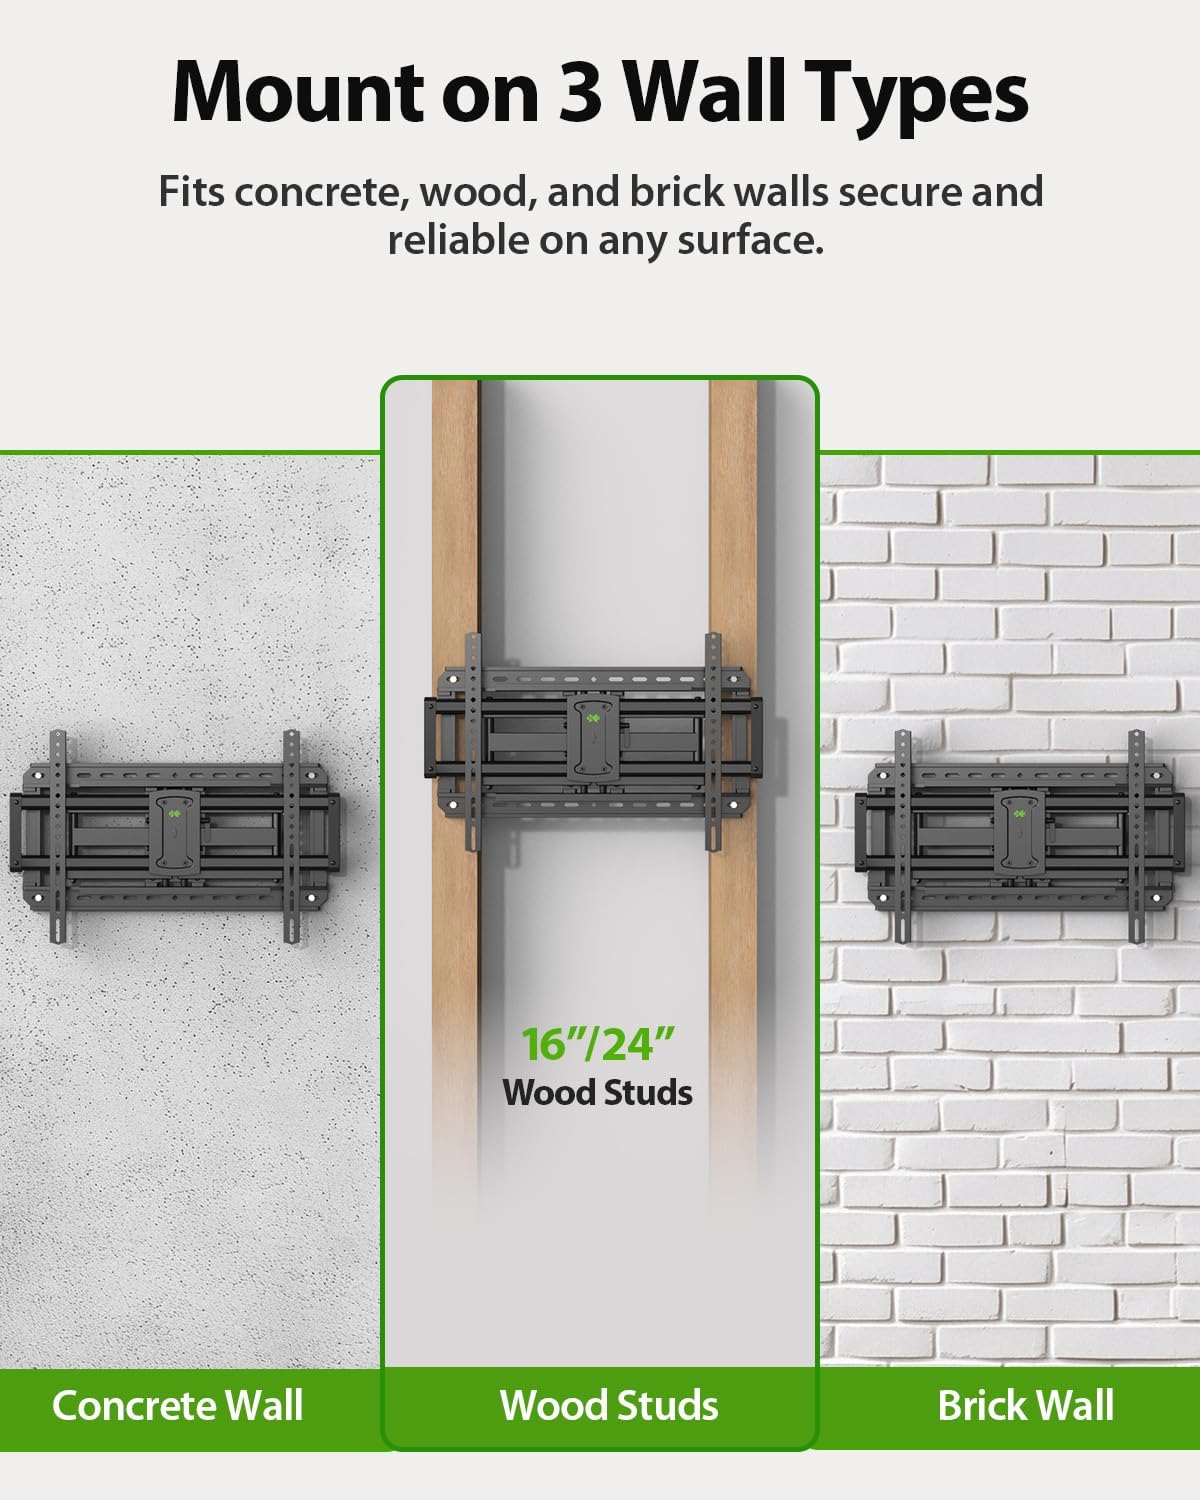
Image: Illustrates the TV mount's swivel function for flexible viewing.
Video: This seller-provided video offers a full explanation of the wall mount's motion capabilities, including tilt, swivel, and extension.
Video: A brief seller video tour demonstrating the wall mount's setup and various adjustments.
6. Antretyen
- Tcheke tout vis ak koneksyon yo detanzantan pou asire yo rete sere epi byen fèm.
- Netwaye montaj la avèk yon twal mou epi sèk. Evite pwodui netwayaj abrazif oswa solvan.
- If the mount's movement becomes stiff, apply a small amount of silicone-based lubricant to the pivot points.
- Use the included cable ties to manage TV cables neatly along the mount arms, preventing tangles and damage.
NAN. Depanaj
- Televizyon an pa nivo: Use the leveling adjustment screws on the TV plate to correct the horizontal alignment (±4°).
- Mòn nan santi l lach: Re-check all lag bolts securing the wall plate to the wall and all screws attaching the TV brackets to the TV. Ensure they are tightened firmly.
- Difikilte pou deplase televizyon an: Ensure no cables are obstructing the movement. Check pivot points for any debris or stiffness; apply lubricant if necessary.
- Pati ki manke: Refer to the parts list. If any parts are missing, contact USX MOUNT customer service.
8. Espesifikasyon
| Karakteristik | Spesifikasyon |
|---|---|
| Nimewo Modèl | XML925 |
| Konpatibilite Gwosè televizyon | 42-97 pous |
| Kapasite pwa | Jiska 150 liv (68 kg) |
| VESA konpatibilite | Min: 200x100mm, Max: 600x400mm |
| Panche Angle | +5 ° / -15 ° |
| Swivel Angle | ± 45° |
| Ajisteman nivelman | ± 4° |
| Ekstansyon soti nan miray la | 2.52 inches (64mm) to 16.61 inches (422mm) |
| Wall Stud Compatibility | 12", 16", 18", 24" wood studs |
| Materyèl | Alloy Steel |
| Koulè | Nwa |

Image: The mount's robust design supports TVs up to 150 lbs.
9. Garanti ak sipò
USX MOUNT products are manufactured with quality and customer satisfaction in mind. For specific warranty details, please refer to the product packaging or contact USX MOUNT customer service. If you encounter any issues or have questions regarding your TV mount, please reach out to our support team for assistance.
Contact information can typically be found on the product packaging or the official USX MOUNT websit.