1. Entwodiksyon
This manual provides essential instructions for the safe and efficient operation of your GROVIEW Mini Projector Bluetooth, Model Groview-B2D-US. Please read this manual thoroughly before using the projector and retain it for future reference.
Gro aview-B2D-US is a compact and portable projector featuring electric focus, Bluetooth 5.1 connectivity, and a fully sealed optical engine designed for reduced noise and extended lifespan. It supports Full HD 1080P input with a native 720P resolution and offers a digital zoom function.
2. Enfòmasyon sou Sekirite
- Pa gade dirèkteman nan lantiy pwojektè a lè l ap limen.amp se sou.
- Ensure proper ventilation around the projector to prevent overheating. Do not block ventilation openings.
- Sèvi sèlman ak adaptè kouran ki vini ak pwojektè a.
- Pa ekspoze pwojektè a anba lapli, imidite, oswa tanperati ekstrèm.
- Evite mete pwojektè a sou sifas ki pa estab.
- Pa eseye demonte oswa repare pwojektè a tèt ou. Kontakte pèsonèl sèvis kalifye pou asistans.
- Kenbe pwojektè a lwen timoun ak bèt kay.
3. Ki sa ki nan bwat la
Verifye ke tout atik yo prezan nan anbalaj la:
- 1 x Groview Electric Focus Projector
- 1 x HDMI kab
- 1 x pouvwa kòd
- 1 x kontwòl remote
- 1 x Manyèl Itilizatè (dokiman sa a)
4. Pwodwi souview
4.1 Konpozan Pwojektè yo
The following image illustrates the main components of the Groview Mini Projector.

4.2 Pò Antre / Sòti
The rear panel of the projector features various ports for connecting external devices.
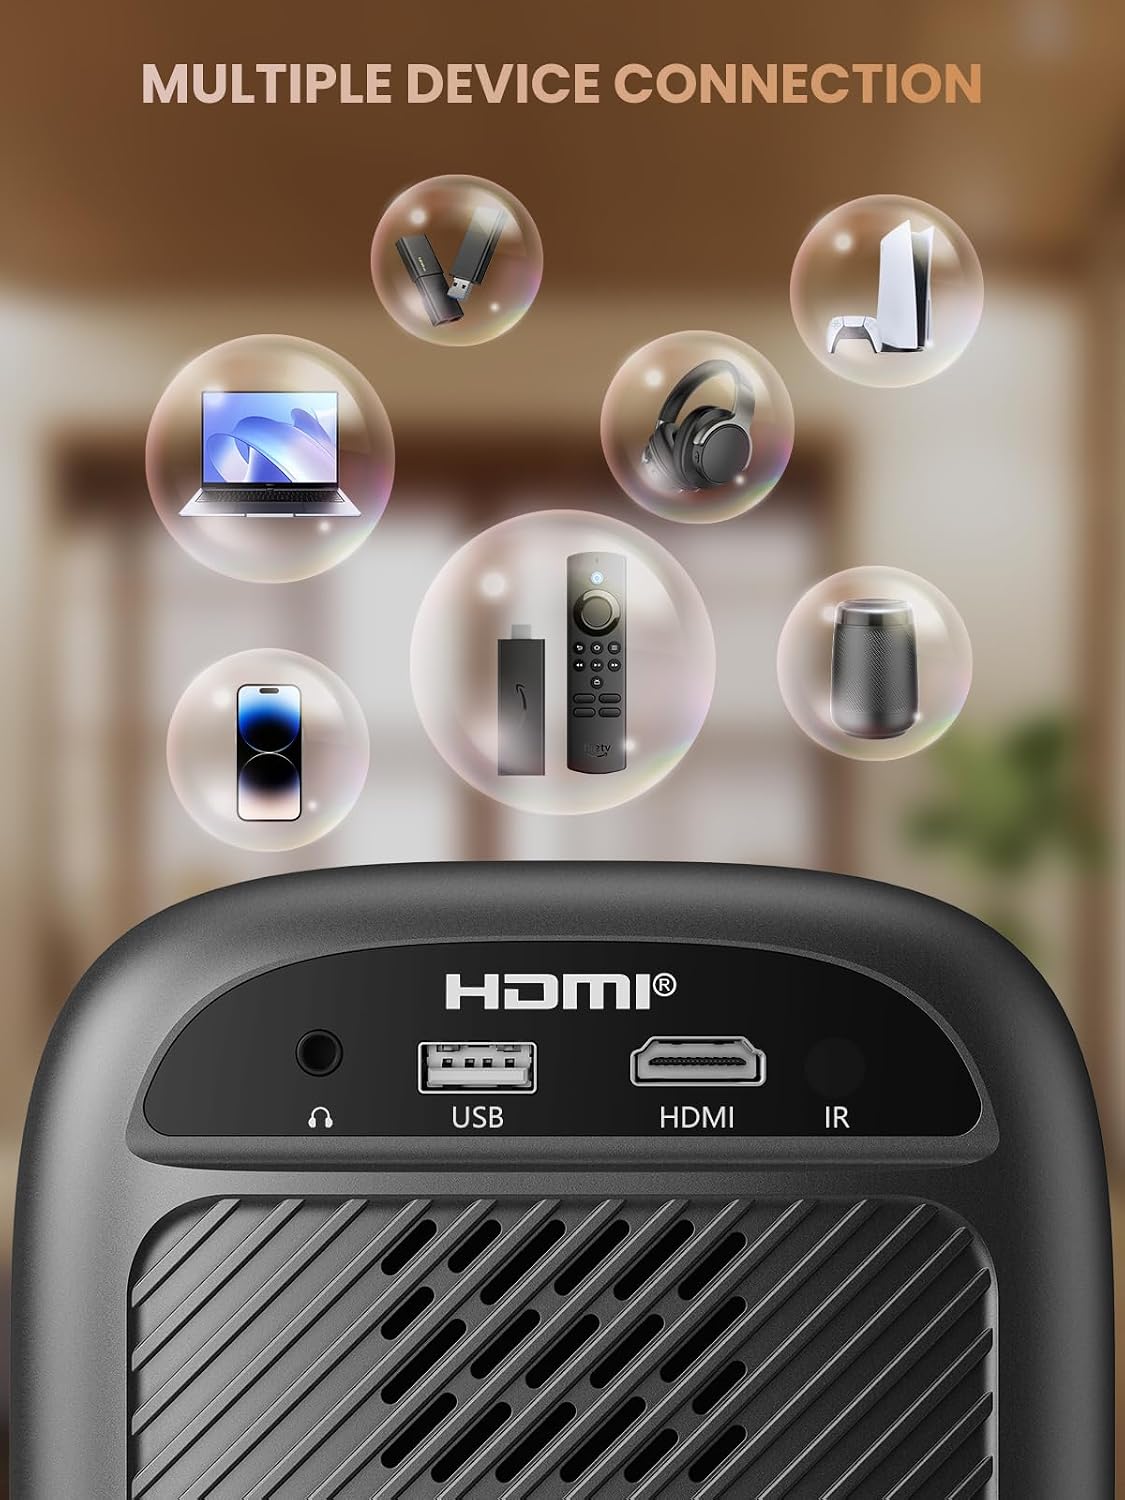
- HDMI Port: Connects to devices such as TV sticks, laptops, game consoles, and Blu-ray players.
- Pò USB: Connects to USB flash drives for media playback.
- Audio Port (3.5mm Jack): Konekte ak oratè ekstèn oswa kas ekoutè.
- IR Reseptè: Pou siyal kontwòl remote.
5. Enstalasyon
5.1 Koneksyon pouvwa
- Konekte kòd kouran an nan pò antre kouran pwojektè a.
- Ploge lòt bout kòd kouran an nan yon priz kouran.
5.2 Plasman Pwojektè
Place the projector on a stable, flat surface. For optimal image quality, position the projector perpendicular to the projection surface (wall or screen). The projector can create a large image from a relatively short distance.
5.3 Ajisteman Konsantre
Gro aview-B2D-US features electric focus, allowing for precise image clarity adjustment using the remote control.

- Limen pwojektè a.
- Point the remote control at the projector.
- Press the dedicated focus buttons (usually marked with 'F+' and 'F-' or similar icons) on the remote until the projected image is sharp and clear.
5.4 Koreksyon Keystone
The projector includes a keystone adjustment slider on the rear panel. This allows you to correct trapezoidal distortion if the projector is not perfectly aligned with the screen. Adjust the slider until the image appears rectangular.
5.5 Premye pouvwa sou
Press the power button on the projector or the remote control to turn on the device. The projector will boot up and display the main interface.
6. Operasyon Enstriksyon
6.1 Konekte Aparèy
Pwojektè a ofri plizyè opsyon koneksyon:
- HDMI: Connect an HDMI cable from your source device (e.g., TV Stick, laptop, game console) to the projector's HDMI port. Select the HDMI input source from the projector's menu.
- USB: Insert a USB flash drive into the USB port. The projector's media player will typically detect the drive automatically, allowing you to browse and play supported media files.
- Bluetooth 5.1: Connect to external Bluetooth speakers or headphones for enhanced audio.

- Enable Bluetooth on your external audio device and set it to pairing mode.
- Sou pwojektè a, ale nan meni paramèt Bluetooth la.
- Chwazi aparèy ou an nan lis aparèy ki disponib pou konekte.
Note: Bluetooth does not support smartphone mirroring.
6.2 Smartphone Connection Methods
To connect a smartphone, an adapter is required:

- Aparèy iOS: Use a Lightning to HDMI adapter cable.
- Aparèy Android: Use a Micro USB/Type C to HDMI adapter cable or a Google Chromecast.
6.3 Navigasyon ak Meni
Use the arrow buttons on the remote control to navigate through the projector's on-screen menu. The 'OK' or 'Enter' button confirms selections, and the 'Back' or 'Return' button goes back to the previous menu.
6.4 Fonksyon Zoom Dijital
The projector features a digital zoom function, allowing you to adjust the image size from 75% to 100% without moving the projector.

Access the zoom settings through the projector's menu and use the remote control to adjust the desired size.
6.5 Itilizasyon kontwòl Remote
The included remote control operates the projector's functions. Ensure batteries are correctly installed. Note: A coin may be needed to open the battery compartment.
7. Antretyen
7.1 Netwayaj
- Lantiy: Siye lantiy la dousman avèk yon twal mou ki pa gen pousyè, espesyalman fèt pou sifas optik. Pa sèvi ak pwodui netwayaj abrazif.
- Eksteryè: Siye deyò pwojektè a avèk yon twal mou epi sèk. Pou mak ki difisil pou retire, yon ti twal mouye.amp Ou ka itilize yon twal, epi apre sa, ou ka sèvi ak yon twal sèk.
7.2 Dust-proof Design
Gro aview-B2D-US features a fully sealed optical engine, which helps prevent dust and debris from entering the projector and affecting image quality or lifespan.

7.3 Depo
When not in use, store the projector in a cool, dry place, away from direct sunlight and extreme temperatures. Use the lens cap to protect the lens from dust and scratches.
NAN. Depanaj
- Pa gen imaj: Check power connection, input source selection, and ensure the lens cap is removed. Verify the connected device is powered on and outputting a signal.
- Imaj flou: Adjust the electric focus using the remote control. Ensure the projector is placed at an appropriate distance from the screen.
- Pa gen son: Check the volume settings on both the projector and the connected source device. If using Bluetooth, ensure the external audio device is properly paired and its volume is up.
- Kontwòl Remote pa travay: Tcheke pil yo nan kontwòl remote la epi asire w pa gen okenn obstak ant kontwòl remote la ak reseptè IR pwojektè a.
- Avètisman Surchof: Ensure ventilation openings are not blocked. Turn off the projector and allow it to cool down before restarting.
For further assistance, please contact Groview sipò pou kliyan.
9. Espesifikasyon
| Karakteristik | Spesifikasyon |
|---|---|
| Mak | Groview |
| Nimewo Modèl | Groview-B2D-US |
| Rezolisyon natif natal | 1280 x 720 piksèl |
| Rezolisyon sipòte | 1080P Full HD |
| Koneksyon Teknoloji | 3.5mm Jack, Bluetooth 5.1, HDMI, USB |
| Karakteristik espesyal | Electric Focus, Fully Sealed Optical Engine, Mini size & Lightweight, 150" Display, Digital Zoom (75%-100%) |
| Itilizasyon Rekòmande | Andedan kay la / Deyò |
| Pwa atik | 2.99 liv |
| Dimansyon pwodwi | 4.8 x 5.7 x 6.9 pous |
| Koulè | Gri |
10. Garanti ak sipò
Groview products are designed for reliability and performance. For information regarding warranty coverage and customer support, please refer to the warranty card included with your purchase or visit the official Groview website. Our service team is available to assist with any product-related inquiries.