1. Entwodiksyon
Thank you for choosing the Weytoll 16.8V Cordless Mini Angle Grinder. This manual provides essential information for the safe and efficient operation, maintenance, and troubleshooting of your new tool. Please read this manual thoroughly before first use and keep it for future reference.
This mini angle grinder is designed for various applications including cutting, grinding, and polishing tasks on materials such as tiles, metal, and wood. Its cordless design offers flexibility and convenience for both indoor and outdoor projects.
2. Enstriksyon Sekirite
AVÈTISMAN: Li tout avètisman sekirite, enstriksyon, ilistrasyon, ak espesifikasyon yo bay zouti elektrik sa a. Si w pa swiv tout enstriksyon ki endike anba la yo, sa ka lakòz chòk elektrik, dife, ak/oswa blesi grav.
2.1 Avètisman jeneral sou sekirite zouti elektrik
- Sekirite Zòn Travay: Kenbe zòn travay la pwòp epi byen limen. Zòn ki dezòdone oswa ki fè nwa yo ka lakòz aksidan. Pa sèvi ak zouti elektrik nan atmosfè eksplozif, tankou lè gen likid, gaz oswa pousyè ki ka pran dife.
- Sekirite elektrik: Evite kontak kò a ak sifas ki gen tè oswa ki gen tè tankou tiyo, radyatè, ranje, ak frijidè. Gen yon risk ogmante nan chòk elektrik si kò ou gen tè oswa tè.
- Sekirite Pèsonèl: Always wear eye protection. Use personal protective equipment such as dust masks, non-skid safety shoes, hard hats, or hearing protection when appropriate.
- Itilizasyon zouti ak swen: Pa fòse zouti elektrik la. Sèvi ak zouti elektrik ki kòrèk la pou aplikasyon w lan. Zouti elektrik ki kòrèk la pral fè travay la pi byen ak pi an sekirite nan pousantaj pou li te fèt la.
- Itilizasyon ak swen zouti batri: Rechaje sèlman ak plato a espesifye pa manifakti a. Yon plato ki apwopriye pou yon kalite pake batri ka kreye yon risk dife lè yo itilize ak yon lòt pake batri.
2.2 Avètisman Sekirite Espesifik pou Moulen Angilè
- Zouti elektrik sa a gen entansyon fonksyone kòm yon moulen, sander, bwòs fil, oswa zouti koupe. Li tout avètisman sekirite, enstriksyon, ilistrasyon, ak espesifikasyon yo bay zouti elektrik sa a.
- Pa sèvi ak Pwodwi pou Telefòn ki pa espesyalman fèt ak rekòmande pa manifakti zouti a. Jis paske akseswar a ka tache ak zouti pouvwa ou, li pa asire operasyon an sekirite.
- Vitès rated akseswar a dwe omwen egal a vitès maksimòm ki make sou zouti elektrik la. Pwodwi pou Telefòn kouri pi vit pase vitès rated yo ka kraze ak vole apa.
- Always ensure the protective guard is properly installed and adjusted for maximum safety during operation. The thickened baffle design reduces debris splash.
- Hold the tool firmly with both hands during operation. A loss of control can result in personal injury.
3. Pake kontni
Carefully unpack all items and check against the list below. If any items are missing or damaged, please contact your retailer.
- 1 x Weytoll Mini Angle Grinder
- 2 x 16.8V 2.0Ah Pil ityòm-ion
- 1 x batri Charger
- 1 x Grinding Blade (Cutting Disc)
- 1 x tournevis
- 1 x Pè Gan
- 6 x Saw Blades (various types)
- 1 x Manyèl Itilizatè (dokiman sa a)
4. Pwodwi souview
Familiarize yourself with the components of your Weytoll Mini Angle Grinder before operation.
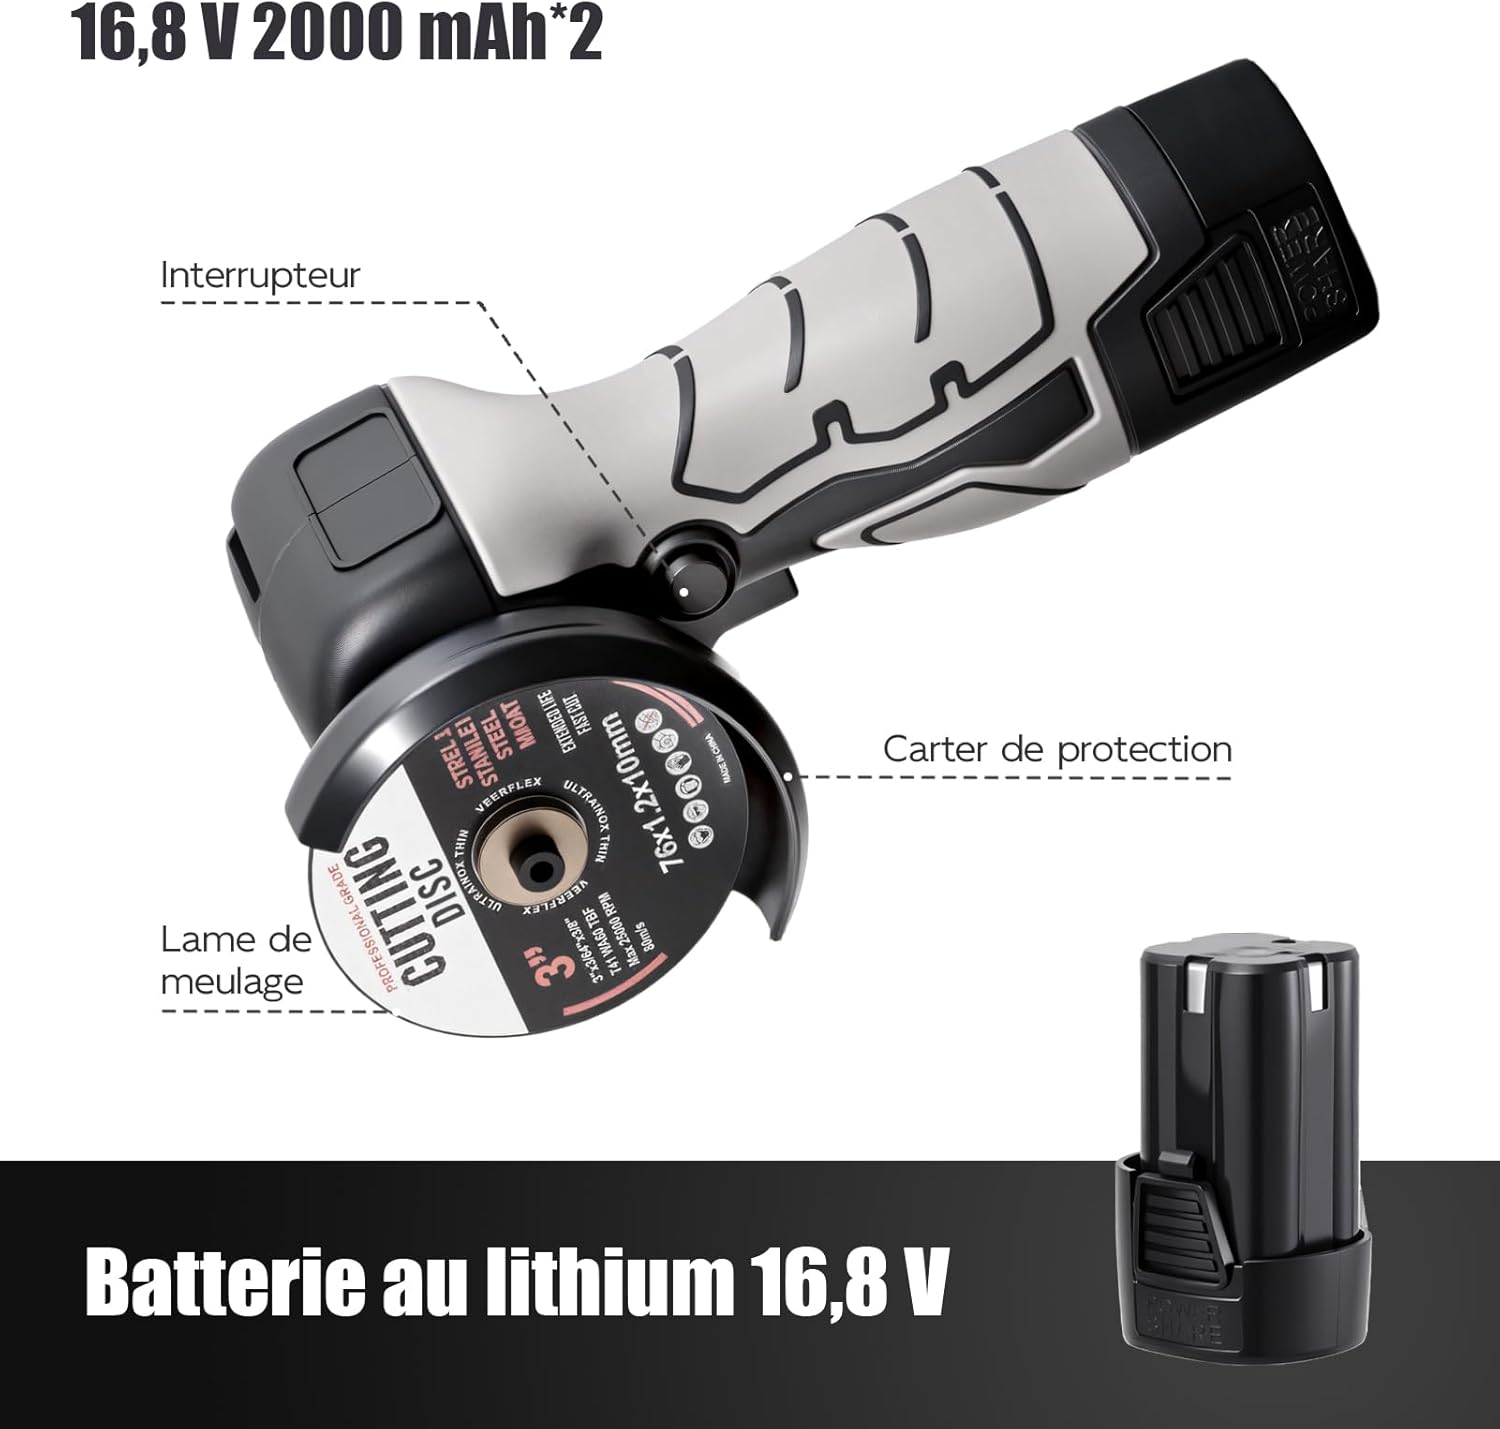
Figi 4.1: Main components of the Weytoll Mini Angle Grinder. Key parts include the power switch, protective guard, grinding blade, and the detachable 16.8V lithium battery.
- Chanje: Activates and deactivates the grinder.
- Gad pwoteksyon: Shields the user from sparks and debris. Always ensure it is correctly positioned.
- Grinding Blade/Cutting Disc: The abrasive disc used for cutting or grinding materials.
- 16.8V Lithium Battery: Provides power to the cordless grinder.
- Bouton Lock Spindle: Used to lock the spindle for easy disc changes.
5. Enstalasyon
5.1 Chaje batri a
The batteries are not fully charged upon delivery. Fully charge the batteries before first use.
- Konekte plato a nan yon priz kouran apwopriye.
- Mete pil ityòm-ion 16.8V la nan plato a.
- Allow the battery to charge until the indicator light on the charger shows a full charge (refer to charger manual for specific indicator details).
- Once charged, disconnect the battery from the charger and unplug the charger from the power outlet.
NOTE: The charger may have a US plug. An adapter for European outlets may be required (not included).
5.2 Installing/Changing the Cutting Disc
Always ensure the tool is switched off and the battery is removed before installing or changing any accessories.

Figi 5.1: Easy assembly steps for installing a cutting disc.
- Press the Spindle Lock Button: Locate and press the spindle lock button to prevent the spindle from rotating.
- Rotate the Inner Flange: While holding the spindle lock, use the provided screwdriver or wrench to rotate the inner flange until it loosens.
- Remove the Inner Flange: Unscrew and remove the inner flange.
- Insert the Wheel: Place the desired cutting or grinding wheel onto the spindle, ensuring it sits correctly on the outer flange.
- Install the Outer Flange: Place the outer flange back onto the spindle, securing the wheel.
- Tighten the Outer Flange: While pressing the spindle lock button, use the screwdriver or wrench to firmly tighten the outer flange.
- Release the Spindle Lock: Release the spindle lock button. Ensure the disc is securely fastened and rotates freely without wobbling.

Figi 5.2: Always use the correct type and size of cutting disc. Figure 1 illustrates the recommended disc type, while Figure 2 shows an unsuitable disc. Ensure the disc's maximum RPM rating meets or exceeds the grinder's 7000 RPM.
IMPORTANT: Only use cutting discs that are compatible with the grinder's specifications (70mm maximum diameter, 10mm joint diameter, and rated for at least 7000 RPM). Using incorrect discs can lead to serious injury or tool damage.
6. Operasyon Enstriksyon
6.1 Operasyon Jeneral
- Mete batri: Ensure the battery is fully charged and securely inserted into the grinder.
- An sekirite pou pyès travay la: Toujou byen sere pyès ki nan travay la pou anpeche l deplase pandan w ap travay la.
- Kenbe zouti a: Hold the grinder firmly with one hand, utilizing the ergonomic design for comfortable and secure handling.
- Kòmanse Zouti a: Press the side switch to turn on the grinder. Allow the disc to reach full speed before contacting the workpiece.
- Kòmanse Travay: Apply light, consistent pressure. Let the tool do the work. Avoid excessive force, which can cause kickback or damage the disc/tool.
- Etenn: Release the side switch to turn off the grinder. Wait for the disc to stop completely before setting the tool down.
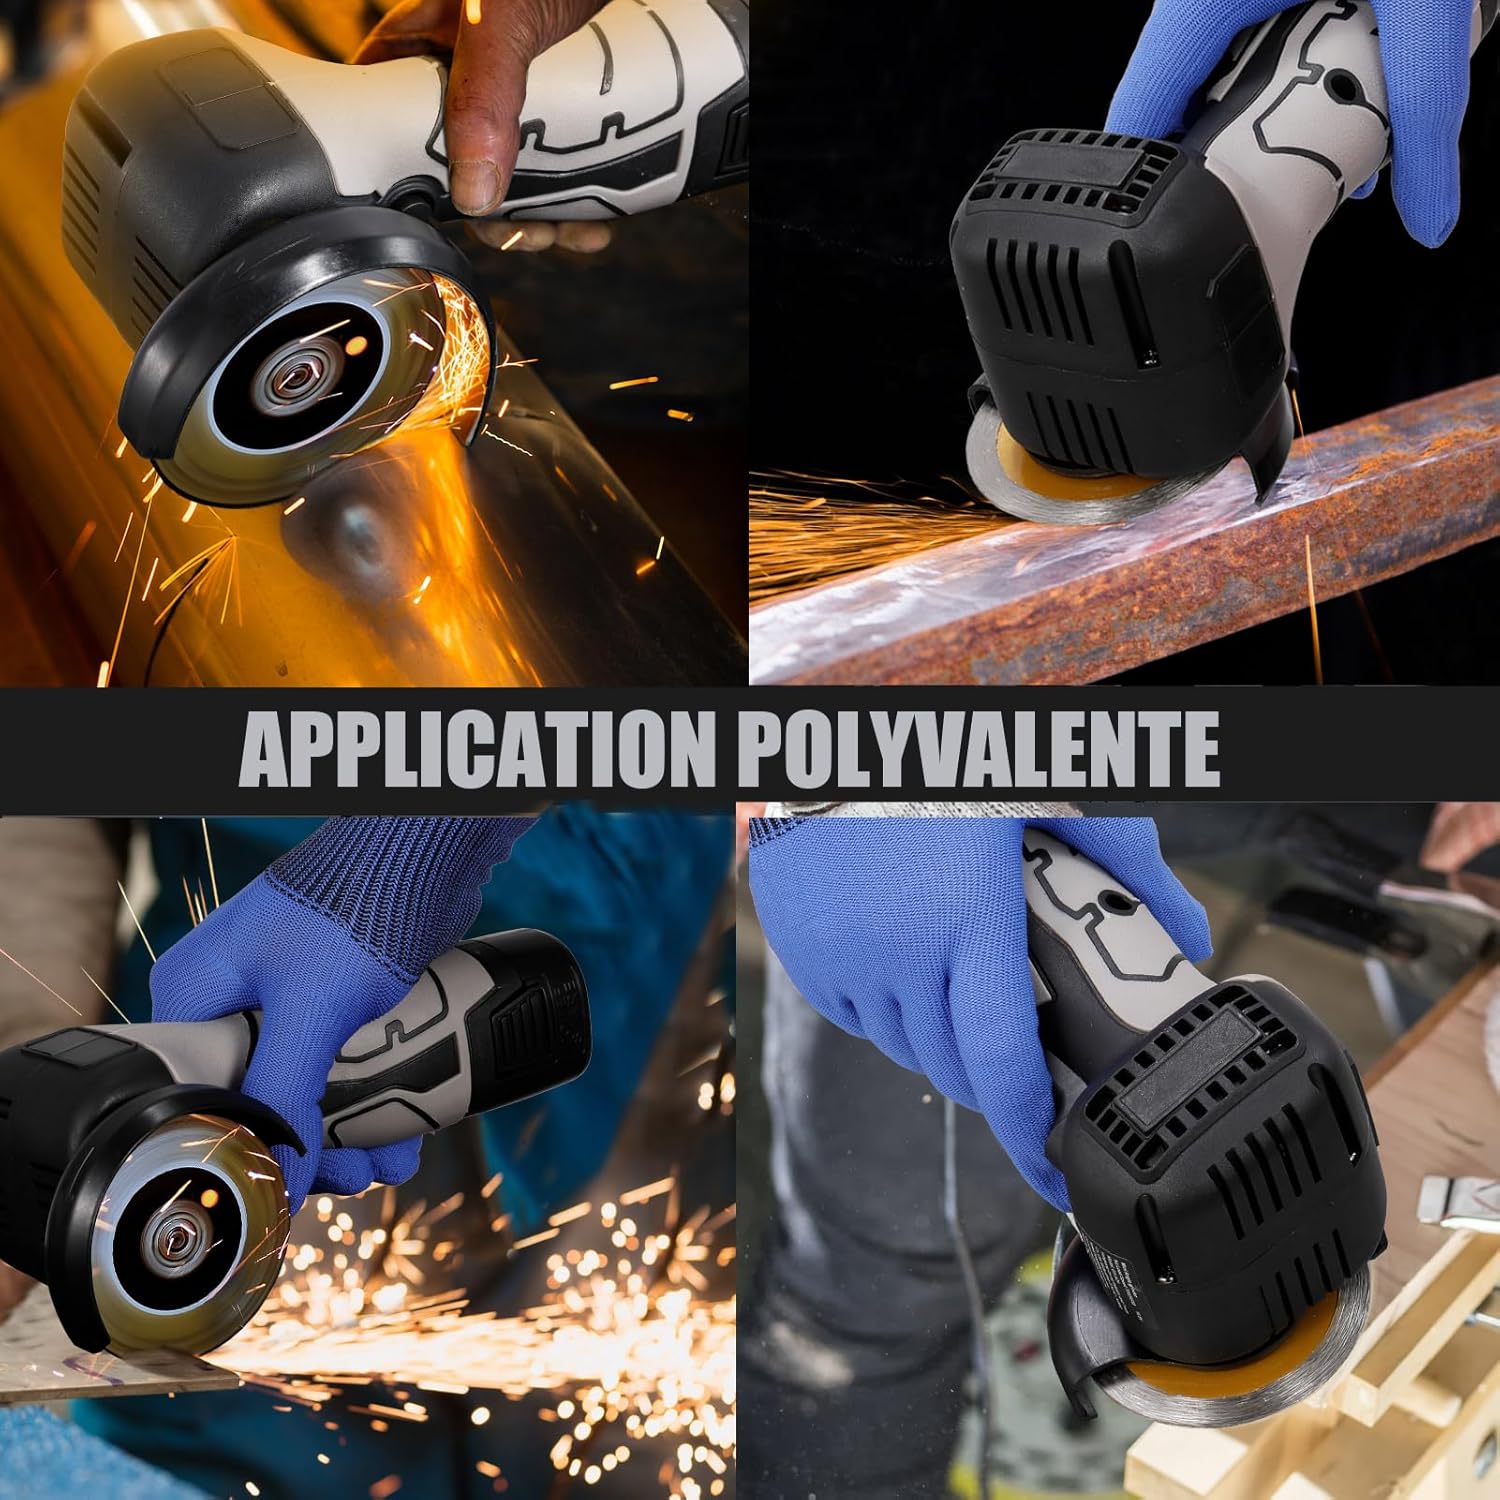
Figi 6.1: Versatile applications of the angle grinder, including cutting and grinding on different materials.

Figi 6.2: The grinder is suitable for both indoor and outdoor tasks, such as grinding wood and cutting metal.
6.2 Cutting Operations
- Use appropriate cutting discs for the material (e.g., metal, tile, PVC pipe).
- Hold the grinder at a slight angle (15-30 degrees) to the workpiece for optimal cutting.
- Do not apply side pressure to the cutting disc, as this can cause it to bind, break, or kickback.
- Allow the disc to cool periodically during long cuts.
6.3 Grinding and Polishing Operations
- Use appropriate grinding or polishing accessories.
- Maintain a shallow angle (5-15 degrees) between the disc and the workpiece for grinding.
- Move the grinder smoothly and consistently across the surface to achieve an even finish.
- For polishing, use specialized polishing pads and compounds.
7. Antretyen
Regular maintenance ensures the longevity and safe operation of your tool. Always disconnect the battery before performing any maintenance.
7.1 Netwayaj
- After each use, clean the tool with a soft, dry cloth.
- Retire tout pousyè oswa debri ki nan ouvèti vantilasyon yo pou anpeche yo chofe twòp.
- Pa sèvi ak dlo oswa pwodui chimik pou netwaye.
7.2 Disc Inspection
- Regularly inspect cutting and grinding discs for wear, cracks, or damage.
- Replace worn or damaged discs immediately. Never use a damaged disc.
7.3 Swen Batri
- Sere pil yo nan yon kote ki fre, sèk, lwen limyè solèy la dirèk ak tanperati ekstrèm.
- Pa sere pil ki fin dechaje nèt pou yon bon bout tan. Chaje yo detanzantan si w pa ap itilize yo.
- If a battery appears damaged or does not hold a charge, discontinue use and dispose of it properly according to local regulations.
7.4 Depo
- Store the grinder and its accessories in a clean, dry, and secure location, out of reach of children.
- Remove the battery from the tool before storage.
NAN. Depanaj
If you encounter issues with your angle grinder, refer to the table below for common problems and solutions.
| Pwoblèm | Kòz posib | Solisyon |
|---|---|---|
| Moulen an pa kòmanse. | Batri a pa byen mete oswa li dechaje. | Asire w ke batri a byen antre. Chaje batri a. |
| Moulen an sispann pandan l ap travay. | Pwoteksyon sou surchaj aktive; batri a fèb. | Reduce pressure on the tool. Charge or replace the battery. Allow tool to cool if overheated. |
| Twòp vibrasyon oswa bri. | Damaged or improperly installed disc; loose components. | Inspect and replace damaged disc. Ensure disc is correctly installed and tightened. Check for loose parts. |
| Pòv pèfòmans koupe/broyaj. | Disk ki ize oswa ki pa kòrèk; puisans ensifizan. | Replace with a new, appropriate disc. Ensure battery is fully charged. |
Si pwoblèm nan pèsiste apre ou fin eseye solisyon sa yo, tanpri kontakte sèvis kliyan.
9. Espesifikasyon
Detailed technical specifications for the Weytoll Mini Angle Grinder WT7000-168.
| Nimewo Modèl | WT7000-168 |
| Mak | Weytoll |
| Rated Voltage | 16.8 Volts |
| Vitès Rated | 7000 RPM |
| Kalite batri | Lityòm-ion |
| Kapasite batri | 2000 mAh (2.0 Ah) |
| Max Grinding Wheel Diameter | 70 mm |
| Joint Diameter | 10 mm |
| Tanperati chaje | 0 ℃ ~ 45 ℃ (32 °F ~ 113 °F) |
| Opere / Depo Tanperati | -20 ℃ ~ 50 °C (-4 °F ~ 122 °F) |
| Dimansyon pwodwi (L x W x H) | 21.2 x 11 x 7.5 cm (8.34 x 4.33 x 2.95 pous) |
| Pwa atik | 0.73 kg (1.61 liv) |
| Materyèl | ABS, Acrylonitrile Butadiene Styrene Rubber |
| Sous pouvwa | Batri Powered |
| Koulè | Nwa |

Figi 9.1: Key specifications at a glance.
10. Garanti ak sipò
No specific warranty information is provided in the product details. For warranty claims or technical support, please contact your retailer or the manufacturer directly with your purchase details.
Please retain your proof of purchase for any warranty or service inquiries.