1. Entwodiksyon
This manual provides detailed instructions for the installation, operation, and maintenance of the Generic XM-18D Full Automatic Egg Incubator Controller. This device is designed to precisely manage temperature and humidity within an egg incubator, ensuring optimal conditions for successful incubation. Please read this manual thoroughly before use to ensure correct operation and to prevent damage to the unit or injury.
2. Enfòmasyon sou Sekirite
- Asire vol opere atage (AC 180V~240V, 50HZ) matches your power supply.
- Do not expose the controller to direct water or excessive humidity (relative humidity should be less than 85%).
- Avoid operating the device in ambient temperatures outside the -20℃ to 70℃ range.
- All wiring should be performed by a qualified individual to prevent electrical hazards.
- Kenbe soti nan atenn timoun yo.
- Dekonekte kouran an anvan ou fè nenpòt antretyen oswa netwayaj.
3. Pake kontni
Verifye ke tout atik yo prezan nan pakè a:
- 1 x XM-18D Incubator Controller Thermostat Hygrometer
- 1 x Capteur Tanperati
- 1 x Humidity Sensor
4. Pwodwi souview
The XM-18D controller features a digital display for real-time monitoring and control of incubation parameters. It includes multiple output lines for various incubator functions.

Figi 4.1: Devan view of the XM-18D Incubator Controller. This image displays the main unit with its digital readouts and control buttons.

Figi 4.2: Labeled front panel of the XM-18D controller. Key components include the humidity display, temperature display, SET switch, fan switch, light switch, SET key, Enter button, work lights, and +/- buttons.
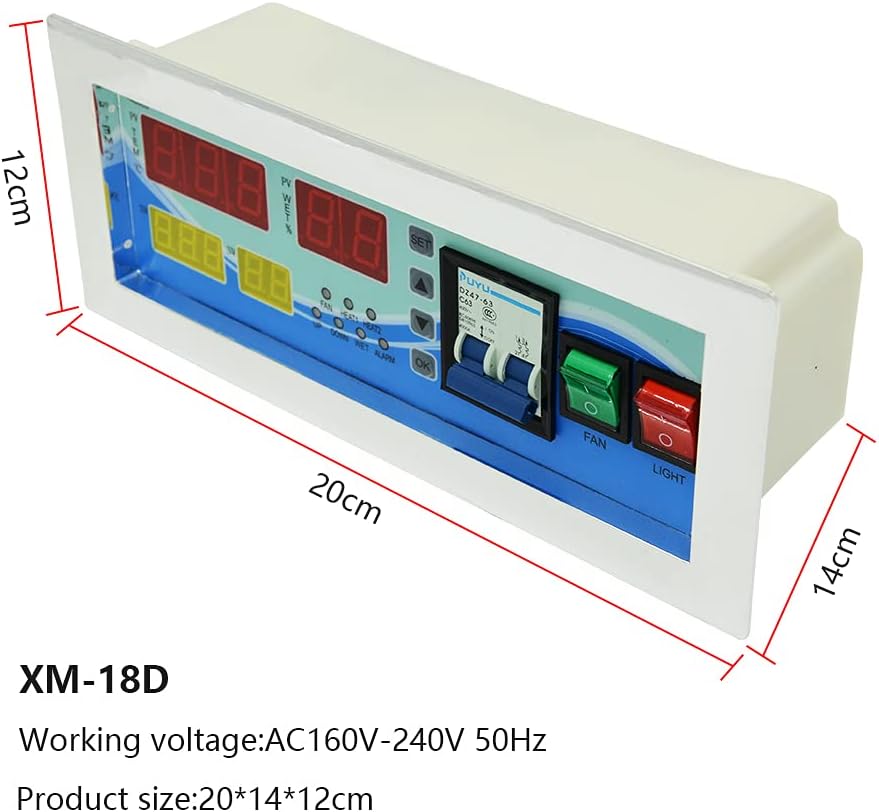
Figi 4.3: Dimensions of the XM-18D controller. The unit measures approximately 20cm in length, 14cm in width, and 12cm in height.

Figi 4.4: Key features of the XM-18D controller. It offers real-time measurement and control of temperature and humidity, along with button touch operation for simple and convenient use.

Figi 4.5: Internal components highlighting the high-quality circuit and microcomputer chip. These ensure stable performance, accurate control, and strong anti-interference capabilities.
5. Enstalasyon
Before operating the XM-18D controller, ensure all necessary connections are made correctly. Refer to the wiring diagram and the video for visual guidance.
5.1 Koneksyon Capteur
Connect the humidity sensor and temperature sensor to their designated terminals on the controller's back panel.

Figi 5.1: Detailed wiring diagram for the XM-18D controller. This diagram illustrates connections for the lamp bulb, uniform temperature, heaters, humidifier, egg turning motor, and ventilating fan, along with the power line, humidity sensor, and temperature sensor connections.
Videyo 5.1: This video demonstrates the correct connection of the power cable, humidity sensor, and temperature sensor to the XM-18D controller. It also shows the initial power-on sequence and basic display functions.
- Locate the terminals for the Humidity Sensor and Temperature Sensor on the back of the controller.
- Carefully connect the wires from the Humidity Sensor to the corresponding terminals.
- Connect the wires from the Temperature Sensor to its designated terminals.
5.2 Koneksyon pouvwa
Connect the power cable to the controller and then to a suitable power outlet.
- Connect the power cable to the main power input terminals (L and N) on the controller.
- Plug the power cable into an AC 180V~240V, 50HZ power source.
5.3 Koneksyon Sòti
Connect the various incubator components (heaters, fan, humidifier, egg turning motor, light) to their respective output terminals as indicated in the wiring diagram (Figure 5.1).
- Connect primary and auxiliary heaters to the HEATI and HEAT2 terminals.
- Connect the exhaust fan to the appropriate fan terminal.
- Connect the egg turning motor to the LEFT and RIGHT terminals.
- Connect the humidifier to the WET terminal.
- Connect the incubator light to the LIGHT terminal.
6. Operasyon Enstriksyon
The XM-18D controller is designed for user-friendly operation. Follow these steps to configure and monitor your incubator.
6.1 Power On and Initial Display
- After all connections are secure, turn on the main power switch on the controller.
- The digital displays will illuminate, showing current temperature (PV TEM) and humidity (PV WET%). The set temperature (SV TEM) and set humidity (SV WET%) will also be displayed.
- If an alarm sounds, manually dismiss it by pressing the "Cancel Alarm" button.
6.2 Setting Temperature and Humidity
To adjust the desired temperature and humidity settings:
- Peze a SET button to enter the setting mode. The temperature setting value will flash.
- Sèvi ak la UP epi DESANN arrow buttons to adjust the desired temperature.
- Peze SET again to move to the humidity setting. The humidity setting value will flash.
- Sèvi ak la UP epi DESANN arrow buttons to adjust the desired humidity.
- Peze OK or SET to confirm and save the settings.
6.3 Egg Turning Settings
The controller supports automatic egg turning. Refer to the manual's detailed parameters for specific timing adjustments.
- Peze a Vire ze button to manually initiate an egg turn or to access egg turning settings (if applicable).
- The egg rotation cycle and period can be adjusted in the advanced settings (refer to the full technical specifications for parameter codes).
6.4 Fan and Light Control
The controller provides dedicated switches for the fan and internal light.
- Sèvi ak la FANATIK switch to turn the incubator's internal fan on or off.
- Sèvi ak la LIMYÈ switch to control the internal light of the incubator.
7. Espesifikasyon
| Karakteristik | Valè |
|---|---|
| Modèl No. | XM-18D |
| Dimansyon | 30 x 12 x 7.5 cm (11.81 x 4.72 x 2.95 pous) |
| Pwa | 0.95 kg (2.64 liv) |
| Tanperati Display Range | 0 ~ 40.5 ° C |
| Tanperati Mezi Presizyon | ±0.1°C |
| Ranje ekspozisyon imidite | 0 ~ 99% RH |
| Humidity Control Accuracy | ± 3% RH |
| Liy Sòti | 6 lines (primary heating, auxiliary heating, exhaust, turn left, turn right, moisten) |
| Sòti aktyèl | Primary and auxiliary heating 30A, other outputs 10A |
| Egg Rotation Time (Max) | 999 fwa |
| Egg Rotation Cycle (Default) | 0~999 minutes (90 minutes) |
| Egg Rotation Period (Default) | 0~999 seconds (180 seconds) |
| Air Exchange Cycle (Default) | 0~999 minutes (120 minutes) |
| Air Exchange Period (Default) | 0~999 seconds (15 seconds) |
| Measuring Line Length | Apeprè. 1.5 mèt |
| Opere Voltage | AC 180V~240V, 50HZ |
| Relative Humidity (Operating) | Mwens pase 85% |
| Tanperati Anbyen (An Fonksyònman) | -20 ℃ ~ 70 ℃ |
8. Antretyen
Proper maintenance ensures the longevity and accurate performance of your XM-18D controller.
- Netwayaj: Regularly wipe the controller's surface with a soft, dry cloth. Do not use abrasive cleaners or solvents. Ensure no liquids enter the device.
- Swen Capteur: Keep the temperature and humidity sensors clean and free from dust or debris. Avoid bending or damaging the sensor cables.
- Vantilasyon: Ensure the controller's ventilation openings are not obstructed to prevent overheating.
- Depo: When not in use for extended periods, store the controller in a cool, dry place away from direct sunlight and extreme temperatures.
NAN. Depanaj
If you encounter issues with your XM-18D controller, refer to the following common problems and solutions:
| Pwoblèm | Kòz posib ak solisyon |
|---|---|
| Kontwolè pa limen. |
|
| Temperature/Humidity readings are inaccurate. |
|
| Heater/Humidifier/Fan not activating. |
|
| Egg turning not working. |
|
| Alarm continuously sounds. |
|
10. Garanti ak sipò
This product is manufactured to high-quality standards. For warranty information or technical support, please contact your retailer or the manufacturer directly. Keep your purchase receipt as proof of purchase.


