
Pwodwi souview
The RHYTHM 8RZ235MS38 is a digital radio-controlled alarm clock featuring 3D figures of Snoopy and Woodstock. It offers a clear LCD screen with comic-style numbers and unique footprint colon indicators. This clock provides essential functions including time display, calendar, temperature, and humidity readings, designed for ease of use and daily convenience.

Figi 1: Devan view of the RHYTHM 8RZ235MS38 Snoopy Digital Radio Alarm Clock, displaying time, date, temperature, and humidity.
Karakteristik kle
- Radio-Controlled Time Synchronization: Automatically adjusts time for accuracy.
- Digital LCD Display: Clear display with comic-style numbers and Snoopy footprint colon.
- 3D Snoopy & Woodstock Figures: Integrated into the design, with Snoopy serving as the snooze button.
- Fonksyon alam: Features electronic sound alarm with snooze capability.
- Detèktè entegre: Displays current temperature and humidity.
- Ekspozisyon kalandriye: Shows date, day, and year.
- Selectable Time Format: Choose between 12-hour (AM/PM) or 24-hour display.
- Fonksyon ekleraj: Includes an afterglow light for visibility in low light conditions.

Figi 2: Plis paseview of the clock's main features, including radio control, 12/24 hour display, temperature/humidity, calendar, and backlight.

Figure 3: Close-up of the Snoopy and Woodstock figures, highlighting Snoopy's role as the snooze button.
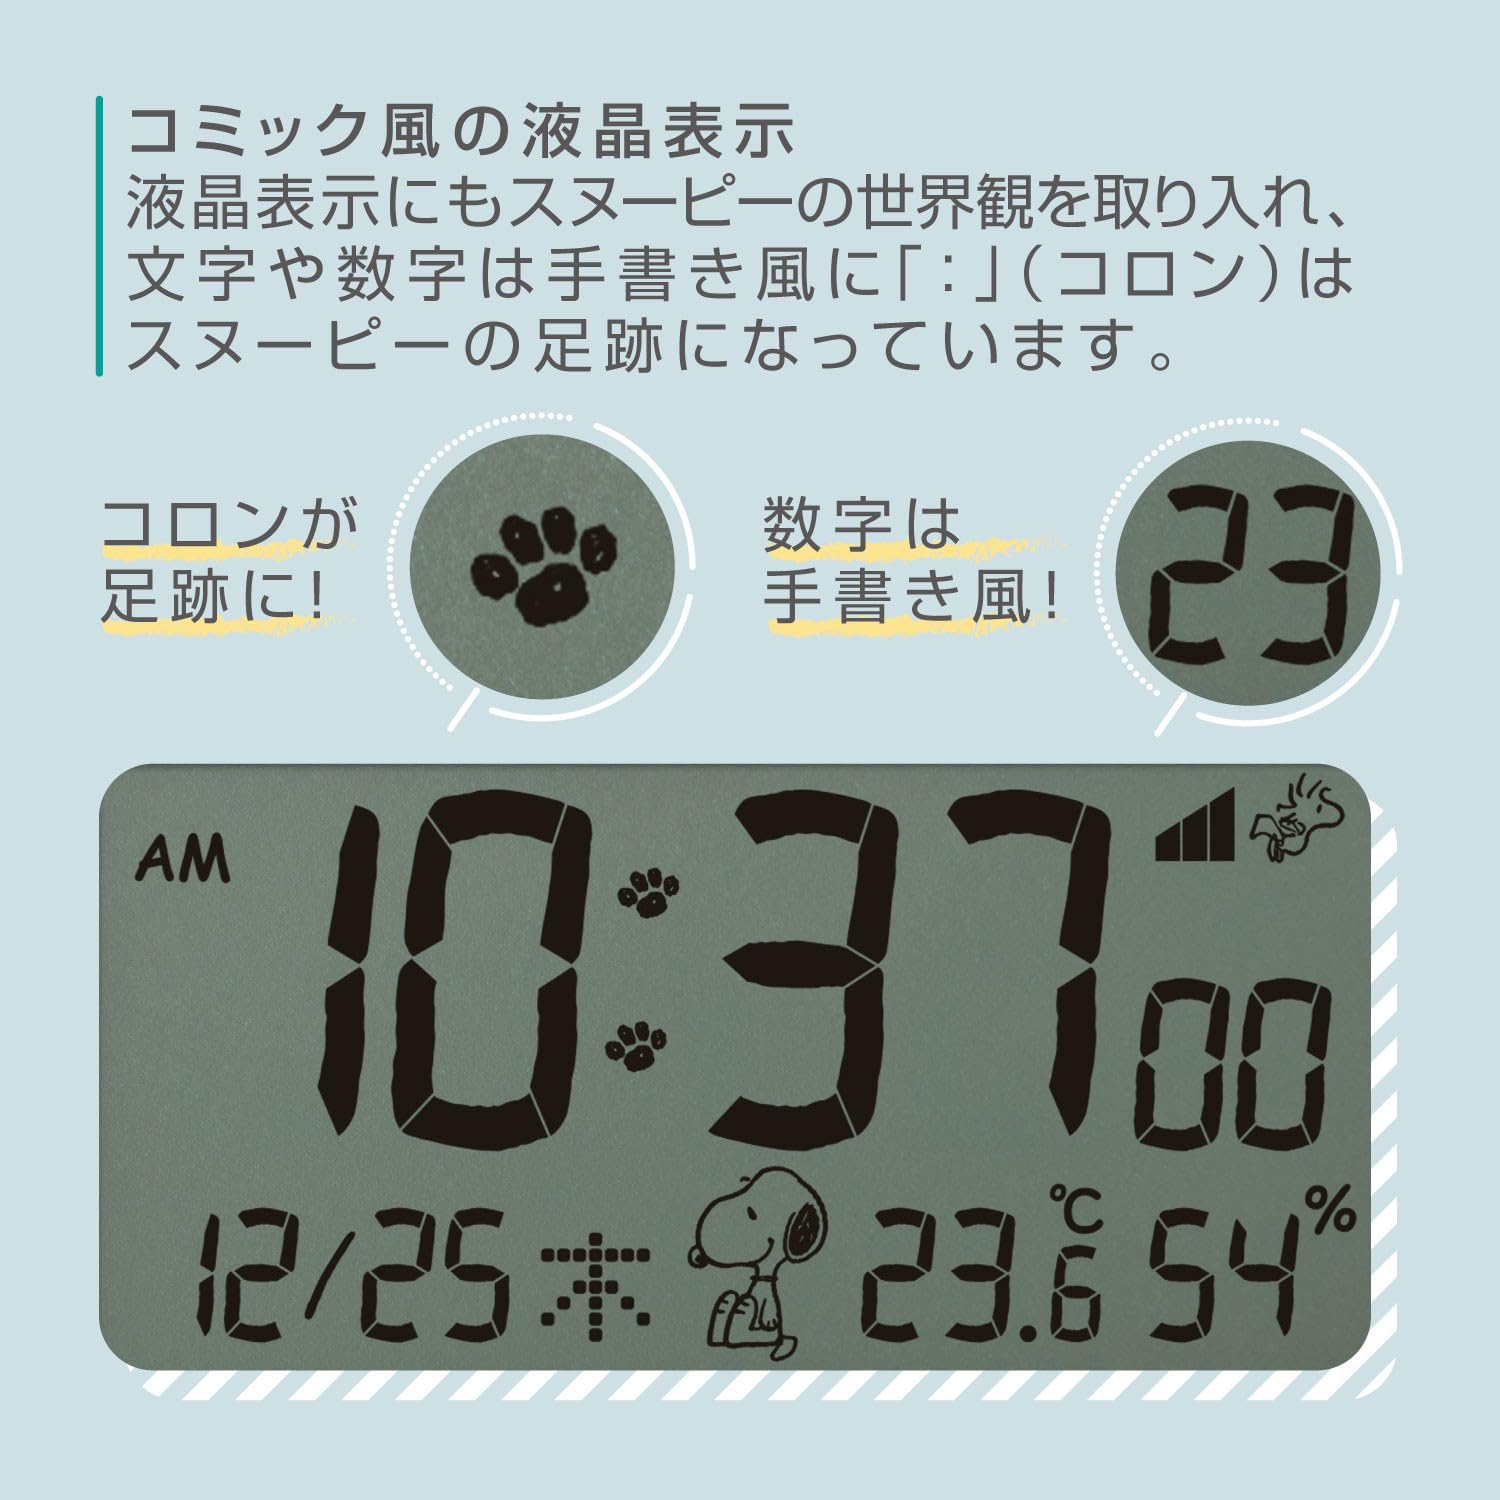
Figi 4: Detaye view of the LCD display, showcasing the unique comic-style numbers and Snoopy's footprints used as the colon separator.
Enstalasyon
1. Koneksyon pouvwa
Connect the provided AC adapter to the clock and plug it into a standard wall outlet. The clock will power on and the display will activate.
2. Senkronizasyon tan inisyal
As a radio-controlled clock, the unit will automatically attempt to synchronize with the atomic time signal upon initial power-up. This process may take several minutes. Ensure the clock is placed in an area with good signal reception, away from large metal objects or electronic interference.
3. Setting Time Zone (if necessary)
If the automatic synchronization does not set the correct time zone for your region, you may need to adjust it manually. Refer to the 'Operating' section for manual time and date setting instructions.
Enstriksyon Operasyon
1. Ekspozisyon lè ak dat
The main LCD screen continuously displays the current time, date (month/day), day of the week, temperature, and humidity.
2. Mete alam la
- Peze a SET ALARM button (location on the front panel) to enter alarm setting mode. The alarm time will flash.
- Sèvi ak la UP epi DESANN bouton pou ajiste lè a.
- Peze SET ALARM again to adjust the minutes. Use UP epi DESANN bouton.
- Peze SET ALARM once more to confirm the alarm time.
- Pou aktive oswa dezaktive alam lan, peze bouton an ALARM ON / OFF button. An alarm icon will appear on the display when activated.
3. Fonksyon repetisyon
When the alarm sounds, press the 3D Snoopy figure on top of the clock to activate the snooze function. The alarm will pause for approximately 5-10 minutes (check specific model details for exact duration) before sounding again.
4. Ekspozisyon Tanperati ak Imidite
The clock automatically measures and displays the ambient temperature (in Celsius or Fahrenheit) and relative humidity. No manual adjustment is typically required for these readings.
5. Kontwòl ekleraj
The display features an afterglow backlight. The intensity or activation method may vary by model. Typically, a dedicated LIMYÈ or SNOOZE button press will activate the backlight for a few seconds.
6. 12/24 Hour Format Toggle
To switch between 12-hour (AM/PM) and 24-hour time formats, locate the 12/24H button (refer to the clock's physical buttons) and press it. The display will change accordingly.
Antretyen
- Netwayaj: Use a soft, dry cloth to clean the clock's surface. Do not use abrasive cleaners or solvents.
- Plasman: Place the clock on a stable, flat surface. Avoid direct sunlight, extreme temperatures, or high humidity.
- Batri rezèv (si sa aplikab): If your model includes a battery backup, replace batteries annually to ensure settings are retained during power outages.
Depanaj
- Ekspozisyon an vid: Ensure the AC adapter is securely plugged into both the clock and a working power outlet. Check if the power outlet is functional.
- Lè a pa kòrèk: Verify the clock is receiving a clear radio signal. Try repositioning the clock. If manual setting was used, re-check the steps in the 'Operating' section.
- Alam pa sonnen: Ensure the alarm is activated (alarm icon visible on display) and the volume is set appropriately. Check that the alarm time is correctly set.
- Temperature/Humidity readings seem inaccurate: Allow the clock to acclimate to its environment for at least 30 minutes. Ensure it is not placed near heat sources, vents, or in direct sunlight.
Espesifikasyon
- Modèl: 8RZ235MS38
- Mak: RITM
- Kalite: Revèy Radyo Dijital
- Dimansyon (apeprè): 4.0 x 4.7 x 2.1 pous (10.2 x 12 x 5.4 cm)
- Pwa (apeprè): 210g
- Ekspozisyon: LCD with comic-style numbers
- Karakteristik: Radio-controlled time, Alarm with Snooze, Thermometer, Hygrometer, Calendar, Backlight.

Figure 5: Visual representation of the clock's dimensions (10.2 x 12 x 5.4 cm) and weight (210g), shown in comparison to a 500ml bottle.
Garanti ak sipò
This product is covered by a standard manufacturer's warranty. For detailed warranty information, product support, or service inquiries, please refer to the warranty card included in your product packaging or visit the official RHYTHM websit.
Tanpri konsève resi acha ou a kòm prèv acha pou nenpòt reklamasyon garanti.