SeeYing HP-H0056
SeeYing Bluetooth Turntable User Manual
Modèl: HP-H0056
1. Enstriksyon Sekirite Enpòtan
Please read these instructions carefully before using the product and retain them for future reference. Adhere to all warnings and follow all instructions.
- Pa sèvi ak aparèy sa a toupre dlo.
- Netwaye sèlman ak yon twal sèk.
- Pa bloke okenn ouvèti vantilasyon. Enstale li dapre enstriksyon manifakti a.
- Pa enstale tou pre okenn sous chalè tankou radyatè, rejis chalè, recho, oswa lòt aparèy (tankou amplifiers) ki pwodui chalè.
- Pwoteje kòd elektrik la pou yo pa mache oswa kwense, sitou nan priz, resipyan konvenyans, ak pwen kote yo sòti nan aparèy la.
- Itilize sèlman atachman/akseswa manifakti a espesifye.
- Deploge aparèy sa a pandan tanpèt zèklè oswa lè li pa itilize pou yon peryòd tan ki long.
2. Pwodwi souview
The SeeYing Bluetooth Turntable is designed for high-fidelity vinyl playback with modern connectivity options. It features a belt-drive system, adjustable counterweight, and a high-quality magnetic cartridge for precise tracking.
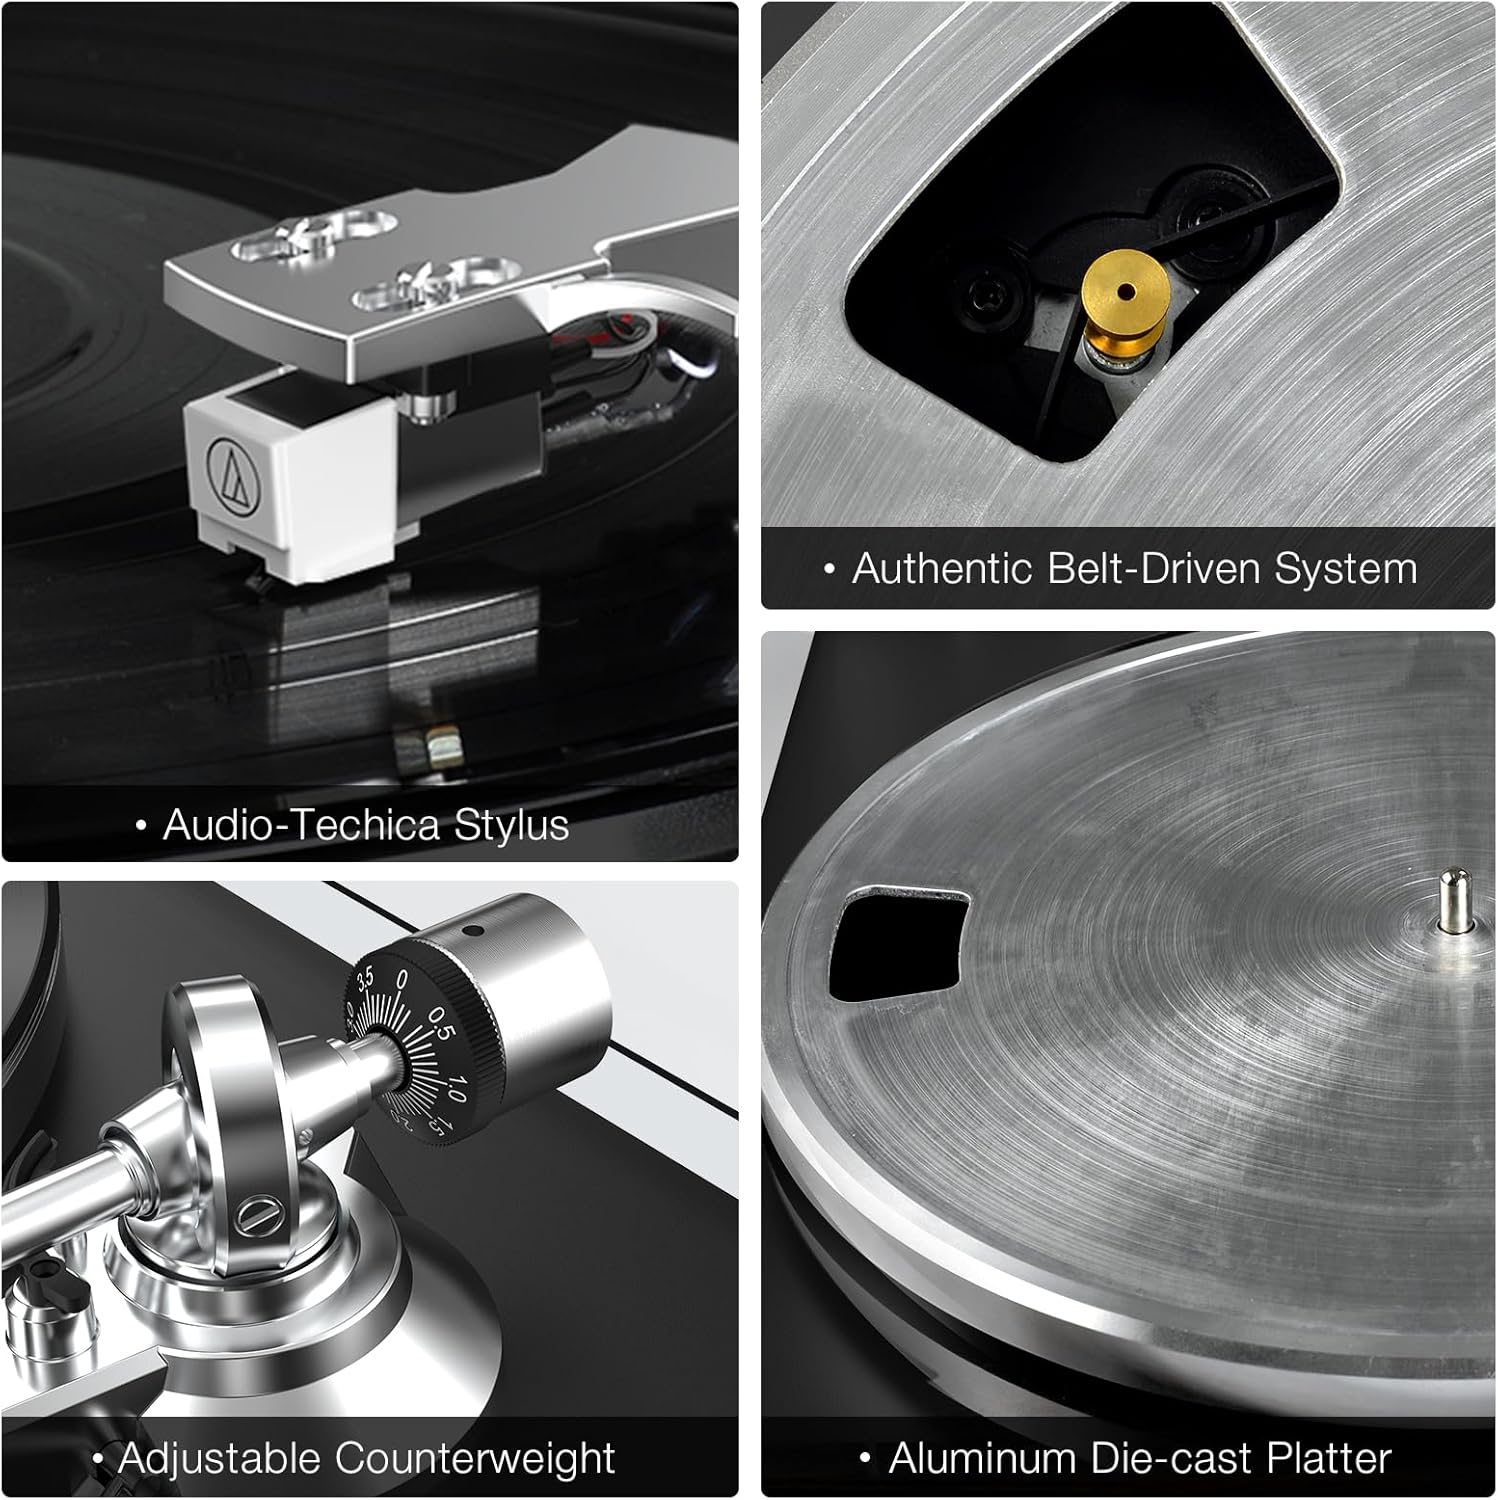
Konpozan kle: This image displays the Audio-Technica stylus, the authentic belt-driven system, the adjustable counterweight, and the aluminum die-cast platter, highlighting the precision engineering of the turntable.

Koneksyon panèl dèyè: This diagram illustrates the various input and output ports on the rear of the turntable, including the ground connector, phono/line-out jacks, phono/line-out switch, USB port for PC link, 12V DC adapter jacks, and wireless output connectivity indicator.
3. Gid Enstalasyon
Follow these steps to set up your SeeYing Turntable for the first time.
- Debake: Retire tout konpozan yo nan anbalaj la avèk prekosyon. Asire w ke tout pyès ki nan lis anbalaj la prezan.
- Enstalasyon plato ak senti:
Place the aluminum platter onto the spindle. Locate the drive belt and carefully stretch it around the motor pulley and the inner rim of the platter. Ensure the belt is not twisted.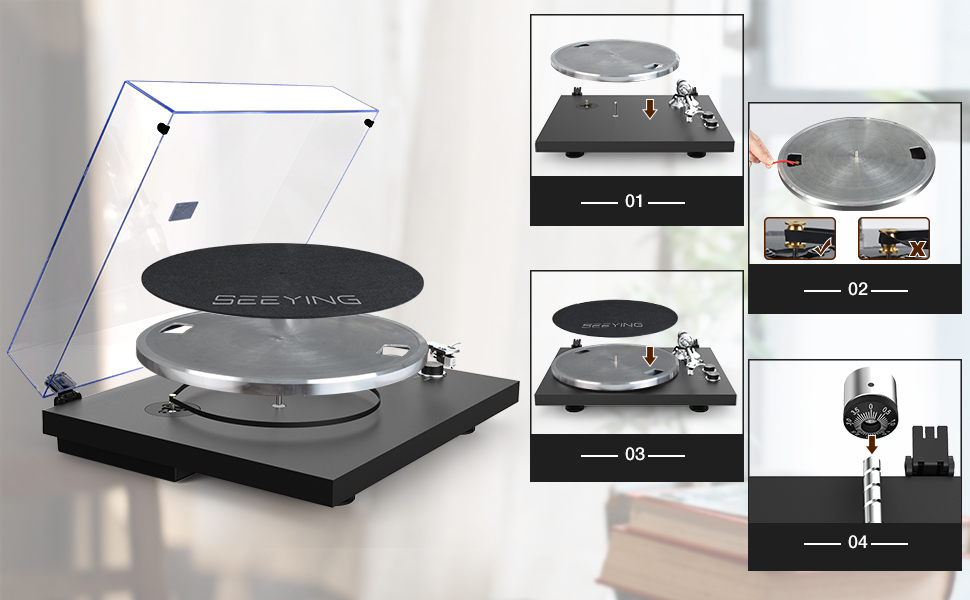
Etap konfigirasyon: This image provides a visual guide for the initial setup, including placing the platter, installing the belt, and adjusting the counterweight.
- Ajisteman kontrepwa: Slide the counterweight onto the rear of the tonearm. Rotate the counterweight until the tonearm is balanced and floats freely. Then, adjust the tracking force according to your cartridge's specifications (typically 1.5-2.5 grams for the included cartridge).
- Enstalasyon Kouvèti Pousyè: Attach the dust cover hinges to the designated slots on the turntable base.
- Koneksyon pouvwa: Connect the provided power adapter to the 'DC IN 12V' port on the rear of the turntable and plug it into a wall outlet.
4. Operasyon Enstriksyon
Learn how to play records and utilize the turntable's features.
4.1 Jwe yon Disk
- Mete yon dosye sou plato a.
- Select the appropriate speed (33 or 45 RPM) using the speed button. For 7-inch records, use the 45 RPM setting. For 12-inch records, use the 33 RPM setting.

Bouton kontwòl: This image highlights the 33 & 45 speed selection button and the Start & Stop button for easy operation.
- Leve bra ton an avèk levye repèkaj la.
- Move the tonearm over the desired starting groove of the record.
- Gently lower the tonearm using the cueing lever. The record will begin to play.
- To stop playback, lift the tonearm using the cueing lever and return it to the tonearm rest.
4.2 Bluetooth Pairing
The turntable can wirelessly connect to Bluetooth speakers or headphones.
- Ensure your Bluetooth speaker/headphones are in pairing mode.
- Turn on the turntable. It will automatically search for and attempt to pair with nearby Bluetooth devices.
- Once connected, the Bluetooth indicator light on the turntable will illuminate steadily. Audio will now be streamed wirelessly.

Koneksyon Wireless: This image demonstrates the turntable's ability to connect wirelessly to Bluetooth speakers, providing a convenient audio experience.
4.3 RCA Output Connection
For wired connections to external amplifiers or powered speakers, use the RCA output.
- Connect the RCA cables (red for right, white for left) from the turntable's RCA output jacks to the corresponding input jacks on your amplifier oswa oratè ki mache ak pisans.
- Set the PHONO/LINE switch on the rear of the turntable to the appropriate setting (PHONO if connecting to a phono input on an amplifier, LINE if connecting to a line-level input or powered speakers).

RCA Sòti: This image illustrates the use of RCA output to connect the turntable to external speakers for enhanced sound quality.
4.4 USB to PC Recording
Konvèti dosye vinyl ou an odyo dijital files sou òdinatè w lan.
- Connect the turntable to your computer using a USB cable (not always included, check 'Included Components').
- Install appropriate audio recording software on your computer (e.g., Audacity).
- Follow the software's instructions to record the audio playback from the turntable.
5. Antretyen
Proper maintenance ensures the longevity and performance of your turntable.
5.1 Netwaye platin an
- Siye kouvèti pousyè a ak kabinè a ak yon twal mou epi sèk.
- For the stylus, use a soft brush and brush gently from back to front.
- Evite itilize pwodui chimik piman bouk oswa pwodui netwayaj abrazif.
5.2 Ranplasman Stylus
The stylus (needle) should be replaced after approximately 300-500 hours of playback to maintain sound quality and prevent record wear.
- Carefully grasp the stylus housing and pull it downwards and forwards to remove it from the cartridge.
- Insert the new stylus by pushing it upwards and backwards into the cartridge until it clicks into place.
- Ensure the new stylus is securely seated.

Detachable Stylus: This image shows the detachable high-end AT3600L stylus, emphasizing its precision tracking and ease of replacement.
NAN. Depanaj
If you encounter issues with your turntable, refer to the following common problems and solutions.
| Pwoblèm | Kòz posib | Solisyon |
|---|---|---|
| Pa gen pouvwa | Power adapter not connected; Power outlet not active | Ensure power adapter is securely connected; Try a different power outlet. |
| Pa gen son oswa volim ki ba | Seleksyon antre ki pa kòrèk sou amplifier; RCA cables loose; PHONO/LINE switch incorrect; Bluetooth not paired | Select correct input on amplifier; Check RCA cable connections; Set PHONO/LINE switch correctly; Re-pair Bluetooth device. |
| Son an defòme oswa li sote | Stylus dirty or worn; Tracking force incorrect; Record dirty or damaged | Clean or replace stylus; Adjust counterweight/tracking force; Clean record or try a different one. |
| Plato a pa vire | Drive belt dislodged or broken; Motor issue | Check and re-seat drive belt; Contact customer support if motor issue suspected. |
7. Espesifikasyon
| Karakteristik | Detay |
|---|---|
| Mak | SeeYing |
| Non modèl | SeeYing (HP-H0056) |
| Koneksyon Teknoloji | Bluetooth |
| Maksimòm vitès wotasyon | 45 Revolutions Per Minute (supports 33 1/3 RPM) |
| Konpozan ki enkli | USB Conversion, RCA Cable |
| Karakteristik espesyal | Entegre Preamplifier, Adjustable Speed |
| Materyèl | Aliminyòm |
| Koulè | Nwa |
| Aparèy konpatib | Bluetooth speakers, Bluetooth headphones, Computers, Active speakers with RCA input, USB-compatible devices (e.g., smartphone, tablet) |
| Dimansyon pwodwi (apeprè) | 48.9 x 42.29 x 19.8 cm |
| Pwa pwodwi (apeprè) | 6.14 Kilogram |
8. Garanti ak sipò
SeeYing is committed to product quality and customer satisfaction. While specific warranty terms are not detailed here, the manufacturer provides excellent 1-to-1 after-sales support for all customers.
For any inquiries or support needs, please contact SeeYing customer service through your purchase platform or the official SeeYing websit.
Ask a question about this manual
Ask about setup, troubleshooting, compatibility, parts, safety, or missing instructions. Manuals+ will review the question and use this page’s manual context to help answer it.