Entwodiksyon
Thank you for choosing the GEARSTONE Foldable Magnetic Exercise Bike. This manual provides essential information for the safe assembly, operation, and maintenance of your exercise bike. Please read this manual thoroughly before use and keep it for future reference.
Enfòmasyon enpòtan sou sekirite
- Konsilte doktè ou anvan ou kòmanse nenpòt pwogram egzèsis.
- Toujou chofe anvan ou fè egzèsis epi refwadi apre.
- Asire w ke tout boulon ak nwa yo byen sere anvan chak itilizasyon.
- Mete bisiklèt egzèsis la sou yon sifas plat epi ki estab.
- Kenbe timoun ak bèt kay lwen ekipman an pandan w ap itilize.
- The maximum user weight capacity for this bike is 120 kg (264 lbs).
- Sispann fè egzèsis imedyatman si ou santi ou ap fèb, ou gen vètij, oswa ou gen doulè.
- Mete rad ak soulye egzèsis ki apwopriye.
Kontni pake
Carefully unpack the box and ensure all parts are present. Refer to the diagram below for a visual representation of the components.

Figi 1: Package Contents. This image displays the various components and tools included with your exercise bike, such as the main frame, pedals, seat, backrest, and assembly tools.
Pake a ta dwe gen ladan:
- Asanble ankadreman prensipal la
- Pedal gòch ak dwa
- Syèj ak Dossier
- Handlebar with LCD Monitor
- Ba estabilizatè (devan ak dèyè)
- Twous pyès ki nan konpitè (boulon, nwa, rondelle)
- Assembly Tools (wrench, Allen key)
- Manyèl itilizatè
Enstalasyon ak Asanble
Follow these steps to assemble your GEARSTONE Foldable Magnetic Exercise Bike. It is recommended to have two people for assembly.
- Mete ba estabilizatè yo: Secure the front and rear stabilizer bars to the main frame using the provided bolts and nuts. Ensure they are firmly tightened for stability.
- Enstale pedal: Identify the left (L) and right (R) pedals. The left pedal screws counter-clockwise, and the right pedal screws clockwise. Thread them into the crank arms and tighten securely.
- Monte Syèj ak Dossier: Insert the seat post into the main frame and adjust to your desired height. Secure it with the locking pin. Attach the backrest to the seat support.
- Attach Handlebar and Monitor: Connect the handlebar assembly to the main frame. Ensure all cables for the LCD monitor and pulse sensors are properly connected. Secure the handlebar with the designated bolts.
- Tcheke final la: Before first use, double-check all connections and ensure all bolts and nuts are tightened.

Figi 2: Assembly Steps. This diagram illustrates the key stages of assembling the exercise bike, from attaching the base supports to installing the seat and pedals.
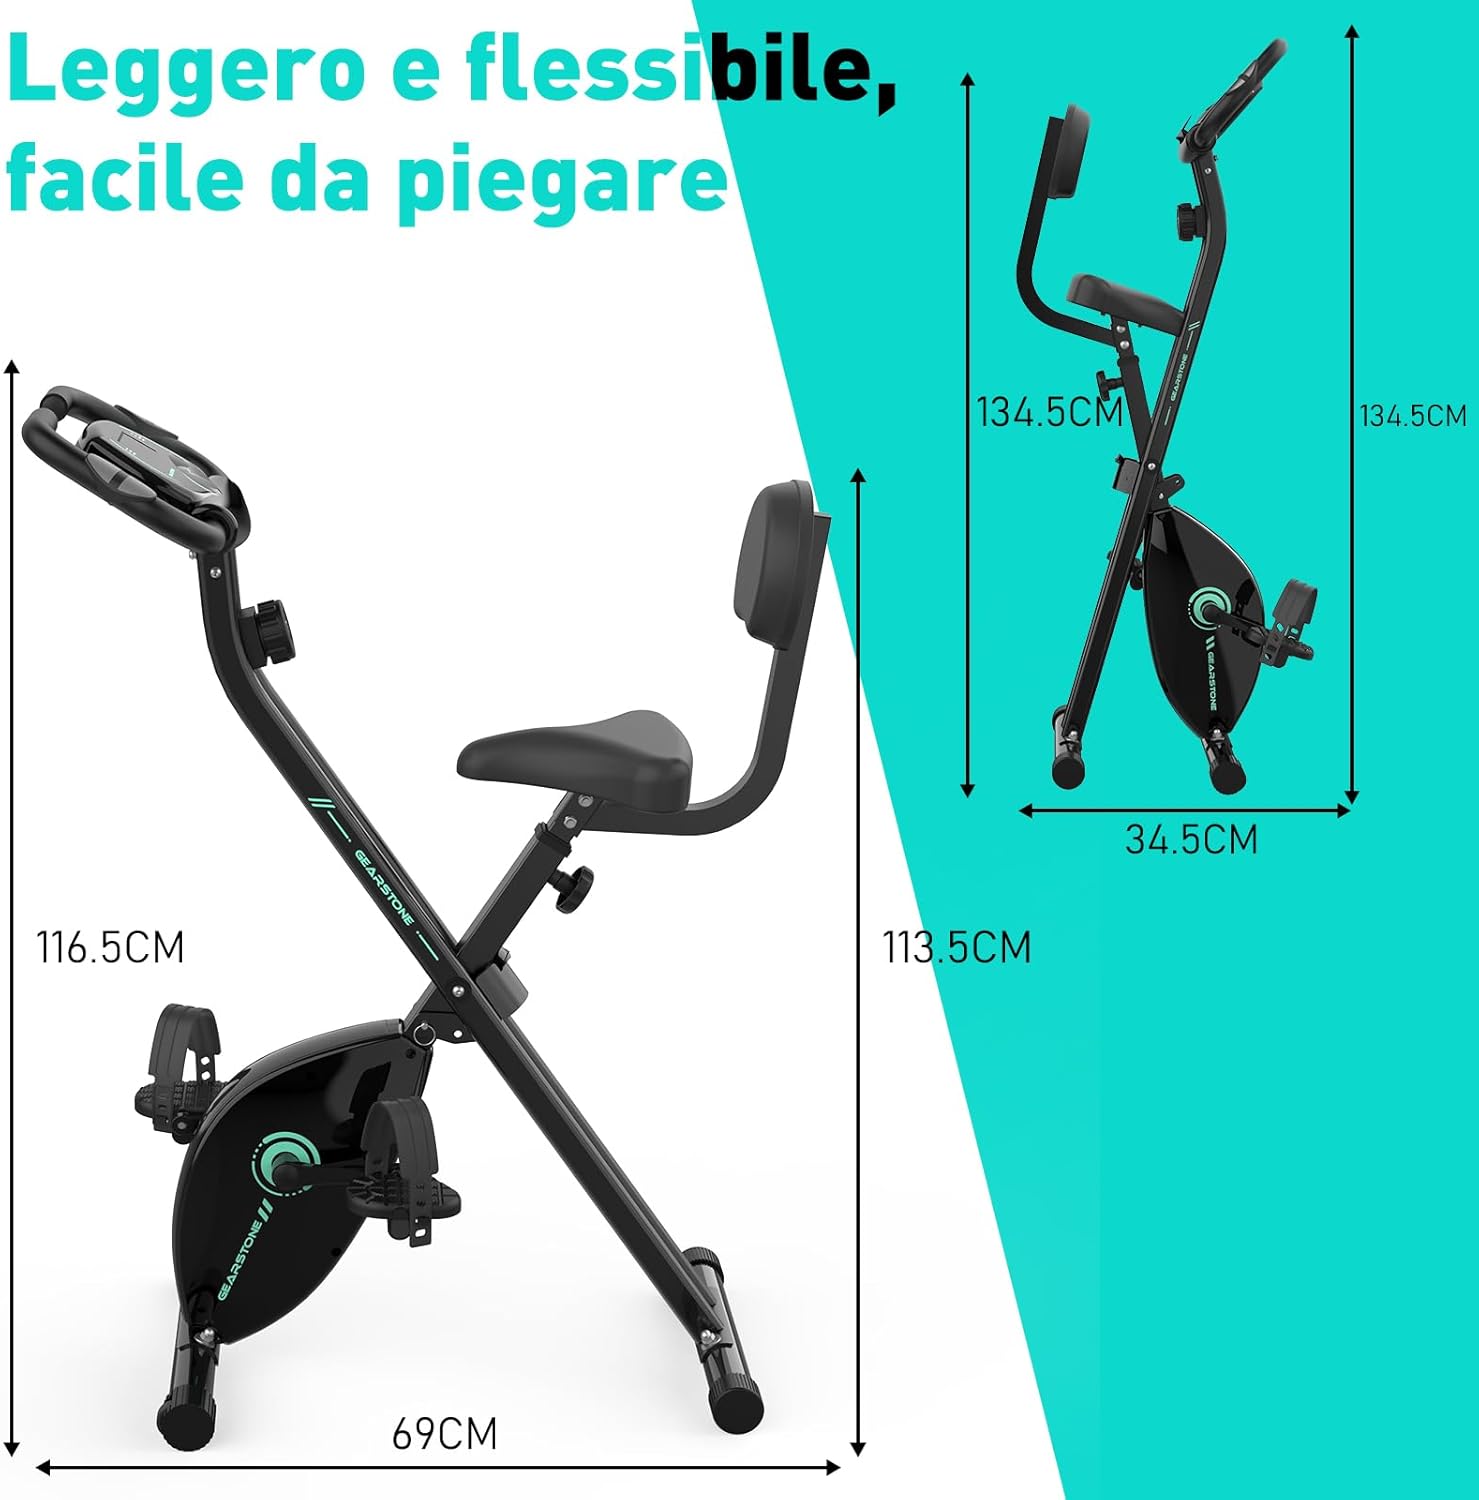
Figi 3: Assembled Bike Dimensions. This image shows the fully assembled exercise bike with its dimensions, highlighting its compact and foldable nature.
Enstriksyon Operasyon
Ajiste Wotè Syèj
The seat height can be adjusted to five different levels to accommodate various user heights. Loosen the adjustment knob located on the seat post, slide the seat to the desired height, and then tighten the knob securely. Ensure your knees have a slight bend at the bottom of the pedal stroke.

Figi 4: Seat and Resistance Adjustment. This image highlights the knob for adjusting magnetic resistance and the mechanism for adjusting seat height.
Ajiste rezistans
The bike features 8 levels of magnetic resistance. Turn the resistance knob, located below the LCD monitor, clockwise to increase resistance and counter-clockwise to decrease it. Start with a lower resistance and gradually increase as your fitness improves.
Sèvi ak LCD ki monitè kè bebe a
The LCD monitor displays key workout data. It is battery-powered. The monitor automatically turns on when you start pedaling or press a button.
- ESKANYE: Automatically cycles through all display functions every few seconds.
- TAN: Montre dire antrennman ou an.
- VITESSE: Montre vitès ou kounye a sou bisiklèt la.
- DISTANS: Displays the distance covered during your current workout.
- KALORI: Estime kalori ou boule pandan w ap fè egzèsis.
- ODOMETER (ODO): Montre distans total akimile.
- PULS: Shows your heart rate when holding the pulse sensors on the handlebars.
To reset the monitor, press and hold the button for a few seconds, or remove and reinsert the batteries.

Figi 5: LCD Monitor Display. This image provides a detailed view of the LCD monitor and its various data display functions.

Figi 6: Resistance Control and Monitor Interaction. This image illustrates how to adjust the resistance level and interact with the LCD monitor's buttons.
Sèvi ak òt telefòn lan
A phone holder is integrated into the LCD monitor panel. Place your smartphone or tablet securely in the holder to enjoy videos or music during your workout.
Folding the Bike for Storage
To fold the bike, loosen the main folding knob (usually located near the base of the frame). Carefully fold the frame inwards until it locks into its compact position. This design allows for easy storage and space-saving.
Antretyen
- Netwayaj: Siye bisiklèt la ak anonsamp Siye twal la apre chak itilizasyon pou retire swe ak pousyè. Pa sèvi ak pwodui netwayaj abrazif.
- Enspeksyon: Regularly inspect all bolts, nuts, and moving parts for tightness and wear. Tighten any loose fasteners.
- Lubrifikasyon: The magnetic resistance system and belt drive are generally maintenance-free. Do not lubricate internal components unless specifically instructed by customer support.
- Depo: Sere bisiklèt la nan yon kote ki fre epi sèk, lwen limyè solèy dirèk ak tanperati ekstrèm.
- Ranplasman batri: Replace the LCD monitor batteries when the display becomes dim or unresponsive.
Depanaj
| Pwoblèm | Kòz posib | Solisyon |
|---|---|---|
| No display on LCD monitor | Pil yo mouri oswa yo mal enstale. | Replace batteries or ensure they are installed with correct polarity. |
| Lekti batman kè ki pa egzak | Hands not firmly on sensors; sensors are dirty. | Ensure firm contact with both pulse sensors. Clean sensors with a dry cloth. |
| Bisiklèt la pa estab oswa li tranble | Boulon ki lach; sifas inegal. | Check and tighten all assembly bolts. Move the bike to a flat, level surface. |
| Rezistans pa chanje | Kab rezistans lan dekonekte oswa domaje. | Inspect the resistance cable connection. If damaged, contact customer support. |
| Bri dwòl pandan operasyon an | Loose parts; friction from moving components. | Check all bolts and nuts for tightness. Ensure no foreign objects are caught in moving parts. If noise persists, contact customer support. |
Espesifikasyon
| Karakteristik | Detay |
|---|---|
| Non modèl | cyclette pieghevole |
| Mak | GEARSTONE |
| Mekanis rezistans | Mayetik |
| Nivo rezistans | 8 nivo reglabl |
| Sistèm kondwi | Belt |
| Materyèl prensipal | Steel, Metal, Foam/Leather |
| Kapasite maksimòm pwa | 120 kilogram (264 liv) |
| Dimansyon pwodwi (L x W x H) | 69 x 39 x 116.5 cm (27.2 x 15.4 x 45.9 pous) |
| Pwa atik | 15.6 kilogram (34.4 liv) |
| Sous pouvwa (Monitè) | Mache ak pil (Pil pa enkli) |
| Karakteristik espesyal | Foldable design, LCD monitor, Pulse sensors, Phone holder, Adjustable seat (5 levels) |
Garanti ak sipò
GEARSTONE provides a yon ane garanti for this product from the date of purchase. This warranty covers manufacturing defects and material faults under normal use.
If you encounter any issues with your exercise bike or have questions regarding its operation or maintenance, please do not hesitate to contact our customer support team. Provide your purchase details and a description of the issue for prompt assistance.
Kontakte sipò: Tanpri gade dokiman acha ou a oswa dokiman détayan an. website for the most up-to-date contact information (e.g., email address or support portal).
Enfòmasyon adisyonèl
For more information about GEARSTONE products and fitness tips, visit our official websit oswa chanèl medya sosyal.