1. Entwodiksyon
The FITCAMX HD2-6588 is an integrated dual dash camera system designed for specific Mercedes-Benz GLC-Class models. It provides high-definition video recording for both the front and rear of your vehicle, maintaining an original equipment manufacturer (OEM) aesthetic. This manual provides instructions for installation, operation, and maintenance of your dash cam.
Konpatibilite: This model (HD2-6588) is specifically designed for Mercedes-Benz GLC-Class 2023-2026 GLC 300 & GLC 350e Hybrid 2025-2026 vehicles that originally come with two cameras in front of the rearview kouvèti glas.
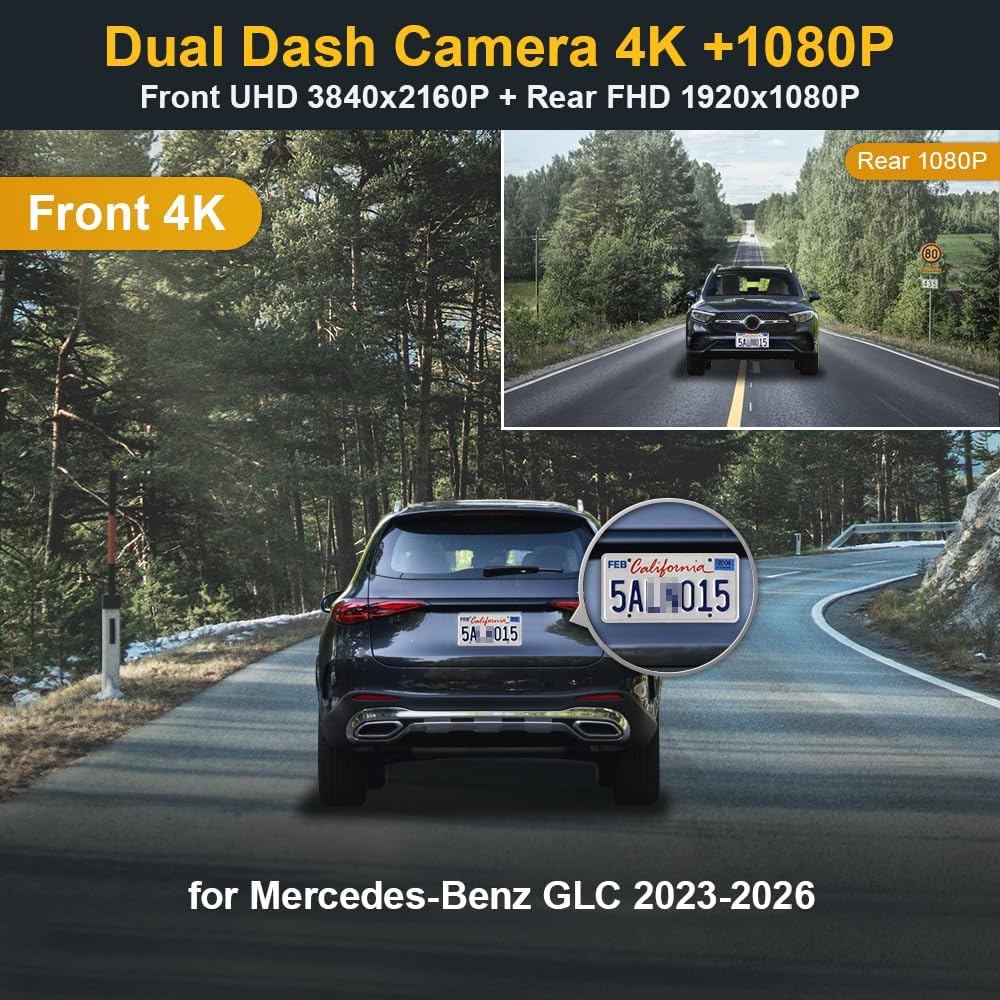
Figure 1.1: FITCAMX HD2-6588 Dual Dash Cam Overview. This image illustrates the 4K front and 1080P rear recording capabilities, along with vehicle compatibility.
2. Pake kontni
Verifye ke tout atik ki nan lis anba a yo enkli nan pakè ou a:
- 4K Dual Dash Cam (Front and Rear Units)
- Power Cable (Y-Cable)
- Manyèl itilizatè
- Kat memwa 128GB
- Removal Pry Tool
3. Choosing the Correct Model
It is essential to select the correct dash cam model for your vehicle to ensure proper fit and functionality. Please follow these steps:
- Confirm your vehicle's style and year of manufacture (e.g., Mercedes-Benz GLC 300 2023).
- Identify the number of original cameras located in front of your rearview kouvèti glas.
- If your vehicle has 2 original cameras, select model HD2-6588.
- If your vehicle has 3 original cameras, select model HD2-6595.
- If you are unsure, contact FITCAMX support and provide a picture of your rearview mirror cover for assistance.
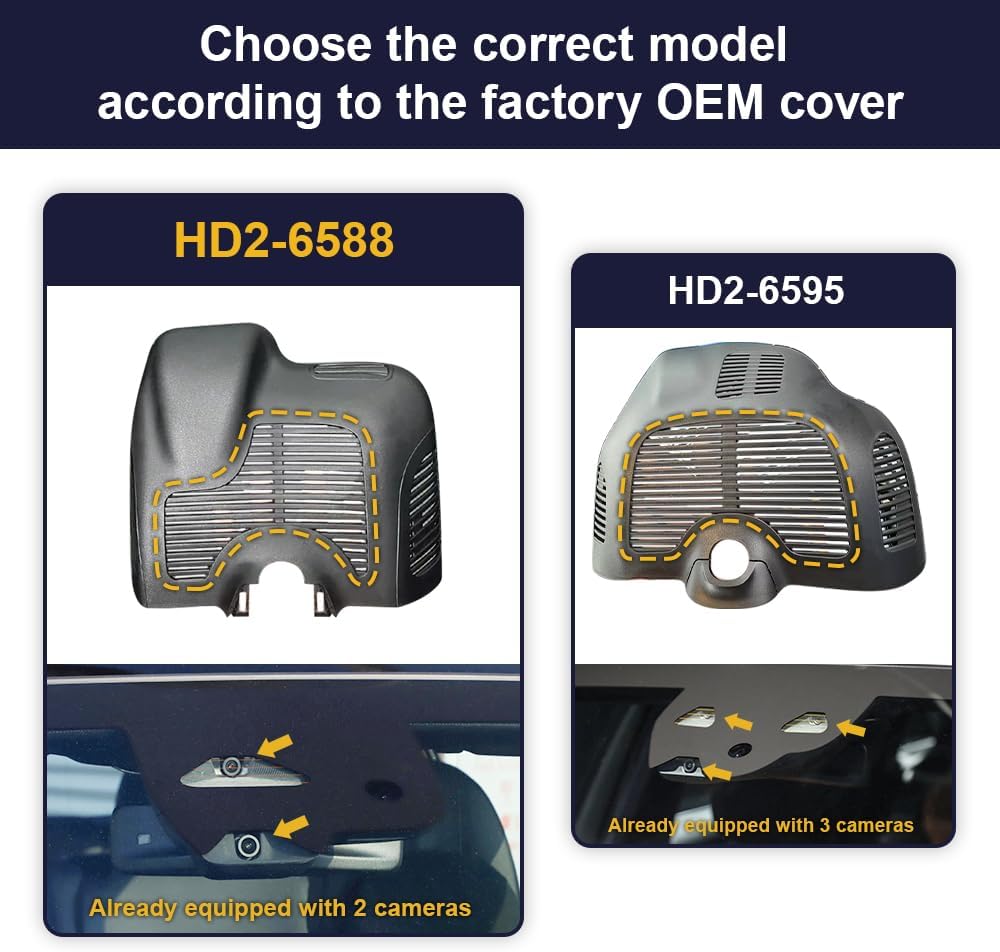
Figure 3.1: Model Selection Guide. This image helps identify the correct dash cam model based on the number of existing cameras near the rearview glas.
4. Enstalasyon ak Enstalasyon
The FITCAMX dash cam is designed for an OEM-style installation, requiring no visible cable routing. Follow these steps carefully.
4.1 Enstalasyon Kamera Devan an
- Use the provided pry tool to gently open the back cover of the original rearview mirror housing.
- Retire kouvèti dèyè a.
- Remove the larger cover to expose the internal wiring.
- Locate the rain sensor wiring. Connect the Y-Cable from the dash cam to the rain sensor.
- Mount the FITCAMX dash cam unit into the housing. Ensure it is securely fitted.
- Re-mount the back cover, ensuring all clips are engaged and the fit is flush.

Figure 4.1: Front Camera Installation Steps. This image provides a visual guide for installing the front dash cam unit.

Figure 4.2: OEM Look After Installation. This image demonstrates the seamless integration of the dash cam into the vehicle's interior.
4.2 Rear Camera Wiring
The rear camera connects to the front unit via a cable. Route this cable discreetly along the vehicle's headliner and pillars to the rear of the vehicle. The rear camera can be mounted on the rear windshield or facing the cabin, depending on your preference.

Figure 4.3: Rear Camera Wiring Diagram and Mounting Options. This image illustrates the cable routing and potential mounting positions for the rear camera.
4.3 Gid Videyo Enstalasyon
For a visual walkthrough of the installation process, please refer to the official installation video:
Video 4.1: Installation Video for Mercedes-Benz. This video demonstrates the step-by-step installation process of the FITCAMX dash cam in a Mercedes-Benz vehicle, including removing covers, connecting cables, and mounting the camera.
5. Operasyon Enstriksyon
The FITCAMX dash cam operates automatically upon vehicle startup. For advanced features and settings, use the dedicated FITCAMX mobile application.
5.1 Wi-Fi Connection & App Usage
To connect your dash cam to the FITCAMX app:
- Ensure the dash cam is powered on (vehicle ignition is on). The indicator lights on the dash cam will illuminate.
- On your smartphone, open Anviwònman epi navige nan Wi-Fi.
- Select the Wi-Fi network name starting with "CAR", "LHD", or "CARDV".
- Antre modpas default la: 12345678.
- Once connected, open the FITCAMX application. You should see a live view from the dash cam.
- Nan aplikasyon an, ou kapab view viv footage, access recorded files, download important videos to your phone, and adjust camera settings.
Nòt: You cannot connect to the dash cam's Wi-Fi and use Apple CarPlay/Android Auto simultaneously. However, the camera records automatically, so continuous Wi-Fi connection is not required for recording.

Figure 5.1: FITCAMX App Interface. This image shows the app's live view and connectivity status.
Video 5.2: Wi-Fi Connect and App Usage. This video illustrates how to connect the FITCAMX dash cam to your smartphone via Wi-Fi and use the FITCAMX application for live viewing, playback, and managing settings.
5.3 Anrejistreman bouk
The dash cam features automatic loop recording. When the memory card is full, the oldest video files will be overwritten by new recordings. You can set the duration of each recording segment (e.g., 1, 3, or 5 minutes) within the FITCAMX app settings.
- A 64GB SD card typically provides approximately 5 hours of recording.
- A 128GB SD card typically provides approximately 10 hours of recording.

Figure 5.3: Loop Recording Feature. This image explains how loop recording manages storage by overwriting older files.
5.4 G-Capteur (Anrejistreman Ijans)
The built-in G-sensor detects sudden movements, impacts, or collisions. When such an event occurs, the dash cam automatically locks the current video segment, preventing it from being overwritten by loop recording. This ensures critical footage konsève kòm prèv.

Figure 5.4: G-Sensor Functionality. This image demonstrates how the G-sensor protects important video files during incidents.
5.5 Parking Mode (Optional Upgrade)
The dash cam supports an optional parking mode for continuous surveillance when your vehicle is parked. This feature requires a separate hardwire kit (not included in the standard package) to connect to your vehicle's fuse box or On-Board Diagnostics (OBD) port.
- Cable to Fuse Box: Enables non-24h recording.
- Cable to On Board Diagnostics (OBD): Enables both 24h and non-24h recording.

Figure 5.5: Parking Mode Wiring Options. This image shows the different hardwire kits for parking mode functionality.
5.6 Vizyon lannwit
Equipped with a CMOS sensor and Wide Dynamic Range (WDR) technology, the FITCAMX dash cam provides clear night vision, ensuring high-quality recordings even in low-light conditions.

Figure 5.6: Night Vision Capability. This image highlights the dash cam's ability to capture clear footage nan anviwònman ki fè nwa.
6. Antretyen
6.1 Fòmataj Kat SD
Regularly formatting the SD card helps maintain optimal recording performance and prevents data corruption. You can format the SD card through the FITCAMX application settings. Avètisman: Formatting will erase all data on the SD card. Ensure you have backed up any important files anvan kontinye.
6.2 Swen Jeneral
- Kenbe lantiy kamera yo pwòp avèk yon twal mou ki pa gen pousyè.
- Avoid exposing the dash cam to extreme temperatures outside its operating range (-20°C to 85°C / -4°F to 185°F).
- Ensure the dash cam is securely mounted to prevent vibrations or dislodgement.
NAN. Depanaj
Men kèk solisyon pou pwoblèm komen ou ka rankontre:
- Q: How to ensure the correct model?
A: Please compare your vehicle style, year, and the shape of your rearview mirror cover. Alternatively, contact FITCAMX for detailed confirmation. - Q: Can I use CarPlay/Bluetooth when driving?
A: Yes. Your phone cannot be connected to CarPlay/Bluetooth and the dash cam's Wi-Fi simultaneously. However, the camera records automatically after the car starts, so you do not need to keep Wi-Fi connected to the camera at all times for recording. - Q: Can I add a rear camera if I already have a front cam?
A: No, because the PCB boards are different. If you wish to change video resolution or add a rear camera, you would need to replace the entire set.
8. Espesifikasyon
| Mak | FITCAMX |
| Non modèl | HD2-6588 |
| Kalite Sèvis Machin | GLC-Class 2023-2026, HD2-6588 (*2 Cams Already) |
| Koneksyon Teknoloji | Powerline |
| Karakteristik espesyal | FITCAMX APP, OEM Style |
| Rezolisyon Capture Videyo | Front 2160P+Rear 1080P |
| Konpozan ki enkli | 4K Dual Dash Cam, Cable, User Manual, 128GB Memory Card, Removal Pry Tool |
| Kalite aliye | Plafon |
| Koulè | HD2-6588 |
| Jaden nan View | 170 Degre |
| Metòd kontwòl | App |
| Teknoloji detèktè optik | CMOS |
| Kalite memwa flash | MicroSD |
| Ouverture maksimòm | 1.6 f |
| Èske pil yo enkli | Wi |
| Estanda Sipòte | MP4 |
| Kalite selil batri | Lityòm |
| Aparèy konpatib | Mercedes-Benz GLC 2023, 2024, 2025 |
| To Frame | 30 fps |
| Flash memwa sipòte gwosè maksimòm | 128 GB |
| Pwa atik | 2 liv |
9. Garanti & Sipò
Garanti: The FITCAMX HD2-6588 dash cam comes with a 1-ane garanti apati dat acha a, ki kouvri domaj fabrikasyon.
Sipò teknik: For any questions, installation assistance, or technical issues, please do not hesitate to contact FITCAMX customer support. Prompt response technical support is available to assist you.