1. Entwodiksyon
This manual provides essential information for the proper installation, operation, and maintenance of your Jyving 1:1 HF Balun. This device is designed to facilitate the connection of a balanced antenna, such as a dipole, to an unbalanced coaxial feedline, ensuring efficient power transfer and minimizing common mode currents. Please read this manual thoroughly before use to ensure optimal performance and safety.
2. Enfòmasyon sou Sekirite
- Always disconnect power from your radio equipment before making any connections to the balun or antenna.
- Ensure all connections are secure and properly insulated to prevent short circuits and electrical hazards.
- Do not exceed the specified power rating of 200W to prevent damage to the balun and associated equipment.
- Install the balun in a location protected from extreme weather conditions, although it is designed to be waterproof.
- Avoid touching the antenna or balun during transmission.
3. Pake kontni
- 1 x Jyving 1:1 HF Balun (JY-2251832819846075)
4. Espesifikasyon
| Karakteristik | Spesifikasyon |
|---|---|
| Pwopòsyon transfòmasyon | 1:1 |
| Enpedans Antre | 50 ohms (dezekilib) |
| Enpedans Sòti | 50 ohms (balanse) |
| Gamme frekans | 1-56 MHz |
| VSWR | Mwens pase 1.5 |
| Pouvwa rezistans | 200W |
| Dimansyon | Dyamèt 57mm x 175mm |
| Pwa | 300 g |
| Kalite Connector | SL16-F (UHF Female) |
| Ki enpèmeyab | Wi |
5. Enstalasyon ak Enstalasyon
The Jyving 1:1 HF Balun is designed for easy integration into your amateur radio antenna system. It is suitable for various balanced antenna types, including horizontal dipoles, inverted V dipoles, and regular V dipoles.
5.1 Physical Mounting
The balun features a sturdy mounting bracket with eye bolts for attaching the antenna wire elements. The top of the balun includes a metal eyelet for suspension, typically from a mast or support rope.

Figi 1: Top view of the balun with mounting points. This image displays the top section of the balun, highlighting the yellow mounting plate with two eye bolts for connecting antenna wires and a central metal eyelet for suspending the balun.

Figi 2: Detaye view of the mounting bracket. This image provides a closer look at the yellow mounting plate, showing the two eye bolts and their associated nuts and washers, used for securing the antenna's radiating elements.
5.2 Koneksyon elektrik
- Koneksyon antèn: Connect the two radiating elements of your balanced antenna (e.g., dipole wires) to the two eye bolts located on the top mounting bracket of the balun. Ensure these connections are mechanically sound and electrically conductive.
- Koneksyon kab koaksyal: The bottom of the balun features an SL16-F (UHF Female) connector. Connect your 50-ohm coaxial feedline, terminated with a matching UHF Male connector, to this port. Tighten the connector securely but do not overtighten.

Figi 3: Anba view with coaxial connector. This image shows the underside of the balun, clearly displaying the SL16-F (UHF Female) connector where the coaxial feedline is attached.

Figi 4: Complete balun assembly. This image presents a full view of the balun, showing both the top mounting bracket and the bottom coaxial connector, along with a label that includes specifications in Chinese.
6. Operasyon Enstriksyon
Once the balun is correctly installed and connected to your antenna and feedline, it operates passively. Its primary function is to provide a 1:1 impedance transformation and common mode current suppression.
- Ensure your antenna is tuned for the desired operating frequency within the 1-56 MHz range. The balun itself does not tune the antenna.
- Monitor your Standing Wave Ratio (SWR) using an SWR meter or antenna analyzer. The balun is designed to maintain an SWR of less than 1.5 when connected to a properly matched 50-ohm balanced antenna.
- Do not exceed the maximum power rating of 200W. Operating above this limit can cause damage to the balun and potentially your radio equipment.
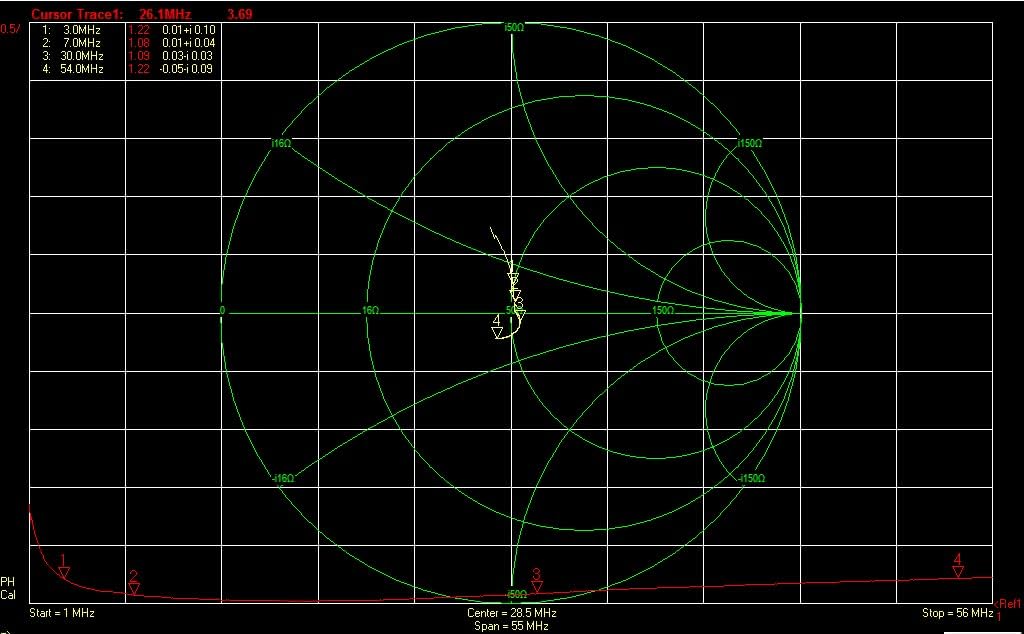
Figi 5: Balun performance Smith Chart. This graph illustrates the impedance characteristics of the balun across its operational frequency range (1-56 MHz), indicating its efficiency and matching capabilities.
7. Antretyen
The Jyving 1:1 HF Balun is designed for durability and requires minimal maintenance.
- Periodically inspect all connections (antenna wires and coaxial cable) for corrosion, looseness, or damage. Clean any corrosion with a suitable contact cleaner.
- Check the physical integrity of the balun housing and mounting bracket. While waterproof, extreme weather can still cause wear over time.
- Ensure the balun is securely mounted and not subject to excessive strain from antenna wires or feedline.
NAN. Depanaj
If you experience issues with your antenna system after installing the balun, consider the following:
| Pwoblèm | Kòz posib | Solisyon |
|---|---|---|
| SWR segondè |
|
|
| Low signal strength / Poor transmission |
|
|
9. Garanti ak sipò
This Jyving 1:1 HF Balun is manufactured to high-quality standards. For any questions regarding installation, operation, or troubleshooting that are not covered in this manual, please contact your retailer or the manufacturer's customer support for assistance.
Please retain your proof of purchase for warranty claims, if applicable.