AVARRO 0E-HDMIMX4
Manyèl Itilizatè Komutateur HDMI AVARRO 0E-HDMIMX4
Model: 0E-HDMIMX4
1. Entwodiksyon
The AVARRO 0E-HDMIMX4 is a high-performance 4x4 HDMI matrix switcher designed to route any of four HDMI input sources to any of four HDMI output displays. It supports 4K Ultra HD resolutions, HDCP 2.2, and advanced features like Smart EDID Management and a built-in 4K-1080P downscaler. This manual provides detailed instructions for installation, operation, and troubleshooting to ensure optimal performance of your device.
2. Enfòmasyon sou Sekirite
- Li tout enstriksyon yo ak anpil atansyon anvan ou opere aparèy la.
- Do not expose this unit to rain, moisture, or excessive humidity.
- Do not place any objects filled with liquids on the unit.
- Pa bloke ouvèti vantilasyon.
- Itilize sèlman adaptè pouvwa yo bay la.
- Pa eseye fè antretyen aparèy la tèt ou. Konfye tout antretyen bay pèsonèl kalifye.
- Asire w ke tout ekipman ki konekte yo byen konekte a tè.
3. Pake kontni
Verify that all items are present before installation:
- AVARRO 0E-HDMIMX4 HDMI Switcher Unit
- IR Remote Control
- DC 12V pouvwa adaptè
- Manyèl Itilizatè (dokiman sa a)
- Mounting Brackets (if applicable, not explicitly mentioned but common for such devices)
4. Pwodwi souview
4.1 Panèl devan

Imaj: Devan view of the AVARRO 0E-HDMIMX4 HDMI Switcher, showing the IR receiver and output selector buttons.
- IR Reseptè: Receives signals from the IR remote control.
- Output Selectors (1-4): Buttons to select the input source for each corresponding HDMI output. Each output has its own set of source selection buttons (1, 2, 3, 4).
- Endikatè ki ap dirije: Indicate the currently selected input for each output.
4.2 Panèl dèyè
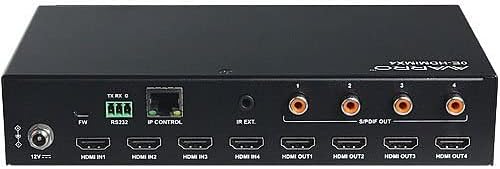
Imaj: Dèyè view of the AVARRO 0E-HDMIMX4 HDMI Switcher, displaying all input/output ports and control interfaces.
- DC 12V AN: Pò D 'pouvwa.
- FW (Micro USB): Micro-USB port for firmware upgrades.
- RS232: Serial port for control via RS232 commands.
- IP CONTROL (RJ45): Ethernet port for network control and Web Aksè UI.
- IR EXT: Port for connecting an external IR receiver.
- ANTRE HDMI (1-4): HDMI input ports for connecting source devices (e.g., Blu-ray player, game console).
- Sòti HDMI (1-4): HDMI output ports for connecting display devices (e.g., TV, projector).
- S/PDIF OUT (1-4): Digital audio output ports for each HDMI output, supporting PCM 2.0/5.1, Dolby Digital, and DTS up to 5.1 Channel.
5. Enstalasyon ak Koneksyon
- Etenn tout aparèy yo: Before making any connections, ensure all source devices, displays, and the switcher are powered off.
- Konekte sous HDMI: Connect your HDMI source devices (e.g., media players, gaming consoles) to the HDMI IN 1-4 ports on the switcher using high-quality HDMI cables.
- Konekte ekran HDMI yo: Connect your HDMI display devices (e.g., TVs, projectors) to the HDMI OUT 1-4 ports on the switcher using high-quality HDMI cables.
- Connect Audio Outputs (Optional): If desired, connect external audio systems to the S/PDIF OUT ports for digital audio extraction.
- Konekte Rezo a (Si ou vle): For IP control and Web UI access, connect an Ethernet cable from your network router/switch to the IP CONTROL (RJ45) port.
- Konekte pouvwa: Connect the provided DC 12V power adapter to the DC 12V IN port on the switcher, then plug the adapter into a power outlet.
- Pouvwa sou aparèy: Power on the switcher, then your display devices, and finally your source devices.
Nòt: For optimal performance with 4K content, use certified High-Speed HDMI cables.
6. Operasyon Enstriksyon
6.1 Front Panel Control
To switch an input source for a specific output:
- Locate the "SELECTOR" buttons for the desired OUTPUT (1-4).
- Press the corresponding "SOURCE" button (1, 2, 3, or 4) below the "SELECTOR" button to route the desired input to that output. The LED indicator will illuminate to show the active input.
6.2 IR Remote Control
The included IR remote control allows for convenient switching from a distance. Point the remote towards the IR receiver on the front panel of the switcher.
- Bouton Antre (1-4): Chwazi sous la opinyon.
- Output Buttons (A-D or 1-4): Selects the output to control.
- Chanjman Matrice: Typically, you would press an Output button, then an Input button to route that input to the selected output. Refer to the remote's specific layout for exact button functions.
6.3 Web Kontwòl UI
La Web UI provides a graphical interface for advanced control and configuration.
- Ensure the switcher is connected to your network via the IP CONTROL port.
- Obtain the IP address of the switcher (refer to network settings or device documentation for default IP or discovery method).
- Louvri a web navigatè sou yon òdinatè ki konekte nan menm rezo a.
- Enter the switcher's IP address into the browser's address bar.
- Log in using the default credentials (if prompted, refer to device documentation for default username/password).
- Sèvi ak la Web UI to manage input/output routing, EDID settings, and other advanced features.
6.4 RS232 Kontwòl
The RS232 port allows for integration with control systems using serial commands. Refer to the detailed RS232 command set documentation (usually available from the manufacturer's website) for specific protocols and commands.
7. Smart EDID Management
The 0E-HDMIMX4 features Smart EDID Management to ensure compatibility between source devices and displays. EDID (Extended Display Identification Data) communicates display capabilities to the source. The switcher can automatically manage EDID or allow manual configuration via the Web UI to optimize video and audio formats for connected devices.
8. Mizajou Firmware
Firmware updates can improve performance, add new features, or resolve issues. The 0E-HDMIMX4 supports firmware upgrading via both the Micro-USB port and the Web UI.
- Mikwo-USB: Connect a computer to the FW (Micro USB) port and use the manufacturer's provided upgrade tool.
- Web UI: Aksede a Web UI and navigate to the firmware upgrade section.
Always download the latest firmware and instructions from the official AVARRO website before attempting an upgrade.
9. Espesifikasyon
| Karakteristik | Detay |
|---|---|
| Modèl | 0E-HDMIMX4 |
| Antre | 4 x HDMI IN |
| Sòti yo | 4 x HDMI OUT, 4 x S/PDIF OUT (Digital) |
| Kontwòl pò | 1 x RS232, 1 x IP CONTROL (RJ45), 1 x FW (Micro USB) |
| Konfòmite HDMI | 4K Ultra HD, HDCP 2.2 compliant |
| Sipò pou rezolisyon videyo | VESA: 800x600 to 1920x1200; SMPTE: 720x576P to 4096x2160 |
| Sipò HDR | HDR 10, HLG, DOLBY VISION up to 4K60 444 |
| Downscaler | Built-in 4K-1080P downscaler |
| To maksimòm Done | 18 Gbps |
| Maksimòm revèy piksèl | 600 MHz |
| Fòma odyo (HDMI) | PCM 2.0/5.1/7.1, Dolby TrueHD, Dolby Atmos, DTS HD Master Audio, DTS:X |
| Audio Formats (S/PDIF) | PCM 2.0/5.1, Dolby Digital, DTS up to 5.1 Channel |
| Pwoteksyon ESD | ±8kV (Egzeyat espas lè) / ±4kV (Egzeyat kontak) |
| Pwoteksyon vag | Voltage: ±1 Kv |
| Pwovizyon pou pouvwa | DC 12V 2A |
| Pouvwa konsomasyon (max) | 10.8W |
| Dimansyon Aparèy (L x W x H) | 8.46 "x 4.73" x 1.65 "(21.49 cm x 12.01 cm x 4.19 cm) |
| Pwa pwodwi | 1.19 liv (0.54 kg) |
NAN. Depanaj
Si ou rankontre pwoblèm, tanpri al gade pwoblèm ak solisyon komen sa yo:
- Pa gen Sòti Videyo/Odyo:
- Asire w tout kab HDMI yo byen konekte.
- Verify the power adapter is correctly connected and the unit is powered on.
- Check that the correct input source is selected for the desired output.
- Test with different HDMI cables.
- Bypass the switcher to confirm source and display functionality.
- Check EDID settings, especially with mixed resolution displays.
- Siyal tanzantan/tranbleman:
- Use high-quality, certified HDMI cables, especially for longer runs or 4K content.
- Ensure cables are not excessively bent or damaged.
- Check for potential electromagnetic interference from other devices.
- Kontwòl Remote pa travay:
- Ensure there are no obstructions between the remote and the switcher's IR receiver.
- Ranplase pil kontwòl remote yo.
- Verify the remote is pointed directly at the IR receiver.
- Web UI/IP Control Issues:
- Confirm the Ethernet cable is properly connected.
- Verify the switcher's IP address and ensure your computer is on the same network subnet.
- Tcheke paramèt pare-feu yo sou òdinatè w la oswa rezo w la.
11. Antretyen
- Netwayaj: Sèvi ak yon twal mou epi sèk pou netwaye deyò aparèy la. Pa sèvi ak pwodui netwayaj likid oswa ayewosòl.
- Vantilasyon: Asire w ouvèti vantilasyon yo vid epi pa bouche pou anpeche yo chofe twòp.
- Depo: If storing the unit for an extended period, disconnect power and store in a cool, dry place.
12. Garanti ak sipò
AVARRO products are designed for reliability and performance. For specific warranty information, please refer to the warranty card included with your product or visit the official AVARRO website. For technical support, product registration, or to download the latest drivers and firmware, please visit www.avarrus.com or contact AVARRO customer service.
Ask a question about this manual
Ask about setup, troubleshooting, compatibility, parts, safety, or missing instructions. Manuals+ will review the question and use this page’s manual context to help answer it.