1. Entwodiksyon
This manual provides instructions for the MEIRIYFA Mini USB Dashcam ACC Hardwired Kit. This power management device is designed to supply continuous power to a dashcam from a vehicle's fuse box, enabling features such as 24-hour parking surveillance even when the vehicle's engine is off.
The kit converts a vehicle's 12V-24V input voltage to a stable 5V DC output at 3A, suitable for various Mini USB powered devices.

Imaj 1.1: Plis paseview of the MEIRIYFA Mini USB Dashcam ACC Hardwired Kit, showing the Mini USB connector, the step-down converter box, and the three-wire input with fuse taps.
2. Pwodwi Features
- Aplikasyon lajè: Compatible with most Mini USB powered devices such as dashcams, GPS navigators, and radar detectors.
- Estanda Sekirite Segondè: Converts 12V-24V vehicle voltage to 5V, supporting extended parking surveillance. Integrated protection prevents overcurrent and overheating.
- Low Voltage Pwoteksyon: Automatically detects battery voltage epi li koupe kouran an si vòl latage drops below 11.6V (for 12V systems) or 23.6V (for 24V systems) to ensure the vehicle can start.
- ACC Voltage Reduction Line: Features a three-wire connection (BAT+, GND-, ACC) for intelligent power management. The dashcam automatically switches to parking mode when the engine is off and to normal recording when the engine is on.
- 24-Hour Surveillance: Provides continuous power to the dashcam from the fuse box, enabling 24-hour parking monitoring.

Image 2.1: Illustration of the kit's high compatibility with devices such as radar detectors, GPS navigation units, dashcams, and mirror dashcams.
3. Espesifikasyon
| Mak | MEIRIYFA |
| Nimewo Modèl | Mini USB |
| Antre Voltage | DC 12V - 24V |
| Sòti Voltage | DC 5V |
| Sòti aktyèl | 3A (Max) |
| Sòti Connector | Mini USB |
| Longè kab | 3.5 meters (Input 0.8m, Output 2.7m) |
| Low Voltage Pwoteksyon | 11.6V (sistèm 12V) / 23.6V (sistèm 24V) |
| Koulè | Nwa |

Image 3.1: Diagram illustrating the kit's universal compatibility, specifically highlighting the Mini USB output and differentiating it from Micro USB and Type C USB.
4. Enstalasyon ak Enstalasyon
Proper installation is essential for the correct functioning of the hardwired kit and your dashcam. If you are unfamiliar with vehicle electrical systems, it is recommended to seek professional installation.
4.1 Identifying Wires
- Yellow Wire (BAT+): Connects to a constant fuse in your vehicle's fuse box. This provides continuous power even when the ignition is off.
- Black Wire (GND-): Connects to a metal bolt or screw on the vehicle's chassis for grounding. Ensure a secure connection to bare metal.
- Fil wouj (ACC): Connects to an ACC (Accessory) fuse in your vehicle's fuse box. This fuse is only powered when the ignition is on.

Image 4.1: Diagram showing the three wires (Black, Yellow, Red) and their respective connection points for grounding, constant power, and accessory power.
4.2 Etap enstalasyon yo
- Monte Dashcam la: Fix your dashcam in the desired position on the windshield, ensuring it does not obstruct your view.
- Wout kab la: Carefully route the Mini USB power cable from the dashcam along the windshield trim, down the A-pillar, and towards the vehicle's fuse box. Ensure the cable is tucked away neatly and securely.
- Konekte fil tè: Attach the black wire (GND-) to a suitable metal grounding point on the vehicle's chassis, typically a bolt or screw.
- Connect Constant Power (BAT+): Using the provided fuse tap, connect the yellow wire (BAT+) to a constant power fuse in your vehicle's fuse box. This fuse should provide power even when the ignition is off.
- Connect Accessory Power (ACC): Using another fuse tap, connect the red wire (ACC) to an accessory power fuse in your vehicle's fuse box. This fuse should only provide power when the ignition is on.
- Connect to Dashcam: Plug the Mini USB connector into your dashcam's power input.
- Fonksyonalite tès: Start your vehicle to ensure the dashcam powers on and begins recording. Turn off the vehicle to verify that the dashcam switches to parking mode (if supported) or powers off correctly based on your dashcam's settings.

Imaj 4.2: Detaye view of the ground wire connection to a metal screw and the fuse tap connections for the power wires.
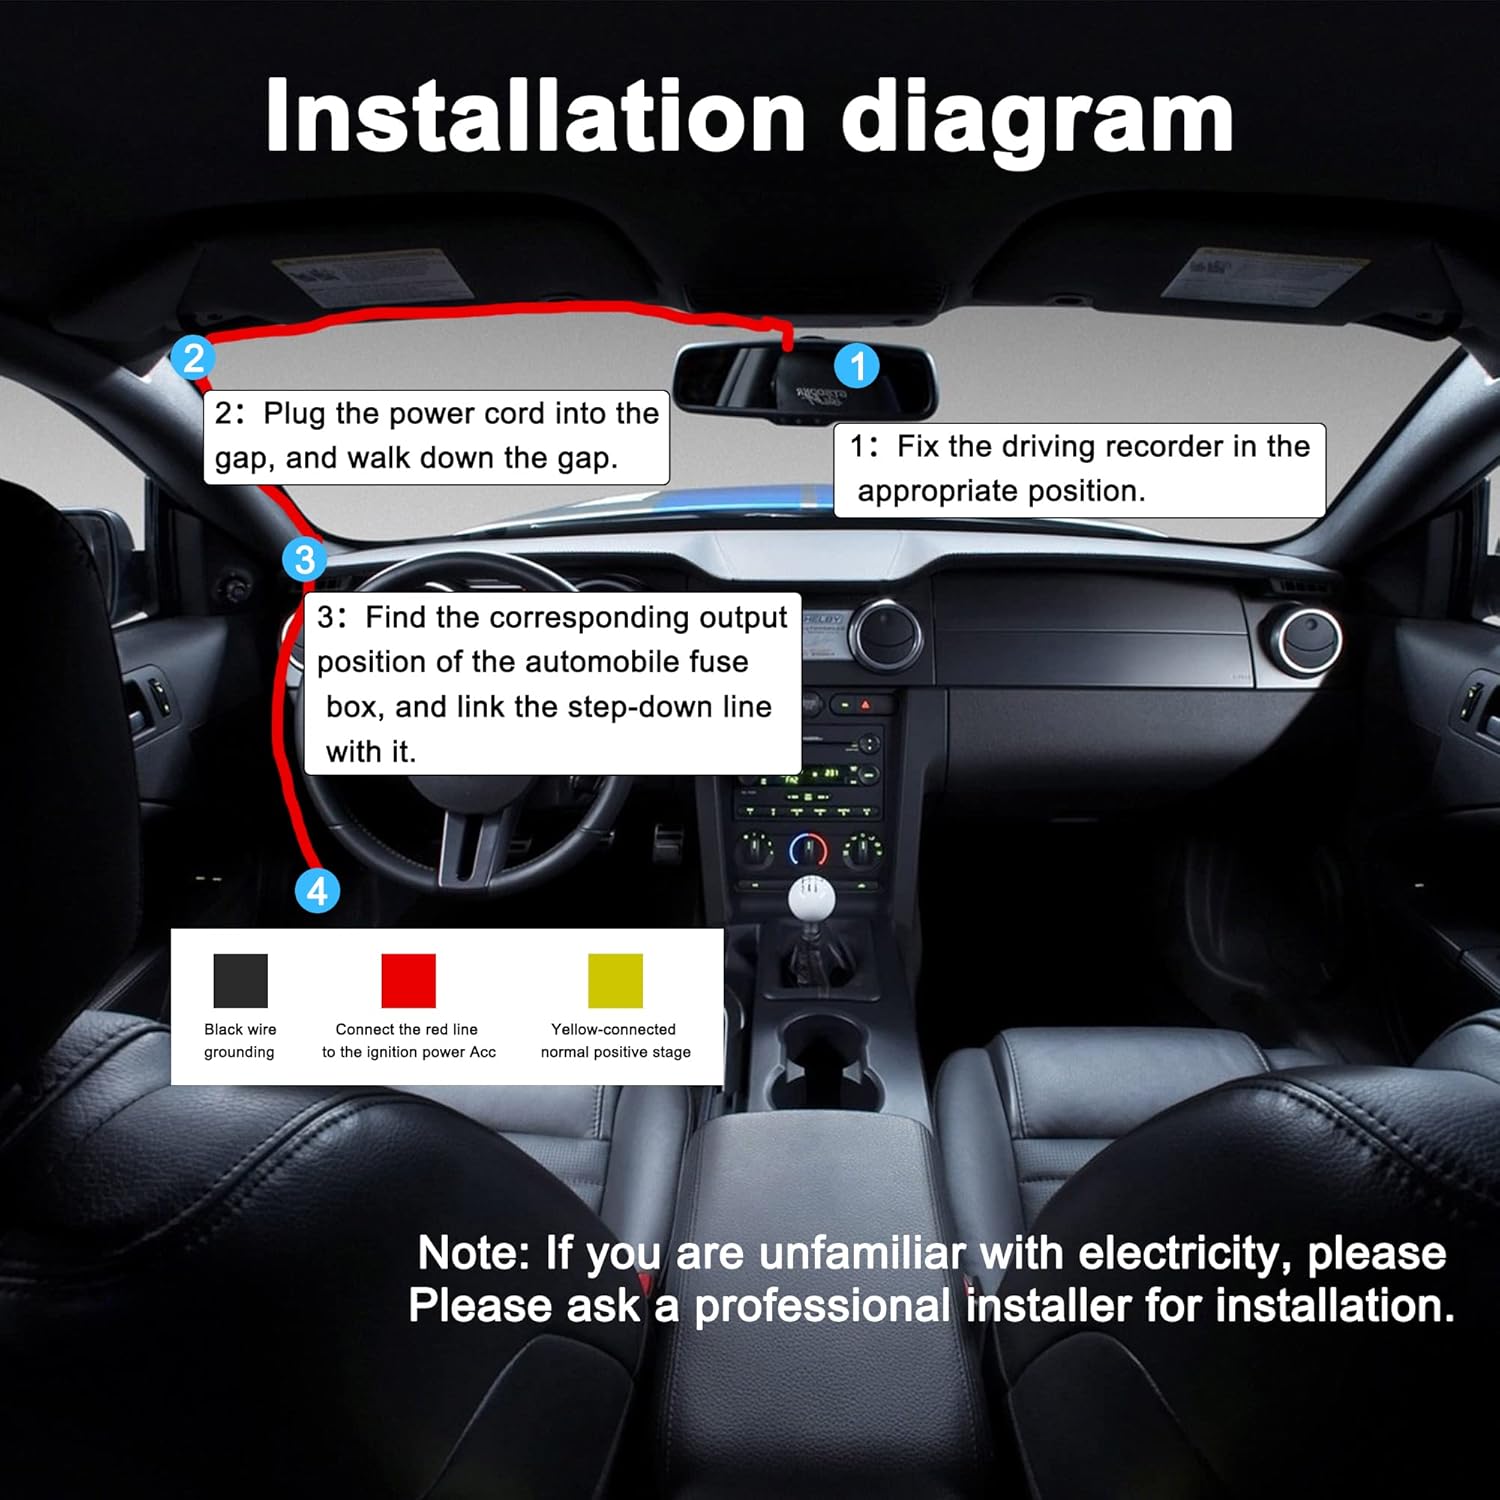
Image 4.3: Step-by-step visual guide for installing the dashcam and routing the hardwire kit cable within a vehicle, showing connections to the fuse box and grounding point.
Note: If you are unfamiliar with vehicle electrical systems, please consult a professional installer for assistance.
5. Operasyon Enstriksyon
Once installed, the MEIRIYFA Hardwired Kit operates automatically to manage power to your dashcam.
- Operasyon nòmal: When the vehicle's engine is running, the red ACC wire detects ignition power, and the kit provides continuous 5V power to the dashcam for normal recording.
- Siveyans Pakin: When the vehicle's engine is turned off, the ACC power is cut. The kit continues to draw power from the constant BAT+ line, allowing the dashcam to enter its parking surveillance mode (if supported by your dashcam). This enables 24-hour monitoring.
- Low Voltage Pwoteksyon: The built-in low voltagsikwi pwoteksyon e a kontwole volim batri machin ou antage. Si batri a voltage drops below 11.6V (for 12V systems) or 23.6V (for 24V systems), the kit will automatically cut off power to the dashcam to prevent excessive battery drain and ensure the vehicle can start.

Image 5.1: Visual representation of the 24-hour surveillance capability and the low voltage protection mechanism, showing a battery icon and the voltage cut-off thresholds.
6. Antretyen
The MEIRIYFA Hardwired Kit is designed for reliable operation with minimal maintenance. Follow these guidelines to ensure optimal performance:
- Tcheke Koneksyon: Periodically inspect all wire connections (ground, BAT+, ACC) to ensure they remain secure and free from corrosion.
- Fuse Integrity: The kit includes fuse taps. Ensure the fuses are correctly seated and not blown. If a fuse blows, replace it with one of the same amperage Rating.
- Wout kab: Verify that the cables are still securely routed and not pinched or exposed to excessive wear.
- Lapwòpte: Keep the step-down converter box free from excessive dust or debris.
NAN. Depanaj
If you encounter issues with your MEIRIYFA Hardwired Kit, refer to the following troubleshooting steps:
| Pwoblèm | Kòz posib | Solisyon |
|---|---|---|
| Dashcam la pa limen. |
|
|
| Dashcam does not enter parking mode or turns off completely when ignition is off. |
|
|
| Vehicle battery drains excessively. |
|
|
8. Garanti ak sipò
According to available product information, specific manufacturer warranty details are not provided for this product. Information regarding spare parts availability is also not available.
For any product-related inquiries, technical support, or assistance with installation, please contact the seller or manufacturer directly through your purchase platform.