1. Entwodiksyon
This manual provides detailed instructions for the setup, operation, and maintenance of your XTUGA U-260 Dual Channel UHF Wireless Microphone System. Please read this manual thoroughly before using the product to ensure proper functionality and to maximize its lifespan. Retain this manual for future reference.
2. Pwodwi souview
The XTUGA U-260 is a professional-grade dual UHF wireless microphone system designed for various applications including church events, karaoke, weddings, and other live events. It features a robust design, adjustable frequencies, and convenient auto-scan and IR pairing functions.
2.1. Konpozan ki enkli
- U-260 UHF Wireless Receiver (1 unit)
- UHF Wireless Handheld Microphones (2 units)
- Antennas (2 units)
- Adaptè kouran (1 inite)
- User's Manual (1 unit)
- Kab Odyo (1 inite)
- Anti-skid Rings (2 units)
- Power Plugs (2 units)
- Power Cables (2 units)

Figure 2.1: All components included with the XTUGA U-260 Wireless Microphone System, including the receiver, two microphones, antennas, power adapter, cables, and anti-skid rings.
2.2. Karakteristik kle
- Dual UHF Channels: Two independent channels with 100 selectable frequencies each (Channel 1: 540.1 - 564.85 MHz; Channel 2: 568.1 - 592.85 MHz).
- Fonksyon Eskane Otomatik: Automatically searches for the least interference channel.
- IR Synchronization: Seamlessly pairs the receiver and microphones.
- Frekans Lock: Prevents accidental frequency changes.
- Long Range Operation: Up to 492ft (150 meters) operating distance.
- Konstriksyon dirab: Microphones feature sturdy metal construction.
- Kalite son siperyè: High-quality dynamic cartridge designed to limit feedback and interference.
- Rechargeable Microphones: Built-in lithium batteries provide up to 8 hours of use on a 3-hour charge via USB-C.
- Dashboard-Inspired Display: Receiver features a unique display for AF and RF signal indication.

Figure 2.2: The receiver's display screen, featuring a dashboard-inspired design for clear signal indication.
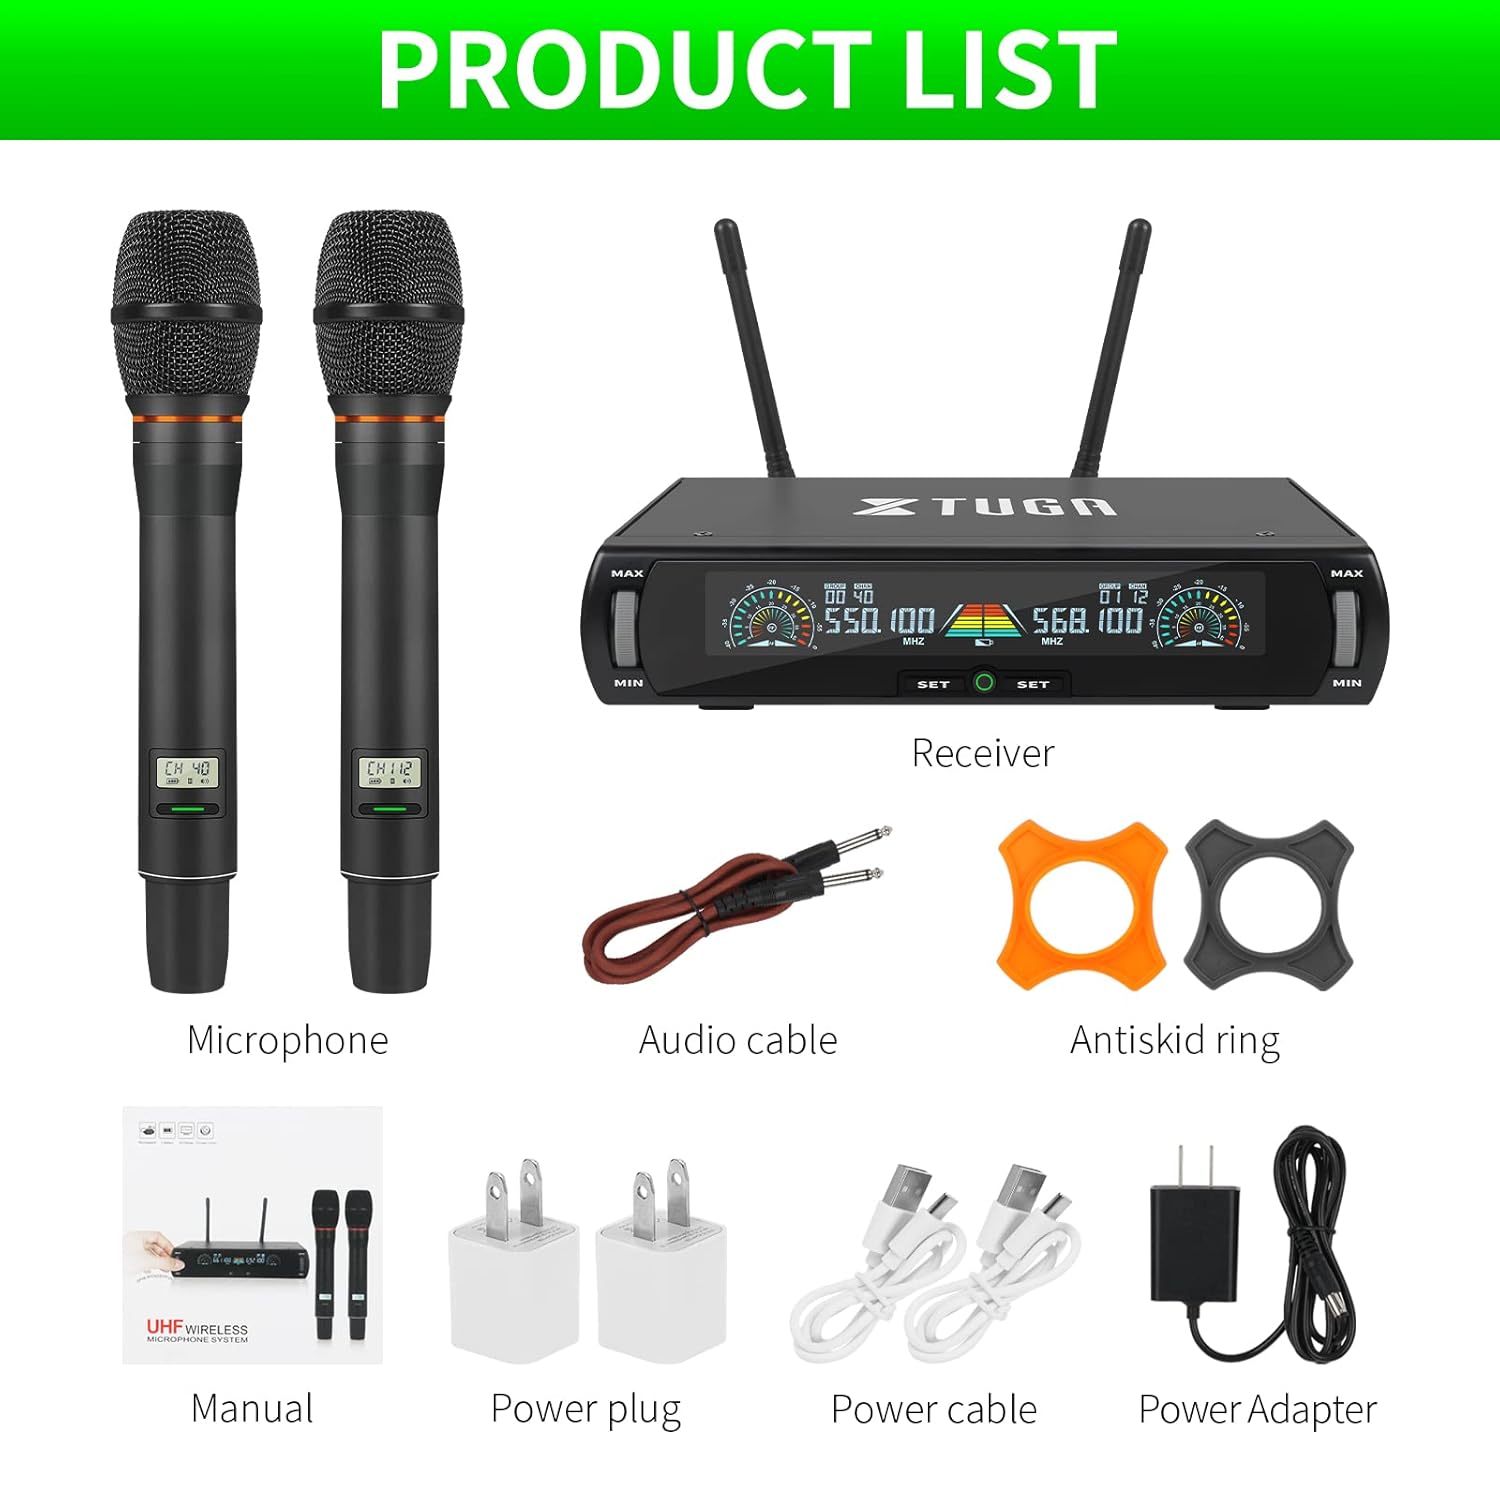
Figure 2.3: Illustration of the microphone's cardioid pickup pattern, designed to reduce noise and capture sound realistically.
2.3. Idantifikasyon konpozan

Figi 2.4: Detaye view of the receiver and microphone components.
- Kontwòl volim
- Function settings button
- Switch (Power/Mode)
- Ekspozisyon ekran
- Power socket (DC 12V)
- Antèn Jack
- XLR pwodiksyon
- Audio output (6.35mm/1/4 inch)
- Steel meshed head (Microphone)
- Display screen (Microphone)
- Switch (Microphone Power)
- Type-C charging port (Microphone)
3. Enstriksyon Enstalasyon
- Depake konpozan: Retire tout atik yo nan anbalaj la avèk prekosyon.
- Konekte antèn: Screw the two antennas into the antenna jacks on the rear of the receiver. Ensure they are securely tightened.
- Koneksyon pouvwa: Connect the power adapter to the receiver's power socket (DC 12V) and plug it into a suitable power outlet.
- Sòti odyo:
- For balanced output, connect XLR cables from the receiver's XLR outputs to your mixer or amplifier.
- For unbalanced output, use the provided 6.35mm (1/4 inch) audio cable to connect the receiver's audio output to your mixer or amplifier.
- Pouvwa sou reseptè: Press the power switch on the receiver. The display screen should illuminate.
- Mikwofòn Chaje: Before first use, ensure both microphones are fully charged using the provided USB-C cables and power plugs. The microphone display will show charging status.
- Mikwofòn pou limen: Press and hold the power switch on each microphone until its display illuminates.

Figure 3.1: The XTUGA U-260 system ready for operation, showing the receiver with antennas and two handheld microphones.
4. Operasyon Enstriksyon
4.1. Frequency Selection and IR Pairing
The system features an auto-scan function to find clear frequencies and IR synchronization for easy pairing.

Figure 4.1: Diagram illustrating the IR pairing process between the microphone and receiver.
- Initiate Auto Scan: On the receiver, press the "SET" button three times quickly for the desired microphone channel (left or right). The receiver will scan for the clearest available frequency.
- Select Frequency (Optional): If you wish to manually select a frequency after the scan, rotate the volume knob corresponding to the microphone channel you are adjusting.
- IR Pairing: Once a frequency is displayed on the receiver, hold the front of the microphone (where its display is located) close to the IR sensor on the receiver. The IR sensor is located on the bottom left side of the receiver's screen.
- Konfime pè: While holding the microphone near the IR sensor, press the "SET" button on the receiver once for the corresponding microphone channel. A small indicator light on the receiver should flash, and the microphone's display will update to show the new frequency, confirming successful pairing. This process may require a couple of attempts to ensure proper alignment and timing.
4.2. Frequency Lock Function
To prevent accidental changes to the selected frequency, use the frequency lock function.

Figure 4.2: Visual representation of the frequency lock function, showing a padlock icon.
- Pou fèmen: Press and hold the "SET" button on the receiver for the desired microphone channel until a lock icon appears on the display.
- Pou déblotché: Press and hold the "SET" button again until the lock icon disappears.
4.3. Kontwòl Volim
Each microphone channel has an independent volume control knob on the receiver. Rotate the "MIN/MAX" knobs to adjust the output volume for each microphone.
4.4. Microphone Charging
The handheld microphones are equipped with built-in rechargeable lithium batteries.

Figure 4.3: Illustration of microphone battery life (8 hours work) and charging time (3 hours) via USB-C.
- Connect a USB-C cable to the charging port at the bottom of the microphone.
- Connect the other end of the USB-C cable to a power adapter or a USB power source.
- A dim red light on the microphone's display bar indicates charging. The light will turn off or change color when fully charged.
- A full charge typically takes approximately 3 hours and provides up to 8 hours of continuous use.
5. Antretyen
- Netwayaj: Sèvi ak yon twal mou epi sèk pou netwaye reseptè a ak mikwofòn yo. Pa sèvi ak pwodui netwayaj likid oswa solvan.
- Depo: Sere sistèm nan nan yon kote ki fre epi sèk, lwen limyè solèy dirèk ak tanperati ekstrèm lè w pa ap itilize li.
- Swen batri: For optimal battery life, avoid fully discharging the microphones frequently. Recharge them regularly, especially if storing for extended periods.
- Jesyon kab: Ensure all cables are connected securely and are not strained or kinked.
NAN. Depanaj
| Pwoblèm | Kòz posib | Solisyon |
|---|---|---|
| Pa gen pwodiksyon son. |
|
|
| Entèferans oswa bri estatik. |
|
|
| Microphone not pairing. |
|
|
| Microphone battery drains quickly. |
|
|
7. Espesifikasyon
| Karakteristik | Detay |
|---|---|
| Modèl | U-260 |
| Mak | XTUGA |
| Mikwofòn Fòm Faktè | Microphone System (Handheld) |
| Koneksyon Teknoloji | UHF Wireless, XLR |
| Kantite Chanèl | 2 (2x100 selectable frequencies) |
| Frequency Range (Channel 1) | 540.1 - 564.85 MHz |
| Frequency Range (Channel 2) | 568.1 - 592.85 MHz |
| Range opere | Jiska 492 pye (150 mèt) |
| Modèl polè | Unidirectional (Cardioid Pickup) |
| Enpedans | 600 Ohm |
| Siyal-a-bwi Pwopòsyon | 120 dB |
| Microphone Power Source | Bati-an rechargeable batri ityòm |
| Dire lavi batri mikwofòn nan | Jiska 8 èdtan |
| Tan Chaje Mikwofòn | Apeprè 3 èdtan (via USB-C) |
| Sous pouvwa reseptè | DC 12V pouvwa adaptè |
| Materyèl | Metal (Microphones) |
| Konpozan ki enkli | Receiver, 2 Handheld Microphones, 2 Antennas, Power Adapter, User Manual, Audio Cable, Anti-skid Rings, Power Plugs, Power Cables |
| Pwa atik | 2 kg |
8. Garanti ak sipò
XTUGA provides a one-year free warranty period for products with authentic brand logos. For any questions, technical assistance, or warranty claims, please contact XTUGA customer support through your purchase platform or the official XTUGA websit.
Tanpri konsève prèv acha ou a pou validasyon garanti a.