
1. Entwodiksyon
The RadioMaster TX12 MKII ELRS is a compact and powerful 16-channel remote control transmitter designed for RC drones and other remote-controlled models. It features an internal ExpressLRS module, supports both EdgeTX and OpenTX operating systems, and is equipped with precision hall-effect gimbals. This manual provides essential information for the safe and effective use of your TX12 MKII ELRS transmitter.

Image 1.1: The RadioMaster TX12 MKII ELRS Remote Control Transmitter, highlighting its compact design and key features like EdgeTX, OpenTX, ExpressLRS, and Hall Gimbals.
2. Enfòmasyon sou Sekirite
Always operate your remote control transmitter responsibly. Failure to follow safety guidelines can result in injury or damage to property. Keep the transmitter away from children. Do not operate in adverse weather conditions or near crowds.
2.1 Sekirite Batri
The TX12 MKII ELRS is designed to operate with 2 x 3.7V Li-ion cells or 2S 7.4V LiPo/LiFe cells. Ensure correct polarity when installing batteries. Only charge 2 x 3.7V Li-ion or 2S 7.4V LiPo/LiFe cells. Do not charge 6.6V LiFe or 3.6V Li-ion cells. Improper battery use or charging can lead to fire, explosion, or other hazards.
Imaj 2.1: View of the battery compartment, showing the warning label regarding compatible battery types and charging precautions. An SD card is also visible in its slot.
3. Pwodwi souview
Familiarize yourself with the components of your TX12 MKII ELRS transmitter.

Image 3.1: A detailed diagram illustrating the various components and controls of the TX12 MKII ELRS transmitter, including gimbals, switches, buttons, and ports. Dimensions are also shown.
3.1 Konpozan kle
- Antèn: For transmitting radio signals.
- Gimbals (Left & Right): Control sticks for pitch, roll, yaw, and throttle. Equipped with precision hall-effect sensors.
- Switches (SA, SB, SC, SD, SE, SF): Programmable 2-position and 3-position switches.
- Sliders (S1, S2): Proportional sliders for auxiliary functions.
- Buttons (SYS, RTN, PAGE>, PAGE<, TELE, MDL, Power, Trim): Navigation and control buttons for the operating system.
- Menu Wheel: Pou navige nan meni yo epi ajiste paramèt yo.
- Ekran LCD: Displays system information, model settings, and telemetry data.
- Pò USB TIP-C: For charging, connecting to a PC for simulator use, and firmware updates.
- Trainer Port: Pou konekte ak yon lòt transmetè pou rezon antrènman.
- Plas kat SD: For storing model data, sounds, and firmware.
4. Enstalasyon
4.1 Enstalasyon batri
- Open the battery compartment cover on the rear of the transmitter.
- Insert two compatible 18650 Li-ion cells or a 2S 7.4V LiPo/LiFe battery pack, ensuring correct polarity.
- Fèmen kouvèti lòj batri a byen.
4.2 SD Kat
The TX12 MKII ELRS comes with an SD card pre-installed. This card contains the necessary files for the EdgeTX/OpenTX operating system, including model settings, sounds, and images. Do not remove the SD card during operation or firmware updates.

Imaj 4.1: Yon gwo plan view of the microSD card correctly inserted into its dedicated slot within the battery compartment.
4.3 Chaje
The transmitter supports USB-C charging with QC3.0 support. Connect a USB-C cable to the TYPE-C USB port on the top of the transmitter and to a suitable USB power source. The charging indicator on the screen will show the charging status.

Imaj 4.2: Anlè view of the TX12 MKII ELRS, highlighting the USB-C data/charging port and the TRS 3.5mm trainer socket.
4.4 mikrolojisyèl
The TX12 MKII ELRS comes with the EdgeTX operating system installed from the factory. For information on updating firmware or switching to OpenTX, please refer to the official RadioMaster website or the EdgeTX/OpenTX documentation.
5. Operasyon
5.1 Power On/Off
- Pou limen: Peze epi kenbe bouton pouvwa a jiskaske ekran an limen.
- Pou etenn: Press and hold the power button. A confirmation prompt will appear; select 'Yes' to power off.
5.2 Gimbal Adjustment
The precision hall-effect gimbals are adjustable without disassembly. The travel range can be set between 38° and 54° to suit your preference.

Image 5.1: Illustration showing the adjustable range of the Hall Gimbals, from a minimum of 38 degrees to a maximum of 54 degrees.
5.3 Kontwòl debaz yo
- Bouton SYS: Aksè nan paramèt sistèm yo.
- RTN Button: Retounen nan meni oswa ekran anvan an.
- PAGE> / PAGE< Buttons: Navigates between pages within menus.
- TELE Button: Accesses telemetry screens.
- MDL Button: Accesses model settings.
- Menu Wheel: Scrolls through options and confirms selections.

Imaj 5.2: Gwo plan view of the SYS, RTN, PAGE, and TELE buttons on the transmitter's control panel.
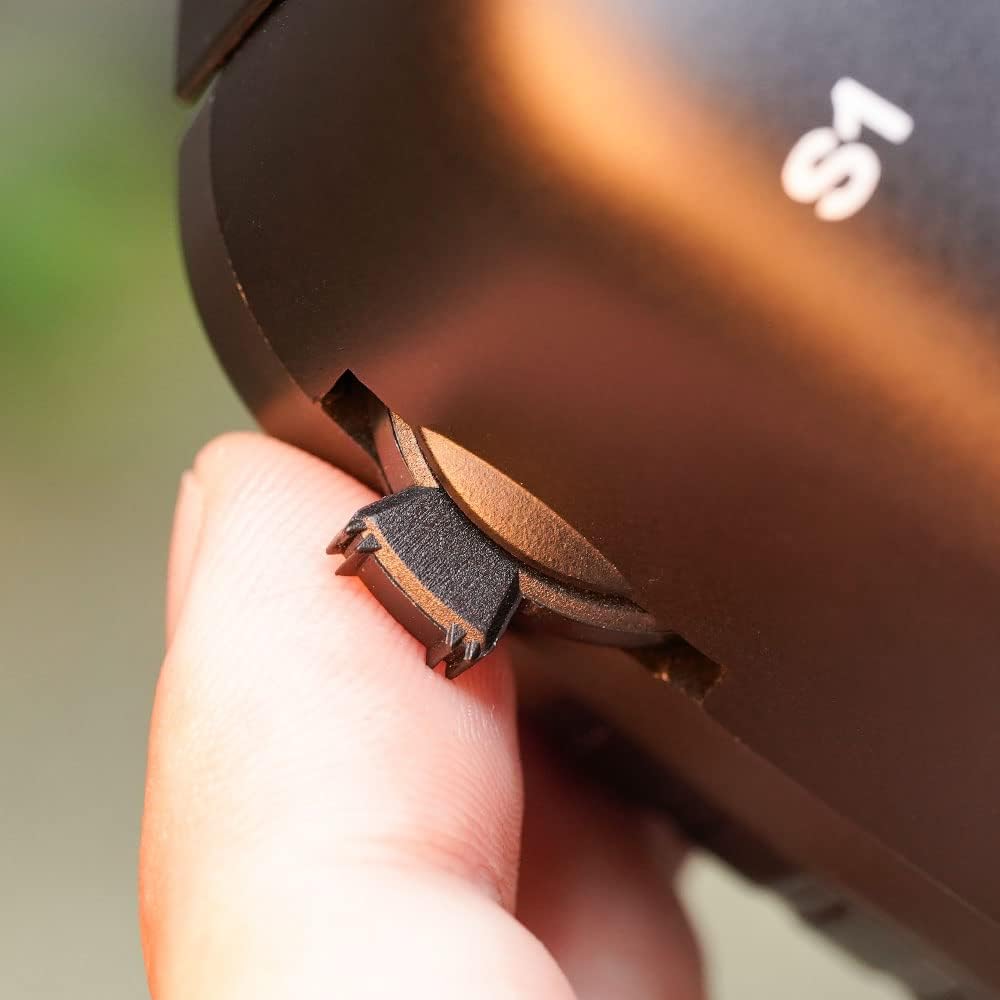
The S1 and S2 slider grips have been improved for better tactile feedback and control.

Imaj 5.3: Yon imaj detaye view of the improved S1/S2 slider grip, designed for enhanced user comfort and control.
5.4 Binding with Receiver
The TX12 MKII ELRS features an internal ExpressLRS module. To bind your transmitter with an ExpressLRS receiver, ensure both devices are powered on and in binding mode. Follow the specific binding procedure outlined in your receiver's manual and the EdgeTX/OpenTX documentation for ExpressLRS.
5.5 Simulator Use and BLE Joystick Mode
The transmitter supports USB simulators, allowing you to practice flying on a computer. Additionally, the ExpressLRS version supports BLE (Bluetooth Low Energy) Joystick Mode, enabling wireless connection to PCs, tablets, and phones for simulator use and games.

Image 5.4: Visual representation of the TX12 MKII ELRS connected to a laptop for simulator use via USB, and an icon indicating support for BLE Joystick Mode for wireless connections.
6. Antretyen
- Netwayaj: Use a soft, dry cloth to clean the transmitter. Avoid using solvents or abrasive cleaners.
- Depo: Sere transmetè a nan yon kote ki fre epi sèk, lwen limyè solèy dirèk ak tanperati ekstrèm. Retire pil yo si w ap sere l pou yon bon bout tan.
- Mizajou mikrolojisyèl: Regularly check for and install the latest firmware updates for EdgeTX/OpenTX and the ExpressLRS module to ensure optimal performance and access to new features.
NAN. Depanaj
- Transmitter will not power on: Ensure batteries are correctly installed and fully charged. Check battery compartment for any loose connections.
- Binding issues: Verify that both transmitter and receiver are in binding mode. Ensure the correct ExpressLRS firmware version is installed on both devices. Check the receiver's manual for specific binding steps.
- Kontwòl yo pa reponn: Check model settings in EdgeTX/OpenTX. Ensure the receiver is properly bound and powered. Inspect physical connections to the receiver.
- Ekran an vid oswa bloke: Try restarting the transmitter. If the issue persists, consider performing a firmware re-flash (refer to official documentation).
8. Espesifikasyon
| Karakteristik | Spesifikasyon |
|---|---|
| Modèl | RadioMaster TX12 MKII ELRS |
| Chanèl | 16 |
| Entèn RF Modil | ExpressLRS |
| Sistèm operasyon | EdgeTX (factory installed), OpenTX compatible |
| Gimbals | Precision Hall-Effect Gimbals |
| Processeur | STM32F407 |
| Chaje | USB-C with QC3.0 support |
| Dimansyon pwodwi | 6 x 3 x 7 pous (159 x 108 x 170 mm) |
| Pwa atik | 12.8 ons (362.87 gram) |
| Kat SD | Enkli |
9. Garanti ak sipò
For warranty information, technical support, or service inquiries, please contact RadioMaster customer support through their official websit la. Kenbe prèv acha ou pou reklamasyon garanti.