
CWI Lighting 1606P33-37-101
CWI Lighting Olinda 37-Light Integrated LED Chandelier Instruction Manual
Model: 1606P33-37-101 | Brand: CWI Lighting
Entwodiksyon
Thank you for choosing the CWI Lighting Olinda 37-Light Integrated LED Chandelier. This manual provides essential information for the safe installation, operation, and maintenance of your new lighting fixture. Please read these instructions thoroughly before beginning installation and retain them for future reference.
Enfòmasyon enpòtan sou sekirite
AVÈTISMAN: Risk pou chòk elektrik. Dekonekte kouran an nan bwat fizib la oswa nan disjonktè a anvan enstalasyon oswa antretyen.
- Tout koneksyon elektrik yo dwe fèt an akò avèk kòd ak òdonans lokal yo, Kòd Elektrik Nasyonal (NEC), ak ANSI/NFPA 70-1999.
- Konsilte yon elektrisyen kalifye si ou pa sèten sou fil elektrik yo.
- This fixture is intended for indoor use only (Dry Location). Do not expose to water or moisture.
- Do not install this fixture on a ceiling that is not structurally sound to support its weight (36 pounds).
- Use only with compatible dimmer switches as specified.
- Avètisman Pwopozisyon 65: Pwodui sa a ka genyen pwodui chimik ke Eta Kalifòni konnen ki lakòz kansè ak domaj nesans oswa lòt pwoblèm repwodiksyon.
Kontni pake
Carefully unpack your chandelier and inspect all components for damage. Keep all packaging materials until you are certain all parts are present and in good condition.
- Olinda 37-Light LED Integrated Metal Chandelier (Black Finish)
- Twous Materyèl Mounting
- Manyèl Enstriksyon
Note: LED bulbs are integrated and not user-replaceable. No separate bulbs are included or required.
Enstriksyon Enstalasyon
1. Pre-Enstalasyon
- Zouti obligatwa (pa enkli): Tournevis Phillips, tournevis plat, pens pou retire fil elektrik, tep elektrik, linèt sekirite, nechèl.
- Ensure the power supply to the installation area is turned OFF at the circuit breaker or fuse box.
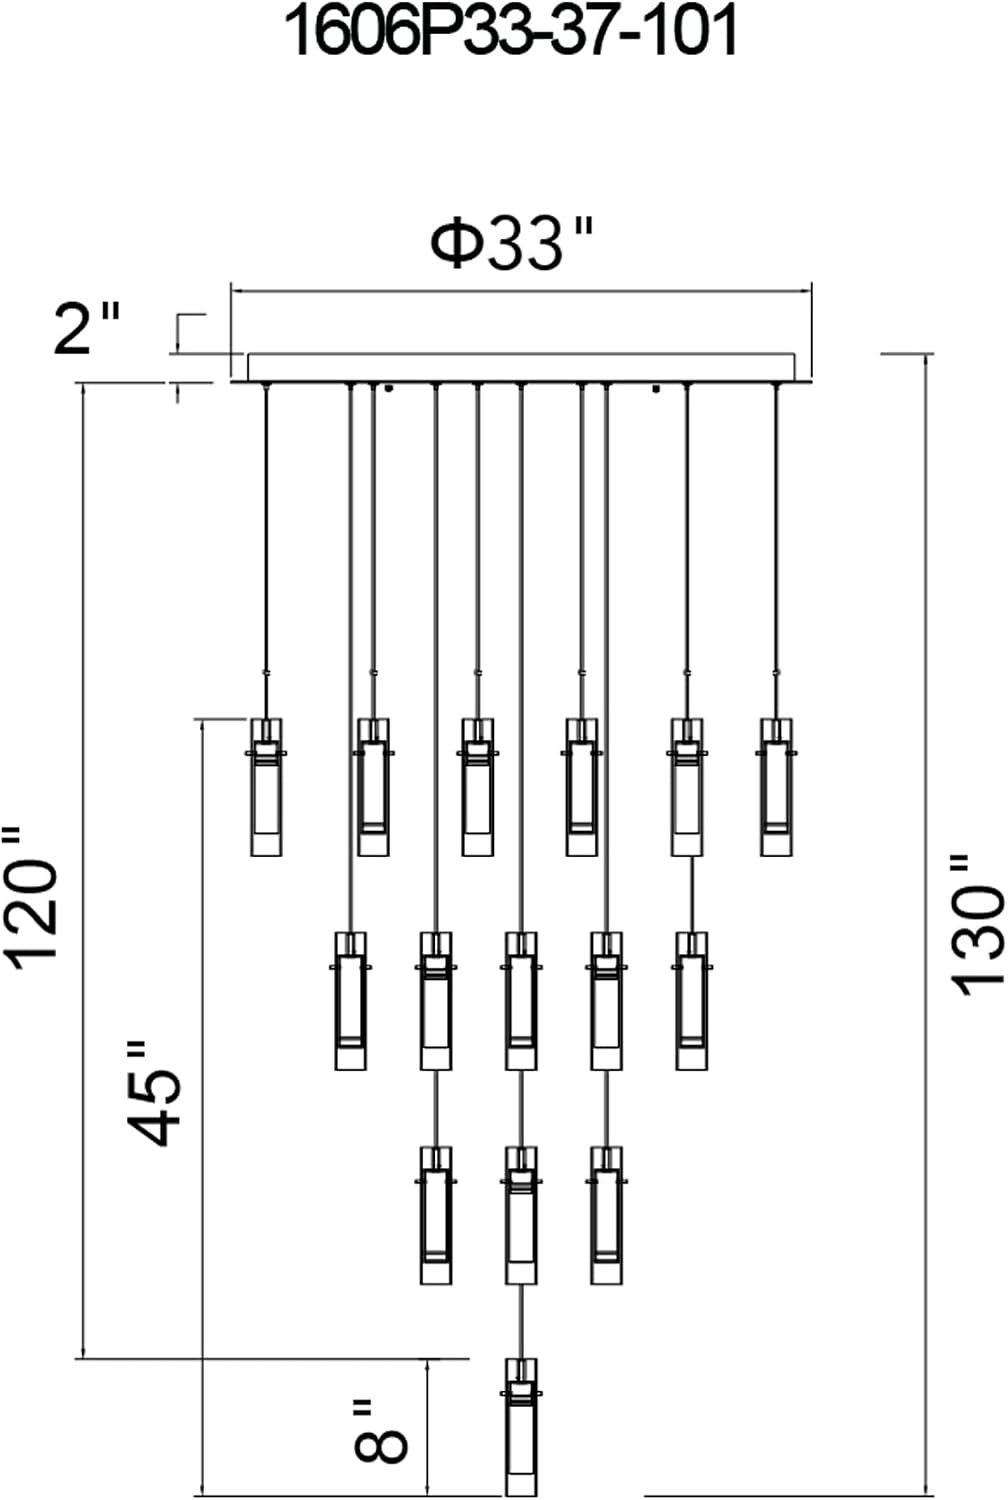
- Review the technical drawing for dimensions and ensure the installation location is suitable.

Figi 1: Technical drawing showing the dimensions of the Olinda Chandelier (Model 1606P33-37-101). Dimensions are approximately 33"L x 33"W x 130"H, with a canopy diameter of 33" and a minimum hanging height of 45".
2. Monte aparèy la
- Attach the mounting bracket to the junction box in the ceiling using the provided screws. Ensure the bracket is securely fastened and can support the chandelier's weight.
- Carefully lift the chandelier and connect the electrical wires. Connect the black wire from the fixture to the black (Live) wire from the junction box, the white wire from the fixture to the white (Neutral) wire from the junction box, and the ground wire from the fixture to the ground wire from the junction box. Secure connections with wire nuts and electrical tape.
- Tuck the wires neatly into the junction box.
- Secure the chandelier canopy to the mounting bracket using the canopy screws. Ensure the canopy is flush with the ceiling.

Figi 2: Detail of the chandelier's top plate, illustrating the connection points for the individual pendant wires and the main electrical connection. This view helps in understanding the wiring and assembly process.
3. Adjusting Pendant Lengths (Optional)
The Olinda chandelier features adjustable pendant cables. If desired, you can adjust the length of individual pendants by carefully pushing the cable into the canopy or pulling it out from the canopy. Ensure all adjustments are made before restoring power.

Figi 3: Yon fèmen view of several individual pendants, showcasing the black finish and clear glass diffusers. This image highlights the design of the light sources.
4. Etap final yo
- Yon fwa enstalasyon an fini, retabli kouran an nan disjonktè a.
- Test the chandelier to ensure all lights function correctly.
Enstriksyon Operasyon
Power On/Off
The Olinda Chandelier is controlled by a standard wall switch. Flip the switch to turn the fixture on or off.
Fonksyonalite gradyasyon
This chandelier is compatible with most standard dimmer switches. To adjust the brightness, use a compatible dimmer switch (not included) installed on your wall circuit. The integrated LEDs produce a warm white light.
Metòd kontwòl
The primary control methods are a wall switch (Standard Switch Type) and a compatible dimmer switch (Controller Type: Remote Control, Control Method: Touch, referring to the dimmer's functionality).
Swen ak Antretyen
- Netwayaj: To clean the fixture, ensure power is off. Use a soft, dry cloth to wipe down the metal and glass surfaces. Do not use abrasive cleaners, solvents, or polishes as they may damage the finish.
- Poul: The LEDs are integrated and designed for long life. They are not user-replaceable.
- Enspeksyon: Tcheke tout koneksyon ak pyès montaj yo detanzantan pou asire yo rete byen fèm.
Depanaj
| Pwoblèm | Kòz posib | Solisyon |
|---|---|---|
| Enstalasyon an pa limen. |
|
|
| Limyè yo ap tranble oswa yo diminye yon fason ki pa konsistan. |
|
|
| Aparèy la ap ronronnen. |
|
|
Espesifikasyon
| Nimewo Modèl | 1606P33-37-101 |
| Mak | CWI Lighting |
| Materyèl | Metal |
| Koulè | Nwa |
| Sous limyè | Entegre dirije |
| Kantite sous limyè | 37 |
| Koulè limyè | Blan cho |
| Wattage | 74 Watts |
| Klète | 3848 Lumen |
| Efikasite | 52.03 lumèn pou chak watt |
| Dimansyon (L x W x H) | 33"L x 33"W x 130"H (Maximum) |
| Pwa atik | 36 liv |
| Kalite aliye | Mòn plafon |
| Itilizasyon Andedan kay la / Deyò | Indoor Only (Dry Location) |
| Sètifikasyon | ETL, BACL certified |
| Asanble obligatwa | Wi |
Garanti ak sipò
Enfòmasyon sou Garanti
This CWI Lighting fixture comes with a 3-ane garanti limite kont domaj manifakti. Garanti sa a kouvri domaj nan materyèl ak nan fabrikasyon anba itilizasyon nòmal. Tanpri konsève prèv acha ou pou reklamasyon garanti.
Sipò pou Kliyan
For technical assistance, missing parts, or warranty inquiries, please contact CWI Lighting customer support. Refer to the product packaging or the official CWI Lighting websit pou jwenn enfòmasyon kontak aktyèl.
Vizyèl pwodwi

Figi 4: The CWI Lighting Olinda 37-Light Integrated LED Chandelier in its full form, showcasing the tiered pendant design and black finish.

Figi 5: Yon ilistrasyon view of the Olinda Chandelier installed, demonstrating its visual impact and scale within a space.

Figi 6: Another perspective of the Olinda Chandelier, highlighting the arrangement of the 37 individual pendants.
Figi 7: A detailed shot of a single pendant, showing the integrated LED light source and the clear glass outer cylinder.

Figi 8: Another close-up of a pendant, emphasizing the sleek black finish and the warm glow of the integrated LED.

Figi 9: A grouping of three pendants, providing a clearer view of their individual construction and the light emitted.

Figi 10: Fè eskanè kòd QR sa a view the Olinda Chandelier in a virtual room environment. (Link to virtual view)
NOTE: "THIS IS A RENDER ONLY, PLEASE REFER TO THE SPECS FOR MORE DETAILS"
Ask a question about this manual
Ask about setup, troubleshooting, compatibility, parts, safety, or missing instructions. Manuals+ will review the question and use this page’s manual context to help answer it.