
1. Entwodiksyon
This manual provides detailed instructions for the installation, operation, and maintenance of your Geek Smart Fingerprint Door Lock, Model L-B201. Please read this manual thoroughly before installation and use to ensure proper function and longevity of the product. Keep this manual for future reference.
2. Pwodwi Features
- Rekonesans anprent: Stores up to 20 unique fingerprints for quick and secure access. Unlocks in approximately 0.1 seconds.
- Mòd Operasyon Doub: Easily switch between Normal mode (auto-lock after 5 seconds) and Passage mode (remains unlocked for free passage).
- Long lavi batri: Powered by 4 AAA batteries (not included), providing approximately 8-12 months of operation.
- Pouvwa ijans: Equipped with a USB port for emergency charging if batteries deplete.
- Enstalasyon senp: Designed for easy DIY installation with minimal tools required. Voice assistant guides programming.
- Inivèsèl konpatibilite: Suitable for both left and right-handed doors. Fits standard door thicknesses from 1-3/8'' to 2-1/8'' (35 to 55mm). Adjustable latch for 2-3/8'' (60mm) or 2-3/4'' (70mm) backsets.
- Aksè pou backup: Includes physical keys for manual override.
3. Pake kontni
Verifye ke tout konpozan yo prezan anvan ou kòmanse enstalasyon an:
- Manch devan Asanble
- Manch Dèyè Asanble
- Latch
- Plak grèv
- Repons (2)
- Keyhole Cover Pin
- Vis Montage (4)
- Kawotchou Joint
- Manyèl Enstriksyon (dokiman sa a)
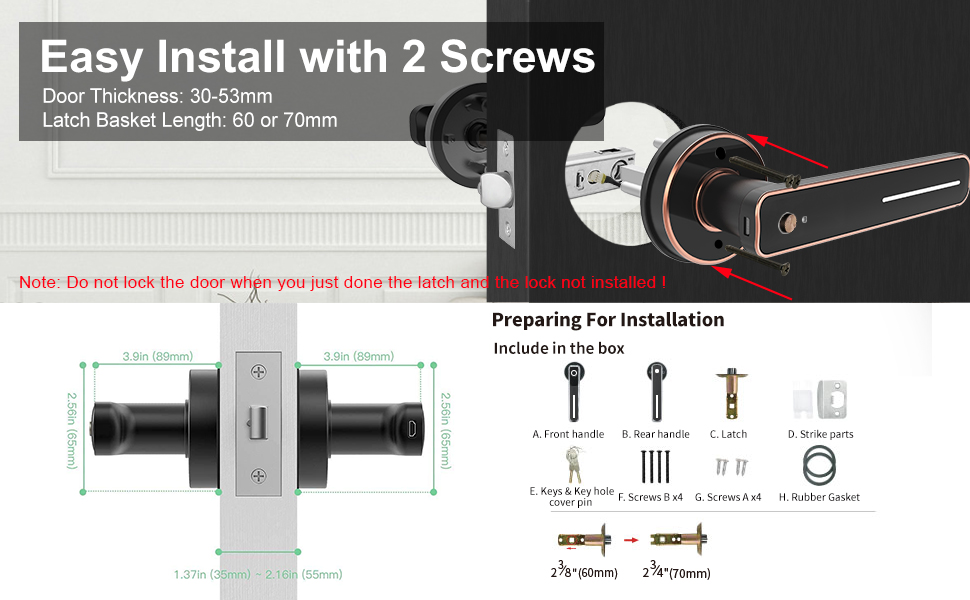
Image: Included components for installation, featuring front and rear handles, latch, strike plate, keys, screws, and gasket.
4. Gid Enstalasyon
Installation typically requires only a screwdriver. Follow these steps carefully:
- Prepare pòt la: Ensure your door meets the thickness requirements (1-3/8'' to 2-1/8'' or 35-55mm) and that the latch backset is set correctly (60mm or 70mm).
- Enstale Latch la: Insert the latch into the door edge. Ensure the bevel of the latch bolt faces the door frame. Secure with screws.
- Install the Front Handle: Position the front handle assembly on the exterior side of the door, aligning the spindle with the latch mechanism.
- Install the Rear Handle: Place the rubber gasket on the interior side of the door. Connect the rear handle assembly to the front handle, ensuring wires are not pinched.
- Sere kadna a: Use the provided screws to firmly attach both handle assemblies to the door.
- Enstale plak grèv la: Mount the strike plate on the door frame, aligning it with the latch bolt.
- Mete pil: Open the battery compartment on the rear handle and insert 4 AAA batteries (not included), observing polarity.

Image: Visual guide for installing the smart lock using two screws, highlighting door thickness and latch basket length.
Note: Do not lock the door when you have just installed the latch and the lock is not fully assembled.
5. Operasyon
5.1 Initial Setup and Fingerprint Enrollment
- After battery installation, the lock will prompt you with voice instructions.
- To add the first administrator fingerprint, follow the voice prompts. You will typically need to place your finger on the sensor multiple times from different angles.
- Once the administrator fingerprint is registered, you can add additional user fingerprints (up to 20 total) by following similar voice prompts.

Image: The fingerprint sensor in action, showing a quick 0.1-second read speed and capacity for 20 fingerprints.
5.2 Debloke Pòt la
- Anprent: Place a registered finger on the sensor. The lock will unlock if the fingerprint is recognized.
- Kle: In case of emergency or battery depletion, use the provided physical key to unlock the door.
5.3 Mode Switching (Passage Mode / Normal Mode)
The lock features a mode switching button, typically located on the interior handle. Press this button to toggle between modes.
- Mòd nòmal: The lock will automatically engage (auto-lock) approximately 5 seconds after being unlocked. This is the standard secure mode.
- Mòd pasaj: The lock will remain unlocked, allowing free entry and exit without requiring a fingerprint or key. This mode is suitable for periods of high traffic.
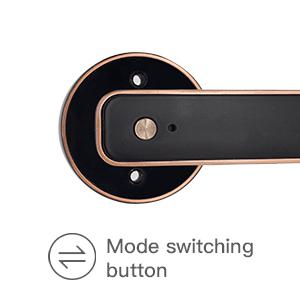
Image: Detail of the mode switching button on the lock's interior handle.

Image: The lock set to Passage Mode, allowing unrestricted entry and exit.
5.4 Chaje Ijans
If the batteries run out, the lock can be temporarily powered using a standard USB power bank connected to the emergency USB port on the exterior handle. This allows you to unlock the door with a registered fingerprint or key.

Image: The USB port for emergency power, located on the exterior handle.

Image: A physical backup key provided for manual access.
6. Antretyen
- Netwayaj: Wipe the lock surface with a soft, dry cloth. Avoid abrasive cleaners or solvents that could damage the finish or electronic components.
- Ranplasman batri: Replace all 4 AAA batteries when the low battery indicator or voice prompt is activated. Do not mix old and new batteries.
- Swen Capteur Anprent Dwèt: Kenbe detèktè anprent lan pwòp epi sèk pou yon pèfòmans optimal.
NAN. Depanaj
| Pwoblèm | Kòz posib | Solisyon |
|---|---|---|
| Lock pa reponn. | Pil ki mouri. | Replace batteries or use emergency USB power. |
| Anprent dwèt la pa rekonèt. | Dwèt la mouye/sal, detèktè a sal, oubyen anprent lan pa byen anrejistre. | Clean finger and sensor. Re-enroll fingerprint if necessary. Try a different registered finger. |
| Kadna a pa fèmen otomatikman. | Lock is in Passage Mode. | Press the mode switching button to return to Normal Mode. |
| Enstriksyon vokal yo pa klè oswa yo pa la. | Low battery or internal error. | Ranplase pil yo. Si pwoblèm nan pèsiste, kontakte sèvis kliyan. |
8. Espesifikasyon
| Karakteristik | Detay |
|---|---|
| Modèl | L-B201 |
| Mak | Pèr entelijan |
| Kalite fèmen | Biometric Fingerprint Handle Lock |
| Materyèl | Aliminyòm |
| Koulè | Nwa |
| Kapasite anprent | Jiska 20 |
| Degaje vitès | Apeprè 0.1 segonn |
| Sous pouvwa | 4 x AAA pil (pa enkli) |
| Pouvwa Ijans | Port USB |
| Lavi batri | 8-12 mwa (apeprè) |
| Epesè Pòt | 1-3/8'' to 2-1/8'' (35-55mm) |
| Latch reglabl | 2-3/8'' (60mm) or 2-3/4'' (70mm) |
| Dimansyon (L x W x H) | 6.03 x 2.55 x 2.82 pous |
| Pwa atik | 2.72 liv |
| Koneksyon | No Bluetooth or Wi-Fi Connectivity |
9. Garanti ak sipò
For warranty information and customer support, please refer to the official Geek Smart websit la oubyen kontakte machann kote ou te achte pwodwi a. Kenbe resi acha ou kòm prèv acha.