1. Entwodiksyon
This manual provides detailed instructions for the safe and efficient operation of your InFocus P120 INL412 Multimedia Projector (Model INL4128). Please read this manual thoroughly before using the projector and keep it for future reference. This projector is designed for high-quality image projection, suitable for various applications including presentations, home entertainment, and gaming.
2. Enfòmasyon sou Sekirite
Obsève prekosyon sekirite sa yo pou evite domaje pwojektè a epi asire sekirite itilizatè a:
- Vantilasyon: Ensure adequate ventilation around the projector. Do not block ventilation openings. Maintain a minimum distance of 30 cm (12 inches) from walls or other objects.
- Sous pouvwa: Sèvi sèlman ak ekipman pouvwa ak volim espesifye a.tage. Konekte kòd kouran an byen fèm.
- Chalè: The projector generates heat during operation. Do not touch the projector's vents or exhaust areas directly after use.
- Sòti limyè: Pa gade dirèkteman nan lantiy pwojektè a lè l ap limen.amp limen, paske limyè entans lan ka domaje je yo.
- Plasman: Place the projector on a stable, level surface. Avoid placing it in direct sunlight, near heat sources, or in areas with high humidity or dust.
- Netwayaj: Dekonekte kòd kouran an anvan ou netwaye li. Sèvi ak yon twal mou epi sèk. Pa sèvi ak pwodui netwayaj likid oswa ayewosòl.
- Sèvis: Pa eseye fè reparasyon pwojektè a tèt ou. Konfye tout antretyen bay pèsonèl sèvis kalifye.
3. Pwodwi souview
3.1 Top Panel and Lens Area
The top panel features the control buttons for basic operation and the lens area with focus and zoom adjustments.

Figi 3.1: Top view of the InFocus P120 INL412 projector, highlighting the control panel on the right and the lens adjustment area on the left. The InFocus logo is visible on the top surface.
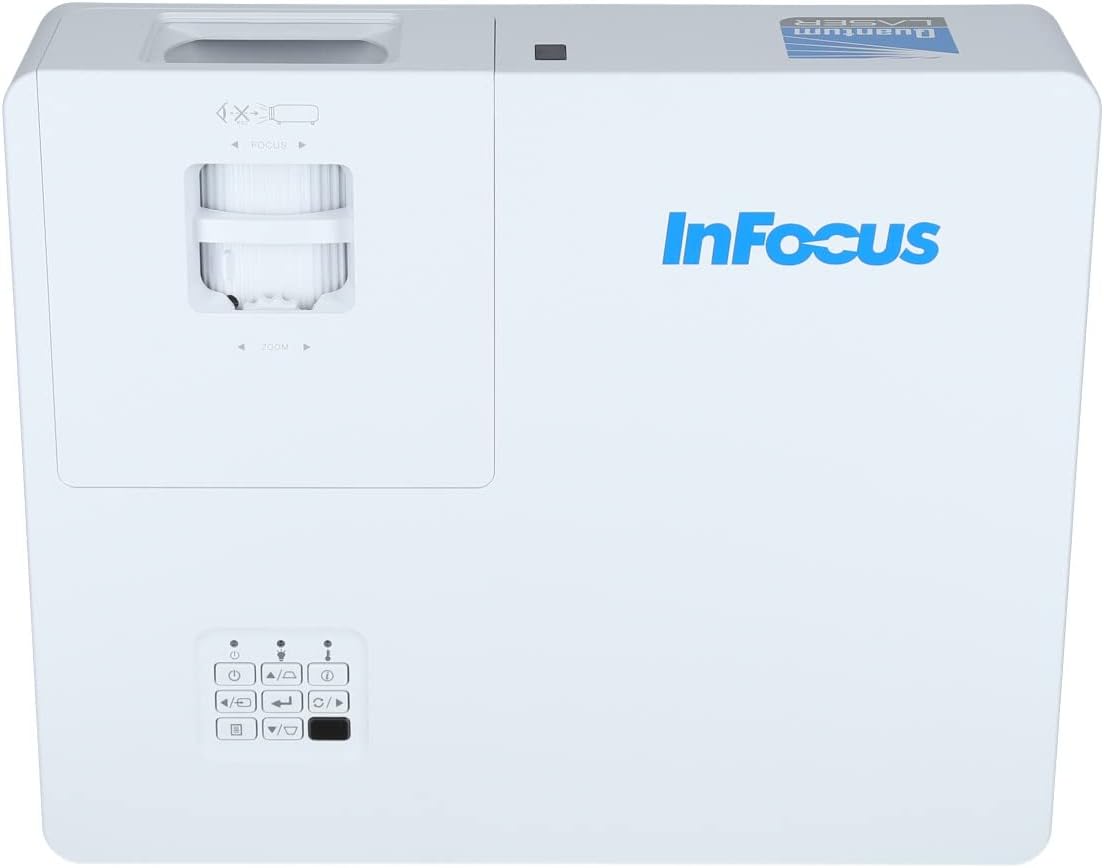
Figi 3.2: Yon fèmen pòt view of the projector's top panel, showing the focus and zoom rings near the lens opening and the array of control buttons for power, menu, source selection, and navigation.
3.2 Koneksyon Panèl Dèyè
The rear panel provides various input and output ports for connecting external devices.

Figure 3.3: Rear panel of the InFocus P120 INL412 projector, displaying a comprehensive array of connectivity options including HDMI (x2), USB, S-Video, Ethernet (LAN), VGA In (x2), VGA Out, RS232, and Audio In/Out ports. The power input is located on the bottom left.
Pò kle yo enkli:
- HDMI 1 & 2: For connecting high-definition digital video and audio sources.
- USB: For connecting USB devices, potentially for media playback or firmware updates.
- S-Videyo: For connecting older video sources.
- VGA IN 1 & 2: For connecting computers or other devices with VGA output.
- Sòti VGA: For connecting to an external monitor.
- Ethernet (LAN): Pou koneksyon ak kontwòl rezo a.
- Audio IN 1 & 2 / Audio OUT: Pou koneksyon odyo analòg.
- RS232: Pou kontwòl seri.
- Antre pouvwa: Pou konekte kòd kouran AC a.
3.3 Front and Side Panels
The front panel houses the projection lens and front ventilation, while the side panels feature additional ventilation grilles.

Figi 3.4: Devan view of the InFocus P120 INL412 projector, displaying the main projection lens on the right and the extensive front ventilation grille on the left, crucial for heat dissipation.

Figi 3.5: Side view of the InFocus P120 INL412 projector, illustrating the side ventilation grilles that contribute to maintaining optimal operating temperature.
4. Enstalasyon
4.1 Plasman Pwojektè
Position the projector on a stable, flat surface or mount it securely. Ensure the projector is within the optimal projection distance for your screen size. Maintain clear space around the projector for proper ventilation.
4.2 Konekte Aparèy
Before connecting any cables, ensure the projector and all source devices are powered off.
- Koneksyon HDMI: Connect an HDMI cable from your source device (e.g., laptop, Blu-ray player, gaming console) to either the HDMI 1 or HDMI 2 port on the projector.
- Koneksyon VGA: Connect a VGA cable from your computer to either VGA IN 1 or VGA IN 2. For audio, connect a separate audio cable from your computer's audio output to the corresponding Audio IN port on the projector.
- Koneksyon USB: Insert a USB drive into the USB port for media playback (if supported by firmware) or service functions.
- Koneksyon Ethernet (LAN): Connect an Ethernet cable to the LAN port for network control or updates.
- Sòti odyo: If using external speakers, connect an audio cable from the Audio OUT port on the projector to your audio system.
4.3 Koneksyon pouvwa
Connect the power cord to the projector's power input and then plug the other end into a grounded electrical outlet.
5. Operasyon Enstriksyon
5.1 Limen/Etenyen
- Pouvwa sou: Peze a Pouvwa button on the projector's control panel or the remote control. The power indicator light will change.
- Pouvwa Off: Peze a Pouvwa button again. A confirmation message may appear. Press the button a second time to confirm shutdown. Allow the projector to cool down before unplugging it.
5.2 Ajisteman Fokus ak Zoom
Rotate the focus ring around the lens until the image appears sharp and clear. Use the zoom ring to adjust the image size to fit your screen.
5.3 Chwazi Sous Antre
Peze a Sous button on the control panel or remote control to cycle through available input sources (HDMI 1, HDMI 2, VGA 1, VGA 2, S-Video, USB). Select the input corresponding to your connected device.
5.4 Navigasyon meni
Sèvi ak la Menu button to access the on-screen display (OSD) menu. Use the arrow buttons to navigate through menu options and the Antre button to select. Press Menu ankò sòti.
6. Antretyen
6.1 Netwaye Lantiy la
Gently wipe the lens with a soft, lint-free cloth specifically designed for optical surfaces. Do not use abrasive cleaners or excessive force, as this can scratch the lens.
6.2 Cleaning the Projector Exterior
Sèvi ak yon twal mou epi sèk pou netwaye pati pwojektè a.asing. For stubborn dirt, dampen the cloth slightly with water, then wipe dry immediately. Avoid getting liquids into the projector's openings.
6.3 Ventilation Care
Regularly check the projector's ventilation grilles for dust accumulation. Use a soft brush or a vacuum cleaner with a brush attachment to gently remove dust from the vents to ensure proper airflow and prevent overheating.
NAN. Depanaj
7.1 Pa gen imaj ki parèt
- Ensure the projector is powered on and the power indicator light is solid.
- Verify that the video cable (HDMI, VGA, etc.) is securely connected to both the projector and the source device.
- Check that the correct input source is selected on the projector.
- Confirm that the source device (laptop, player) is powered on and outputting a signal.
7.2 Imaj la twoub oswa li pa byen fokus
- Ajiste bag konsantre a sou lantiy pwojektè a jiskaske imaj la byen file.
- Ensure the projector is at the correct distance from the screen.
- Netwaye lantiy pwojektè a si li sanble sal.
7.3 Pa gen son
- If using HDMI, ensure the source device's audio output is set to HDMI.
- If using VGA, ensure a separate audio cable is connected from the source to the projector's Audio IN port.
- Tcheke paramèt volim yo sou pwojektè a ak aparèy sous la.
- If using external speakers, ensure they are properly connected to the Audio OUT port and powered on.
8. Espesifikasyon
| Karakteristik | Detay |
|---|---|
| Mak | Enfocus |
| Manifakti | Nan Konsantre |
| Non modèl | P120 INL412 |
| Nimewo Modèl | INL4128 |
| Ane | 2023 |
| Entèfas Materyèl | Ethernet, HDMI, S-Video, USB |
| Kantite Atik | 1 |
| Aspè rapò | 16:9 |
| Wattage | 341 wat |
| Batri enkli | Non |
| Batri obligatwa | Non |
| Faktè fòm | Desktop |
| Kalite aliye | Table mòn |
| Kontwòl Remote enkli | Wi |
| Dimansyon pwodwi | 56.13 x 46.48 x 25.15 cm |
| Pwa atik | 5.5 kg |
| Gwosè Imaj maksimòm | 308.28 pous |
| Minimòm Gwosè Imaj | 910.63 Milimèt |
| Premye Dat ki disponib | 5 janvye 2022 |
9. Garanti ak sipò
For warranty information and technical support, please refer to the documentation included with your purchase or visit the official InFocus websit la. Kenbe prèv acha ou pou reklamasyon garanti.