1. Entwodiksyon
Mèsi pou acha aasing the XTUGA ES602 Professional DJ Mixer. This manual provides essential information for the safe and efficient operation of your mixer. Please read it thoroughly before use and retain it for future reference.
The XTUGA ES602 is a versatile 7-channel mixing console designed for stage audio, DJ applications, and music production. It features XLR and LINE inputs, +48V phantom power, a built-in digital effect processor, USB/MP3 playback, and Bluetooth connectivity.
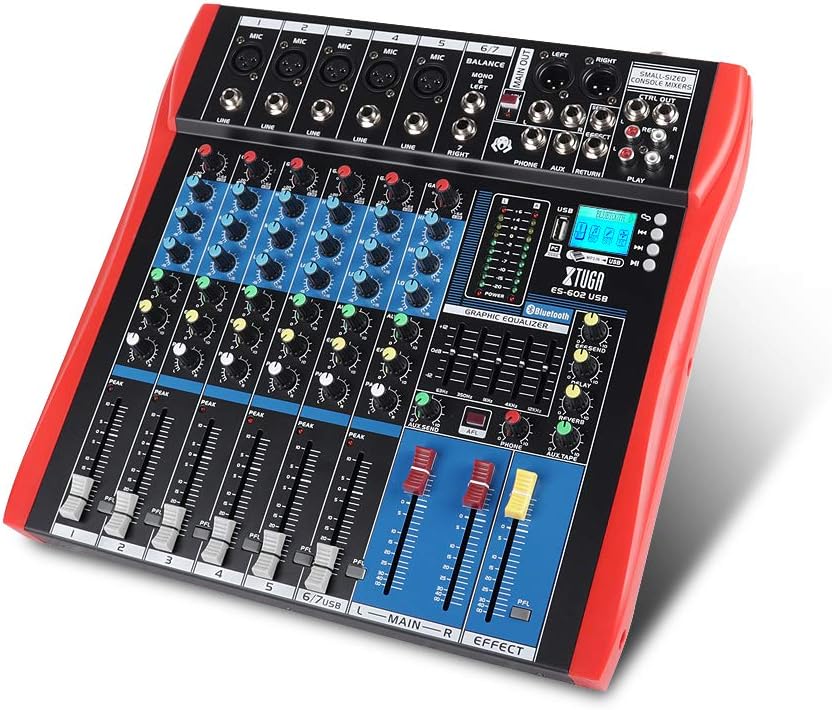
Figure 1: XTUGA ES602 Professional DJ Mixer overview. This image displays the top panel of the mixer, showing all input channels, control knobs, faders, and the master section with the USB/MP3/Bluetooth module.
2. Enstriksyon Sekirite
- Pwovizyon pou pouvwa: Sèvi ak adaptè kouran espesifye a sèlman. Asire w ke vòl latage matche ak ekipman pou kouran lokal ou a.
- Dlo ak imidite: Pa ekspoze aparèy la anba lapli oswa imidite. Pa mete objè ki plen likid sou aparèy la.
- Vantilasyon: Asire bon jan vantilasyon. Pa bloke ouvèti vantilasyon yo.
- Sous Chalè: Kenbe aparèy la lwen sous chalè tankou radyatè, recho, oswa lòt aparèy ki pwodui chalè.
- Netwayaj: Clean only with a dry cloth. Avoid liquid cleaners.
- Sèvis: Pa eseye fè antretyen aparèy sa a tèt ou. Konfye tout antretyen bay pèsonèl sèvis kalifye.
- Phantom pouvwa: When using condenser microphones, ensure +48V phantom power is activated only after connecting the microphone and before connecting to other devices to prevent damage.
3. Karakteristik
The XTUGA ES602 mixer offers a range of features for professional audio mixing:
- 7-Chanèl melanje konsole: Equipped with XLR and LINE inputs for versatile connectivity.
- +48V Phantom Power: Available for condenser microphones.
- Kontwòl chanèl endividyèl yo: Each channel features GAIN, 3-band EQ (HIGH, MID, LOW), AUX, EFFECT, PAN control knobs, and a volume fader.
- PFL (Pre-Fader Listen) Switch: Allows monitoring of individual channels via headphones.
- Built-in Digital Effect Processor: Includes REPEAT, EFF SEND, DELAY, SEND, and RETURN controls for integrated effects.
- USB/MP3 Playback and Recording: Direct USB input for MP3 playback from U-disk and recording capabilities.
- Koneksyon Bluetooth: Seamlessly connect mobile phones, tablets, and other Bluetooth-enabled devices for audio playback.
- Rezilta prensipal: XLR (L/R) and 1/4" (L/R) stereo output jacks.
- Sòti REC: Dedicated REC (L/R) output for external recording devices.
- Entèfas Headset: Pou siveyans odyo.
- Endikatè ki ap dirije: Power and output level indicator lights for easy monitoring.
- Konsepsyon dirab: Ultra-thin, all-metal chassis for high density dust resistance and durability.
4. Kontwòl ak Fonksyon
This section details the various controls and connections on your XTUGA ES602 mixer.
4.1 Input Channels (Channels 1-7)
- MIC Input (XLR): Connects balanced microphones.
- LINE Input (1/4" Jack): Connects line-level instruments or devices.
- +48V PHANTOM Power Switch: Activates phantom power for condenser microphones on XLR inputs.
- Bouton GAIN: Ajiste sansiblite antre a pou chak kanal.
- Bouton egalizatè HIGH, MID, LOW: 3-band equalizer for adjusting the treble, midrange, and bass frequencies of each channel.
- Bouton AUX: Controls the send level to the auxiliary output.
- Bouton EFÈ: Controls the send level to the internal effect processor.
- Bouton PAN: Adjusts the stereo position (left/right) of the channel.
- PFL Switch: Engages Pre-Fader Listen for monitoring the channel's signal before the fader.
- PEAK LED: Illuminates when the input signal is too high, indicating potential clipping.
- Chèn Fader: Adjusts the output volume of the individual channel.
4.2 Seksyon Mèt la
- MAIN OUT (XLR & 1/4" Jacks): Balanced stereo main outputs for connecting to amplifiers oswa oratè ki mache ak pisans.
- REC OUT (RCA Jacks): Stereo output for connecting to recording devices.
- PHONES Jack (1/4"): Stereo headphone output for monitoring.
- AUX SEND/RETURN Jacks: For connecting external effects processors or monitoring systems.
- Fader prensipal yo (G/D): Kontwole volim jeneral pwodiksyon mixer la.
- EFFECT Level Knob: Adjusts the overall level of the internal effects.
- REPEAT, DELAY Knobs: Controls parameters of the digital effect processor.
- LEVEL Meter: LED display showing the main output level.

Figi 2: Detaye view of the XTUGA ES602 mixer's channel controls and LED level meters. This image highlights the individual channel knobs for GAIN, EQ, AUX, EFFECT, PAN, and the main output level indicators.
4.3 USB/MP3/Bluetooth Module
- Pò USB: For connecting a USB flash drive for MP3 playback or connecting to a computer for recording/playback.
- Ekspozisyon LCD: Shows current mode, track information, and Bluetooth status.
- Bouton kontwòl: Play/Pause, Stop, Previous/Next Track, Mode selection (USB/Bluetooth/PC).
- Endikatè Bluetooth: Montre estati koneksyon Bluetooth la.

Figure 3: Close-up of the Bluetooth and MP3 connection section on the XTUGA ES602 mixer. This image shows the USB port, LCD display, and control buttons for media playback and Bluetooth pairing.
5. Enstalasyon
Follow these steps to set up your XTUGA ES602 mixer.
5.1 Koneksyon pouvwa
- Asire w ke switch pouvwa mixer a nan pozisyon OFF (Off).
- Connect the provided power adapter to the mixer's power input.
- Branche adaptè kouran an nan yon priz kouran AC ki apwopriye.
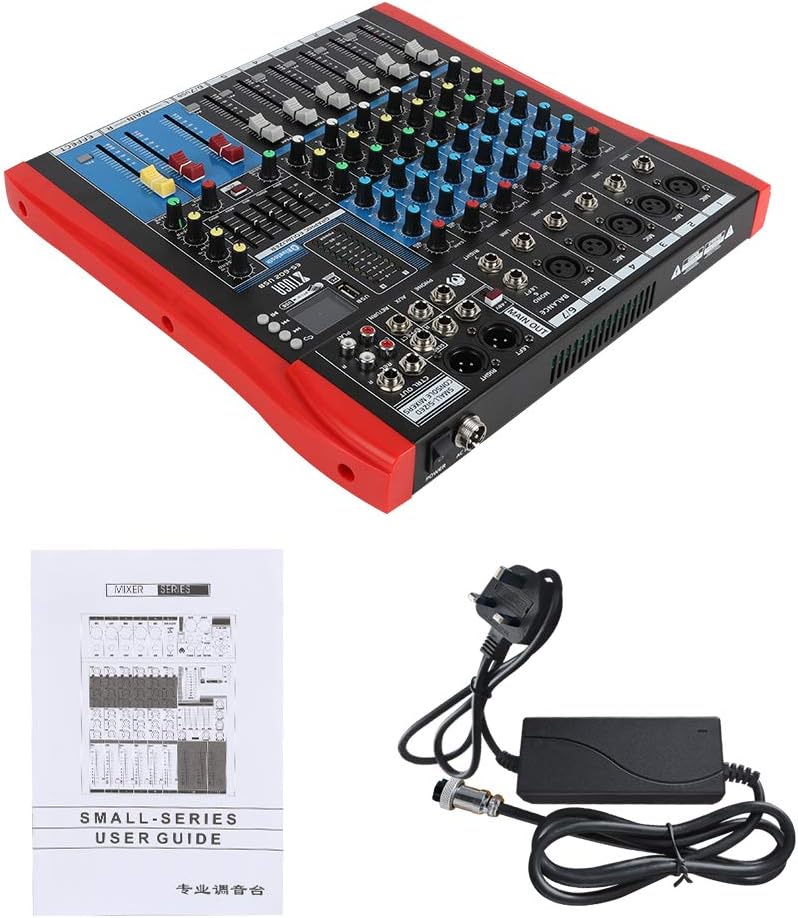
Figure 4: XTUGA ES602 mixer shown with its power adapter and user guide. This illustrates the components included for initial setup.
5.2 Konekte Mikwofòn ak Enstriman
- For microphones, connect XLR cables to the MIC Antre jacks. If using condenser microphones, activate the +48V PHANTOM Power Switch for the respective channel.
- For line-level instruments (keyboards, guitars with preamps, etc.), connect 1/4" TS/TRS cables to the LINE Antre jak.
- Ensure all channel GAIN knobs are set to their minimum position before connecting.
5.3 Konekte Aparèy Sòti yo
- Konekte oratè prensipal ou yo oubyen amplifier nan la MAIN OUT (XLR or 1/4") jak.
- For recording, connect an external recording device to the REC OUT (RCA) jak.
- Ploge kas ekoutè nan la TELEFÒN jack for monitoring.
5.4 Connecting to a Computer for Recording
- Connect a USB cable from the mixer's USB pò nan òdinatè w lan.
- The mixer should be recognized as an audio device by your operating system.
- Select the mixer as the input device in your digital audio workstation (DAW) or recording software.
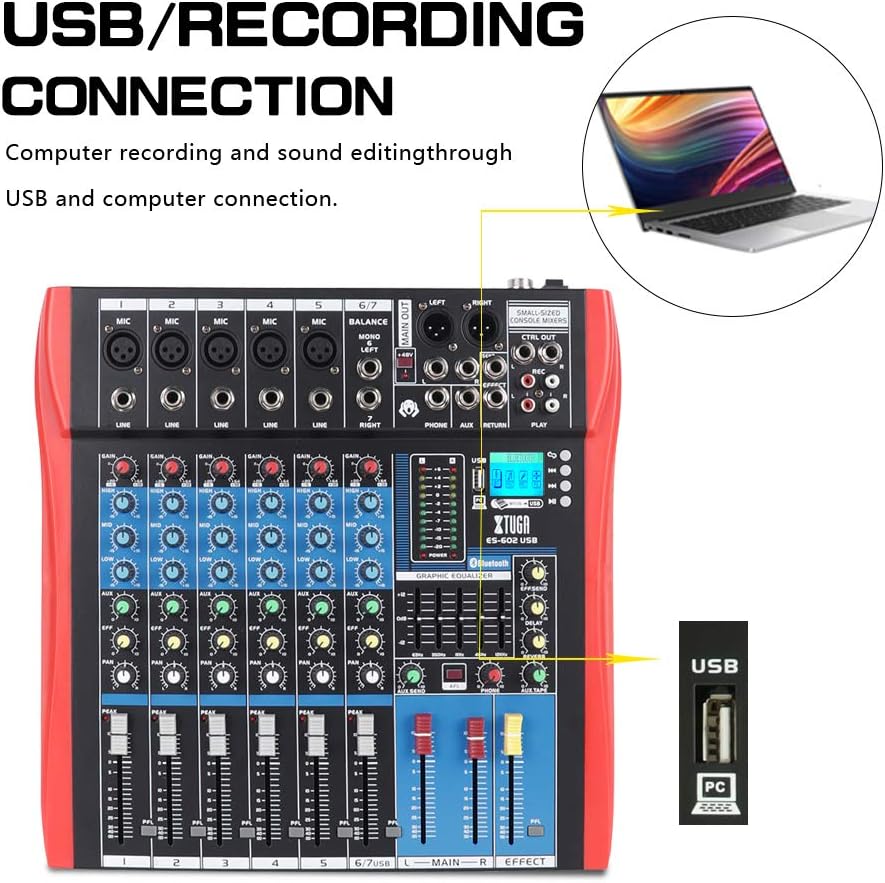
Figure 5: Illustration of the XTUGA ES602 mixer connected to a laptop via USB for recording and sound editing. This highlights the USB input port and its function.
6. Opere
This section covers the basic operation of your XTUGA ES602 mixer.
6.1 Limen ak Anrejistreman Nivo Inisyal
- After all connections are made, turn on your mixer's power switch.
- Dousman leve a MAIN Faders nan yon nivo koute konfòtab.
- For each active input channel, gradually increase the bouton GAIN jiska la PEAK ki ap dirije flashes only occasionally during the loudest parts of the signal.
- Adjust individual Chanèl Faders to balance the mix.
6.2 Sèvi ak Bluetooth
- Peze a bouton MODE on the USB/MP3/Bluetooth module until "Bluetooth" appears on the LCD display. The Bluetooth indicator will flash.
- On your mobile device, search for Bluetooth devices and select "XTUGA MIXER" (or similar).
- Once paired, the Bluetooth indicator will become solid. You can now play audio from your device through the mixer.
- Use the module's control buttons for Play/Pause, Next/Previous track.
6.3 USB/MP3 Playback
- Mete yon kle USB ki gen odyo MP3 ladan l files nan USB pò.
- The mixer should automatically switch to USB mode and begin playback. If not, press the bouton MODE pou chwazi USB.
- Use the control buttons to navigate tracks and control playback.
6.4 Anrejistreman
- To USB Drive: In USB/MP3 mode, press the bouton REC on the module to start recording the main mix to the connected USB drive. Press again to stop.
- Pou òdinatè a: Ensure the mixer is connected to your computer via USB. Open your recording software and select the mixer as the input device. Start recording within your software.
6.5 Itilizasyon Efè yo
- Ajiste a Bouton EFÈ on individual channels to send a portion of that channel's signal to the internal effect processor.
- Sèvi ak la EFFECT Level knob in the master section to control the overall volume of the applied effect.
- Ajiste a REPETE epi RETA knobs to fine-tune the characteristics of the digital effect.
7. Antretyen
Bon antretyen asire lonjevite ak pèfòmans optimal mixer ou a.
- Netwayaj: Sèvi ak yon twal mou epi sèk pou netwaye deyò mixer la. Pa sèvi ak pwodui netwayaj abrazif, solvan, oswa sir.
- Pwoteksyon pousyè: Lè w pa ap itilize mixer a, kouvri l pou pwoteje l kont pousyè ak debri.
- Depo: Sere mixer a nan yon kote ki fre epi sèk, lwen limyè solèy dirèk ak tanperati ekstrèm.
- Jesyon kab: Evite pliye oswa sèrse kab yo twòp. Dekonekte kab yo lè w rale ploge a, pa rale kab la li menm.
NAN. Depanaj
If you encounter issues with your mixer, refer to the following common problems and solutions.
- Pa gen Sòti Son:
- Check if the mixer is powered on.
- Asire tout MAIN Faders and individual Chanèl Faders are raised.
- Verify that output cables are securely connected to your amplifier/oratè.
- Tcheke volim sou ou amplifier/oratè.
- Pa gen siyal antre:
- Ensure microphones/instruments are properly connected to the correct input jacks.
- Tcheke si la bouton GAIN for the respective channel is sufficiently turned up.
- If using a condenser microphone, ensure +48V PHANTOM pouvwa se aktive.
- Test input sources (microphones, instruments) with another device to confirm they are working.
- Son defòme:
- Diminye a bouton GAIN for the offending channel if the PEAK ki ap dirije se toujou ap limen.
- Pi ba a MAIN Faders if the output level meter is consistently in the red.
- Tcheke pou kab ki domaje.
- Pwoblèm koneksyon Bluetooth:
- Ensure the mixer is in Bluetooth mode (LCD shows "Bluetooth").
- Make sure your mobile device's Bluetooth is enabled and within range.
- Eseye dekonekte epi konekte aparèy la ankò.
- USB Playback Not Working:
- Ensure the USB drive is properly inserted and contains compatible MP3 files.
- Peze a bouton MODE to ensure the mixer is in USB mode.
- Eseye yon kondui USB diferan.
9. Espesifikasyon
| Karakteristik | Spesifikasyon |
|---|---|
| Nimewo Modèl | ES602 (also ES802/1202 series) |
| Kantite Chanèl | 7 |
| Koneksyon Teknoloji | Oksilyè, Bluetooth, USB |
| Antre odyo | Auxiliary, USB, XLR |
| Sòti Connector Kalite | Oksilyè, XLR |
| Sous pouvwa | Fil elektrik |
| Pwa atik | 3.59 kg |
| Dimansyon pwodwi | 46 x 46 x 14 cm |
| Manifakti | XTUGA |
| UPC | 784124158754 |
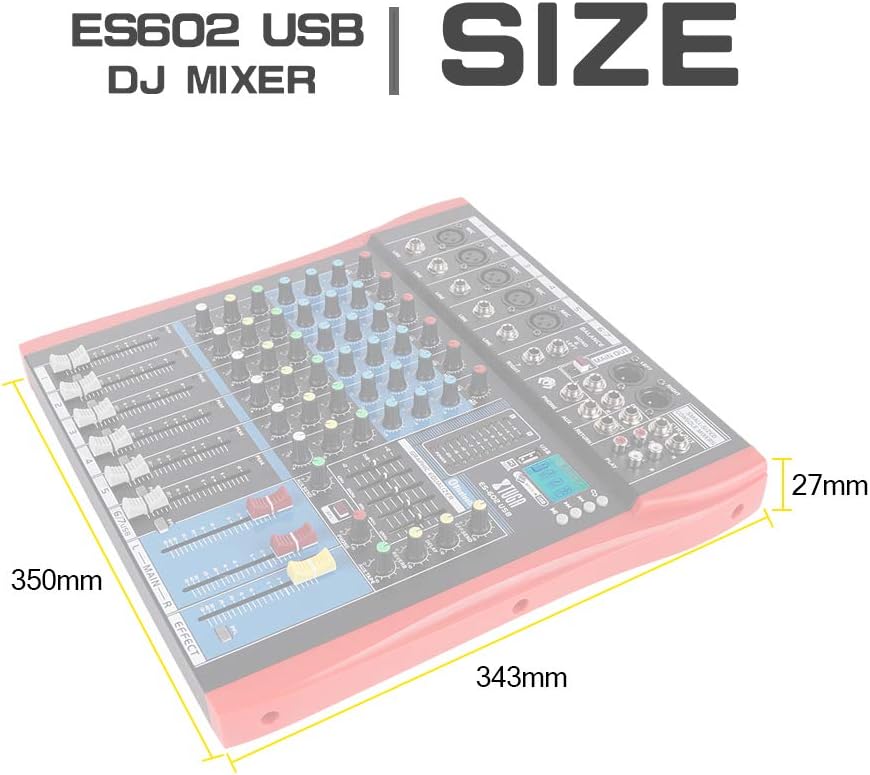
Figure 6: Dimensions of the XTUGA ES602 USB DJ Mixer, showing measurements of 350mm length, 343mm width, and 27mm height.
10. Garanti ak sipò
XTUGA products are designed for reliability and performance. For warranty information and technical support, please refer to the warranty card included with your product or visit the official XTUGA websit la. Kenbe resi acha ou kòm prèv acha pou nenpòt reklamasyon garanti.