Entwodiksyon
This manual provides detailed instructions for the ZEXMTE 6-in-1 USB C Hub with M.2 SATA SSD Enclosure. This versatile docking station expands the connectivity of your USB-C enabled devices, offering multiple ports for data transfer, video output, network connection, power delivery, and integrated M.2 SATA SSD storage.
Karakteristik pwodwi
The ZEXMTE 6-in-1 USB C Hub integrates the following functionalities:
- M.2 SATA NGFF SSD Enclosure: Supports B-Key and B+M Key SATA-based M.2 SSDs (2230, 2242, 2260, 2280 sizes) with USB 3.1 Gen 1 (5Gbps) speeds.
- Sòti HDMI: Supports up to 4K resolution at 30Hz for external displays.
- Livrezon pouvwa USB-C (PD): Up to 100W for charging your host device.
- 3 pò USB 3.0: SuperSpeed 5Gbps data transfer for peripherals like thumb drives, keyboards, mice, and external hard drives.
- Gigabit-Ethernet: Provides stable and fast 10/100/1000Mbps wired network connection.

Figi 1: Plis paseview of the ZEXMTE 6-in-1 USB C Hub, highlighting its HDMI, USB 3.0, USB-C PD, Ethernet, and M.2 SSD Enclosure features.
Espesifikasyon
| Karakteristik | Spesifikasyon |
|---|---|
| Dimansyon pwodwi | 5.91 x 3.15 x 0.39 pous |
| Pwa atik | 3.98 ons |
| Entèfas Materyèl | Ethernet, HDMI, USB, USB Type C |
| Total pò USB | 6 (3 x USB 3.0, 1 x USB-C PD, 1 x USB-C Host, 1 x M.2 SATA) |
| Rezolisyon HDMI | Jiska 4K @ 30Hz |
| Vitès Done USB 3.0 | Jiska 5 Gbps |
| Vitès Ethernet | 10/100/1000Mbps |
| Antre USB-C PD | Jiska 100W |
| M.2 SSD Compatibility | SATA-based NGFF M.2 SSD (B-Key / B+M Key) only. Sizes: 2230, 2242, 2260, 2280. |
Gid Enstalasyon
1. M.2 SATA SSD Installation
The hub features an integrated M.2 SATA SSD enclosure. Follow these steps to install your compatible M.2 SATA SSD:
- Check SSD Compatibility: Ensure your M.2 SSD is SATA-based (B-Key or B+M Key). NVMe (M-Key) SSDs are pa supported. Refer to Figure 2 for visual guidance.
- Louvri bwat la: Gently press the back cover of the hub and slide it back to open the M.2 enclosure.
- Mete SSD a: Align the M.2 SATA SSD with the slot inside the enclosure and insert it firmly.
- SSD an sekirite: Align the circular notch on the SSD with the fastener and press the fastener down to secure the SSD in place.
- Fèmen patiraj la: Align the three slots on the cover with the hub and press down to close the enclosure securely.

Figure 2: M.2 SSD compatibility. Only SATA-based (B-Key or B+M Key) M.2 SSDs are supported. NVMe (M-Key) SSDs are not compatible.
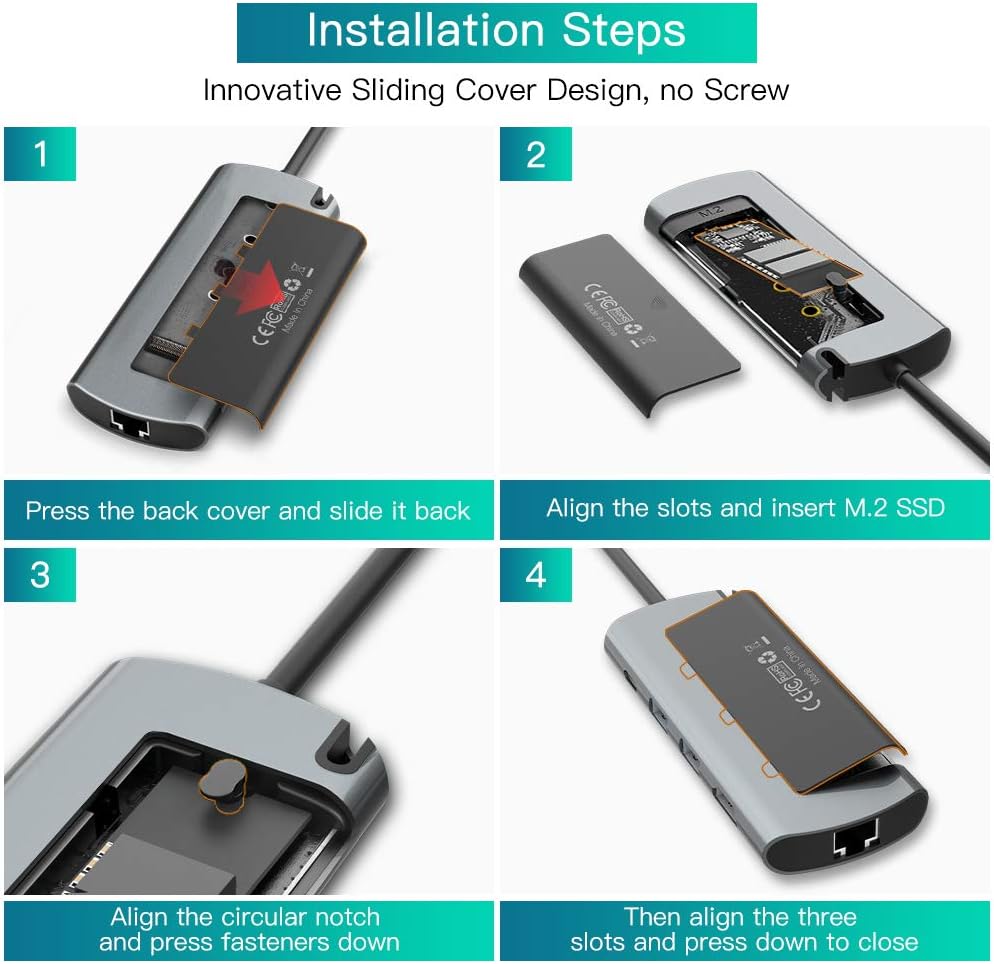
Figure 3: Step-by-step guide for installing an M.2 SATA SSD into the enclosure. Ensure proper alignment and secure fastening.
2. Connecting the Hub to Your Device
Connect the integrated USB-C cable of the ZEXMTE hub to a USB-C port on your host device (e.g., laptop, tablet, smartphone). The hub is plug-and-play and typically requires no additional drivers.
Enstriksyon Operasyon
1. Using USB 3.0 Ports
The hub provides three USB 3.0 ports for connecting various USB peripherals. These ports support data transfer speeds up to 5Gbps.
- Connect USB devices such as external hard drives, USB flash drives, keyboards, mice, or printers to any of the three USB 3.0 ports.
- Ensure your device drivers are up-to-date for optimal performance.

Figure 4: Illustration of USB 3.0 ports supporting SuperSpeed data transfer for various peripherals.
2. HDMI Sorti Videyo
Connect an HDMI cable from the hub's HDMI port to an external display (monitor, TV, projector) to extend or mirror your device's screen.
- Supports resolutions up to 4K (3840x2160) at 30Hz.
- Ensure your host device's USB-C port supports DisplayPort Alternate Mode (Alt Mode) for video output.
- Adjust display settings on your host device as needed (e.g., extend, duplicate, resolution).

Figure 5: Connecting the hub to a 4K display via HDMI for clear video output.
3. Gigabit Ethernet Connection
For a stable and high-speed internet connection, use the Gigabit Ethernet port.
- Connect an Ethernet cable from your router or modem to the hub's RJ45 port.
- The hub supports 10/100/1000Mbps network speeds.
- Your host device should automatically detect the wired connection.

Figure 6: The Gigabit Ethernet port provides a fast and stable wired network connection.
4. USB-C Power Delivery (PD)
Pò USB-C PD a pèmèt ou chaje aparèy lame ou a pandan w ap itilize sant lan.
- Connect your original USB-C power adapter to the hub's USB-C PD port.
- The hub supports up to 100W power input, delivering power to your host device and connected peripherals.
Depanaj
- Pa gen okenn sòti ekspozisyon atravè HDMI:
- Asire w ke pò USB-C aparèy lame w la sipòte Mòd Altènatif DisplayPort.
- Eseye yon lòt kab HDMI oswa yon lòt monitè.
- Check display settings on your host device.
- Ensure the hub is receiving sufficient power, especially if multiple devices are connected.
- M.2 SSD Not Recognized or Disconnecting:
- Verify that your M.2 SSD is SATA-based (B-Key or B+M Key), not NVMe (M-Key).
- Ensure the SSD is correctly installed and secured within the enclosure (refer to Setup Guide).
- Check if the SSD is properly formatted for your operating system.
- Ensure the hub is connected directly to your host device's USB-C port.
- If using a high-power SSD, ensure the hub is connected to a power source via the PD port.
- Aparèy USB yo pa fonksyone:
- Try connecting the USB device directly to your host device to confirm it's functional.
- Asire w ke sant lan byen konekte ak aparèy lame ou a.
- If multiple high-power USB devices are connected, ensure the hub is receiving power via the PD port.
- Surchof:
- It is normal for the hub to generate some heat during operation, especially when the M.2 SSD is actively reading/writing large files or when multiple ports are in use.
- If the hub becomes excessively hot, disconnect it and allow it to cool down. Reduce the number of connected high-power devices or ensure adequate ventilation.
- Pwoblèm Koneksyon Ethernet:
- Tcheke koneksyon kab Ethernet la ak tou de sant lan ak routeur/modèm ou an.
- Verify that your network settings on the host device are configured correctly.
- Eseye yon lòt kab Ethernet.
Antretyen
- Kenbe mwaye a pwòp lè w siye l avèk yon twal mou epi sèk.
- Evite ekspoze sant lan nan tanperati ekstrèm, imidite, oswa limyè solèy dirèk.
- Do not attempt to disassemble or repair the hub yourself, as this will void the warranty.
- Store the hub in a safe place when not in use to prevent damage.
Garanti ak sipò
ZEXMTE products are designed for reliability and performance. For warranty information or technical support, please refer to the product packaging or contact ZEXMTE customer service through their official channels. Keep your purchase receipt for warranty claims.