aarke AAC3-Steel
aarke Carbonator III Instruction Manual
Model: AAC3-Steel
Entwodiksyon
The aarke Carbonator III is a premium sparkling water maker designed for home use. It allows you to transform ordinary tap water into sparkling water quickly and efficiently, offering a sustainable alternative to single-use plastic bottles. This manual provides comprehensive instructions for setting up, operating, maintaining, and troubleshooting your Carbonator III.

The aarke Carbonator III in stainless steel, accompanied by its PET water bottle.
Karakteristik kle:
- Operasyon san pwoblèm: Cordless and electricity-free design allows for flexible placement.
- Konsepsyon elegant: Minimalist and compact build in stainless steel enhances kitchen aesthetics.
- Jeni presizyon: Features a redesigned stainless steel precision nozzle for refined carbonation.
- Twous konplè: Includes the Carbonator 3, 1X PET BPA-free water bottle, 1X drip tray cover, and 1X aarke cleaning cloth.
- Konpatibilite versatile: Compatible with various standard CO2 cylinders.
- Kapasite jenere: 800 ml (27.05 fl. oz) bottle volume provides ample sparkling water.
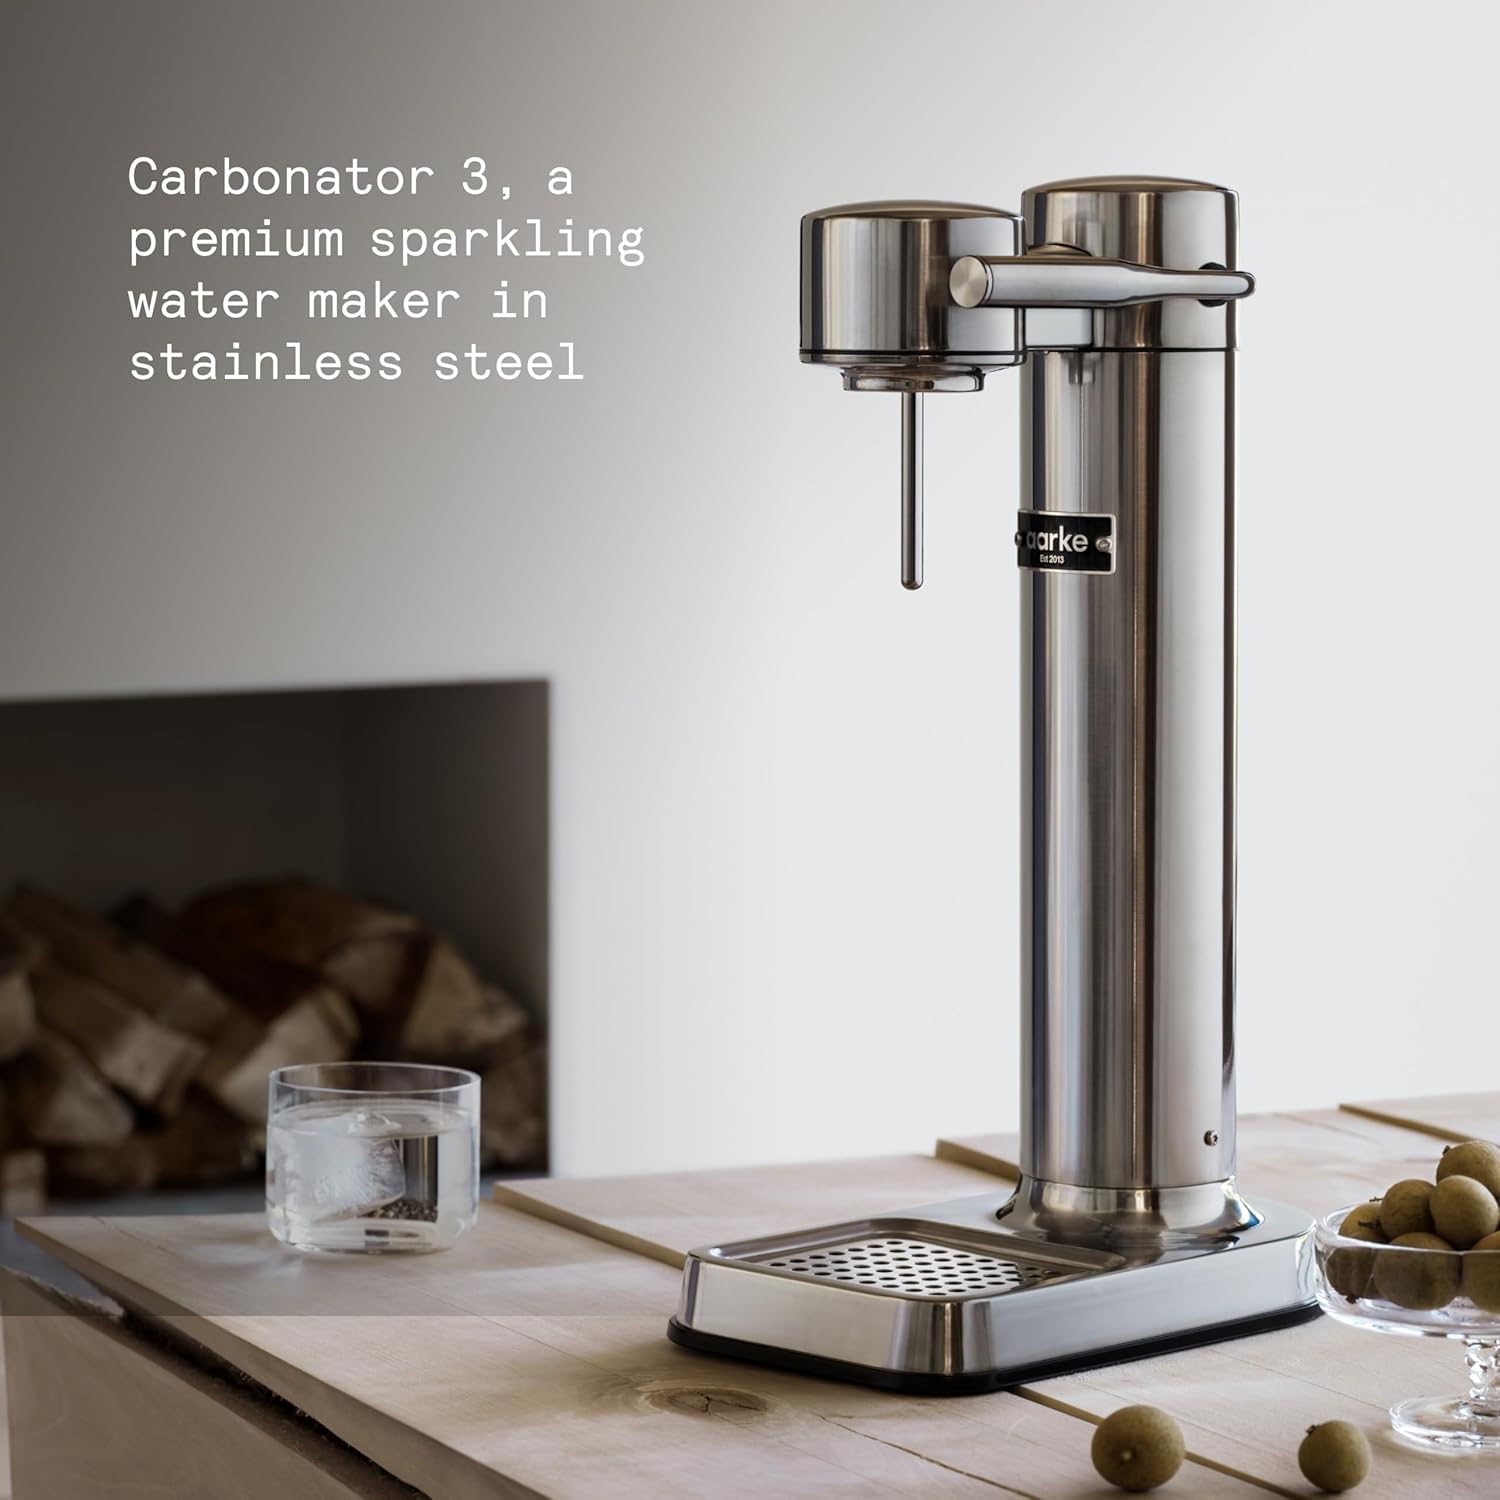
The aarke Carbonator III, showcasing its premium stainless steel design.
Enstalasyon
Before first use, ensure all components are clean. The Carbonator III operates without electricity, offering placement flexibility.
Enstale silenn CO2:
- Place the Carbonator III upright on a flat, stable surface.
- Carefully turn the Carbonator III upside down.
- Screw the CO2 cylinder into the designated hole at the bottom of the machine until it is firmly secured. Do not overtighten.
- Return the Carbonator III to its upright position.

The CO2 cylinder, which screws into the base of the Carbonator III.
Important Safety Note: Always use the aarke Carbonator III only with Aarke PET bottles (no glass). Ensure the bottle is filled only up to the marked line.
Enstriksyon Operasyon
Follow these steps to carbonate your water:
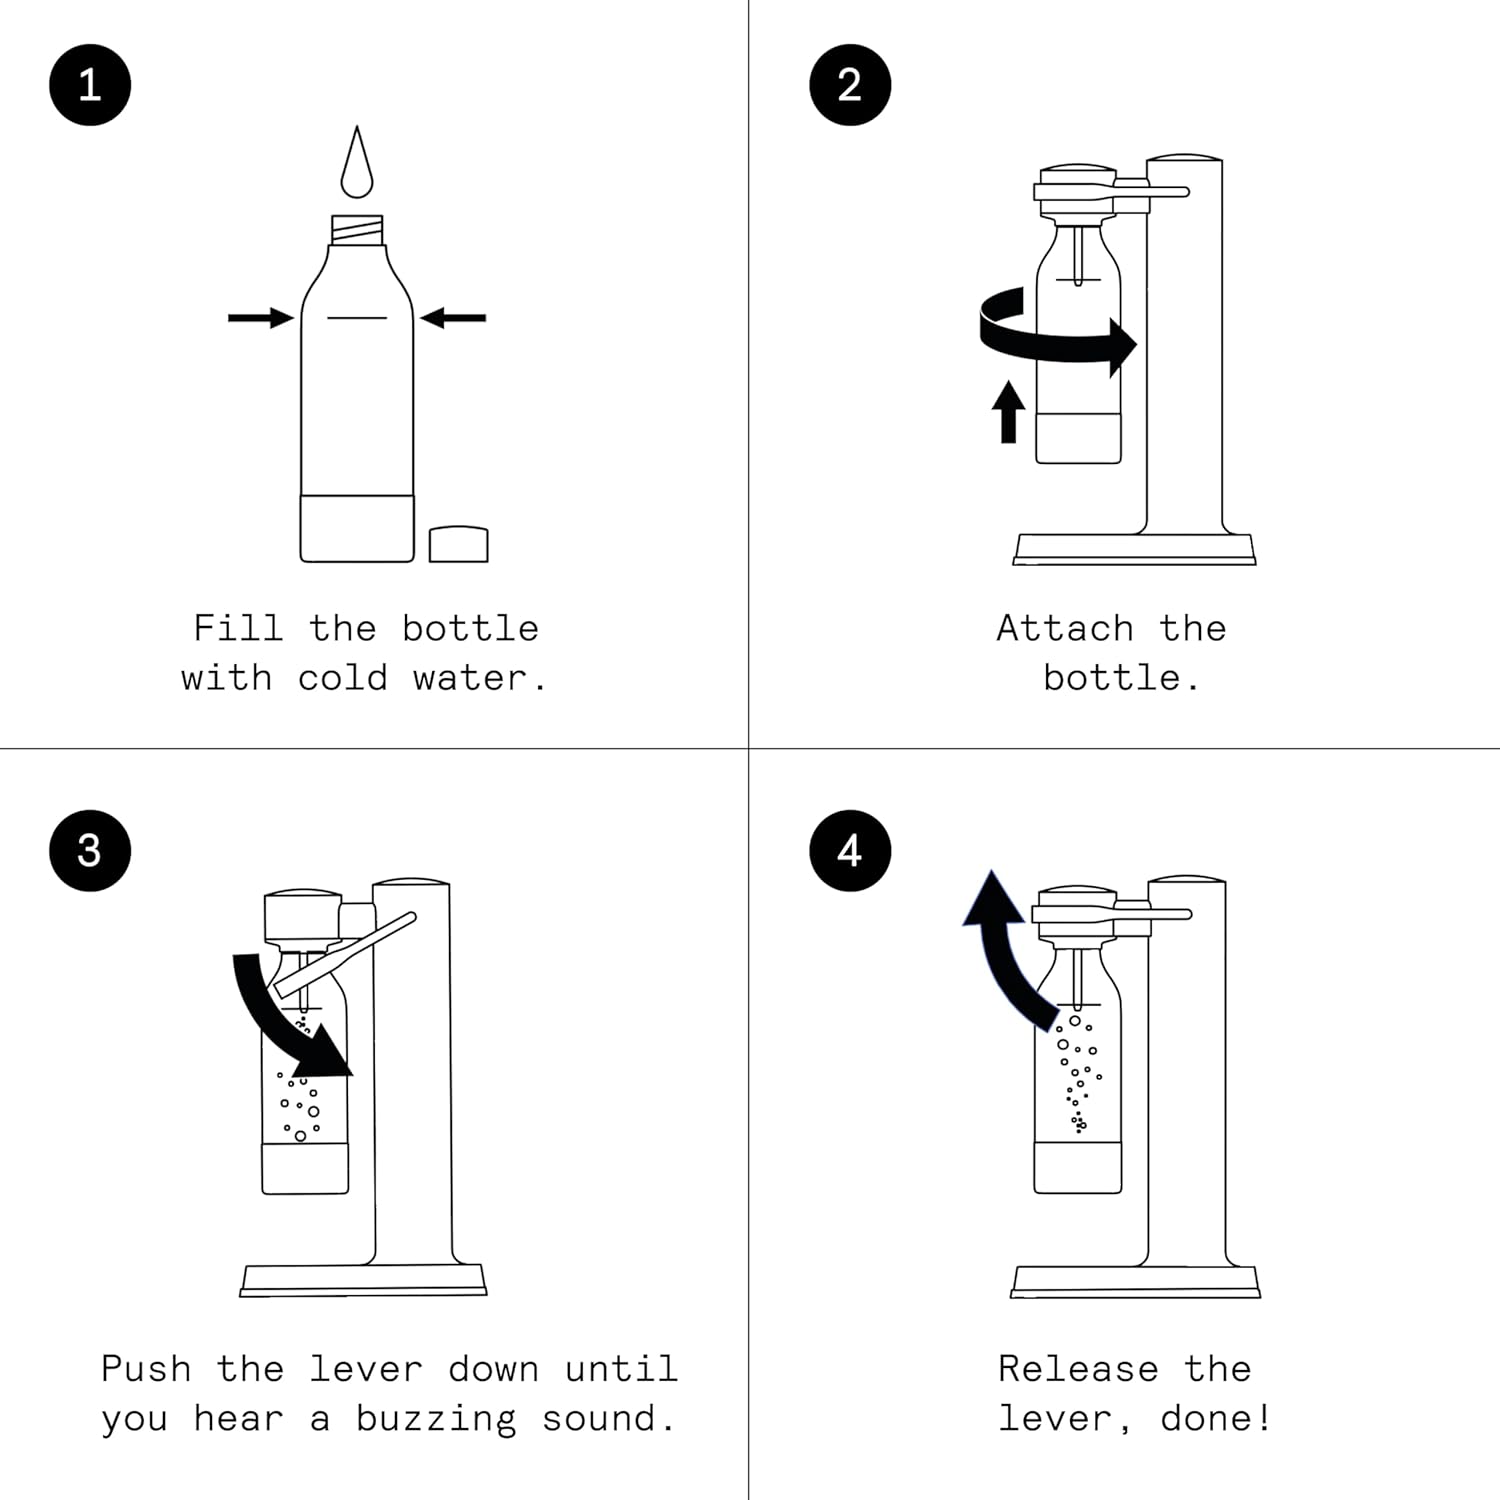
Visual guide for carbonating water with the aarke Carbonator III.
- Ranpli boutèy la: Fill the provided aarke PET bottle with cold, clean water up to the fill line. Do not overfill.
- Attach the Bottle: Screw the bottle firmly into the Carbonator III's nozzle. Ensure it is securely attached to prevent leaks.
- Carbonate: Pull the lever down slowly and hold it until you hear a distinct buzzing sound. This indicates that the water is being carbonated. For more bubbles, you can release the lever and repeat the process 1-2 more times.
- Release and Enjoy: Release the lever. The excess pressure will be released automatically. Unscrew the bottle and enjoy your freshly carbonated water.

User attaching the aarke PET bottle to the Carbonator III for carbonation.
Antretyen
Regular cleaning ensures optimal performance and longevity of your Carbonator III.
- Netwaye machin nan: Wipe down the exterior of the Carbonator III with the included aarke cleaning cloth or a soft, damp cloth using a mild detergent mixture. Do not immerse the machine in water.
- Netwaye plato degoute a: The drip tray cover can be removed and washed with warm soapy water. Ensure it is completely dry before placing it back.
- Cleaning the Bottle: The aarke PET bottle should be hand-washed with warm water and mild soap. Do not wash in a dishwasher or use hot water above 40°C (104°F) as this can damage the bottle.
- CO2 Cylinder Replacement: Replace the CO2 cylinder when the carbonation level decreases significantly or no gas is dispensed. Refer to the CO2 cylinder manufacturer's instructions for safe handling and disposal.
Depanaj
| Pwoblèm | Kòz posib | Solisyon |
|---|---|---|
| No bubbles or weak carbonation. | CO2 cylinder is empty or not properly installed. | Replace CO2 cylinder or ensure it is screwed in tightly. |
| Water leaking from the bottle connection. | Bottle not screwed on tightly enough or damaged. | Ensure bottle is securely tightened. Inspect bottle for cracks or damage; replace if necessary. |
| Lever is difficult to push down. | Excess pressure in the bottle or mechanism obstruction. | Ensure bottle is not overfilled. Check for any foreign objects obstructing the lever mechanism. |
| Buzzing sound does not occur. | CO2 cylinder empty or internal issue. | Replace CO2 cylinder. If problem persists, contact aarke support. |
Espesifikasyon
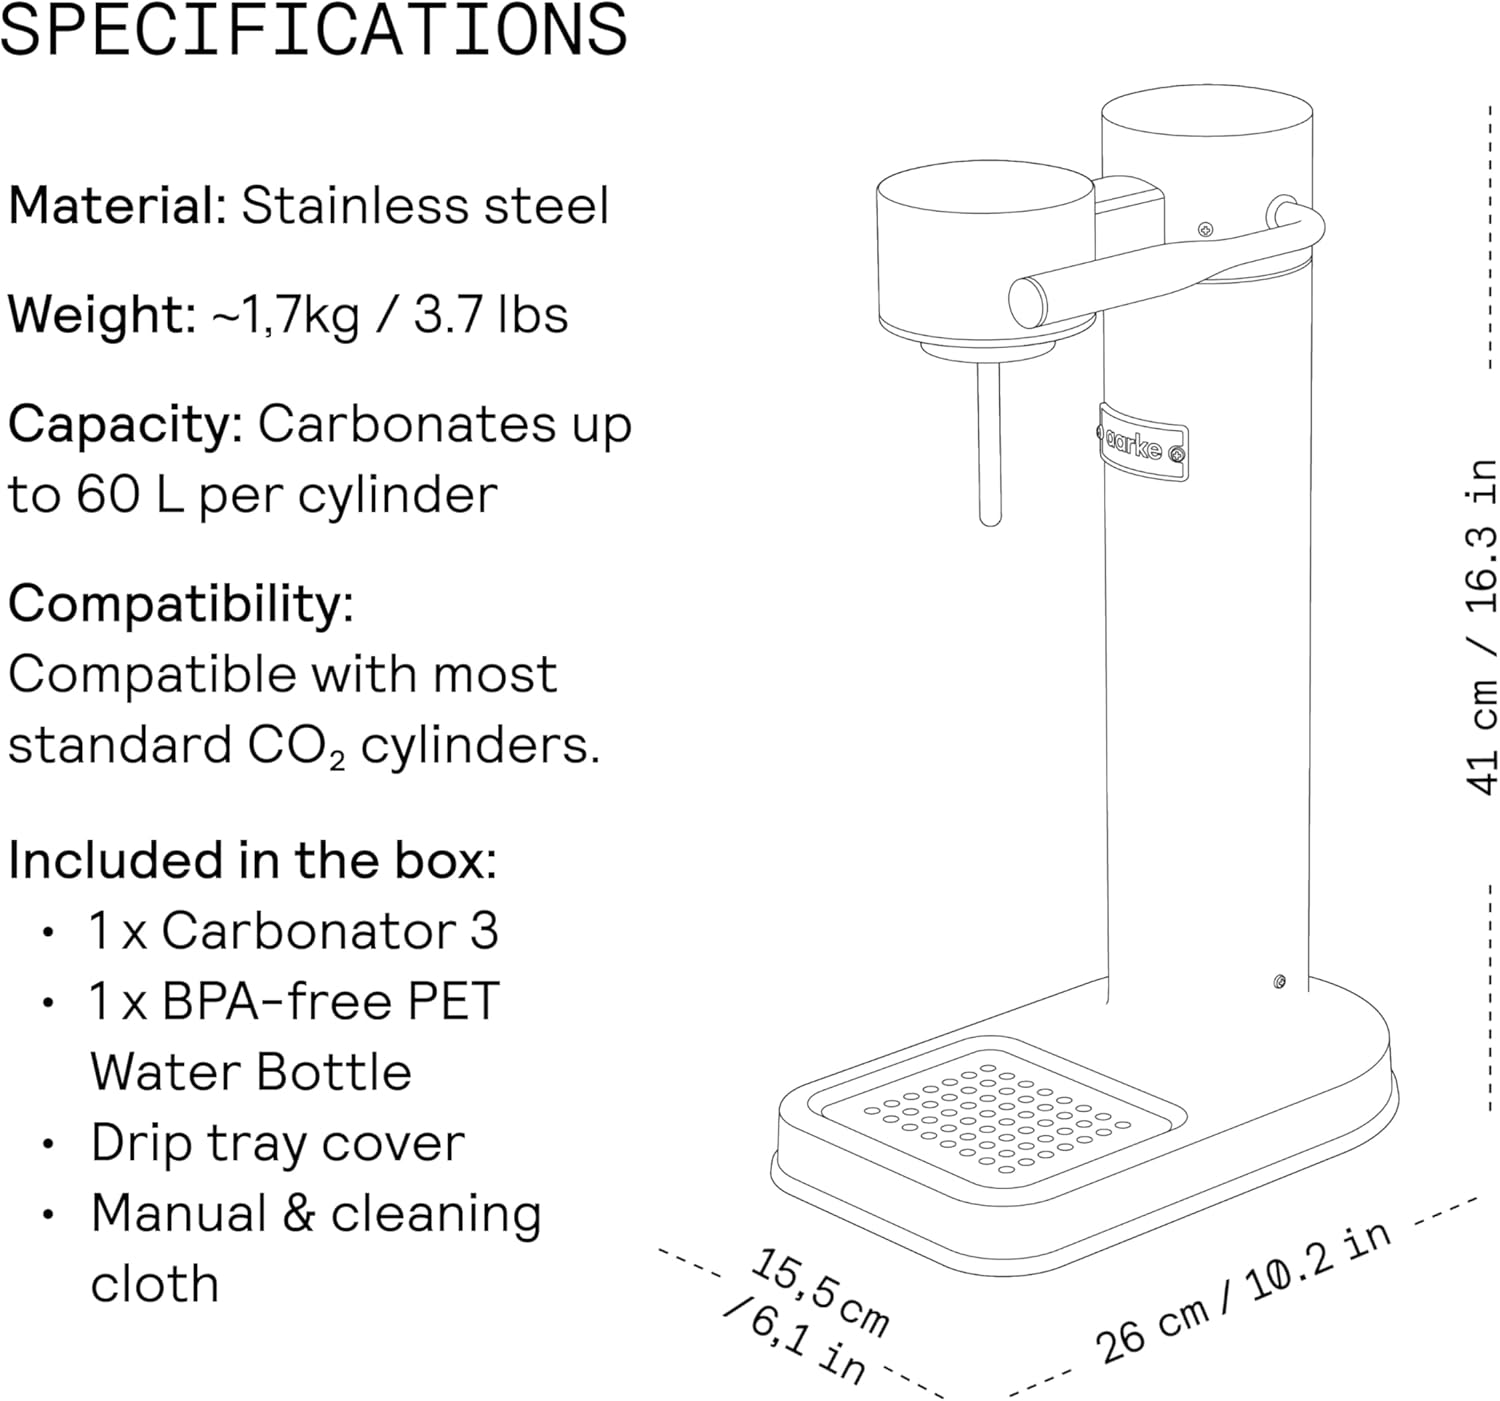
Detailed specifications and dimensions of the aarke Carbonator III.
- Modèl: AAC3-Steel
- Materyèl: Nerjaveèi asye
- Dimansyon (H x W x P): Approximately 16.3 in (41 cm) x 10.2 in (26 cm) x 6.1 in (15.5 cm)
- Pwa: Apeprè 3.78 lbs (1.72 kg)
- Volim boutèy: 800 ml (27.05 ons likid)
- Carbonation Capacity: Up to 60 L per CO2 cylinder (depending on carbonation level)
- Sous pouvwa: Manyèl (pa bezwen elektrisite)
- Konpatibilite: Compatible with most standard CO2 cylinders (60L, 425g).
Garanti ak sipò
The aarke Carbonator III comes with a 2-year limited warranty from the date of purchase, covering defects in materials and workmanship under normal use. For warranty claims, technical support, or general inquiries, please visit the official aarke websit la oubyen kontakte sèvis kliyan yo dirèkteman.
Pou plis enfòmasyon, vizite a aarke Store on Amazon.
Ask a question about this manual
Ask about setup, troubleshooting, compatibility, parts, safety, or missing instructions. Manuals+ will review the question and use this page’s manual context to help answer it.