
1. Entwodiksyon ak souview
The AVMATRIX VS0601 is a compact, multi-format 6-channel video switcher designed for live production environments. It supports a variety of input signals, including 4 SDI and 2 HDMI inputs, and offers scaled outputs for both SDI and HDMI Program (PGM) feeds. The device also features HDMI and SDI multiview outputs for comprehensive monitoring, various transition effects (CUT, AUTO, T-BAR, FADE, WIPE, MIX), GPIO Tally, Picture-in-Picture (PIP), and Fade-to-Black (FTB) functionalities. Its portable design makes it suitable for diverse applications.
2. Pwodwi Features
- Multi-format 6-Channel Input: Accepts 4 SDI and 2 HDMI input signals.
- Scaled Outputs: SDI and HDMI PGM outputs with scaling capabilities.
- Multiview Siveyans: Dedicated HDMI and SDI multiview outputs for monitoring all inputs simultaneously.
- Efè Tranzisyon: Supports CUT, AUTO, T-BAR transitions, along with FADE, WIPE, and MIX effects.
- GPIO Tally Interface: For integration with live tally systems.
- Foto nan Foto (PIP): Allows for overlaying one video source onto another.
- Fade-to-Black (FTB): Smooth transition to a black screen.
- Konsepsyon kontra enfòmèl ant: Portable and easy to transport for on-location use.
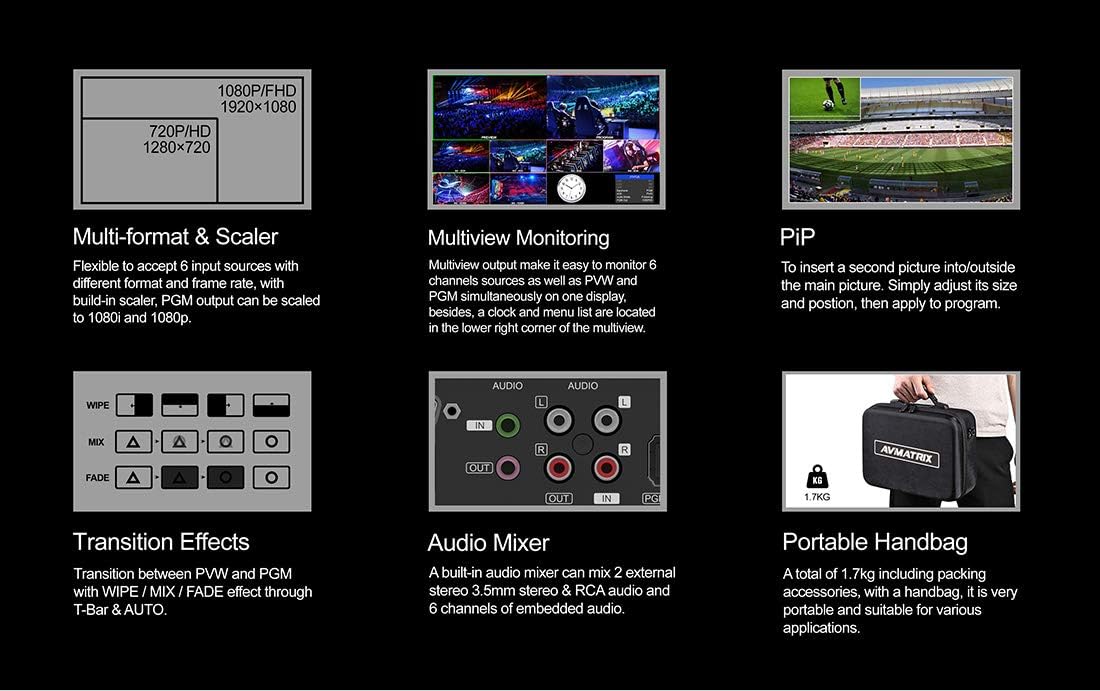
Figi 2.1: Karakteristik kle yoview
3. Enstalasyon
3.1 Debalaj ak enspeksyon
Carefully unpack the AVMATRIX VS0601 and all accessories. Inspect the unit for any signs of damage during transit. Retain the packaging materials for future transport or storage.
3.2 Konekte pouvwa
Connect the provided DC 12V power adapter to the 'DC 12V' input port on the rear panel of the switcher. Plug the adapter into a suitable power outlet. Ensure the power switch is in the 'OFF' position before connecting power.
3.3 Video Input Connections
The VS0601 supports 4 SDI inputs and 2 HDMI inputs. Connect your video sources (cameras, media players, computers) to the corresponding input ports on the rear panel.
- SDI Inputs: Connect up to four SDI sources to the 'SDI IN 1-4' ports.
- Antre HDMI: Connect up to two HDMI sources to the 'HDMI IN 5-6' ports.

Figi 3.1: Koneksyon Panèl Dèyè a
3.4 Video Output Connections
Connect your display monitors or recording devices to the output ports.
- Program (PGM) Output: Connect your main program display or recorder to the 'PGM OUT' (SDI or HDMI) ports.
- Multiview Sòti: Connect a monitor to the 'MULTIVIEW OUT' (HDMI or SDI) for simultaneous viewing of all inputs, program, and preview.
- Sòti USB: Connect to a computer via the 'USB OUT' port for streaming applications.
3.5 Koneksyon Audio
The switcher includes audio input and output options.
- Antre odyo: Connect external audio sources to the 'AUDIO IN' (RCA L/R or 3.5mm stereo) ports.
- Sòti odyo: Connect to external audio monitoring or recording devices via the 'AUDIO OUT' (RCA L/R or 3.5mm stereo) ports.
3.6 Tally and LAN Connections
- Tally: Connect a Tally system to the 'TALLY' (DB-15) port for visual indication of program and preview sous.
- LAN: Connect an Ethernet cable to the 'LAN' (RJ45) port for network control and firmware updates.
4. Operasyon Enstriksyon
4.1 Kontwòl Panel Front
The front panel provides intuitive controls for selecting inputs, managing transitions, and adjusting audio.

Figi 4.1: Layout panèl devan
- PGM (Program) Buttons: Select the input currently live on the program output.
- PVW (Preview) Bouton: Select the input to be previewed before transitioning to program.
- T-Bar: Manually control transitions between preview ak pwogram.
- Bouton KOUPE: Instantly switch from preview nan pwogram.
- Bouton OTO: Execute a transition with a pre-set speed.
- MENU Knob: Navigate and select options within the on-screen display (OSD) menu.
- AUDIO/EFFECTS Buttons: Access audio mixer controls, keying functions (Chroma, Luma, DSK), and Picture-in-Picture (PIP) settings.
4.2 Basic Switching
- Power on the unit using the switch on the rear panel.
- Sou Multi laview monitor, observe all connected inputs.
- Press a button in the PVW row to select an input for preview. This input will appear on the preview section of your multiview kontwole.
- Press a button in the PGM row to select an input for program. This input will immediately go live.
- To transition from the previewed source to the program output, use the T-Bar, KOUPE button for an instant switch, or OTO button for a timed transition.
4.3 Audio Mixing
The VS0601 features an integrated audio mixer. Access the audio controls via the front panel buttons and the OSD menu to adjust levels for embedded audio from HDMI/SDI inputs and external analog audio inputs.
- Sèvi ak la AFV (Audio Follow Video) function to automatically switch audio with video transitions.
- Manually adjust individual audio channel levels using the menu and rotary knob.
4.4 Keying and PIP
The switcher supports various keying effects and Picture-in-Picture functionality.
- Kle Kwoma: Use for green screen or blue screen effects.
- Luma Key: Key based on brightness levels.
- DSK (Downstream Key): Overlay graphics or text onto the program output.
- PIP (Foto-an-Foto): Display a smaller video source within the main program video. Adjust size and position through the OSD menu.
5. Espesifikasyon
| Kategori | Detay |
|---|---|
| Modèl | VS0601 |
| Antre | 4x SDI (SD/HD/3G-SDI), 2x HDMI (Type-A) |
| Antre odyo analòg | 1x 3.5mm stereo audio, 1x RCA (L/R) audio |
| Sòti PGM | 1x SDI (SD/HD/3G-SDI), 1x HDMI (Type-A) |
| AUX Sòti | 1x SDI (SD/HD/3G-SDI) |
| Multiview Sòti yo | 1x SDI (SD/HD/3G-SDI), 1x HDMI (Type-A) |
| Analog Audio Sòti | 1x 3.5mm stereo audio, 1x RCA (L/R) audio |
| Entèfas LAN | RJ45 x1, Synchronize local time |
| Tally Entèfas | DB-15 x1 |
| Sipò fòma antre SDI | 1080p 60/50/30/25/24, 1080i 60/50, 720p 60/50, 576i, 480i |
| HDMI Antre Fòma Sipò | 1080p 60/50/30/25/24, 1080i 60/50, 720p 60/50, 576p, 576i, 480p, 480i |
| Fòma Sòti PGM | 1080p 60/50/30/25/24, 1080i 60/50 |
| Multiview Fòma Sòti | 1080p 60 |
| Konfòmite SDI | SMPTE 292M/SMPTE 259M/SMPTE 424M |
| Dimansyon (LWD) | 249.2 x 172.3 x 55mm |
| Pwa | 1 kg (2.2 liv) |
| Tanperati travay | -20 ~ 60 ° C |
| Tanperati Depo | -30 ~ 70 ° C |
| Kouran | DC 12V, 1.2A |
| Voltage | DC 6-17V |
| Pwovizyon pou pouvwa | DC 12V, 2A |

Figi 5.1: Espesifikasyon teknik
6. Antretyen
- Netwayaj: Sèvi ak yon twal mou epi sèk pou netwaye deyò aparèy la. Pa sèvi ak pwodui netwayaj likid oswa ayewosòl.
- Vantilasyon: Asire w ke gen bon vantilasyon toutotou aparèy la pou anpeche l chofe twòp. Pa bloke okenn ouvèti vantilasyon.
- Depo: When not in use for extended periods, store the switcher in a cool, dry place, preferably in its original packaging.
- Mizajou mikrolojisyèl: Periodically check the AVMATRIX official websit la pou mizajou firmwèr pou asire pèfòmans optimal ak aksè a nouvo fonksyonalite yo. Swiv enstriksyon yo bay ak mizajou firmwèr la ak anpil atansyon.
NAN. Depanaj
7.1 Pa gen Sòti Videyo
- Verify that the power adapter is securely connected and the unit is powered on.
- Check all video cables (SDI, HDMI) for secure connections at both the switcher and the display/source.
- Ensure the correct input is selected on the PGM row.
- Confirm that the output resolution of the switcher is compatible with your display device.
- Test with different cables or display devices if possible.
7.2 Pa gen Sòti Odyo
- Tcheke tout kab odyo yo pou koneksyon yo byen fèm.
- Verify audio levels in the mixer settings via the OSD menu. Ensure no channels are muted.
- Confirm that the audio source is active and producing sound.
- If using embedded audio, ensure the video source is providing audio.
7.3 Controls Unresponsive
- Restart the unit by powering it off and then on again.
- Ensure no foreign objects are obstructing buttons or the T-Bar.
- If connected via LAN, check network connection and control software status.
8. Garanti ak sipò
For warranty information and technical support, please refer to the official AVMATRIX websit la oubyen kontakte distribitè lokal ou a. Kenbe resi acha ou kòm prèv acha pou reklamasyon garanti.
Resous sou entènèt:
- AVMATRIX Official Websit
- LILLIPUT Store on Amazon (Manufacturer/Seller)