
1. Entwodiksyon
This manual provides essential instructions for the setup, operation, and maintenance of your SUNMI T2 Smart POS Terminal. The T2 is an integrated point-of-sale device featuring a 15.6-inch Full HD touch screen and a built-in thermal printer, designed for various commercial applications.
2. Pwodwi souview
2.1 Konpozan Aparèy
The SUNMI T2 terminal integrates a high-resolution display, a powerful processor, and a thermal printer into a single unit. Key components include:
- 15.6-inch Full HD Touch Screen (1920x1080)
- Integrated Thermal Printer (80mm paper width, 200mm/s print speed)
- Base Unit with connectivity ports
- Antre pouvwa
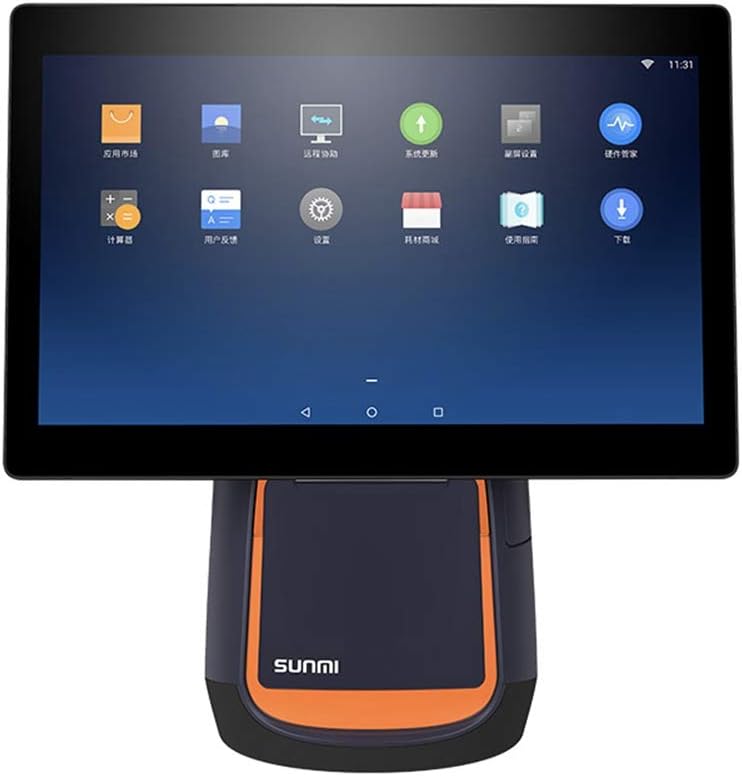
Figi 2.1: Devan view of the SUNMI T2 Smart POS Terminal. The 15.6-inch touch screen is visible, displaying various application icons, indicating its Android operating system interface.

Figi 2.2: Side view of the SUNMI T2 terminal, illustrating the design of the stand and the adjustable angle of the main display unit.
2.2 Kontni pake a
Lè w ap debale, verifye si tout bagay yo la:
- SUNMI T2 Printer (T2 model)
- Pouvwa kab
- Manyèl Itilizatè (dokiman sa a)
3. Enstriksyon Enstalasyon
3.1 Debalaj ak plasman
- Carefully remove the SUNMI T2 terminal from its packaging.
- Place the device on a stable, flat surface, ensuring adequate ventilation around the unit.
- Avoid placing the device near heat sources, direct sunlight, or in areas with high humidity or dust.
3.2 Koneksyon pouvwa
- Connect the provided power cable to the power input port located at the rear of the device base.
- Branche lòt bout kab kouran an nan yon priz elektrik estanda.
- The device will typically power on automatically or can be powered on using the power button.
3.3 Premye Limen ak Konfigirasyon
- Press and hold the power button (refer to Section 5.1 for button location) until the screen illuminates.
- Follow the on-screen prompts to complete the initial setup, including language selection, Wi-Fi connection, and time zone settings.
- Connect to your local network via Wi-Fi or Ethernet (if available) to ensure proper functionality and updates.
4. Operasyon Enstriksyon
4.1 Operasyon Touch Screen
The SUNMI T2 features a capacitive multi-touch screen. Operate the device using standard touch gestures:
- Tape: Chwazi atik oswa aktive fonksyon yo.
- Glise: Navige nan meni yo oubyen defile kontni an.
- Zoom-pou-zoom: Adjust the size of on-screen content.
4.2 Integrated Printer Operation
The T2 includes an 80mm thermal printer for receipts and order tickets.
4.2.1 Loading Printer Paper
- Locate the printer cover on the front of the device base.
- Press the release button or latch to open the printer cover.
- Insert a new roll of 80mm thermal paper, ensuring the paper feeds from the bottom and the leading edge extends slightly out of the printer slot.
- Fèmen kouvèti enprimant lan byen fèm jiskaske li fè yon klik an plas.
- Tear off any excess paper.
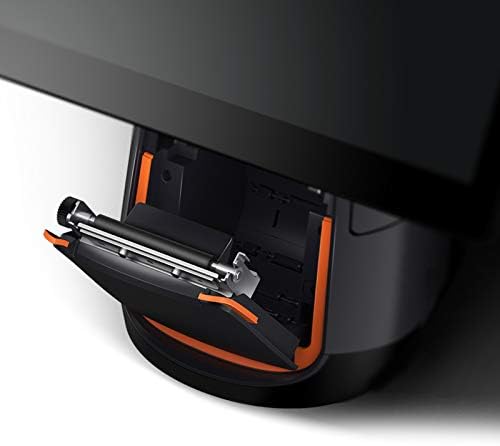
Figi 4.1: Detaye view of the integrated thermal printer compartment with the cover open, illustrating the correct method for inserting a new 80mm thermal paper roll.

Figi 4.2: Entèn view of the SUNMI T2's thermal printer mechanism, highlighting its design for efficient paper handling and high-speed printing up to 200mm/s.
4.2.2 Printing Receipts
Once paper is loaded, the printer will automatically activate when a print command is issued from your POS software application. Ensure your application is correctly configured to use the integrated printer.
4.3 Koneksyon
The SUNMI T2 supports various connectivity options:
- Wi-Fi: 2.4G/5G (IEEE 802.11 a/b/g/n) for wireless network access.
- Bluetooth: Supports Bluetooth 2.1/3.0/4.0 (BLE) for connecting peripherals.
- Pò USB: USB Type A port x1, USB 3.1 Type C x1, USB 2.0 x2 (total 3 USB ports).
- RJ11: Cash drawer port x1.
- RJ45: LAN port x1 for wired network connection.
- Kas ekoutè Jack: 3.5mm pwodiksyon odyo.
- Mikwo-USB: Debug port x1.
Connect external devices such as barcode scanners, external keyboards, or cash drawers to the appropriate ports as needed.
5. Antretyen
5.1 Netwaye Aparèy la
- Power off the device and disconnect the power cable before cleaning.
- Sèvi ak yon ti moso twal mou, ki san pèl dampened with water or a mild, non-abrasive cleaner to wipe the screen and exterior surfaces.
- Do not use harsh chemicals, abrasive pads, or excessive moisture.
- For the thermal printer head, use a specialized thermal printer cleaning pen or card to ensure optimal print quality.
5.2 Mizajou lojisyèl
Regularly check for and install software updates for the SUNMI OS and your POS application to ensure optimal performance, security, and access to new features. Updates can typically be found in the device's settings menu or through your POS software provider.
NAN. Depanaj
6.1 Pwoblèm komen ak solisyon
- Aparèy la pa limen:
- Ensure the power cable is securely connected to both the device and a working electrical outlet.
- Verifye priz kouran an fonksyonèl.
- Eseye peze epi kenbe bouton pouvwa a pandan 10-15 segonn.
- Ekran an pa reponn:
- Rekòmanse aparèy la.
- Asire w ekran an pwòp epi li pa gen okenn debri.
- Printer is not printing:
- Check if thermal paper is loaded correctly and not jammed.
- Ensure the printer cover is securely closed.
- Verify that the POS application is sending print commands and is configured for the integrated printer.
- Rekòmanse aparèy la.
- No network connection (Wi-Fi/Ethernet):
- Check Wi-Fi settings and ensure you are connected to the correct network.
- For Ethernet, ensure the cable is securely connected to the RJ45 port and your router/switch.
- Restart your network equipment (router/modem).
If issues persist, refer to the support section or contact your vendor.
7. Espesifikasyon
The following table details the technical specifications of the SUNMI T2 Smart POS Terminal:

Figi 7.1: Plis paseview of SUNMI T2 Technical Specifications, detailing hardware and software components.
| Karakteristik | Detay |
|---|---|
| Modèl | T2 |
| Ekspozisyon prensipal | 15.6" FHD, 1920x1080 |
| Processeur | Qualcomm Snapdragon Octa-core processor |
| Sistèm operasyon | Android 7.1, SUNMI OS |
| memwa | 2GB RAM, 16GB ROM |
| Manyen ekran | G+G capacitive multi-touch screen |
| Enprimant | Built-in high speed 80mm thermal printer with automatic cutter, print speed 200mm/s |
| Wi-Fi | 2.4G/5G (IEEE 802.11 a/b/g/n) |
| Bluetooth | Supports Bluetooth 2.1/3.0/4.0 (BLE) |
| Pò ekstèn | USB Type A x1, RJ11 cash drawer x1, RJ45 LAN x1, Headphone jack x1, Power port x1, Micro-USB debug x1 |
| Pò USB | USB 3.1 Type C x1, USB 2.0 x2 |
| Ekstèn memwa | Supports MicroSD (TF) up to 64GB |
| Adaptè pouvwa | Antre: AC100-240V / 1.7A, Sòti: DC24V / 2.5A |
| Dimansyon | 37.4cm x 33.8cm x 22.4cm |
| Pwa atik | 17.6 liv (apeprè 7.98 kg) |
| Anviwònman travay | Temp: 0°C - 40°C |
| Anviwònman Depo | Temp: -20°C - 60°C |
8. Garanti ak sipò
For warranty information and technical support, please refer to the documentation provided with your purchase or contact the vendor/manufacturer directly. Keep your purchase receipt as proof of purchase.
Manufacturer: Kunxilin Electronic CO. (Brand: SUNMI)