
1. Entwodiksyon
This manual provides detailed instructions for the installation, operation, and maintenance of your ASRock B365 PRO4 ATX Motherboard. Please read this manual thoroughly before proceeding with installation to ensure correct setup and to prevent damage to the components.
The ASRock B365 PRO4 motherboard supports 9th and 8th Generation Intel Core Processors, offering a robust platform for personal computing. It features a Digi Power Design with an 8 Power Phase Design, ensuring stable power delivery to the CPU.
2. Enfòmasyon sou Sekirite
- Toujou dekonekte ekipman pou kouran an anvan ou enstale oswa retire nenpòt konpozan.
- Mete yon braslè ponyèt anti-estatik pou anpeche domaj akòz dechaj elektwostatik (ESD) sou konpozan sansib yo.
- Manyen kat manman an nan kwen li yo pou evite touche konpozan sansib yo.
- Asire w ke bwat òdinatè w la byen vantile pou anpeche l chofe twòp.
- Kenbe kat manman an lwen imidite ak tanperati ekstrèm.
3. Enstalasyon ak Enstalasyon
3.1 Kontni pake a
Verifye ke tout atik yo prezan nan pakè a:
- ASRock B365 PRO4 Motherboard
- Gid Enstalasyon Rapid
- CD sipò
- I / O Shield
- 2 x SATA done Câbles
- 3 x Screws for M.2 Sockets
- 1 x Standoff for M.2 Socket

Image: ASRock B365 PRO4 Motherboard and its included accessories, including the quick installation guide, support CD, I/O shield, SATA cables, and M.2 screws/standoff.
3.2 Layout mèr
Familyarize w ak konpozan kle yo ak konektè ki sou kat manman an.

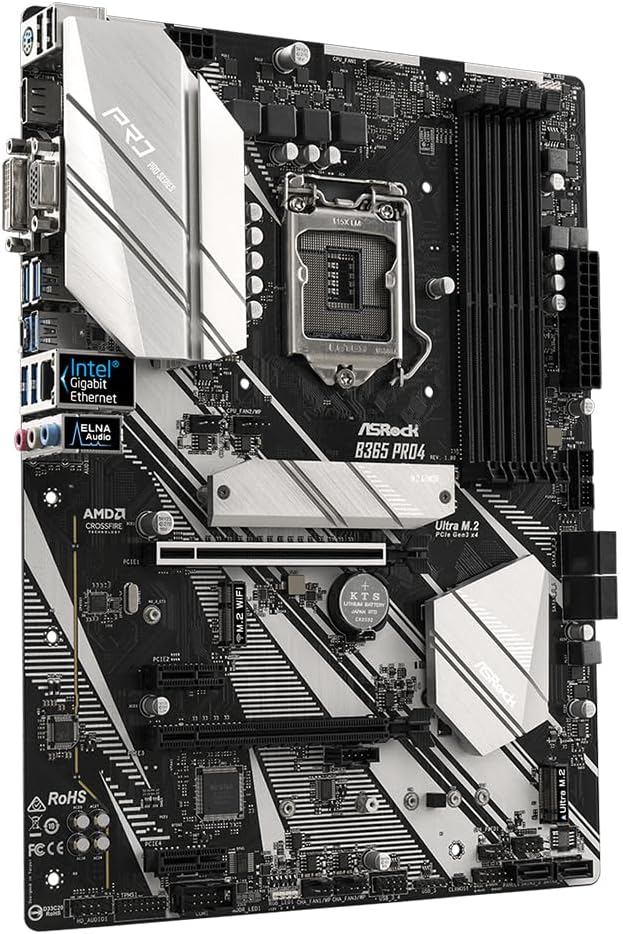
Imaj: Anwo-anba view of the ASRock B365 PRO4 Motherboard, highlighting the CPU socket, RAM slots, PCIe slots, and M.2 slots.

Imaj: Angle view of the ASRock B365 PRO4 Motherboard, showing the heatsinks and various connectors.
3.3 Enstalasyon CPU (LGA1151)
- Louvri levye priz CPU a epi leve plak chajman an.
- Aliyen CPU a ak priz la ak anpil atansyon, pou asire w ke triyang an lò ki sou CPU a koresponn ak triyang ki sou priz la.
- Mete CPU a dousman nan priz la san fòse li.
- Close the load plate and secure it with the lever.
3.4 Enstalasyon memwa (RAM)
The motherboard features 4 DDR4 DIMM slots, supporting dual-channel memory up to 64GB.
- Louvri klip yo nan tou de bout fant DIMM lan.
- Align the notch on the RAM module with the key in the DIMM slot.
- Insert the RAM module firmly until the clips snap into place.
3.5 Enstalasyon Aparèy Depo
The motherboard supports 6 SATA3 ports and 2 Ultra M.2 ports.
- Disques SATA yo: Connect SATA data cables to the SATA ports on the motherboard and to your storage devices (HDDs/SSDs). Connect power cables from your power supply to the devices.
- SSD M.2 yo: Locate the M.2 slots. Insert the M.2 SSD into the slot at an angle, then gently push it down and secure it with the provided screw and standoff.
3.6 Enstalasyon Kat Ekspansyon (PCIe)
The motherboard has 2 PCI-Express 3.0 x16 slots and 2 PCI-Express 3.0 x1 slots.
- Select an appropriate PCIe slot for your expansion card (e.g., graphics card).
- Remove the corresponding metal bracket from your PC case.
- Align the card with the slot and press firmly until it is seated correctly.
- Fikse kat la ak yon vis sou bwat PC a.
3.7 Connecting Peripherals to the I/O Panel
Panèl I/O dèyè a bay plizyè pò pou konekte aparèy ekstèn.
Imaj: Gwo plan view of the ASRock B365 PRO4 Motherboard's rear I/O panel, showing ports for PS/2, USB 2.0, USB 3.1 Gen 1, VGA, DVI-D, HDMI, LAN, and audio jacks.
- Pò USB: Connect USB devices (keyboard, mouse, external drives) to the available USB 2.0 (5 ports) and USB 3.1 Gen 1 (8 ports, including 1 Type-C rear) ports.
- Sorti Videyo: Connect your monitor to the VGA, DVI-D, or HDMI port.
- Pò LAN: Konekte yon kab Ethernet pou aksè nan rezo a.
- Pak odyo: Connect speakers, headphones, or microphones to the audio jacks.
- PS/2 pò: Connect a PS/2 keyboard or mouse.
4. Operasyon Enstriksyon
4.1 Premye Demaraj ak Enstalasyon BIOS
- After assembling all components, connect the power supply and monitor.
- Power on your system. Press Del or F2 during startup to enter the BIOS/UEFI setup utility.
- Configure boot order, system time, and other necessary settings. Save changes and exit.
- Install your operating system from a bootable USB drive or optical media.
4.2 Enstalasyon chofè
After installing the operating system, install the necessary drivers from the provided Support CD or download the latest versions from the ASRock websit la. Motè kle yo enkli:
- Chofè Chipset
- Chofè Odyo (Realtek ALC892)
- LAN Drivers (Intel I219V Gigabit Ethernet)
- Graphics Drivers (for integrated graphics or discrete GPU)
5. Antretyen
- Retire pousyè: Netwaye pousyè ki sou kat manman an ak fanatik bwat yo regilyèman avèk lè konprese. Asire w ke sistèm nan etenn epi debranche anvan ou netwaye li.
- Mizajou BIOS: Tcheke ASRock la website periodically for BIOS updates. Updates can improve system stability and compatibility. Follow the instructions carefully when updating the BIOS.
- Jesyon kab: Asire w ke fil yo byen pase pou amelyore sikilasyon lè a epi pou anpeche entèferans.
NAN. Depanaj
- Pa gen pouvwa:
- Check all power connections, including the 24-pin ATX and 8-pin 12V CPU power connectors.
- Asire w ke switch ekipman pou pouvwa a nan pozisyon ON an.
- Pa gen ekspozisyon:
- Verify that the monitor is connected to the correct video output (either integrated graphics or discrete GPU).
- Remete kat grafik la ak modil RAM yo.
- Enstabilite/Pwoblèm Sistèm:
- Tcheke modil RAM yo pou wè si yo byen plase.
- Asire w ke radyatè CPU a byen enstale epi li fè bon kontak.
- Mete ajou chofè yo ak BIOS yo nan dènye vèsyon yo.
- SSD M.2 pa detekte:
- Ensure the M.2 SSD is correctly seated and secured.
- Check BIOS settings to ensure M.2 slots are enabled and configured correctly (SATA vs. PCIe mode).
7. Espesifikasyon
| Karakteristik | Detay |
|---|---|
| CPU Socket | LGA 1151 |
| Procesè konpatib yo | 9th/8th Generation Intel Core Processors (up to 95W) |
| Chipset | Intel B365 |
| memwa | 4 x DDR4 DIMM slots, Dual Channel, Non-ECC, Buffered, Max 64GB (2666/2400/2133 MHz) |
| Fant ekspansyon | 2 x PCIe 3.0 x16, 2 x PCIe 3.0 x1 |
| Sipò pou plizyè grafik | AMD Quad CrossFireX and CrossFire Technology |
| Depo | 6 x SATA3 ports (RAID 0, 1, 5, 10), 2 x Ultra M.2 ports (PCIe Gen3 x4 & SATA3) |
| Odyo | Realtek ALC892 7.1-Chèn HD Audio |
| LAN | Intel I219V Gigabit Ethernet |
| Pò USB | 8 x USB 3.1 Gen1 (1 Type-C rear, 5 rear, 2 via header), 5 x USB 2.0 (2 rear, 3 via header) |
| Sorti Videyo | 1 x VGA, 1 x DVI-D, 1 x HDMI |
| Faktè fòm | ATX (12.0 x 9.0 inch / 30.5 x 22.9 cm) |
8. Garanti ak sipò
8.1 Enfòmasyon sou Garanti
The ASRock B365 PRO4 Motherboard comes with a 1-ane garanti limite. This warranty covers defects in materials and workmanship under normal use. For specific terms and conditions, please refer to the warranty card included with your product or visit the official ASRock websit.
Note: Damage caused by improper installation, misuse, unauthorized modifications, or natural disasters is not covered under warranty.
8.2 Sipò teknik
For technical assistance, driver downloads, BIOS updates, or further troubleshooting, please visit the official ASRock support websit:
You may also contact ASRock customer service directly through their websit pou sipò pèsonalize.