1. Enfòmasyon enpòtan sou sekirite
Read and understand all safety warnings and instructions before operating this garden tiller. Failure to follow these instructions may result in serious injury or death.
- Ekipman Pwoteksyon Pèsonèl: Always wear appropriate safety gear, including eye protection, hearing protection, sturdy footwear, and gloves.
- Sekirite gaz: Gasoline is highly flammable. Handle fuel in a well-ventilated area, away from sparks, open flames, or other ignition sources. Do not smoke while fueling.
- Operating Area: Clear the work area of stones, debris, and other objects that could be thrown by the tines. Keep bystanders, children, and pets at a safe distance (at least 15 meters/50 feet).
- Echapman motè: Operate the tiller in a well-ventilated outdoor area. Engine exhaust contains carbon monoxide, which is a colorless, odorless, and deadly gas.
- Kontwòl machin: Always maintain a firm grip on the handlebars. Be aware of the tines and their rotation direction. Never operate the tiller on excessively steep slopes.
- Antretyen: Disconnect the spark plug wire before performing any maintenance or adjustments to prevent accidental starting.
2. Pwodwi souview ak Konpozan
Familiarize yourself with the main parts of your Hecht HEC-796 garden tiller.

Figi 2.1: The handlebar assembly featuring the Hecht brand logo. This is where the operator controls the tiller.

Figi 2.2: Close-up of a handlebar grip, designed for comfortable and secure handling during operation.

Figi 2.3: The throttle control and engine kill switch located on the handlebar for easy access. The red switch is for turning the engine ON/OFF.

Figi 2.4: View of the engine area, showing the fuel tank cap (silver) and the air filter housing (black cage). Regular checks of these components are crucial for performance.

Figi 2.5: The tilling tines (black blades) and the transport wheel. The transport wheel assists in moving the tiller to and from the work area.
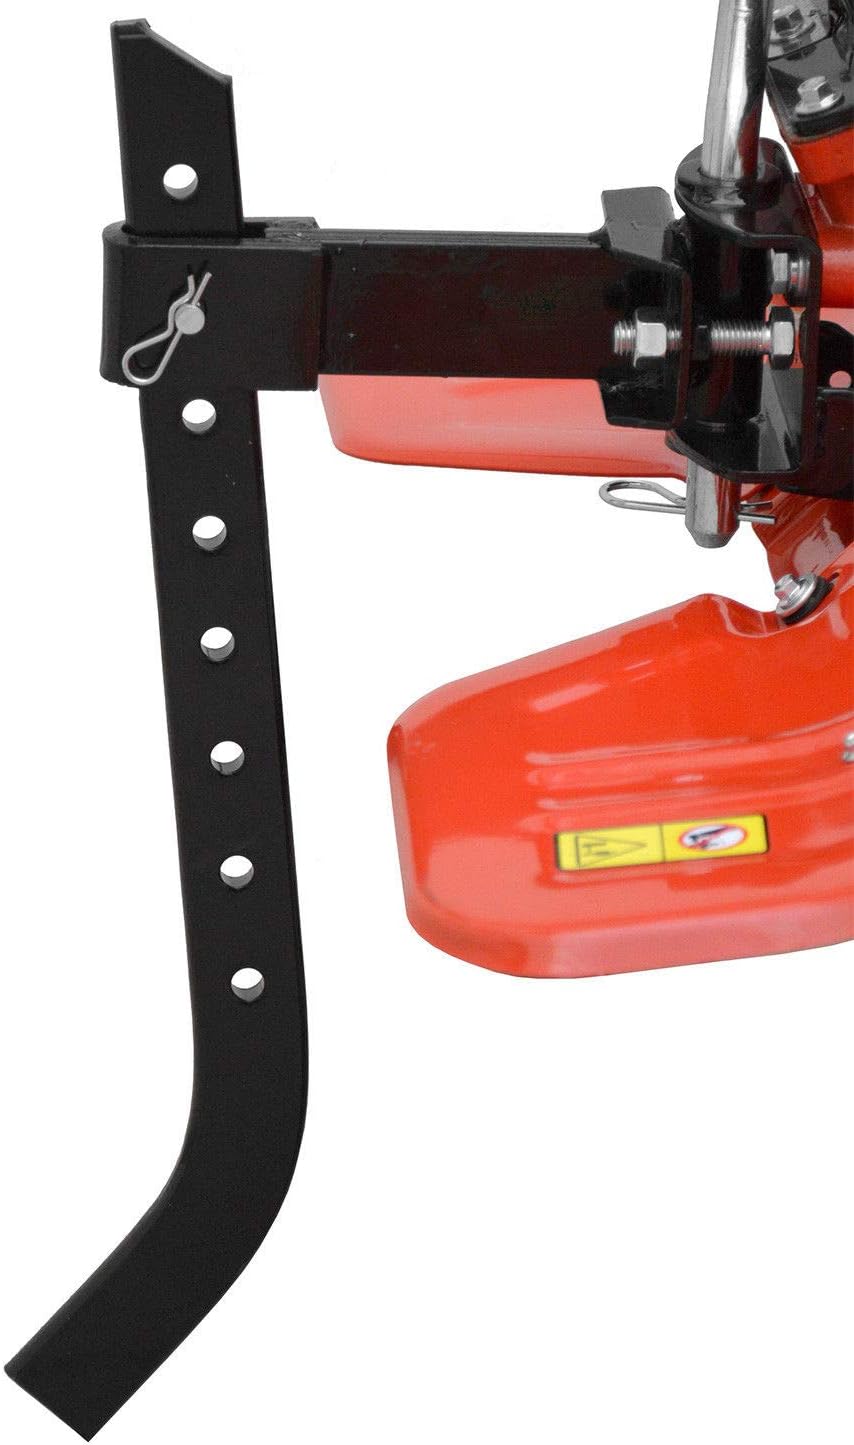
Figi 2.6: The adjustable depth stake (also known as a drag bar) at the rear of the tiller. This component helps control the tilling depth and forward speed.
3. Enstalasyon ak Asanble
Your Hecht HEC-796 tiller may require some assembly before first use. Follow these steps carefully:
- Debake: Retire tout konpozan yo nan anbalaj la avèk prekosyon. Tcheke pou wè si gen nenpòt domaj oswa pyès ki manke.
- Asanble gidon: Attach the handlebar assembly to the main unit. Secure it firmly using the provided bolts and nuts. Ensure all cables (throttle, kill switch) are routed correctly and not pinched.
- Transport Wheel Installation: Install the transport wheel(s) as per the diagrams in the separate assembly guide. Ensure they can be easily raised and lowered.
- Depth Stake/Drag Bar: Attach the depth stake to the rear of the tiller. Adjust its height to the desired tilling depth. A lower setting results in deeper tilling and slower forward movement.
- Tcheke likid:
- Lwil motè: Fill the engine with appropriate 4-stroke engine oil (e.g., SAE 10W-30) to the recommended level on the dipstick. Do not overfill.
- Gaz: Ranpli tank gaz la ak gazolin fre san plon. Pa sèvi ak E85 oubyen gaz melanje. Asire w bouchon gaz la byen sere.
4. Operasyon Enstriksyon
Before starting, ensure you have read the safety section and the tiller is properly assembled and fueled.
4.1. Kòmanse motè a
- Valv gaz: Open the fuel valve (if equipped).
- Chokes: Deplase levye choke a nan pozisyon 'CHOKE' (pou demaraj frèt).
- Acct: Set the throttle lever to the 'FAST' or 'START' position.
- Chanjman pou touye moun: Ensure the engine kill switch is in the 'ON' position.
- Demaraj rkul: Pull the recoil starter handle slowly until resistance is felt, then pull firmly and quickly. Repeat until the engine starts.
- Chofe: Yon fwa motè a demarre, deplase levye choke a piti piti nan pozisyon 'RUN' pandan motè a ap chofe.
4.2. Tilling
- Lower Transport Wheel: Raise the transport wheel(s) to engage the tines with the ground.
- Engage Tines: Engage the tines using the appropriate lever or clutch control on the handlebar.
- Control Depth: Use the depth stake to control how deep the tines penetrate the soil. For initial passes, a shallower depth is often recommended.
- Kenbe kontwòl: Walk behind the tiller, maintaining a firm grip on the handlebars. Allow the tiller to pull itself forward. Do not force it.
- Plizyè Pas: For deeply compacted soil, make several passes, gradually increasing the tilling depth with each pass.
4.3. kanpe motè a
- Disengage Tines: Disengage the tines.
- Acct: Move the throttle lever to the 'SLOW' or 'IDLE' position and allow the engine to cool for a minute.
- Chanjman pou touye moun: Move the engine kill switch to the 'OFF' position.
- Valv gaz: Close the fuel valve (if equipped) for storage.
5. Antretyen
Regular maintenance ensures optimal performance and extends the life of your tiller. Always disconnect the spark plug wire before performing any maintenance.
- Apre chak itilizasyon:
- Clean soil and debris from the tines and housing.
- Inspect tines for damage or wear.
- Tcheke pou fasteners ki lach.
- Every 10-20 Hours of Operation (or Annually):
- Lwil motè: Check engine oil level and change if necessary. Refer to the engine manual for specific oil change intervals.
- Filtè lè: Netwaye oswa ranplase filtè lè a. Yon filtè lè sal ka diminye pèfòmans motè a.
- Bouji: Inspect and clean the spark plug. Replace if electrodes are worn or fouled.
- Filtè gaz: Inspect and replace the fuel filter if necessary.
- Depo:
- Vide tank gaz la oubyen ajoute yon estabilizè gaz si w ap sere l pou plis pase 30 jou.
- Clean the entire machine thoroughly.
- Sere nan yon zòn sèk, byen ayere, lwen limyè solèy dirèk ak tanperati ekstrèm.
NAN. Depanaj
Gade seksyon sa a pou pwoblèm komen ak solisyon potansyèl yo.
| Pwoblèm | Kòz posib | Solisyon |
|---|---|---|
| Motè pa kòmanse |
|
|
| Motè a pa mache byen/li pa gen ase puisans |
|
|
| Tiller does not cultivate effectively |
|
|
If problems persist after attempting these solutions, contact a qualified service technician or Hecht customer support.
7. Espesifikasyon teknik
| Spesifikasyon | Valè |
|---|---|
| Mak | Hecht |
| Modèl | HEC-796 |
| Nimewo Pati | H796 |
| Sous pouvwa | Ki mache ak gazolin |
| Pouvwa motè | 4.5 kW / 6.12 HP |
| Travay Lajè | 80 cm |
| Travay Pwofondè | 30 cm |
| Pwa atik | 68 Kilogram |
| GTIN | 08595614920148 |
8. Garanti ak Sipò Kliyan
This Hecht HEC-796 garden tiller is covered by a manufacturer's warranty. Please refer to the separate warranty document included with your purchase for specific terms and conditions, including warranty period and coverage details.
For technical assistance, spare parts, or warranty claims, please contact your authorized Hecht dealer or visit the official Hecht websit pou jwenn enfòmasyon sou sipò kliyan.
Hecht Customer Service:
- Refer to your purchase documentation for local contact details.
- Vizite www.hecht.cz/en/ for general information and support.