1. Entwodiksyon
This manual provides detailed instructions for the installation, operation, and maintenance of your GIGABYTE Z370XP SLI motherboard. Designed for 8th Generation Intel Core processors, this ATX motherboard offers robust performance and features for various computing needs. Please read this manual thoroughly before beginning installation.
2. Karakteristik kle
- Supports 8th Generation Intel Core Processors.
- Dual Channel DDR4 memory support with 4 DIMM slots.
- USB 3.1 Gen 2 with USB Type-C for high-speed connectivity.
- 2-Way Graphics Support (SLI/CrossFire) for enhanced visual performance.
- Intel Gigabit LAN for stable and fast network connections.
- GIGABYTE UEFI Dual BIOS for system protection and easy configuration.
- APP Center including Easy Tune and Cloud Station Utilities for system management.
- Realtek ALC1220 Codec for high-definition audio.
- ATX Form Factor (305mm x 225mm).
3. Pake kontni
Verifye ke tout atik yo prezan nan pakè a. Si gen nenpòt atik ki manke oswa ki domaje, kontakte machann ou an.
- GIGABYTE Z370XP SLI Motherboard
- (Additional accessories such as SATA cables, I/O shield, and manual may be included depending on the region and retailer.)
4. Enstalasyon ak Enstalasyon
Before installing the motherboard, ensure your system components are compatible and that you have a static-free environment.
4.1 Kat manman an finiview

Imaj 1: Top-desann view of the GIGABYTE Z370XP SLI Motherboard. This image displays the CPU socket, DIMM slots, PCIe slots, and various headers.

Imaj 2: Angle view of the GIGABYTE Z370XP SLI Motherboard, highlighting the heatsinks and overall layout.
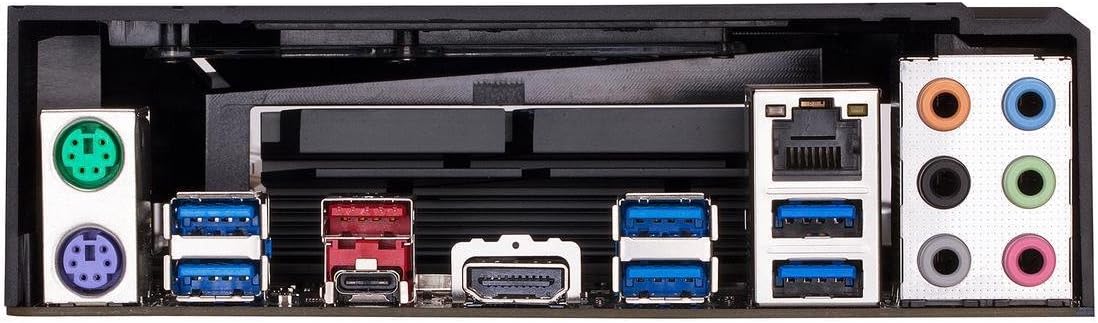
Imaj 3: Rear I/O panel of the GIGABYTE Z370XP SLI Motherboard, showing the various ports including USB, HDMI, Ethernet, and audio jacks.
4.2 CPU Enstalasyon
- Jwenn priz CPU LGA 1151 la sou kat manman an.
- Louvri levye priz CPU a epi retire bouchon pwoteksyon an.
- Aliyen CPU a ak priz la ak anpil atansyon, pou asire w ke triyang lò ki sou CPU a koresponn ak triyang ki sou priz la.
- Mete CPU a dousman nan priz la san fòse li.
- Fèmen levye priz la pou byen sere CPU a.
- Enstale radyatè CPU a dapre enstriksyon manifakti a.
4.3 Enstalasyon memwa (RAM)
- Louvri klip yo nan tou de bout fant DIMM yo.
- Aliyen dan ki sou modil memwa DDR4 la ak dan ki nan plas DIMM lan.
- Mete modil memwa a byen fèm nan fant lan jiskaske klip yo kase nan plas yo.
- Pou operasyon doub kanal, gade manyèl kat manman an pou konfigirasyon plas rekòmande yo.
4.4 Enstalasyon Aparèy Depo
- Disques SATA yo: Connect SATA data cables from your storage devices (HDDs/SSDs) to the SATA 3 ports on the motherboard. Connect SATA power cables from your power supply to the drives.
- M.2 Kondwi: Locate the M.2 slots. Insert the M.2 drive at an angle and secure it with the provided screw.
4.5 Enstalasyon Kat Grafik ak Kat Ekspansyon
- Open the latch on the desired PCI Express x16 slot.
- Align your graphics card or expansion card with the slot and press down firmly until it is seated.
- Fikse kat la ak yon vis sou bwat òdinatè w la.
- Konekte tout kab pouvwa PCIe ki nesesè yo soti nan ekipman pou pouvwa ou a nan kat grafik la.
4.6 Koneksyon pouvwa
- Konekte konektè prensipal ATX 24-pin ki soti nan ekipman pou pouvwa a nan pò ki koresponn lan sou kat manman an.
- Konekte konektè pouvwa CPU ATX 12V 8-pin (oswa 4+4-pin) la ak kat manman an.
4.7 Koneksyon Front Panel
Connect the front panel cables (power button, reset button, HDD LED, power LED, USB ports, audio jacks) to their respective headers on the motherboard. Refer to the motherboard's silkscreen labels for correct orientation.
5. Operasyon Enstriksyon
5.1 Premye Demaraj Sistèm
- After all components are installed and connected, close your PC case.
- Konekte monitè ou, klavye ou, ak sourit ou.
- Connect the power cord to your power supply and turn on the power switch.
- Peze bouton pouvwa a sou bwat PC ou a.
- The system should power on and display the GIGABYTE splash screen.
5.2 Enstalasyon BIOS/UEFI
Pou antre nan zouti konfigirasyon BIOS/UEFI a, peze bouton an. DEL key repeatedly during the initial boot process. The BIOS allows you to configure system settings such as boot order, CPU/memory frequencies, and peripheral settings. Save changes before exiting.
5.3 Enstalasyon chofè
After installing your operating system, install the necessary drivers for the motherboard chipset, LAN, audio, and other integrated components. These drivers are typically provided on a support DVD or can be downloaded from the GIGABYTE official websit.
6. Antretyen
- Retire pousyè: Regularly clean dust from inside your PC case, especially from fans and heatsinks, to prevent overheating. Use compressed air for best results.
- Mizajou BIOS: Tcheke GIGABYTE a regilyèman. website for BIOS updates. BIOS updates can improve system stability, compatibility, and performance. Follow the instructions provided by GIGABYTE carefully when updating the BIOS.
- Mizajou chofè: Kenbe chofè sistèm ou yo ajou pou asire pèfòmans optimal ak konpatibilite ak nouvo lojisyèl ak pyès ki nan konpitè.
NAN. Depanaj
Si ou rankontre pwoblèm, gade etap depanaj komen sa yo:
- Pa gen kouran/Pa gen demaraj:
- Ensure all power cables (24-pin ATX, 8-pin CPU, GPU) are securely connected.
- Check if the power supply is switched on.
- Verifye koneksyon bouton pouvwa a sou panèl devan an.
- Pa gen ekspozisyon:
- Ensure the monitor is connected to the graphics card (or motherboard if using integrated graphics) and powered on.
- Remete kat grafik la ak modil memwa yo.
- Test with a single RAM stick in different slots.
- Enstabilite/Pwoblèm Sistèm:
- Tcheke tanperati CPU ak GPU yo.
- Asire w tout chofè yo byen enstale epi yo ajou.
- Kouri zouti dyagnostik memwa pou tcheke si gen erè RAM.
- Reyajiste paramèt BIOS yo nan valè defo yo.
- On-board Readout/Debug LED: The motherboard may feature an on-board debug LED or POST code display. Consult the full GIGABYTE manual for specific code meanings to diagnose boot issues.
8. Espesifikasyon
| Karakteristik | Detay |
|---|---|
| Mak | GIGABYTE |
| Non modèl | Z370XP SLI |
| CPU Socket | LGA 1151 |
| Procesè konpatib yo | 8yèm jenerasyon Intel Core |
| Kalite Chipset | Intel Z370 |
| Teknoloji memwa RAM | DDR4 |
| Vitès revèy memwa | 2666 MHz (Sipòte pi wo atravè OC) |
| Fant memwa ki disponib | 4 |
| Ram Memory Maximum Size | 64 GB |
| Entèfas kat grafik | PCI Express |
| Total PCIe Ports | 4 |
| Total SATA Ports | 6 |
| M.2 Fant | 2 |
| Total pò USB | 8 (Rear I/O) + Internal Headers |
| USB 3.1 Gen 2 Kalite-C | 1 (Antre/Sòti dèyè) |
| Kantite pò Ethernet | 1 (Intel Gigabit LAN) |
| Total Number of HDMI Ports | 1 |
| S/PDIF Connector Type | Optik |
| Kalite Konektè prensipal pouvwa | 24-Pin ATX |
| Faktè fòm | ATX (305mm X 225mm) |
| Pwa atik | 16 ons |
| UPC | 889523011324 |
9. Enfòmasyon sou Garanti
The GIGABYTE Z370XP SLI motherboard typically comes with a 3-ane garanti limite. Warranty terms and conditions may vary by region and retailer. Please retain your proof of purchase for warranty claims. For detailed warranty information, visit the official GIGABYTE websit.
10. Sipò teknik
For further assistance, driver downloads, BIOS updates, or troubleshooting not covered in this manual, please visit the official GIGABYTE support websit: www.gigabyte.com/support. You may also contact GIGABYTE customer service directly.