Entwodiksyon
Mèsi pou acha aasing the Powell Chadwick Hall Tree. This manual provides essential information for safe assembly, operation, and maintenance of your new furniture. Please read all instructions carefully before beginning assembly and retain this manual for future reference.
The Chadwick Hall Tree is designed to enhance your entryway or hall with its classic style and practical features. It includes a top shelf, four mounted hooks, and a hinged storage seat, all finished in a rich cherry tone. The storage seat is equipped with child-safe hinges for added safety.

Image: The Powell Chadwick Hall Tree in Cherry finish, showcasing konsepsyon ak fonksyonalite li yo.
Enfòmasyon sou Sekirite
AVÈTISMAN: Pwodui sa a ka ekspoze ou a pwodui chimik tankou pousyè bwa, ke Eta Kalifòni konnen ki lakòz kansè. Pou plis enfòmasyon ale nan www.P65Warnings.ca.gov.
Pou asire w ke w ap itilize pwodui sa a san danje, tanpri obsève sa ki annapre yo:
- Pa sere boulon nèt jiskaske tout boulon yo konplètman aliyen epi yo antre nan twou / nwa.
- Pa twò sere boulon vis ak boulon pou evite nidite.
- Always use hand tools to assemble this product. Do not use power tools.
- The storage seat lid is equipped with non-slam child-safe hinges to prevent sudden closing and potential injury.
- The unit includes breath holes within the storage compartment for safety.
- Install the anti-tipping hardware as instructed to prevent the unit from tipping over, which can cause serious injury.
- Pa kite timoun yo monte oswa pann sou tiwa, pòt, oswa etajè.
- Do not remove or disable the power interlock system.
Video: Demonstration of the safety hinges feature, designed to prevent slamming and pinching.
Karakteristik pwodwi
- Dimansyon: Fully assembled size is 40.47 inches (W) x 18 inches (D) x 64 inches (H).
- Konsepsyon: Features recessed back panel details for a seamless blend of style and function.
- Kwòk: Four mountable double hook coat hangers, each with a weight limit of 7 pounds, ideal for coats, hoodies, and hats.
- Fini: Rich cherry tone suitable for entryways, mudrooms, or hallways.
- Storage Seat: Lid equipped with non-slam child-safe hinges for safety. Seat height is 18 inches with a weight limit of 275 pounds.
- Depo kache: Ample hidden storage space underneath the seat, with dimensions of 34.5 inches (W) x 13 inches (D) x 12 inches (H).
Videyo: Finiview of the hidden storage feature, demonstrating how to access and utilize the space.

Image: The Chadwick Hall Tree with its storage seat lid open, revealing the internal storage compartment.
Lis Pati
Before assembly, ensure all parts and hardware are present. Refer to the exploded diagram below for identification.

Image: Exploded diagram showing all individual components of the Hall Tree with letter labels.
Lis pyès ki nan konpitè:
| Atik | Deskripsyon | Kantite |
|---|---|---|
| H1 | Bwa goujon | 20 |
| H2 | Cam Lock | 14 |
| H3 | Cam Bolt | 14 |
| H4 | Vis | 13 |
| H5 | Boulon | 04 |
| H6 | Long vis | 02 |
| H7 | Goch Goch | 01 |
| H8 | Dwa charnyèr | 01 |
| H9 | Ti vis | 08 |
| H10 | Hook | 04 |
| H11 | Hook vis | 08 |
| H12 | Allen kle | 01 |
| H13 | Cap plastik | 05 |
| H14 | Phillips tèt vis | 02 |
Enstriksyon Asanble
Some assembly is required. Please follow these steps carefully. It is recommended to have two people for certain steps.
Step 1: Assemble the Back Panel Support
Attach the back panel support (M) to the side panels (J) using bolts (H5) and cam locks (H2). Secure with the Allen wrench (H12).

Image: Detailed diagram for assembling the back panel support in Step 1.
Step 2: Connect Side and Front Panels
Connect the side panels (J, I) and front panel (G) to the base using cam bolts (H1) and cam locks (H2). Ensure all connections are snug but do not overtighten.

Image: Diagram illustrating the connection of side and front panels to the base in Step 2.
Step 3: Attach the Top Panel of the Storage Bench
Secure the top panel (K) to the assembled base using cam bolts (H3) and cam locks (H2). Use wood dowels (H1) for alignment. Cover exposed cam locks with plastic caps (H13).

Image: Diagram showing how to attach the storage bench top panel in Step 3.
Step 4: Install Bun Feet
Attach the bun feet (L) to the bottom of the storage bench (J, I, G, K).

Image: Diagram for installing the bun feet to the base of the hall tree in Step 4.
Step 5: Attach Hooks to Back Panels
Secure the hooks (H10) to the back panels (B and C) using hook screws (H11) and Phillips head screws (H14).

Image: Diagram showing the attachment of hooks to the back panels in Step 5.
Etap 6: Konekte Panno Dèyè yo
Join the two back panels (B and C) together using wood dowels (H1).

Image: Diagram for connecting the two back panels in Step 6.
Step 7: Attach Side Supports to Back Panels
Attach the side supports (D and E) to the assembled back panels using screws (H4) and the Allen wrench (H12).

Image: Diagram showing the attachment of side supports to the back panels in Step 7.
Etap 8: Mete panèl anwo a
Secure the top panel (A) to the upper back assembly using wood dowels (H1), cam locks (H2), cam bolts (H3), long screws (H6), and plastic caps (H13). Use the Allen wrench (H12) as needed.

Image: Diagram for attaching the top panel to the upper back assembly in Step 8.
Step 9: Attach Back Panel (F)
Attach the back panel (F) to the upper back assembly using wood dowels (H1), cam locks (H2), cam bolts (H3), and plastic caps (H13). Use the Allen wrench (H12) as needed.

Image: Diagram for attaching the back panel (F) to the upper back assembly in Step 9.
Step 10: Connect Upper and Lower Sections
Carefully place the assembled upper section onto the storage bench. Secure them together using wood dowels (H1), screws (H4), and the Allen wrench (H12).

Image: Diagram showing the connection of the upper and lower sections of the hall tree in Step 10.
Step 11: Install Storage Seat Hinges
Attach the left hinge (H7) and right hinge (H8) to the storage seat lid and the storage bench using small screws (H9) and Phillips head screws (H14). Ensure the hinges operate smoothly for the non-slam feature.

Image: Diagram for installing the storage seat hinges in Step 11.
Anti-Tipping Hardware Installation
IMPORTANT: For your safety, to prevent the danger of this unit tipping over, it is important that the wall anchor is properly attached.
Step 1: Prepare Wall Anchor
Put wall anchor (C) into the wall and attach mounting bracket (B) to the wall with long screw (E). Ensure the wall anchor is properly secured.

Image: Diagram showing the installation of the wall anchor and mounting bracket.
Step 2: Attach Mounting Bracket to Hall Tree
Attach mounting bracket (B) to the back of the hall tree with short screw (D).
Image: Diagram showing the attachment of the mounting bracket to the back of the hall tree.
Step 3: Secure Hall Tree to Wall
Slide the strap (A) through the mounting brackets and pull to tighten the Hall Tree snug against the wall.

Image: Diagram illustrating how to secure the hall tree to the wall using the anti-tipping strap.
Enstriksyon Operasyon
The Powell Chadwick Hall Tree is designed for straightforward use:
- Coat Hooks: Use the four double hooks to hang coats, jackets, hats, scarves, and bags. Ensure items do not exceed the 7-pound weight limit per hook.
- Top etajè: The top shelf provides additional space for decorative items or small storage bins.
- Ban Depo: The hinged seat opens to reveal a spacious storage compartment. Lift the seat gently; the safety hinges will prevent it from slamming shut. Close the lid gently to engage the non-slam mechanism.
- Syèj: The bench seat can support up to 275 pounds, providing a convenient spot for sitting while putting on or taking off shoes.
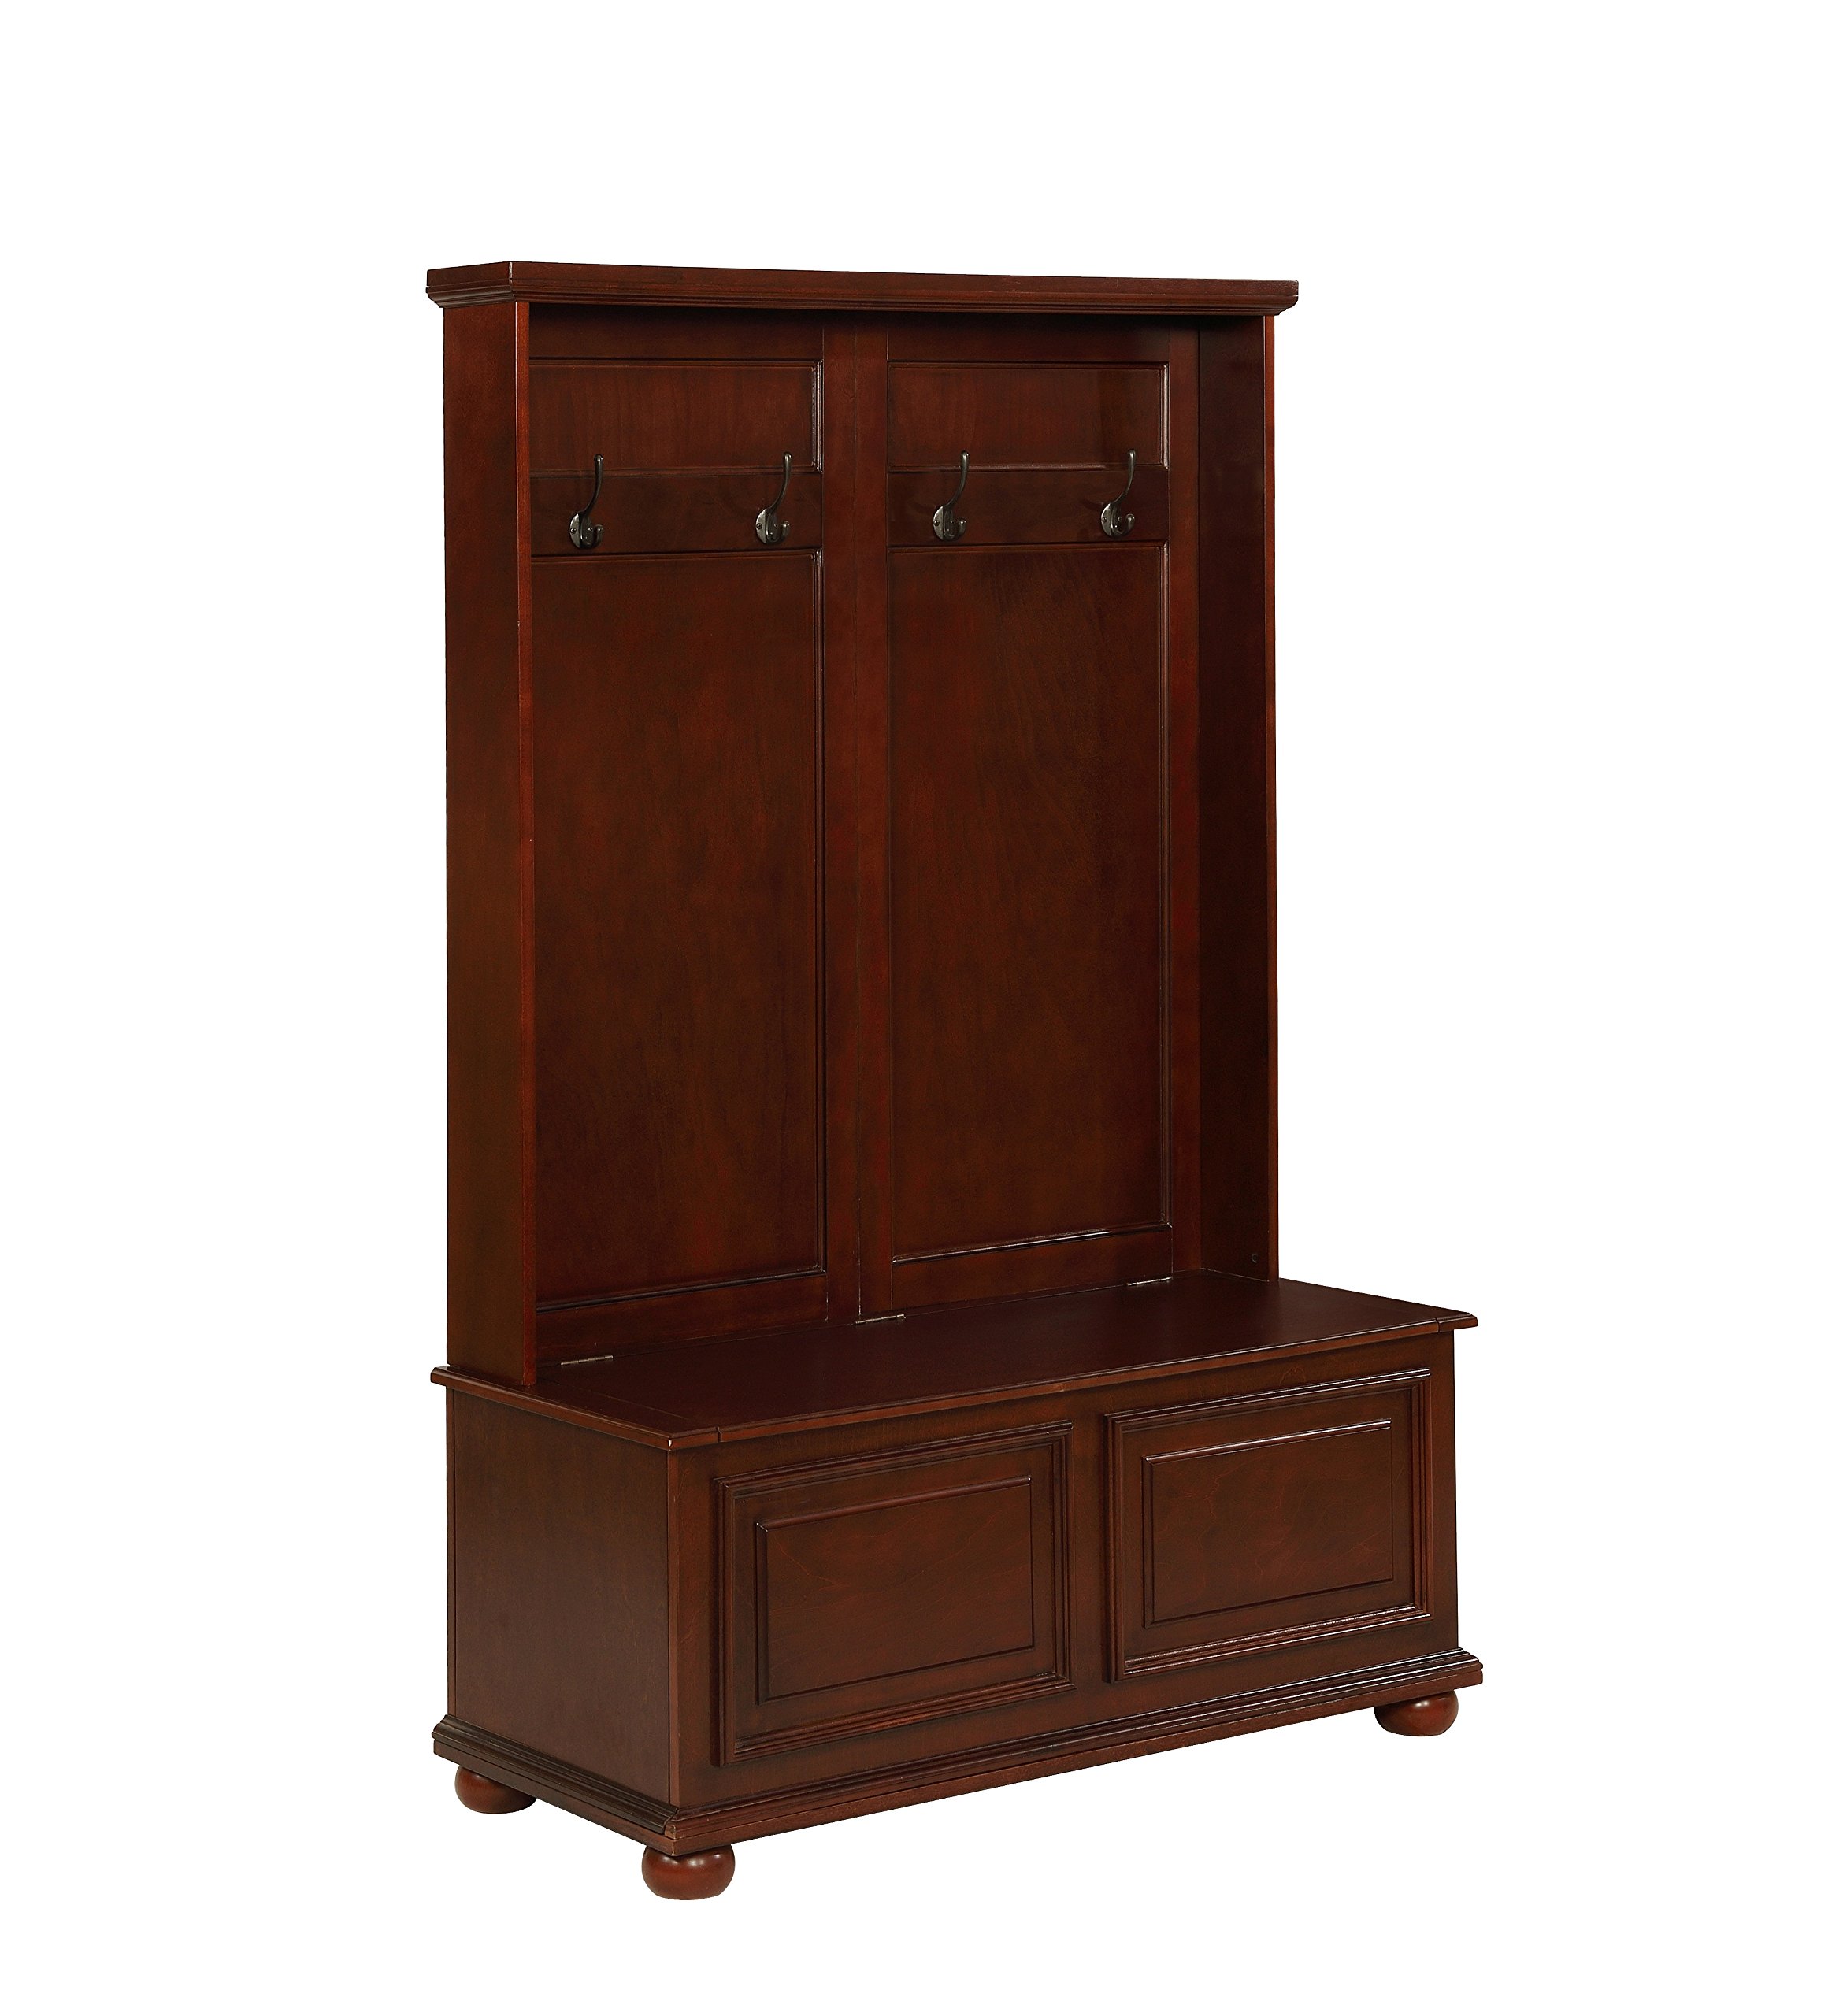
Image: The Chadwick Hall Tree in a home setting, demonstrating its use for hanging items and providing seating.
Antretyen
To maintain the beauty and longevity of your Chadwick Hall Tree, follow these simple care instructions:
- Netwayaj: Siye sifas yo ak yon mou, damp twal. Evite itilize pwodui chimik ki agresif, pwodui netwayaj abrazif, oswa pwodui poli ki ka domaje fini an.
- Époussetage: Siye pousyè a regilyèman avèk yon twal sèk e mou.
- Devèsman: Siye likid ki koule a imedyatman avèk yon twal pwòp e sèk.
- Materyèl: Periodically check all bolts and screws to ensure they are tight. Re-tighten if necessary, but do not overtighten.
- Limyè solèy la: Evite ekspoze a limyè solèy dirèk pou yon tan ki long, sa ka lakòz fini bwa a pèdi koulè oswa pèdi koulè.
- Imidite: Maintain a consistent humidity level in your home to prevent wood from expanding or contracting, which can lead to cracks or warping.
Depanaj
If you encounter any issues with your Hall Tree, consider the following common solutions:
- Inite Wobbly: Ensure all assembly bolts and screws are securely tightened. Check that the unit is placed on a level surface.
- Storage Lid Not Closing Smoothly: Verify that the safety hinges are correctly installed and free from obstruction. Do not force the lid.
- Pati ki manke: If any parts were missing upon delivery, please contact customer support with your model number and a description of the missing items.
- Pati ki domaje: If any components arrived damaged, contact customer support for assistance.
Espesifikasyon
| Karakteristik | Detay |
|---|---|
| Pwa atik | 97 liv |
| Dimansyon pwodwi | 18 x 40.47 x 64 pous |
| Nimewo Modèl Atik | 15A7058 |
| Wotè rasanble | 64.25 pous |
| Rasanble Lajè | 18 pous |
| Rasanble Longè | 40.5 pous |
| Wotè Syèj Reyini | 18 pous |
| Limit Pwa Syèj | 275 liv |
| Hook Weight Limit | 7 liv chak |
| Dimansyon Depo | 34.5 pous (lajè) x 13 pous (pwofondè) x 12 pous (wotè) |
| ASIN | B07587B2GX |
| Dat Premye Disponib | 1 out 2016 |

Image: Detailed diagram showing the dimensions of the Chadwick Hall Tree.
Garanti ak sipò
For warranty information or customer support, please refer to the documentation included with your purchase or visit the official Powell Furniture website. If you require replacement parts or further assistance, please have your model number (15A7058) and ASIN (B07587B2GX) ready when contacting support.