
1. Entwodiksyon
This manual provides detailed instructions for the installation, operation, and maintenance of your ASRock AB350M-HDV MicroATX Motherboard. The ASRock AB350M-HDV is designed to support AMD Socket AM4 A-Series APUs (Bristol Ridge) and Ryzen Series CPUs (Summit Ridge), featuring a Digi Power design and 7 Power Phase design for stable performance. It supports DDR4 memory and offers various connectivity options including SATA3, USB 3.0, and an Ultra M.2 slot.
2. Pwodwi souview
The ASRock AB350M-HDV motherboard is a MicroATX form factor board, ideal for compact PC builds. It features essential components for a modern computing system.

Figi 2.1: Angle view of the ASRock AB350M-HDV Motherboard, showcasing its compact MicroATX design and various components.
Karakteristik kle:
- Supports AMD Socket AM4 A-Series APUs (Bristol Ridge) and Ryzen Series CPUs (Summit Ridge).
- DDR4 memory support up to 3200+ (OC) for Ryzen CPUs and 2400 for A-series APUs.
- 1 PCIe 3.0 x16 slot and 1 PCIe 2.0 x1 slot for expansion cards.
- 4 SATA3 ports and 1 Ultra M.2 (PCIe Gen3 x4 & SATA3) slot for storage.
- 6 USB 3.0 ports (2 front, 4 rear) and 2 USB 2.0 ports for peripheral connectivity.
- Integrated Gigabit Ethernet for network connectivity.
- Video outputs: VGA, DVI, HDMI.

Figi 2.2: Anwo-anba view of the ASRock AB350M-HDV Motherboard, highlighting the CPU socket, RAM slots, M.2 slot, and PCIe slots.
3. Enstalasyon ak Enstalasyon
Follow these steps carefully to install your ASRock AB350M-HDV motherboard and its components.
3.1 CPU Enstalasyon
- Jwenn priz CPU AM4 la sou kat manman an.
- Lift the load lever on the side of the socket.
- Aliyen mak triyangilè ki sou CPU a ak mak ki koresponn lan sou priz la. Mete CPU a ak anpil atansyon nan priz la san fòse li.
- Lower the load lever to secure the CPU in place.
- Enstale radyatè CPU a dapre enstriksyon manifakti a.
3.2 RAM (Memory) Installation
- Locate the DDR4 DIMM slots. This motherboard has 4 slots.
- Louvri klip yo nan tou de bout fant DIMM lan.
- Align the notch on the RAM module with the key in the DIMM slot.
- Insert the RAM module firmly into the slot until the clips snap into place. Ensure both clips are closed.
3.3 Enstalasyon Aparèy Depo (SATA & M.2)
Disques SATA yo:
- Konekte yon bout kab done SATA a nan yon pò SATA3 sou kat manman an.
- Konekte lòt bout kab done SATA a ak dis lou ou oswa SSD ou.
- Konekte yon kab kouran SATA soti nan inite ekipman pou kouran ou (PSU) a nan aparèy depo a.
M.2 SSD:
- Locate the Ultra M.2 slot on the motherboard.
- Remove the M.2 screw and standoff from the slot.
- Mete SSD M.2 a nan fant lan nan yon ang 30 degre.
- Push the M.2 SSD down and secure it with the screw and standoff.
3.4 Koneksyon pouvwa
- Connect the 24-pin ATX power connector from your PSU to the 24-pin power socket on the motherboard.
- Connect the 8-pin (or 4-pin) ATX 12V power connector from your PSU to the corresponding socket near the CPU.
3.5 Koneksyon Front Panel
Connect the cables from your PC case (Power Button, Reset Button, HDD LED, Power LED, USB, Audio) to the corresponding headers on the motherboard. Refer to the motherboard layout diagram in your physical manual for exact header locations.
3.6 Enstalasyon Kat Grafik
- Locate the PCIe 3.0 x16 slot.
- Retire kouvèti plas ekspansyon ki koresponn lan nan bwat PC ou a.
- Align the graphics card with the PCIe slot and press it down firmly until it clicks into place.
- Fikse kat grafik la nan bwat la avèk yon vis.
- Connect any required PCIe power cables from your PSU to the graphics card.
4. Operasyon Enstriksyon
4.1 Premye Demaraj ak Enstalasyon BIOS/UEFI
- Apre ou fin rasanble tout konpozan yo, konekte monitè a, klavye a ak sourit la.
- Pouvwa sou sistèm ou an.
- Pandan demaraj la, peze plizyè fwa bouton an DEL or F2 kle a pou antre nan zouti konfigirasyon BIOS/UEFI a.
- In the BIOS, you can configure boot order, system time, and other advanced settings. Save changes and exit to boot into your operating system installation media.
4.2 Enstalasyon chofè
After installing your operating system, install the necessary drivers for the motherboard components. These typically include chipset drivers, audio drivers, LAN drivers, and any specific utility drivers. Drivers can be found on the ASRock official websit pou modèl kat manman espesifik ou a.
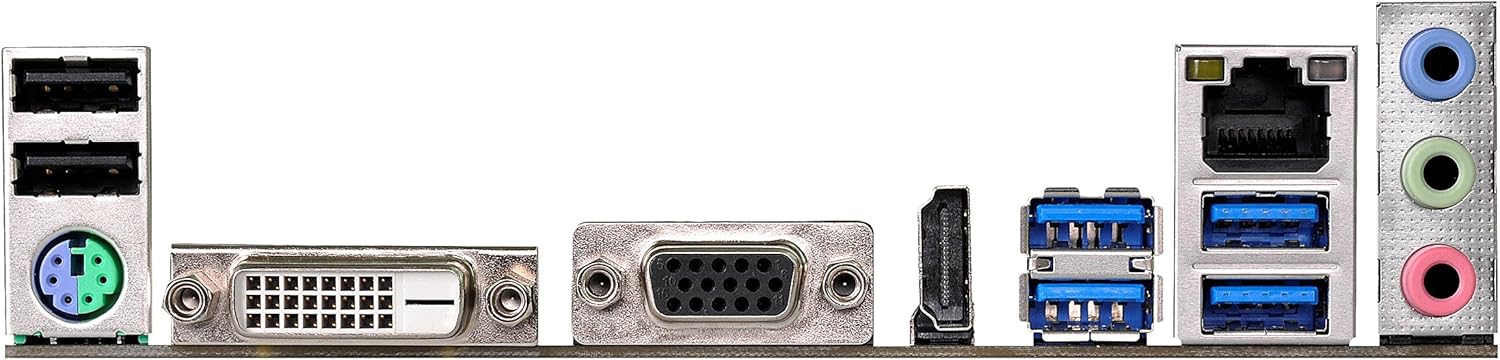
Figure 4.1: Rear I/O panel of the ASRock AB350M-HDV Motherboard, showing USB ports, video outputs (VGA, DVI, HDMI), LAN port, and audio jacks.
5. Antretyen
Bon antretyen asire lonjevite ak pèfòmans optimal kat manman ou an.
5.1 Netwayaj
- Regilyèman netwaye pousyè ki soti nan mèr la ak konpozan lè l sèvi avèk lè konprese.
- Asire w ke sistèm nan etenn epi debranche anvan ou netwaye li.
- Evite sèvi ak pwodui netwayaj likid dirèkteman sou konpozan yo.
5.2 Mizajou BIOS/UEFI
Tcheke ASRock la detanzantan. website for BIOS/UEFI updates. Updates can improve compatibility, stability, and performance. Follow the instructions provided by ASRock carefully when performing a BIOS update to avoid system damage.
NAN. Depanaj
Seksyon sa a bay solisyon pou pwoblèm komen ou ka rankontre.
6.1 Pa gen kouran / Pa gen POST (Oto-tès lè w ap limen)
- Tcheke Koneksyon Pouvwa: Ensure the 24-pin and 8-pin (or 4-pin) CPU power connectors are securely seated.
- Verify PSU: Test your power supply unit (PSU) to ensure it is functional and providing adequate power.
- Remonte konpozan yo: Remove and re-install the CPU, RAM, and graphics card to ensure they are properly seated.
- Klè CMOS: Refer to your physical manual for instructions on how to clear the CMOS (Complementary Metal-Oxide-Semiconductor) settings, which can resolve boot issues.
6.2 Pa gen okenn pwodiksyon ekspozisyon
- Koneksyon pou kontwole: Ensure your monitor is correctly connected to the graphics card or motherboard (if using an APU with integrated graphics).
- Kat grafik: If using a dedicated graphics card, ensure it is properly installed and has sufficient power. Test with another graphics card if possible.
- APU Compatibility: If using an AMD A-Series APU, ensure your monitor is connected to the motherboard's video outputs (VGA, DVI, HDMI). Ryzen CPUs without integrated graphics require a dedicated graphics card.
6.3 Sistèm operasyon an pa demarre
- Lòd bòt: Check the BIOS/UEFI settings to ensure the correct boot device (e.g., SSD/HDD with OS) is prioritized.
- Aparèy Depo: Verify that your storage device is detected in the BIOS.
- Enstalasyon sistèm operasyon an: If the OS is newly installed, ensure the installation process completed successfully.
7. Espesifikasyon
| Mak | ASRock |
| Non modèl | AB350M-HDV |
| CPU Socket | Socket AM4 |
| Kalite Chipset | AMD Promontory B350 |
| Procesè konpatib yo | AMD A-Series APUs (Bristol Ridge), Ryzen Series CPUs (Summit Ridge) |
| Teknoloji memwa RAM | DDR4 |
| Vitès revèy memwa | 2133 MHz (Base), up to 3200+ (OC) for Ryzen CPU |
| Fant memwa ki disponib | 4 |
| Entèfas kat grafik | PCI Express (1x PCIe 3.0 x16, 1x PCIe 2.0 x1) |
| Total SATA Ports | 4 (SATA3) |
| M.2 Fant | 1 (Ultra M.2, PCIe Gen3 x4 & SATA3) |
| Total pò USB | 8 (6x USB 3.0, 2x USB 2.0) |
| Sorti Videyo | VGA, DVI, HDMI |
| Kalite Konektè prensipal pouvwa | 24-Pin ATX |
| Faktè fòm | MicroATX |
| Pwa atik | 1.3 liv |
8. Enfòmasyon sou Garanti
The ASRock AB350M-HDV Motherboard comes with a 1 ane garanti. For specific terms and conditions, please refer to the warranty card included with your product or visit the official ASRock websit.
9. Sipò
For further assistance, technical support, or driver downloads, please visit the official ASRock websit:
You can also find contact information for customer service and support resources on their websit.